
Thanks for your feedback.
Optimize Webex Contact Center Desktop call notifications
 Feedback?
Using Webex App for calls
The call option in Webex App is available only to users signed in with the Agent role. Users signed in with the Supervisor + Agent role can still perform agent tasks, such as handling incoming calls, making outdials, and managing courtesy call backs from the desktop. However, when performing supervisor functions—such as monitoring another agent—the answer button will not be available. Only the activities outlined in this document are supported for users with the Supervisor + Agent role.
When you use Webex App for calls and sign in to agent desktop using either Dial Number or Extension, you can choose the following to simplify your call notifications:
- Manage Webex Calling calls in Agent Desktop—This is meant only for Agent persona and does not work correctly for Supervisors during monitoring, barge-in, or similar call scenarios.
- Hide the floating mini window when multitasking during a call
This is only available with Webex App 44.12 or later.
To use this feature Webex Calling must be enabled in Control Hub. If you can't access the feature, check with your organization administrator for assistance.
The Webex App call window is minimized to your taskbar (Windows) or dock (Mac). You use the Desktop to manage your call notifications and mid call actions.
The following are changes you'll see when you choose to optimize your notifications:
-
Incoming call
You'll see the following incoming call notification popover, with the Answer and Decline options.
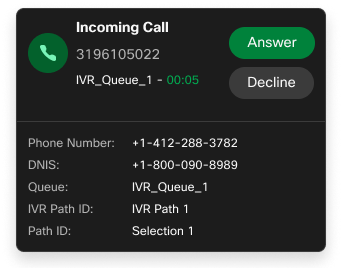
The administrator configures and customizes the information shown on the incoming call notification in Webex Contact Center. If the Manage Webex Calling calls in Agent Desktop toggle is enabled, it adds an additional way to manage calls (via Contact Center notifications) but does not stop the calls from ringing in the primary Webex App or on linked devices. It allows agents to answer incoming calls on their Webex Calling devices directly from their agent desktop, without the need to pick up the phone physically.
You can set a specific Webex Calling device (like a desk phone, softphone, or Webex App) as your "preferred device" for answering calls when using Webex Contact Center. To select your preferred device in Webex Contact Center, you must have the device assigned to your profile in Webex Control Hub. You can then manage your device and interaction preferences within the Agent Desktop application. To set your preferred device:
- Log in to Agent Desktop.
- Click on the Profile icon or your name, at the top right corner.
- Go to User Profile or Settings.
- Navigate to Interaction Preferences section.
- Select your preferred device from the available options in the drop-down list.
- Click Save to set your preference.
If you have one Webex Calling device, you don't have to set a preferred device. If you change your extension, the preferred device list refreshes. If there are no available devices, the option to set a preferred device is disabled or removed.
During a call

You'll see the above mid call options that include a keypad button to enter dual tone multi-frequency (DTMF) tones, a mute button to mute or unmute the call and so on.
-
Conference, consult or transfer calls
When somebody consults with you during a call or transfers a call to you, the notification popover occurs in the Desktop.
-
Outdial and outbound calls
When you make an outdial or outbound call, you'll see options to Answer and Cancel. When you click Answer or Cancel the notification popover closes.
If you want to cancel the call after you click Answer, you can reopen the Webex App call window, from your taskbar/dock and click Cancel.


