- Home
- /
- Article

Thanks for your feedback.

Deployment guide for Calling in Webex App (Unified CM)
 In this article
 Feedback?
Overview
Overview of Calling in Webex App (Unified CM)
The Calling in Webex App (Unified CM) solution lets you register Webex App directly to your Cisco Unified Communications Manager call control environment (on-premises enterprise, Business Edition 6000/7000, Unified CM Cloud or as delivered through an HCS partner solution).
Users
This solution enhances the calling experience for end users, allowing them to directly make calls in Webex App through your Unified CM environment, use midcall features, and control their desk phone from Webex App.
When dialing from Webex App, users can use the same dial strings or prefixes as they do on their desk phones; Webex App functions like any other desk phone registered to your Unified CM. Unified CM calls that are established in Webex App use the configuration that's in place for your Unified CM deployment (such as location, bandwidth settings, point to point media, and so on).
Administrators
As an administrator of Calling in Webex App (Unified CM), you reuse your existing Unified CM and Mobile and Remote Access (MRA) configuration that you may've already had in place. The deployment model is similar to Jabber. The same device types are used: In softphone mode, Webex App registers as a SIP device with the product type "Cisco Unified Client Services Framework" or CSF for desktop, TCT or BOT for mobile, and TAB for tablets. Alternatively, Webex App can connect to Unified CM using CTI to control the user's endpoints.
The Webex App makes its primary connection to the Webex cloud to get its service configuration (messaging, meetings, presence, contact lists, calling behavior, and so on), but it also reads the following configuration from the Unified CM environment to provide specific calling functionality to users:
-
Initial Unified CM discovery through DNS query to discover any configured voice services domain. (In a multicluster environment, Intercluster Lookup Service is also leveraged to determine which cluster the Unified CM user is homed to.) An outside domain (MRA deployment) is also discovered. (If the Webex domain does not match the existing Voice Services Domain, you can set a Voice Services Domain in Control Hub, and associated with specific users.)
-
UC service profiles (for voicemail through Unity Connection, CTI services, and advanced calling functionality through supported parameters in the Jabber config service profile or XML file)
-
Single Sign-On (SSO) credentials if an Identity Provider (IdP) is integrated
-
Oath tokens, including refresh and expiry timers. (Users need to reauthenticate if a session expires.)
-
Certificate validation
Calling features in Webex App
This integration provides the following feature set in Webex App for desktop (Windows and Mac) and for mobile (Android, iPad, and iPhone). Wherever possible, the feature listings in this table include a link to a relevant help article for end users. See Audio and video calls for more general information on making a call. See Supported calling options for a feature comparison table for end users.
Basic calling features
|
Feature |
Description and documentation |
Desktop |
Mobile |
|---|---|---|---|
|
Answer call |
— |
✓ |
✓ |
|
Answer call without sharing video |
✓ |
✓ | |
|
Desk Phone Control |
Desk Phone Control (including meetings and calls in Webex App)—See Make Calls With Your Desk Phone. |
✓ | |
|
DTMF input during the call |
— |
✓ |
✓ |
|
End call |
— |
✓ |
✓ |
|
Make call |
— |
✓ |
✓ |
|
Mute/Unmute |
— |
✓ |
✓ |
|
On a Call presence |
In Webex App, users in the same organization can see this presence
indicator during an active call. |
✓ |
✓ |
Midcall calling features
|
Feature name |
Description and documentation |
Desktop |
Mobile |
|---|---|---|---|
|
Call Pickup |
If a user is in a customer support role and their coworker isn't able to answer an incoming call to their phone, the support user gets a notification in Webex App if both are in the same pickup group. That user can answer their call from the notification in the app. The user can also pick up the calls in other pickup groups. See Pick Up Someone Else's Call. |
✓ |
✓ |
|
Call Recording |
You can determine how much control users have over recording calls. Depending on the setup, incoming and outgoing calls may be recorded automatically or you may be able to decide which calls you want to record. If you enable users with call recording, they can start and stop recordings at their own discretion. When a call is being recorded, that recording continues whether a user moves the call to another device, merges the call with another active call, or makes a conference call. They're presented with a visual indicator letting them know when a call is being recorded. See Record Your Phone Calls. |
✓ |
✓ |
|
Call Waiting |
When a user is already in call and someone else calls, the called user can choose how they want to handle the incoming call. For example, the user can put the active call on hold and answer the second call. See Answer Call Waiting for more information. |
✓ |
✓ |
|
Conference calls |
When users are on a call with someone else, they might want to add other people into the call to start a conference call right away. They can add up to 8 other people into conference calls started in this way. See Start a Conference Call. |
✓ |
✓ |
|
Control Your Video Device from the App |
Users can start or stop sharing your video on a connected video device right from the app. For example, if connected to a Cisco Webex Board and users don't want to share video, they no longer have to walk up to the board and turn off the video. They can turn it off from the app. See Turn Off Your Video During a Meeting or Call On Webex Boards, Room and Desk Devices. |
✓ | |
|
Hold/resume |
Users place a call on hold and resume in Webex App. See Put a Phone Call On Hold. |
✓ |
✓ |
|
Hunt Groups |
Users can sign in or out of a Hunt Group from Call Settings. When they're signed in and a call comes into a group that they belong to, they'll see the Hunt Group number on the incoming call notification. Sign in to a Hunt Group. |
✓ |
✓ |
|
Merge |
Users take 2 active calls and merge them into a single conference call in Webex App. See Merge Two Phone Calls. |
✓ |
✓ |
|
Mirror self-view |
Mirror self-view—By default, when users share video during a call, they can see themselves just like you're looking in a mirror. If they text behind them and want to read it easily instead of having to read it backwards, tehey may want to off the Mirror my video view setting. This setting doesn't affect the way other people in the meeting see you. See Turn Off Mirror View for Your Self-View Video.. |
✓ |
✓ |
|
Move a call into a meeting |
Users in a call can take advantage of advanced meetings features such as transcriptions, real-time translations, notes, action items, recordings, and whiteboarding. Just move that call into a full-featured meeting. Before moving the call into a meeting, users can even invite other people into the discussion. |
✓ |
✓ |
|
Multiline |
Users can use up to 8 phone lines with Webex App and leverage advanced calling features on each line such as call forward, transfer, hunt group, shared lines, and voicemail. They can also assign different ringtones to each line. And you can turn on presence for shared lines so that line status is displayed for users. See Change the Active Line for Calling. |
✓ | |
|
Park and retrieve calls |
Users can park a call on one device and that user or someone else can retrieve the call from another device. |
✓ |
✓ |
|
Resume from different devices |
A user can put a call on hold from the desktop app and resume it on mobile. Or, put your mobile call on hold and resume it on a desk phone. Go any direction between desk phone, mobile, and desktop; just put the call on hold and resume wherever it's convenient. See Put a Phone Call On Hold. |
✓ |
✓ |
|
Screen sharing |
Screen sharing—Share content from a computer screen during a call in Webex App. Users can choose a specific application to share, rather than having to share their whole screen. If a user answers on desk phone, a screen share is still possible. The phone user sees the shared screen from the phone if it supports video, otherwise they'll see the shared screen from the app. See Share Your Screen in a Phone Call. Users can share your screen regardless of whether the person they called is using a cloud-registered device or an on-premises device. The screen share is still sent with a high frame rate (30 FPS), high resolution (1080p), and includes audio. |
✓ | |
|
Switch between front and back cameras |
On mobile phones or tablets, you can switch between front-facing and back-facing cameras. See the mobile sections in Change Your Video Settings. |
✓ | |
|
Transfer |
Redirects a connected call within Webex App. The target is the user to which another user wants to transfer the call. See Transfer a Phone Call. |
✓ |
✓ |
|
Virtual cameras |
During a call, users can choose to use a virtual camera. Use a virtual camera, such as an application, driver, or software, to create an overlay of video, images, or feeds. |
✓ |
Additional features
|
Feature name |
Description and documentation |
Desktop |
Mobile |
|---|---|---|---|
|
Add a Pause to Dial String |
Users can add a pause to an entered phone number, which they might need if joining a conference call and need to enter numbers in response to the automated system. They can add a comma (,) to the number, which gives a 1-second delay in the dialing. They can add several commas in a row to extend the delay. For example: 95556543123,,,,56789. |
✓ |
✓ |
|
Add Contacts, Search Your Contacts, and Make a Call |
Users can add coworkers into a Contacts list and group them however they like, making people easier to find when users need to chat or call. Users can even look up Outlook contacts (Windows), local address book (Mac), and local phone contacts (iPhone, iPad, and Android) from Webex App, so they can easily find contacts and make a call. When you add your coworker to your Contacts list, you can edit their profile and add additional phone numbers for them. Then, you'll see the new phone number when you make an audio or video call, so it's easier to call them at their alternative number. See Add Someone to Your Contacts List. |
✓ |
✓ |
|
Automatic Gain Control (AGC) |
AGC is a unique circuit that listens to the incoming audio level and adjusts the recording level when sounds are too loud or too soft. When the audio volume is too loud, it automatically reduces the sound. When the audio is too soft, it automatically amplifies the sound. This doesn't adjust the audio volume at the OS level. |
✓ |
✓ |
|
Call on Webex App |
Users can choose whether to call people using their phone number or using a call in Webex App. A call in Webex App is a quick way to call someone else who's using Webex App. Users can share their screen and whiteboard while in the call, but they can't put the call on hold, transfer the call, or use other features only available in phone calls. See Call Anyone with a Webex App account. Users only have access to the dial pad if they have a paid calling license. If they have a free calling license, they can still call other Webex App users. |
✓ |
✓ |
|
Call control for calls in Webex App |
If using a Cisco 730 headset, users can use its USB adapter or Bluetooth to answer and end calls, put calls on hold and resume them, as well as mute and unmute calls. See Make and Answer Calls on the Cisco Headset 730. |
✓ | |
|
Call history |
When a user calls other people in the organization, they see more details about phone numbers in the call history. So, to call someone back, that user can see if they're calling a work or mobile number. Users can select the Call icon beside someone’s name or number in their Call History and automatically call the person back at the number in the history. Users no longer need to choose what number to reach others at. After they return a missed call, they can delete the call from call history. The call history only shows the last 200 calls over the last 30 days. See View Call and Meeting History for more information. |
✓ |
✓ |
|
Call Statistics |
When users are in a call, they can check call statistics, such as packet loss, latency, and resolution rate. See Access Call Statistics. |
✓ | |
|
Click to Call from Outlook |
You can set up your Windows or Mac computer so that Webex App is the default option for calling numbers that you click outside of the app, for example, in Microsoft Outlook or from a link in your web browser. See Click to Call From Another App. |
✓ | |
|
Client Matter Codes (CMCs) and Forced Authorization Codes (FMCs) |
With client matter codes (CMCs) and forced authorization codes (FACs), you can effectively manage call access and accounting. CMCs assist with call accounting and billing for clients, and FACs regulate the types of calls that certain users can place. CMCs force the user to enter a code; this action specifies that the call relates
to a specific client matter. You can assign client matter codes to customers,
students, or other populations for call accounting and billing purposes. FACs
force the user to enter a valid authorization code that is assigned at a certain
access level before the call is completed. See the |
✓ |
✓ |
|
Contact Center Integration |
Webex App can integrate into your Cisco Contact Center application and be controlled in Finesse desktop (Unified Contact Center Enterprise or Express). This integration supports contact center features such as multiline, recording, conferencing, and more. See Contact Center Integration for the latest supported features. |
✓ | |
|
Diagnostics in the Webex App |
If users experience connection issues, they can use the diagnostic tool to identify configuration errors or export a network diagnostics report. This information helps you troubleshoot any issues they're experiencing. See the Troubleshooting chapter. |
✓ | |
|
Dial-via-Office (DVO) |
When you set up users with DVO, they have the option to make work calls using their mobile phone connection, which ensures calls are uninterrupted even if data is unavailable. No matter what option they choose, the work number is always used as the caller ID so people can easily identify users. See Make Work Calls Over a Mobile Phone Connection. |
✓ | |
|
Dial Plan Mapping |
You configure dial plan mapping to ensure that dialing rules on Cisco Unified Communications Manager match dialing rules on your directory. See the Prepare Your Environment chapter. |
✓ |
✓ |
|
Emergency calls |
If users make an emergency call in Webex App, the call is made using the device’s Phone app, making it easier for Emergency Services to pinpoint a location through their network carrier. |
✓ | |
|
Extend and Connect |
You can set up users to connect to alternate devices to make and receive calls. Users can see those devices under Alternate Devices when they go to calling settings. That's where they can add or edit the phone numbers for those devices. See Make a Call From an Alternate Device. |
✓ | |
|
Fast failover (MRA) |
Webex can detect failure quickly, whether it's a controlled shutdown, node failure, or network failure, and seamlessly fail over to a backup path through MRA so user productivity isn't affected. See the Prepare Your Environment chapter. |
✓ |
✓ |
|
Health Checker for Phone Services Status |
If unsure whether Phone Service is working properly, users can check out the status of the phone connection from the app. On Windows, they click their profile picture and then go to Help > Health Checker. On Mac, they go to Help > Health Checker. Health Checker tests the connection and lets users know if there's a problem. |
✓ | |
|
High Definition (HD) Video |
Users can enable or disable HD video by clicking their profile picture, going to Settings (Windows) or Preferences (Mac), selecting Video, and then enabling or disabling the setting. They may want to disable HD video if their computer CPU is running high or they want to save network bandwidth during a call or meeting. |
✓ | |
|
Location Monitoring |
You can turn on location monitoring so that when users call emergency services from Webex (for example, 911), their location is automatically shared with emergency responders. |
✓ |
✓ |
|
Missed calls |
See how many calls you’ve missed with a red badge counter in the Calls |
✓ | |
|
More calling options |
Users can call someone's video address (for example, bburke@biotechnia.com) from anywhere in the app where they'd make any type of call (example: search for someone or being in a space with that person). |
✓ | |
|
Multi call window |
Webex App users with multiple lines see this by default. It is a separate, floating window to help with managing multiple or shared lines. See Manage your phone calls in the Multi Call window. |
✓ (Windows) | |
|
Network Handoff (Wi-Fi to LTE) |
When you're on an active call and you need to change networks but want to keep the call in Webex, no need to worry; the change is made automatically without any interruption or effect to call quality. (See Unified CM features in Prepare Your Environment.) |
✓ |
✓ |
|
Phone numbers in contact cards |
Work numbers and mobile numbers are synchronized from Active Directory and appear as selectable items in Webex App. (Requires Cisco Directory Connector to synchronize user phone number attributes to the Webex cloud.) |
✓ |
✓ |
|
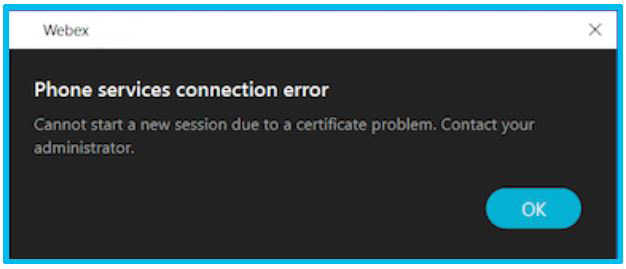
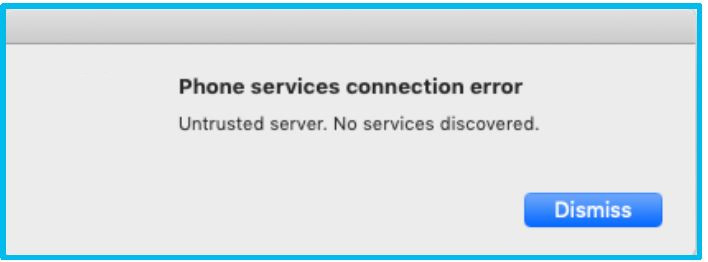
Phone Service Connection Error and Action |
The footer in Webex App shows more descriptive error messages if the phone service disconnects. See Error Messages. |
✓ |
✓ |
|
Popout Call Window |
When a user calls someone else, the call window pops out, and both users can access calling features. While in the call, users can still respond to critical messages. |
✓ | |
|
PSTN calling for mobile app users in India |
Users in India can make that call when they can't be on the corporate network.
The Webex mobile app gives them the option to use the device's calling app
instead. See |
✓ | |
|
PSTN for Personal Mode Devices |
Leveraging Hybrid Calling, you can provide PSTN access to users' personal mode devices. (See the Deployment Guide for Hybrid Calling for Cisco Webex Devices.) |
✓ | |
|
RedSky location reporting for emergency calling |
To comply with Ray Baum's act, you can require users to give accurate location information when they are outside the office. |
✓ |
✓ |
|
Self Care Portal—Call forwarding |
If users need to take your work calls from another number, they can set up call forwarding right from Webex App. They just enter the call forwarding number, and their calls all ring at that number. See Forward Phone Calls and Access More Call Settings. |
✓ |
✓ |
|
Self Care Portal—Single Number Reach (SNR) |
Users can access the Self Care Portal from Webex App and add more numbers for devices they want to ring simultaneously with their enterprise directory number. See Get Work Calls at Any Number and Access More Call Settings. |
✓ |
✓ |
|
Support for Cisco 500 series and 700 series (bluetooth) headsets |
If users have the Cisco 700 series headset, they can use its USB adapter to answer and end calls, put calls on hold and resume them, as well as mute and unmute calls. When users use a Cisco headset with Webex App, you can now keep track of it in Webex Control Hub. This lets you track inventory and troubleshoot issues for your users. (See the deployment chapter.) |
✓ | |
|
Support for Jabra headsets |
See Details%20about%20Headset%20Support for supported models. |
✓ | |
|
Suppress call notifications when presenting, when DND is enabled, or when you're already in a call or meeting. |
Users can mute notifications for incoming calls so that they don't see or hear someone calling. If voicemail is set up, the caller can leave a message. The call still shows up in the spaces list and call history. |
✓ | |
|
Switch your call from Webex to your mobile phone app |
When you're on an active call in Webex and you want to take your call on the run,
just switch your call from Webex to your mobile phone app. You maintain
connectivity and call quality with only a short pause in your call while you make
the quick switch from More
|
✓ | |
|
tel, sip and clicktocall protocol |
See the relevant section in this overview chapter. |
✓ |
✓ |
|
Voicemail |
No more missing calls in Webex App. Users can manage their voicemail in the Calls tab. There's a red badge counter that lets them know how many voice messages they have. They can check out the details of a message, play it, mark it as read, delete it, or call back the sender. After they listened to messages, either with Webex App or desk phone, the red badge counter disappears. See Voicemail. |
✓ |
✓ |
|
Visual Voicemail |
Visual voicemail—No more missing calls in Webex App. Users get a dedicated Voicemail tab |
✓ |
Deployment features
|
Feature name |
Description and Documentation |
Desktop |
Mobile |
|---|---|---|---|
|
Apple and Android Push Notifications (APNs) |
On iPhone, iPad, and Android devices, push notifications let the
user know about incoming calls in Webex App. (See the Due to regulations in China, iPhone and iPad users no longer have the slide option to answer incoming calls when their mobile device is locked. Instead, they get an alert notification and must first unlock the screen and then tap the notification to answer the incoming calls. |
✓ | |
|
Local Push Notification Service (LPNS) |
This is a reliable and secure way to notify Webex users on iOS devices of incoming VoIP calls under the following operating conditions:
|
✓ iOS and iPad OS | |
|
Auto-Discovery of Service Domain |
You can use Control Hub to configure a UC manager profile to add a service domain automatically to users' Phone Services settings in Webex App. That way, they don't need to manually enter a domain and can sign in right away. (See the deployment chapter.) |
✓ |
✓ |
|
Configure Self Care Portal Link |
You can choose the portal link for your users when they access it from the Call Settings in their app. (See the deployment chapter for config file steps and the appendix for related policy parameters.) |
✓ |
✓ |
|
Customize virtual background |
You can let users add up to 3 images of their own to use for virtual backgrounds. See Configure Virtual Backgrounds for Webex Users. |
✓ | |
|
Customize emergency dialing disclaimer |
You can customize the content of the emergency dialing disclaimer to meet regulations and business needs in various regions and situations. You can also change the frequency of the disclaimer pop-up, or hide the disclaimer if the emergency responder infrastructure is not ready. (See the customizable parameters in the Appendix.) |
✓ |
✓ |
|
Disable video for all 1:1 calls |
Using Control Hub, you can disable video for calling or set the default to video off for compliance, privacy, or network purposes. |
✓ |
✓ |
|
Expressway Mobile Remote Access (MRA) for Webex App |
MRA provides a secure connection for Webex App traffic without having to connect to the corporate network over a VPN. (See the Mobile and Remote Access Through Cisco Expressway Deployment Guide.) |
✓ |
✓ |
|
Secure and encrypted calls |
Encrpyted calls are configurable from Unified CM and indicated by
a lock icon |
✓ |
✓ |
|
Service Discovery |
Service discovery enables clients to automatically detect and locate services on your enterprise (internal) and MRA (external) network. (See the deployment chapter.) |
✓ |
✓ |
|
Simplified call options (enable or disable and order call options) |
You can set up user calling options to suit their needs. For example, they may not need to make Webex App calls and only want to call coworkers using their work number, mobile number, or SIP URI address. You can disable calls in Webex App so they don't have that option show up when they make a call. See Configure Call Settings for Your Organization. |
✓ |
✓ |
|
SIP (URI) address routing |
Configurable in Control Hub, this setting allows you to decide which SIP addresses are routed through the Webex cloud. The default is for all SIP URIs to be routed through Unified CM except for Webex services. See Configure SIP Address Routing for Your Organization. |
✓ | |
|
Single Sign-On (SSO) |
With SSO integration between your IdP, your premises environment,
and the Webex cloud, users can sign in across applications with
one set of credentials. (See the |
✓ |
✓ |
|
Virtual cameras (macOS) |
You can use Webex Control Hub to enable or disable virtual camera usage for your users' calls and meetings in the Webex app. Users can use a virtual camera, such as an application, driver, or software, to create an overlay of video, images, or feeds. |
✓ (macOS only) |
More information about Desk Phone Control (DPC)
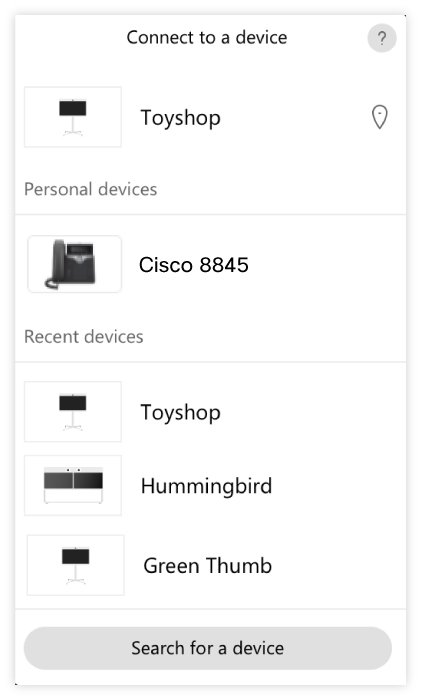
Any desk phones or Extension Mobility profiles that are associated with the user's Unified CM account are listed as an available device to connect to in Webex App for Windows or Mac. If the device is selected, Unified CM calls that are dialed from or answered in Webex App use that desk phone. Users can start or stop the call, enter DTMF input (which the phone acknowledges), and use the midcall features that are documented in the preceding feature table. Users can also join meetings from Webex App in desk phone control mode.
Webex App does not support Extension Mobility.
Users can access the description of your desk phone right from their desktop app and
personalize that description to something that makes sense. They can hover over the
phone description and then click ![]() to change the name. If you assigned more than one desk phone to
users, customizing each description can be helpful.
to change the name. If you assigned more than one desk phone to
users, customizing each description can be helpful.
Calling experience with Webex App for users
Call comparison
|
Calls through Unified CM environment |
Calls and meetings through Webex cloud |
|---|---|
|
Calls initiated directly from a 1:1 space or from a contact card in the Webex App |
Ad hoc meetings from a group space in the Webex App |
|
Search and then call a user in the Webex App |
Using the Join button in the Webex App to join an ad hoc or scheduled meeting |
|
Dialing directory numbers or PSTN
numbers from Call |
Dialing premises Directory URIs
from Call |
|
Desk phone control (DPC) calls (outgoing: dial a directory or PSTN number in the Webex App, take the call on the Unified CM device; incoming: answer the call in Webex App, take the call on the device). |
Joining a meeting while paired through Room, Desk, or Board devices |
|
1:1 calls that are placed directly in the Webex App to a free user in the consumer organization, to a user in another organization, or to a user in the same organization who doesn't have a directory number. (Numbers are not shared across organizations, so don't appear in contact cards.) These are classified as a Call on Webex App. |
User experience
- For users who are paired to a cloud-registered Room, Desk, or Board device:
-
-
Unified CM registration in the Webex App stays active.
-
Incoming calls to a user's directory number are presented in Webex App and, when accepted, calls are answered on the desktop app and do not use the paired Room, Desk, or Board device.
-
If the Webex device is configured in Control Hub as a Workspace that is enabled for Hybrid Calling, the user can dial from Webex App and the call then starts on the Webex device using that device's directory number as the caller ID on the receiving end. A user cannot answer an incoming call to a paired device.
-
If the Webex device is not in a Workspace that's enabled for Hybrid Calling, the directory number or PSTN dialing fails and an error message is presented in the user's Webex App.
-
- For users who are in desk phone control mode in Webex App:
-
-
Media (audio and video) for 1:1 calls to users with contact cards and calls that are started from the search or dial view go through the on-premises desk phone.
-
Media (audio and video) for group space meetings, Webex meetings (scheduled or ad-hoc), and calls to users without contact cards go through the on-premises desk phone.
-
- For scenarios involving a call going to voicemail:
-
-
Incoming calls that don't go through Unified CM do not roll over to voicemail and continue to ring until the user answers or declines.
-
Incoming calls that go through Unified CM (for example, to a user's corporate directory number) roll over to voicemail.
-
Architecture
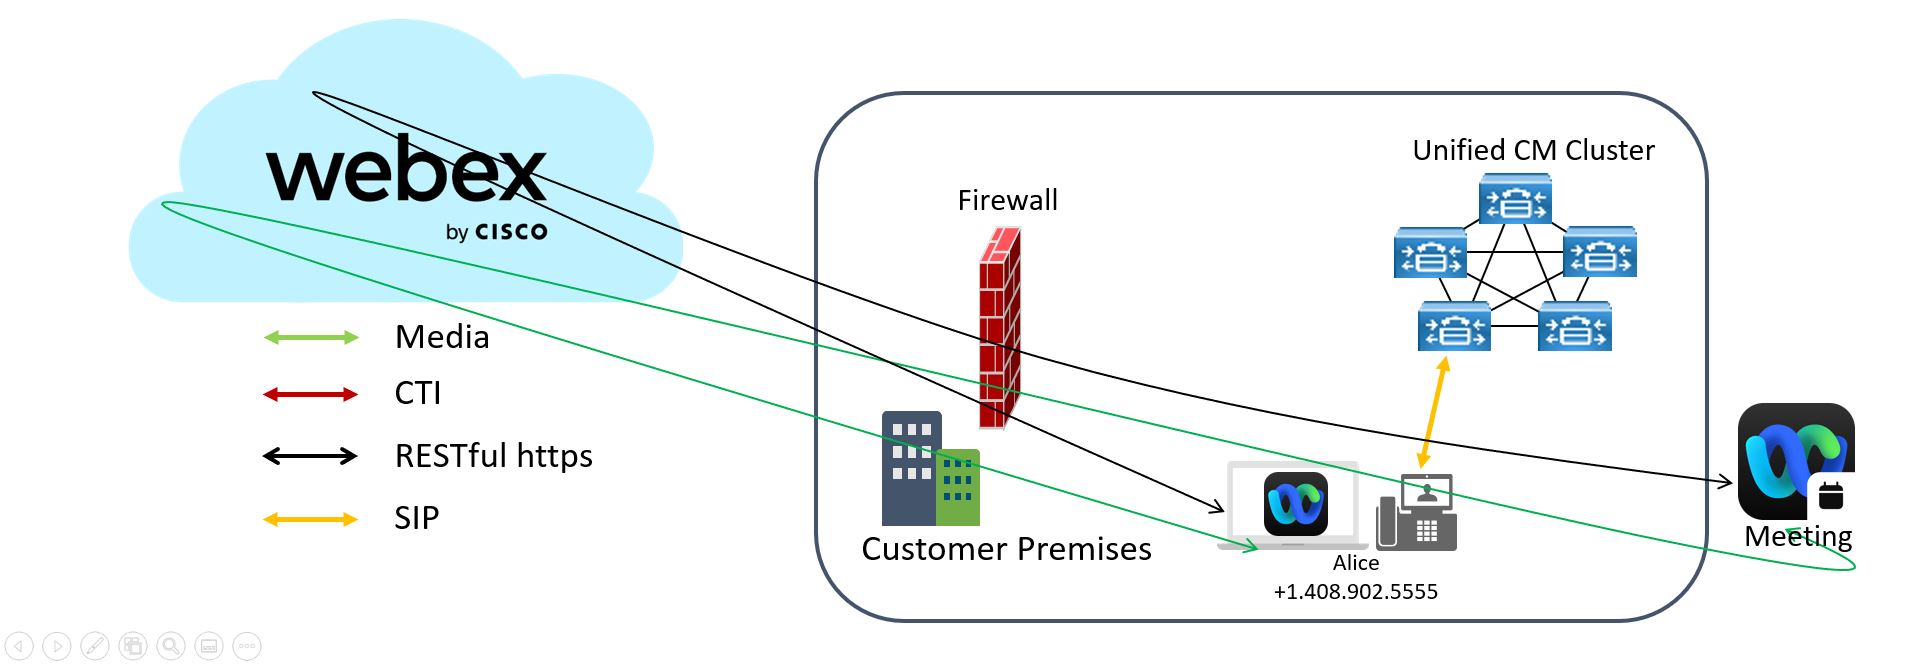
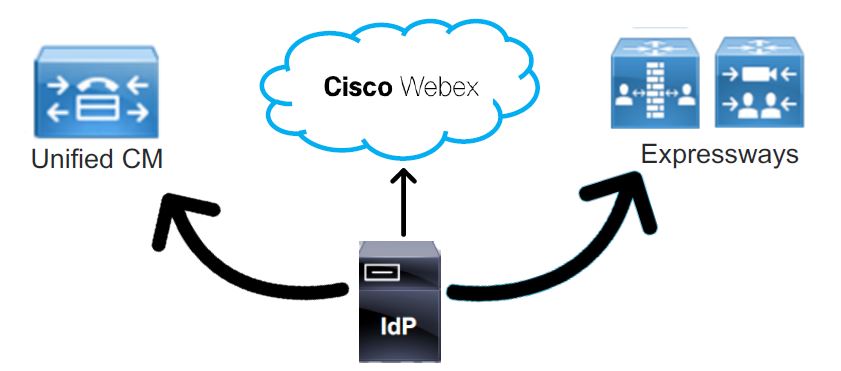
On network
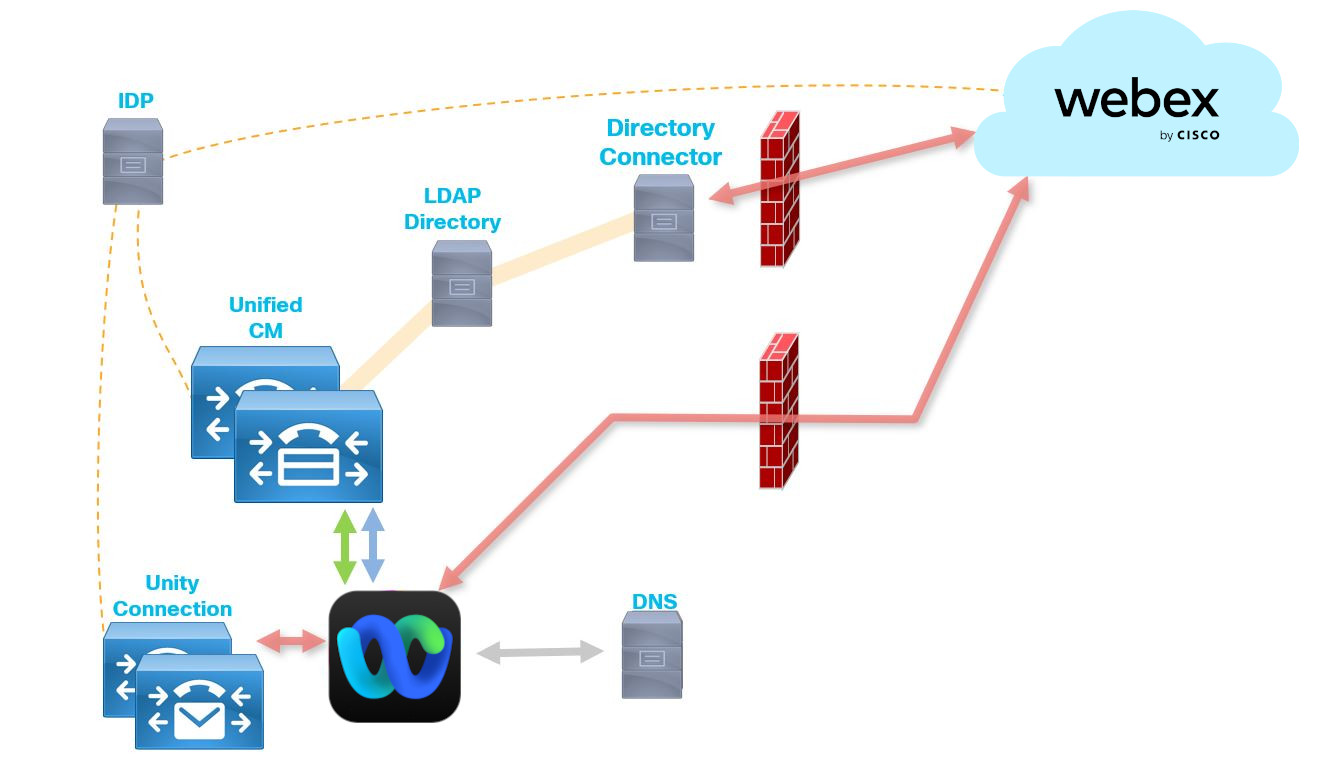
This architecture diagram represents Webex integrated with a Unified CM calling environment that is inside the corporate network.
|
Icon |
Protocol |
Purpose |
|---|---|---|
|
|
HTTPS |
Webex cloud services, Visual Voicemail |
|
|
SIP |
Softphone Mode |
|
|
CTI/QBE |
Deskphone Control |
|
|
LDAP |
Directory |
|
|
DNS |
Service Discovery |
|
|
SP Agreement |
Single Sign-On (SSO) Agreement |


Remote
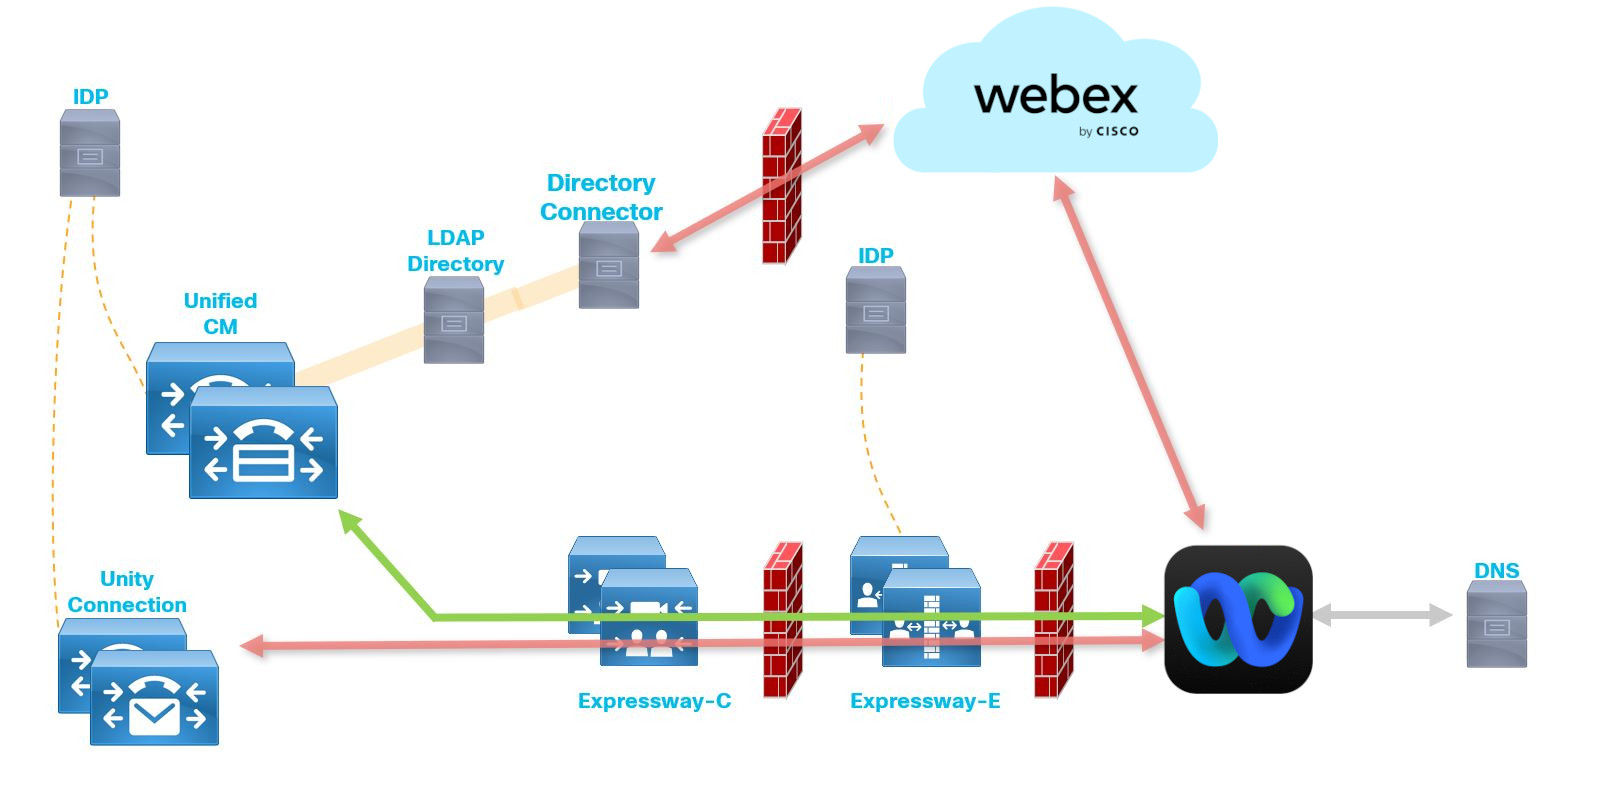
This architecture diagram represents Webex integrated with a Unified CM calling environment. The environment also contains Expressway pair that is deployed for Mobile and Remote Access (MRA) for remote users.
|
Icon |
Protocol |
Purpose |
|---|---|---|
|
|
HTTPS |
Webex cloud services, Visual Voicemail |
|
|
SIP |
Softphone Mode |
|
|
LDAP |
Directory |
|
|
DNS |
Service Discovery |
|
|
SP Agreement |
Single Sign-On (SSO) Agreement |
Call flows for Calling in Webex App (Unified CM)
Unified CM call answered on Webex App
-
Using Webex App, Alice calls Bob's directory number from the contact card in their 1:1 space.
-
The call rings on Bob's Webex App.
-
Bob answers the call in the Webex App. Call signaling is established through Unified CM.
-
Both parties can turn on video and share content. (Video is on by default if a camera is present.)
Unified CM incoming call answered on desk phone
-
From her Webex App, Alice calls Bob's directory number from their Webex App 1:1 space. (Bob's directory number is available on his contact card in the app.)
-
Call signaling is established through Unified CM. The call rings on both Bob’s desk phone and his Webex App.
-
Bob answers on his desk phone. Media flows directly between Alice's Webex App and Bob’s desk phone.
-
Both parties can turn on video and share content. (Video is on by default if a camera is present on the Webex App desktop device.)
Call on Webex App to a user with no directory number
-
Using Webex App, Alice calls Bob's Webex App from their 1:1 space. (Bob's directory number is not available on his contact card in the app.)
-
Bob answers the call on Webex App.
-
The call is established between the two Webex App users as a call on Webex App. Media flows between the two Webex App instances over the cloud or through an on-premises Video Mesh Node if deployed.
Unified CM call in Webex App to PSTN number
-
Alice calls a PSTN number from Webex App using the Call
 tab.
tab. -
Call signaling is established through the Unified CM to the PSTN gateway.
-
Media flows directly between Webex App and the PSTN gateway.
Unified CM call in desk phone control mode
-
Using Webex App, Alice (in desk phone control mode) calls Bob's directory number from their Webex App 1:1 space. (Bob's directory number is available on his contact card in the app.)
-
The call goes through her desk phone. Call signaling is established through Unified CM.
-
Bob’s desk phone rings and he gets a notification on Webex App.
-
Bob answers the call in Webex App in desk phone control mode. Media flows directly between the two desk phones.
Meeting join in desk phone control mode
-
Using the Webex App, Alice (while in desk phone control mode) joins a meeting. (The meeting must be directly from a space and take place only in the Webex App. Full Featured Meetings are not supported.)
-
In desk phone control mode, the media is established between the Unified CM phone and the meeting over the cloud. Media flows between the two over the cloud or through a Video Mesh Node if deployed.
Prepare your Environment
Call control environment requirements
To enable Calling in Webex App (Unified CM), you must use one of the supported Unified CM-based Cisco call control solutions, and ensure that you're on the minimum supported version or later.
| Call solution | Version |
|---|---|
| Cisco Unified Communications Manager* |
Minimum |
| |
|
Recommended | |
| |
|
Cisco Business Edition |
Check the software load summary documentation for BE6K and BE7K to ensure the solution is running a supported version of Unified CM. |
| Cisco Hosted Collaboration Solution |
11.5 and later at a minimum. 12.5 and later is recommended for SIP Oath encrypted calls support. (CAPF is not supported.) |
|
Cisco Unified Communications Manager Cloud |
— |
* For voicemail integration in Webex App, we recommend that the Cisco Unity Connection version match the Unified CM version. However, make sure the authentication method and credentials are the same across both servers.
** In alignment with Apple's changes to the iOS notification architecture, Cisco Webex App is implementing Apple Push Notification support for notifications. We highly recommend that customers upgrade Cisco Unified Communications Manager, Cisco Expressway, and Cisco Webex App as soon as possible. Failure to upgrade on time will result in loss of voice notification for Cisco Webex App users using Unified Communications Manager and IM notifications for Cisco Webex App iOS users. For up to date support information that is related to Push Notifications with iOS 13, including upgrade requirements, refer to Apple Push Notification Service Updates.
While not required, if you want Mobile and Remote Access (MRA) support (so Webex App can be used in softphone mode outside the corporate network), you must use a Cisco Expressway traversal pair, and ensure that you're on the minimum supported version or later.
| Call solution | Version |
|---|---|
| Cisco Expressway E and C traversal pair for Mobile and Remote Access (MRA) |
X8.11.4 or later is required for Calling in Webex App (Unified CM). See the "Important Information" section in the Expressway Release Notes for more information. This release and later provide added security. X12.6 or later for Push Notifications. If you use Mobile Remote Access (MRA) and want to configure MRA failover, Expressway Release X14.0 or later is required. See the Mobile and Remote Access via Expressway Deployment Guide for more information. |
Unified CM feature requirements
Many Unified CM features are automatically available in Webex App after you configure your environment. However, certain features need to be preconfigured in Unified CM for them to work in Webex App.
Auto answer with tone on connect
You can configure auto answer on a directory number that is assigned to the user. See the System Configuration Guide for Cisco Unified Communications Manager for your release at https://www.cisco.com/c/en/us/support/unified-communications/unified-communications-manager-callmanager/products-installation-and-configuration-guides-list.html and see the Cisco Unified CM Administration online help for more information about the Auto Answer setting.
For an agent on Webex to hear a tone before the call connects, choose True for the Tone on connect Cisco CallManager service parameter. This parameter determines whether a tone plays to indicate that media starts to stream. The valid values for this parameter are True, which plays a tone, or False, which does not play a tone, and the default is False. This Global Parameter affects all the users in the cluster.
Call Park
The Call Park feature allows you to place a call on hold so that can be retrieved from another phone or soft client in the Unified Communications Manager system (for example, a phone in another office or the Webex app). If you are on an active call, you can park the call to a call park extension by clicking Park in Webex. Another phone or soft client in your system can then dial the call park extension to retrieve the call.
For more information about call park configuration, see Call Park and Directed
Call Park
in the Feature Configuration Guide for Cisco Unified
Communications Manager for your release at https://www.cisco.com/c/en/us/support/unified-communications/unified-communications-manager-callmanager/products-installation-and-configuration-guides-list.html.
Call Recording
Call Recording enables a recording server to archive agent conversations. Webex App supports this feature for Unified CM-based deployments.
Some releases of Unified CM require a device package to enable recording capabilities. To confirm, verify that the Built In Bridge field is available in the Phone Configuration window for the device. If the field isn’t available, download and apply the most recent device packages.
For detailed information about how to configure call recording, see the Recording
chapter in the Feature Configuration Guide for Cisco Unified Communications Manager.
For configuration parameters that you can configure in the Jabber Config XML file or client configuration service, see the Feature Parameters table in the Appendix in this guide.
Dial Plan Mapping
You configure dial plan mapping to ensure that dialing rules on Cisco Unified Communications Manager match dialing rules on your directory.
Application Dial Rules
Application dial rules automatically add or remove digits in phone numbers that users dial. Application dialing rules manipulate numbers that users dial from the client.
For example, you can configure a dial rule that automatically adds the digit 9 to the start of a 7 digit phone number to provide access to outside lines.
Directory Lookup Dial Rules
Directory lookup dial rules transform caller ID numbers into numbers that the client can lookup in the directory. Each directory lookup rule you define specifies which numbers to transform based on the initial digits and the length of the number.
For example, you
can create a directory lookup rule that automatically removes the area code and
two-digit prefix digits from 10-digit phone numbers. An example of this type of
rule is to transform
4089023139 into
23139.
Dial Via Office Reverse
The Dial via Office (DvO) feature allows users to initiate Webex App outgoing calls with their work number using the mobile voice network for the device.
Webex App supports DvO-R (DvO-Reverse) calls, which work as follows:
-
User initiates a DvO-R call.
-
The client notifies Cisco Unified Communications Manager to call the mobile phone number.
-
Cisco Unified Communications Manager calls and connects to the mobile phone number.
-
Cisco Unified Communications Manager calls and connects to the number that the user dialed.
-
Cisco Unified Communications Manager connects the two segments.
-
The user and the called party continue as with an ordinary call.
The users do not receive incoming calls on Webex App in the following situations:
-
If users select the Mobile Voice Network calling option on any network and the Single Number Reach (SNR) is not configured for their device, they will not receive incoming calls on Webex App.
-
If users select the Mobile Voice Network calling option on any network and the Single Number Reach (SNR) is configured with the Ring Schedule, they will not receive incoming calls on Webex App beyond the time set in the Ring Schedule.
|
Connection |
Calling Options | |||||
|---|---|---|---|---|---|---|
|
Voice over IP |
Mobile Voice Network |
Autoselect | ||||
|
Wi-Fi |
Outgoing: VoIP |
Incoming: VoIP |
Outgoing: DvO-R |
Incoming: VoIP |
Outgoing: VoIP |
Incoming: VoIP |
|
Mobile Network (3G, 4G, 5G) |
Outgoing: DvO-R | Incoming: VoIP | ||||
To set up DvO-R, follow the steps in Configuring Dial via Office-Reverse to Work with Mobile and Remote Access.
Extend and Connect
The Extend and Connect feature allows administrators to deploy Unified Communications Manager (UC) Computer Telephony Integration (CTI) applications that interoperate with any endpoint. With Extend and Connect, users can access UC applications from any location using any device.
Users can only add and edit numbers for existing devices. You must configure at least one device for users. If no device exists, then even if this feature is enabled, users won't see it as an option in Webex App.
See Configure Extend and Connect for more information.
Move call to mobile
Users can transfer an active VoIP call from the Webex App to their mobile phone number on the mobile network. This feature is useful when a user on a call leaves the Wi-Fi network (for example, leaving the building to walk out to the car), or if there are voice quality issues over the Wi-Fi network.
Before you begin
| 1 |
From Cisco Unified CM Administration, go to , and then search for the user's Webex App for mobile (TCT or BOT) device. |
| 2 |
For Mobility User ID, choose the user's ID (typically the same as the Owner User ID. |
| 3 |
Choose the Associated mobile identity that you configured. |
| 4 |
For Transfer to Mobile Network, choose Use Mobility Softkey (user receives call) When this setting is configured, Unified CM calls the phone number of the PSTN mobile service provider for the mobile device. |
| 5 |
Save your changes, then go to and locate any user accounts you want to add this feature to. |
| 6 |
Check the following settings:
|
| 7 |
Save your changes. |
What to do next
Users can change the Destination in the Self Care Portal:
-
In the Webex App settings, go to .
-
On the Self Care Portal page, select your mobile device.
-
Click Edit Single Number Reach, change the entry for Phone Number or URI, and then click Save.
Multiline
You can configure multiple phone lines for your users to perform daily Webex App tasks. You can add up to 8 phone lines for each user. You can configure multiline for your users on the Cisco Services Framework (CSF) device for desktop clients.
Multiline is supported on Cisco Unified Communications Manager release 11.5 SU3 and later. However, if you are using Cisco Unified Communications Manager release 11.5 SU3 or Cisco Unified Communications Manager release 12.0, you must manually install the Cisco Options Package (COP) file on all cluster nodes and restart Cisco Unified Communications Manager to enable multiline.
To configure multiline, use the steps in Add a directory number to the device to add multiple lines to a device and then associate the device to users.
Multiline is supported when using Webex App for desktop in Mobile and Remote Access (MRA) mode. This function can be enabled on the Expressway-C in the traversal pair (Unified Communication > Configuration > SIP Path headers and set it to On).
You can also configure the RemoteInUsePresencePrimaryLineOnly parameter if you want to modify the presence for shared line scenarios. See Policy parameters for more information.
This parameter is not a selectable preset in Unified CM. You must add it as a customer parameter under policies.
After you have installed and configured Multiline, your users can:
-
Select a preferred line for making calls.
-
View missed calls and voicemails.
-
Use call forwarding, transfers, and conference calls on all lines.
-
Assign custom ringtones to each line.
Multiline supports the following features on all lines:
-
CTI control for the desk phone
-
Hunt groups
-
Shared line, dial rules, and directory lookup
-
Accessory manager
If Multiline is enabled, these features are only available on the primary line:
-
Call pickup
-
Extend & Connect
Multi call window
The multi call window is a separate, floating window that helps Webex App users to manage multiple or shared lines. As well as making and receiving calls on multiple or shared lines, users can see the status of all lines, and they also have better access to features like hold, transfer, and barge, without changing to another window.
Configure the following features on Unified CM to give users the maximum benefit from the multi call window:
-
Multiline
-
Voicemail
-
Barge
-
Privacy
-
Message waiting indicator (MWI)
Read these articles:
Push Notifications
When your cluster is enabled for Push Notifications, Cisco Unified Communications Manager use either the Apple or Google cloud’s Push Notification service to send push notifications to compatible Webex clients that run on iOS (Apple Push Notifications or APNs) or Android (Firebase Cloud Messaging or FCM) devices. Push Notifications let your system communicate with the client, even after it has entered into background mode (also known as suspended mode). Without Push Notifications, the system may not be able to send calls to clients that have entered into background mode.
For more information about how to configure Apple and Android push notifications (APNs), see Push Notifications (On-Premises Deployments) in the Push Notifications Deployment Guide.
Location reporting for emergency calling
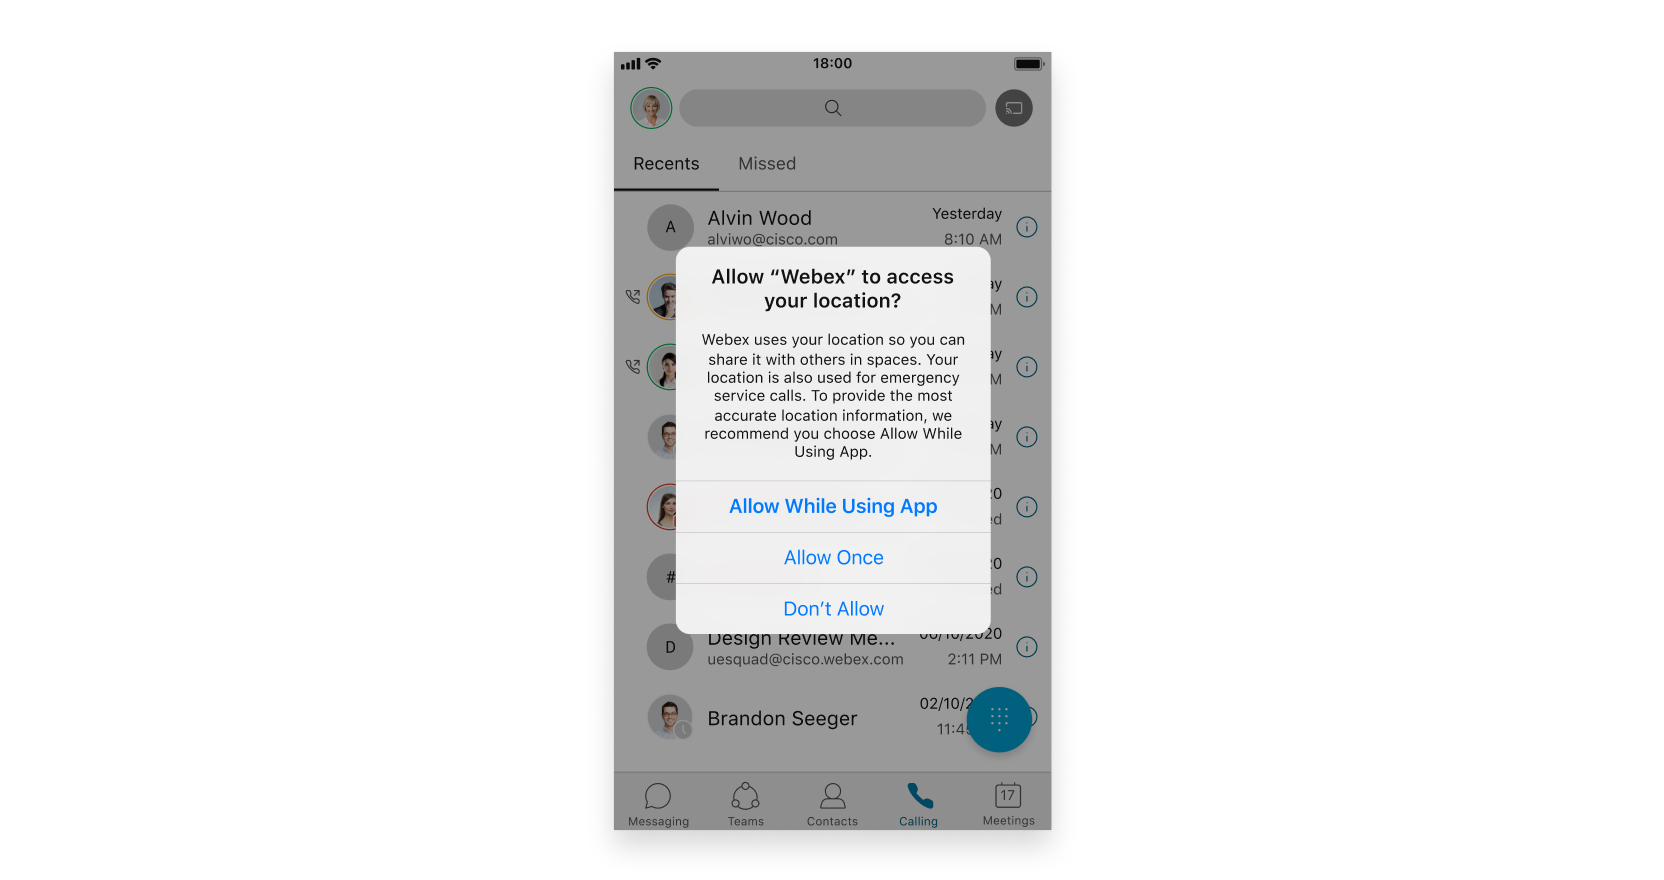
To comply with Ray Baum's act, in the US, you can require users to give accurate location information when they are outside the office.
If the Webex App determines users moved to a new location, they are prompted to update their address. When users make an emergency call from Webex App, accurate location information is automatically sent through a National E911 Service Provider to the public-safety answering point (PSAP), which is the local emergency call center that responds to emergency calls. This way, first responders have the necessary information needed to pinpoint the "dispatchable location" and quickly reach an emergency caller regardless of the device they dial from, or their exact location inside a large building.
This feature is limited to Windows, Mac, Linux, VDI, iPad, Android Tablet and Chromebook.
For mobile soft phone device with cellular, Webex App cross-launches the built-in phone app to make the emergency call.
Users on MacOS Monterey need to grant network permission to Webex App, so that Webex can report the BSSID to Redsky. If BSSID cannot be reported automatically, each user must manually add their locations in the Webex App.
If you're environment uses Unified CM 12.5 or earlier, you must upgrade to the supported server version:
| Customer type | Required components and supported versions |
|---|---|
| Unified CM on-premises |
Unified CM 12.5SU6 Cisco Emergency Responder 12.5SU6 Cisco Expressway X14.1 |
| Unified CM Cloud |
Unified CM 12.5SU5a Cisco Emergency Responder 12.5SU5a Cisco Expressway X14.0.4 |
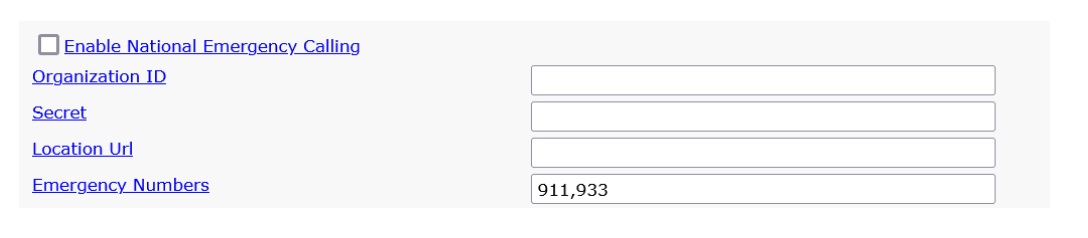
RedSky-related configuration goes through the Unified CM service profile powered by the UDS interface.
-
<EnableEmergencyCalling>(Yes/No) -
<OrganizationId> -
<Secret> -
<LocationUrl> -
<EmergencyNumbers>
If you're using Unified CM 14 or later, your users must install the Redsky MyE911 app and report location from there. If you're using CER to report the on-premises wireless location, you can keep CER and use the RedSky solution to only track off-premises location.
Webex App for Linux doesn't support CER. You must deploy RedSky to report both on-premises and off-premises location for emergency calling.
For mobile soft phone devices (TCT/BOT), you must provision the emergency number (such as 911) in your Unified CM server, so that Webex App launches the built in phone app to make the emergency call. See "Create and Configure Webex Softphone Devices" in the deployment chapter.
Further documentation
Configuring Emergency Responder with a National E911 Service Provider
Cisco Emergency Responder integrates with National E911 Service Provider like RedSky or Intrado for automated Location update, MSAG (Master Street Address Guide) for a User input location and Call Completion. Emergency Responder automatically finds and tracks the dispatchable locations of all your devices as they move throughout the enterprise so you can comply with E911 regulations.
Configuring Unified Communications Manager for Nomadic E911 Support
Nomadic E911 enables administrators to address the requirements of RAY BAUM’S Act by letting users update their location natively in Webex App.
Survivable Remote Site Telephony (SRST)
Cisco Unified Survivable Remote Site Telephony (SRST) provides Unified CM with fallback support for Webex App users. Cisco Unified SRST enables routers to provide call-handling support for Webex App users when they lose connection to remote primary, secondary, or tertiary Cisco Unified CM installations or when the WAN connection is down.
For more information about this feature, see Configure SRST
in the System Configuration Guide for your
Unified CM release and see the Cisco Unified SCCP and SIP SRST System
Administrator Guide (All Versions) for IOS configuration, feature
support, and restrictions.
Voicemail
For voicemail to work in Webex App, you must ensure that Cisco Unity Connection and Unified CM use a matching authentication method (for example, legacy SSO, oAuth SSO, or non-SSO). When integrated with Unified CM, Cisco Unity Connection (the voicemail and messaging system) provides voice-messaging features for users that you configure manually, through AXL services, or through LDAP integration. After receiving voice messages in their mailboxes, users receive message-waiting lights on their phones and integrated applications—in this case, Webex App.
For server performance considerations, don't use Visual Voicemail with both Jabber and Webex App at the same time.
Users get a visual voicemail inbox in Webex App. They can play messages, delete messages, mark as read, and respond with an audio or video call:
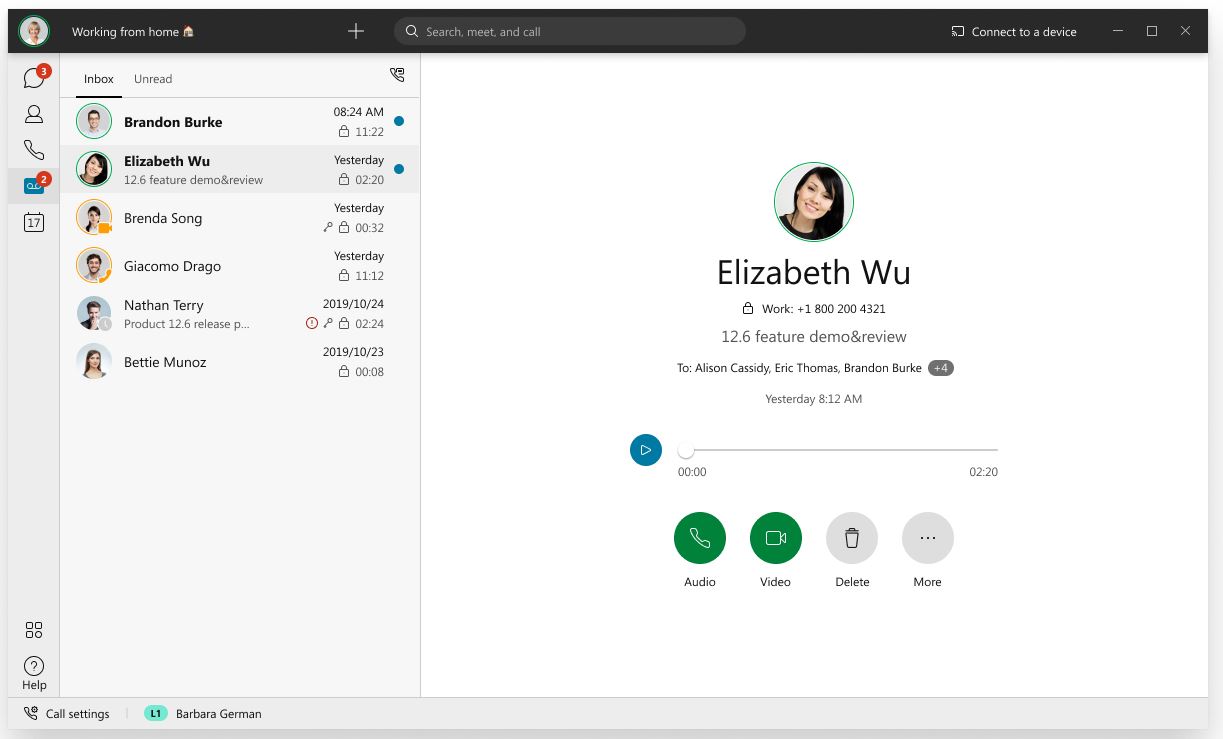
Users can also click Call Voicemail ![]() , which accesses the voicemail system with an internal or external call.
Users can then retrieve, listen to, reply to, forward, and delete their messages. For more
information about this feature for your users, see the Webex App
Voicemail
documentation.
, which accesses the voicemail system with an internal or external call.
Users can then retrieve, listen to, reply to, forward, and delete their messages. For more
information about this feature for your users, see the Webex App
Voicemail
documentation.
Voicemail always uses Unified CM end user credentials. These credentials and the voicemail credentials on Unity Connection must be consistent—either set up both with single sign-on (SSO) or with non-SSO credentials, so that the sign in experience is the same. See Recommended configuration for more information.
For information about setting up Cisco Unity Connection and integrated it with your Unified CM environment, see the following documentation:
-
Cisco Unified Communications Manager SIP Integration Guide for Cisco Unity Connection for your release at https://www.cisco.com/c/en/us/support/unified-communications/unity-connection/products-installation-and-configuration-guides-list.html
-
Managing the Phone System Integrations in Cisco Unity Connection
in the System Administration Guide for Cisco Unity Connection for your release at https://www.cisco.com/c/en/us/support/unified-communications/unity-connection/products-maintenance-guides-list.html.
Wi-Fi to LTE Call Network Handoff
Wi-Fi to LTE Call Handoff provides flexibility for Calling in Webex App (Unified CM) users to switch between different networks (such as Wi-Fi and LTE) without disconnecting any active calls that the user may be while switching network.
This feature is automatically enabled for desktop and mobile users. Your calling environment must be on Unified CM 14 and later. See the Unified CM release notes for more information.
For known issues and limitations for this feature, see the known issues in the deployment chapter.
Wireless Location Monitoring Service
Webex App supports wireless access point (AP) location monitoring. Wireless location monitoring service allows you to determine the physical location from where your Webex App users connect to the corporate network. This information is stored in Cisco Unified Communications Manager.
This feature is supported with on-premises and Mobile and Remote Access (MRA) Edge wireless connections.
Webex App monitors your users’ locations, gathers Service Set ID (SSID) and Basic Service Set ID (BSSID) information, and sends this information to Unified CM at least every 24 hours (desktop only), or whenever:
-
Their current access point changes.
-
They sign in to Webex App.
-
They switch between networks for on-premises and Expressway for MRA.
-
Webex App resumes from sleep or is made active.
If Webex App for mobile gets suspended, it may not send the location every 24 hours.
-
For on-premises deployments, configure wireless location monitoring using
EnableE911OnPremLocationPolicyparameter with the value true. -
For Expressway for MRA deployments—you can configure wireless location monitoring using the
EnableE911EdgeLocationPolicywith the value true andE911EdgeLocationWhiteListwith a list of up to 30 SSIDs, separated by a semicolon.
For more details on these parameters, see the Appendix in this guide.
For more information about how to configure Cisco Emergency Responder (CER), see the Cisco Emergency Responder Administration Guide for your release at https://www.cisco.com/c/en/us/support/unified-communications/emergency-responder/products-maintenance-guides-list.html.
Contact Center feature requirements
Webex App can integrate into your Cisco Contact Center solution (Unified Contact Center Enterprise or Express) and be controlled in Finesse desktop as a softphone client. This integration supports contact center features such as multiline, recording, conferencing, and more.
To see the latest supported features in the Webex App, see Contact Center integration for Webex App.
For information about how to configure your Cisco Contact Center solution, see the Feature Guide documentation for your specific product and release:
Network requirements
When using Calling in Webex App (Unified CM) over your corporate Wi-Fi network, we recommend that you do the following:
-
Design your Wi-Fi network to eliminate gaps in coverage as much as possible, including in areas such as elevators, stairways, and outside corridors.
-
Ensure that all access points assign the same IP address to the mobile device. Calls are dropped if the IP address changes during the call.
-
Ensure that all access points have the same service set identifier (SSID). Hand-off may be much slower if the SSIDs do not match.
-
Ensure that all access points broadcast their SSID. If the access points do not broadcast their SSID, the mobile device may prompt the user to join another Wi-Fi network, which interrupts the call.
-
Ensure that the Enterprise firewall is configured to allow the passage of Session Traversal Utilities for NAT (STUN) packets.
Conduct a thorough site survey to minimize network problems that could affect voice quality. We recommend that you do the following:
-
Verify nonoverlapping channel configurations, access point coverage, and required data and traffic rates.
-
Eliminate rogue access points.
-
Identify and mitigate the impact of potential interference sources.
For more information, see the following documentation:
-
The
VoWLAN Design Recommendations
section in the Enterprise Mobility Design Guide. -
The Cisco Unified Wireless IP Phone 7925G Deployment Guide.
-
The Capacity Coverage & Deployment Considerations for IEEE 802.11g white paper.
-
The Solutions Reference Network Design (SRND) for your Cisco Unified Communications Manager release.
Ports and protocols
Calling in Webex App (Unified CM) uses the ports and protocols listed in the following table. If you plan to deploy a firewall between the client and a server, configure the firewall to allow these ports and protocols.
|
Port |
Application layer protocol |
Transport layer protocol |
Description |
|---|---|---|---|
|
Configuration | |||
|
6970 |
HTTP |
TCP |
Connect to the TFTP server to download client configuration files. |
|
6972 |
HTTPS |
TCP |
Connects to the TFTP server to download client configuration files securely for Cisco Unified Communications Manager. |
|
8443 |
HTTPS |
TCP |
Traffic to Cisco Unified Communications Manager. |
|
Communication Manager signaling | |||
|
2748 |
CTI |
TCP |
Computer Telephony Interface (CTI) used for desk phone control. |
|
5060 |
SIP |
TCP |
Provides Session Initiation Protocol (SIP) call signaling. |
|
5061 |
SIP over TLS |
TCP |
SIP over TLS provides secure SIP call signaling. (Used if Secure SIP is enabled for device.) |
|
5070 to 6070 |
BFCP |
UDP |
Binary Floor Control Protocol (BFCP) for video screen sharing capabilities. |
|
Voice or video media exchange | |||
|
16384 to 32766 |
RTP/SRTP |
UDP |
Cisco Unified Communications Manager media port range used for audio, video, and BFCP video desktop share. |
|
33434 to 33598 |
RTP/SRTP |
UDP |
Cisco Webex Hybrid Services media port range used for audio and video. |
|
8000 |
RTP/SRTP |
TCP |
Allows users to receive video transmitted to their desk phone devices on their computers through the client. |
Supported codecs
|
Type |
Codec |
Codec type |
Webex App for Android |
Webex App for iPhone and iPad |
Webex App for Mac |
Webex App for Windows |
|---|---|---|---|---|---|---|
|
Audio |
G.711 |
A-law |
Yes |
Yes |
Yes | |
|
µ-law/Mu-law |
Yes |
Yes |
Yes | |||
|
G.722 |
Yes |
Yes |
Yes | |||
|
G.722.1 |
24 kb/s and 32 kb/s |
Yes |
Yes |
Yes | ||
|
G.729 |
No |
No |
No | |||
|
G.729a |
Yes |
Yes |
Yes | |||
|
Opus |
Yes |
Yes |
Yes | |||
|
Video |
H.264/AVC |
Baseline profile |
Yes |
Yes |
Yes | |
|
High profile |
No |
Yes |
Yes | |||
Certificate requirements
Unified CM certificates (no MRA in deployment)
To establish a secure connection with Unified CM, Webex App validates the certificate that is presented by the server during the connection process. Unlike Jabber, Webex App does not prompt users with the option to accept an untrusted certificate.
Unified CM must be configured with certificates that Webex App can validate, preferably a CA root that signed the tomcat certificate (which is known to the operating system that Webex App is on, Windows or MacOS by default). or a self-signed trusted certificate (which must be deployed to the OS in advance by the enterprise administrator).
|
|
|
The Tomcat certificate is also used for secure SIP when Webex App is enabled for encrypted calls (SIP Oauth operates on the
default port 5090). See Configure the Phone Security
Profile for Encrypted Calls
in this guide for
more details.
Certificates issued with a deprecated signature algorithm (such as SHA-1) do not work; you must use a supported secure signature algorithm such as SHA-256 or later, as documented in the Certificates chapter in the Administration Guide for Cisco Unified Communications Manager.
The certificates that are deployed on Unified CM servers must include the fully qualified domain name (FQDN) as the server identity rather than a simple hostname or IP address (for example, cucm-server-1.example.com rather than cucm-server-1 or 203.0.113.1).
In Cisco Unified CM Administration > System > Server, the Unified CM server names must be defined as FQDN.
See High Level View of Certificates and Authorities in CUCM and CUCM Certificate Management and Change Notification for information about certificate management in Unified CM.
Unified CM certificates (with MRA in deployment)
The Unified CM Tomcat certificate is significant for Mobile and Remote Access (MRA). This certificate is automatically installed on the Cisco Unified Communications Manager. By default, it is self-signed and has the same common name (CN).
The Tomcat certificate is also used for secure SIP when Webex App is enabled for encrypted calls (SIP Outh operates on the
default port 5091 for MRA). See Configure the Phone
Security Profile for Encrypted Calls
in this
guide for more details.
We recommend using CA-signed certificates. However, if you do use self-signed certificates, the two certificates must have different common names. The Expressway does not allow two self-signed certificates with the same CN. So if the CallManager and tomcat self-signed certificates have the same CN in the Expressway's trusted CA list, the Expressway can only trust one of them. This means that either secure HTTP or secure SIP, between Expressway-C and Cisco Unified Communications Manager, will fail.
Expressway certificates (with MRA in deployment)
For MRA scenarios, certificates only need to be validated on the Expressway.
The Expressway certificate signing request (CSR) tool prompts for and incorporates the relevant Subject Alternative Name (SAN) entries as appropriate for the Unified Communications features that are supported on that Expressway.
The following table shows which CSR alternative name elements apply to which Unified Communications features.
|
Add these items as Subject Alternative Names (SANs) |
When generating a CSR for MRA |
|---|---|
|
Unified CM registrations domains (despite their name, these have more in common with service discovery domains than with Unified CM Unified CM SIP registration domains) |
Required on Expressway-E only |
|
(Clustered systems only) Expressway cluster name |
Required on Expressway-C only |
You must restart the Expressway for any new uploaded server certificate to take effect.
Expressway-E server certificate requirements
The Expressway-E server certificate needs to include the following element in its list of subject alternative names (SAN):
-
Unified CM registrations domains: all of the domains which are configured on the Expressway-C for Unified CM registrations. Required for secure communications between endpoint devices and Expressway-E.
The Unified CM registration domains used in the Expressway configuration and Expressway-E certificate, are used by Mobile and Remote Access clients to lookup the _collab-edge DNS SRV record during service discovery. They enable MRA registrations on Unified CM, and are primarily for service discovery.
These service discovery domains may or may not match the SIP registration domains. It depends on the deployment, and they don't have to match. One example is a deployment that uses a .local or similar private domain with Unified CM on the internal network, and public domain names for the Expressway-E FQDN and service discovery. In this case, you need to include the public domain names in the Expressway-E certificate as SANs. There is no need to include the private domain names used on Unified CM. You only need to list the edge domain as a SAN.
Select the DNS format and manually specify the required FQDNs. Separate the FQDNs by commas if you need multiple domains. You may select CollabEdgeDNS format instead, which simply adds the prefix collab-edge to the domain that you enter. This format is recommended if you do not want to include your top level domain as a SAN (see example in following screenshot).
Requirements when migrating from Jabber to Webex App
In migration scenarios, you may encounter an issue if you're using a
private CA with the Certificate Revocation List (CRL) default format
(ldap :///) for the Expressway-E
certificate.
In that deployment, after migrating from Jabber to the Webex App, Webex App on iOS devices does not register to Unified CM phone services.
The registration fails because the iOS client tries to reach the CRL
URL from the Internet, but the CRL format
ldap:/// is not supported by iOS
clients.
If you're using a private CA for issuing certificates for Expressway-E, we recommend that the Expressway-E is issued by a public CA, and then you can migrate users from Jabber to the Webex App.
If you must use certificates signed by a private CA for your Expressway-E
setup (in particular, a CRL with the format
ldap:///), follow these steps to ensure
a successful migration from Jabber to the Webex App:
-
Remove the CRL parameter, if any, from the private CA template.
-
Reissue Expressway-E server certificates without the CRL parameter.
-
Make sure certificates that the private CA signs support the following requirements for iOS:
-
Minimum key size of 2048
-
SHA-2 signature
-
Server DNS name as SAN
-
Extended key usage extension containing the id-kp-serverAuth OID
-
Validity period of 398 or fewer days
-
-
Install the root CA file on mobile devices
For Apple iOS devices, you must also enable full trust for root certificates.
Headset requirements
Unified CM calling in Webex App supports the following Cisco series headsets. Click the links for more information on each model:
-
730 Series (Bluetooth)
Some Jabra headsets are supported. See Details about headset support for more information.
When using a supported headset in Webex App, the headset firmware can get updated automatically. Users get a message that pops up letting them know that an update is available, and then they'll get confirmation after it's updated.
License requirements
You require a Cisco Webex organization (managed in Control Hub) with a paid subscription. User accounts must be managed in your organization but they don't require a specific license assignment to use Calling in Webex App (Unified CM).
Additionally, for softphone functionality, each Webex App registers to Unified CM as a softphone client. Like Cisco Jabber, this registration uses the Cisco Unified Client Services Framework (CSF) client for desktop and a BOT, TCT, or TAB device for mobile, and counts as a device toward Unified CM licensing. Users with three or more apps and/or devices require CUWL perpetual licensing or for the organization to be on a Flex Calling subscription.
We recommend Flex Calling as the subscription channel for Calling in Webex App (Unified CM).
Webex App requirements
To ensure that Calling in Webex App (Unified CM) functions correctly and the latest features, functionality, and other fixes are continuously delivered, users must be on the latest release of the Webex App for desktop or mobile, or the latest VDI thin client.
The Web app (web.webex.com) does not allow users to call phone numbers.
-
For installation and upgrade instructions, see Installation and automatic upgrade.
-
For managing the frequency of Webex App updates for users in your organization, see Product update controls for Webex App.
-
Chromebooks on both ARM and x86 architecture are supported for Calling in Webex App (Unified CM). Users can also be signed into phone service on both a Chromebook and Android phone at the same time.
-
For VDI deployment steps, see the Deployment guide for Virtual Desktop Infrastructure (VDI).
-
For release information, see the Release notes and What's new documentation for the Webex App and the VDI release notes for Webex App for VDI.
Recommended configuration
Single sign-on (SSO) and IdP integration
-
For Calling in Webex App (Unified CM), SSO is supported with Unified CM and Expressway. You must either enable or disable SSO on both. For a consistent user experience with SSO, we recommend that you extend your Identity Provider (IdP) integration to Webex App so that users can sign in with the same credentials. With Single Sign-On (SSO) integration between your IdP, your premises environment, and the Webex cloud, users can sign in across applications with one set of credentials.
-
For premises Unified CM configuration, see the SAML SSO Deployment Guide for Cisco Unified Communications Applications for your release. We recommend applying this configuration to Unified CM and any Unity Connection voicemail servers in your deployment.
-
For Expressway configuration, see the Mobile and Remote Access via Cisco Expressway Deployment Guide for your release.
-
For cloud (Webex App) configuration, see Single Sign-On Integration with Webex Control Hub
See the following table for supported authentication types:
|
Type |
Windows |
Mac |
iOS |
Android |
|---|---|---|---|---|
| IWA Auth with NTLM |
✓ |
✓ |
✓ See the SSO Redirect URI requirements |
✓ |
| IWA Auth with Kerberos |
✓ | |||
| Form-based Auth |
✓ |
✓ |
✓ |
✓ |
| Cert-based Auth |
✓ |
✓ |
✓ See the SSO Redirect URI requirements |
✓ |
SSO redirect URI
The Webex App supports SSO redirect URI, an enhancement to the app's embedded browser support.
This feature provides the following enhancements:
-
Provides protection against "Authorization Code Interception Attack" using RFC7636.
-
Allows Webex App running on an Operating Systems other than iOS to use the Embedded Browser (For example: Android).
-
Allows Webex App to use the Embedded browser for Unified Communications Manager (and MRA) OAuth flow. This support prevents dual login when SSO is enabled.
Requirements
This feature requires the following minimum versions:
-
Unified CM 12.5(x) releases-12.5(1) SU4 and Unified CM 14.0(x) releases-14.0(1) SU1 and later
-
Expressway X14 and later
-
Webex App 41.4 and later
For more information, see the following documentation:
Configuration
For Unified CM—No configuration is required.
For Expressway—On the Expressway-C, you must set the parameter Webex Client Embedded Browser Support to Yes to enable this feature. For more information, see Configure MRA Access Control in the Mobile and Remote Access Through Cisco Expressway Deployment Guide (X14.0) .
Directory synchronization and contact cards
We recommend using the Cisco Directory Connector for user synchronization from your Active Directory into Control Hub.
You can also synchronize user phone numbers. Their numbers appear in contact cards in the Webex App for Windows and Mac:
For iOS and Android, users can access someone's contact card from a space by just tapping a profile picture. See Verify Who You're Contacting for more information.
For the numbers to appear, you must deploy Cisco Directory Connector to synchronize the numbers from an existing Active Directory attribute into the cloud. See the attribute mapping information in the Deployment Guide for Cisco Directory Connector at https://www.cisco.com/go/hybrid-services-directory.
Overview of Auto-Provisioning of Webex App
The auto-provisioning feature in Control Hub allows the users to self-provision the devices for Calling in Webex (Unified CM) with zero or minimal intervention. This feature avoids over-provisioning of multiple devices in Unified CM that helps to minimize the impact on cluster scaling and licensing usage. Devices are auto created in Unified CM, when a user provisioned for Calling in Webex (Unified CM) signs in with their registered email address or User ID to Webex App.
Administrators don't need to go to Unified CM to pre-provision any of the Webex App devices for users in their organization. When the user signs in to the Webex App with any device for the first time, and if the device isn’t already available in the Unified CM server, the new device type is auto created for the user.
This feature allows auto-provisioning of following devices types in Unified CM for the users when they sign into Webex App from various device platforms:
-
Android Device (BOT)
-
Chromebook/iPad Devices (TAB)
-
Windows/MAC Devices (CSF)
-
iPhone Device (TCT)
After the deletion of a device, it is recommended that you wait for 5-10 minutes before you auto-provision a device of the same type. Also, you can reset the device from Webex App before you auto-provision it again (Go to Help > Health Checker and click the Reset button.)
Prerequisite
Before you plan to allow auto-provision of Webex App for the users, make sure that you meet the following requirements:
-
Activate Cloud-Connected UC and set up the on-premises devices in your organization to communicate with the Control Hub. For more information, see Set Up Cloud-Connected UC for On-Premises Devices.
-
Assign the Register to Unified Communications Manager license to the user account in Control Hub.
Do not assign a Webex Calling license unless the user is using Webex Calling services. Otherwise, the Webex app will register to Webex Calling instead of Unified CM.
-
Cisco Unified Communications Manager clusters should be version 11.5 or above. See the supported Unified CM version for Calling in Webex (Unified CM) at Deployment Guide for Calling in Webex (Unified CM).
-
The minimum supported Webex App version is 41.12 and higher.
-
The minimum supported Cisco Expressway Release version is X14.0.2. If the Expressway version is below the recommended version, Expressway should add the following URLs manually to the Allow List to allow external clients (Cisco Jabber or Webex App) to access the Unified Communications nodes discovered having MRA configuration:
-
POST:
https://{{cucmip}}:8443/devicemanagement/v1/clientAutoProv/createDevice -
GET:
https://{{cucmip}}:8443/ucmservices/v1/supportedServices
-
-
Ensure that the User ID or email ID of Unified CM users matches with the User ID of the user records entity in Webex Identity Service. Also, the users configured in the Unified CM server should be available in the organizations’ Webex Identity Service.
Additional configuration
We recommend the following additional configuration to provide further benefits for your Calling in Webex App (Unified CM) deployment:
-
Quality of Service (QoS), covered in the Appendix in this guide. QoS helps manage packet loss, delay and jitter on your network infrastructure.
-
Call Admission Control (CAC) on Unified CM, covered in the System Configuration Guide for Cisco Unified Communications Manager. CAC enables you to control the audio quality and video quality of calls over a wide-area (IP WAN) link by limiting the number of calls that are allowed on that link at the same time.
Deploy Webex Teams with Unified CM
Calling in Webex App (Unified CM) deployment task flow
These steps walk you through a typical phone only deployment that's used for Calling in Webex App (Unified CM). For this deployment, Webex App is going to register to Unified CM as a softphone client, just like Cisco Jabber does.
Before you begin
Prepare your environment for Calling in Webex App (Unified CM)
| 1 |
Configure UC services workflow Bundle together UC services in a service profile. You must create a CTI service which provides Webex App with the devices that are associated with the user. You can create a voicemail service if you want users to have access to voicemail in Webex App. At the end, create a service profile to add the UC services which later get applied to end user accounts. |
| 2 |
Choose from the Service discovery options: Service discovery enables clients to automatically detect and locate services on your enterprise network. You can configure service discovery using one of the following options.
|
| 3 |
Choose from the Authentication options: These options determine the authentication mechanism that is used when a user signs into phone services in Webex App:
|
| 4 |
Set parameters on phone configuration for desktop clients The client can retrieve configuration settings in the phone configuration from specific locations on Cisco Unified Communications Manager. |
| 5 |
Configure Unified CM end users for Calling in Webex App (Unified CM) For Calling in Webex App (Unified CM) to work, you must create new users or configure existing users on Unified CM with the following settings. |
| 6 |
Follow these steps in the Create softphones workflow:
Follow these steps to manually or automatically create and configure softphone devices (these correspond to each Webex App for softphone use), add a directory number to the softphone device, associate the device with an end user account, and optionally configure devices and Webex App instances for secure and encrypted calls. |
| 7 |
Follow these steps in the Create softphones workflow:
Follow these steps to manually or automatically create and configure softphone devices (these correspond to each Webex App for softphone use), add a directory number to the softphone device, associate the device with an end user account, and optionally configure devices and Webex App instances for secure and encrypted calls. |
| 8 |
Configure push notifications and recommended settings With Push Notifications, your deployment uses Google or Apple's cloud-based Push Notification service to push voice calls, video calls, and instant message notifications to Webex App for iOS and Android clients that are running in the background. You must enable Push Notifications to maintain persistent communication with Webex App for iOS and Android. |
| 9 |
Choose an option:
You can set client configuration parameters that are applied when users sign in using one of the following methods:
|
| 10 |
Configure moving a call into a meeting When users are in the middle of a call, they may want to invite other coworkers into the discussion while making use of some advanced meetings features. Users can move that call to a meeting. From there, people can raise their hands when they want to share something important, add an emoji to let someone know visually that they agree with what's being said, make use of breakout rooms, and much more. |
| 11 |
Follow these steps in Calling experience for users workflow:
You can use Control Hub to customize the calling experience for you users. Set a UC Manager Profile with either or both a voice services domain and UDS server. Set the calling behavior for some of your users (recommended) or for your entire organization (when you're ready to roll out the service). For Calling in Webex App (Unified CM), you configure this setting so that users can use the calling feature set. Set calling options that appear in the app and whether users can do a single click-to-call. |
| 12 |
Authenticate with phone services in Webex App If you have DNS SRV implemented, users will be autodiscovered for phone services in the Webex App. If you don't, you can also simplify their sign-in process with the UC manager profile you configured earlier, which contains UDS server or the UC domain (FQDN or IP address of Unified CM) for Phone Services. If none of these options is in place, users must manually enter a server address for the UDS server or the UC domain (FQDN or IP address of Unified CM) that you provide to them. |
| 13 |
Configure extra features after deployment These tasks are optional and are not mandatory for deploying Calling in Webex App (Unified CM). However, these features provide more customization for you and your users. You can refer to the documentation that is linked in each step for additional guidance. |
Overview of service profile
-
Create UC services.
-
Associate the UC Service with the Service Profile.
-
Associate the User with the Service Profile.
Create default service profile
Create a service profile to add the UC services.
| 1 |
Open the Cisco Unified CM Administration interface. |
| 2 |
Select . The Find and List Service Profiles window opens.
|
| 3 |
Select Add New. The Service Profile Configuration window opens.
|
| 4 |
Enter a name for the service profile in the Name field. |
| 5 |
Select Make this the default service profile for the system if you want the service profile to be the default for the cluster. On Cisco Unified Communications Manager release 9.x only, users who have IM only capabilities must use the default service profile. For this reason, select Use Default. |
| 6 |
Select Save. |
What to do next
Create the UC services for your deployment.
Configure UC services workflow
Set up the relevant UC services in a service profile for your Calling in Webex App (Unified CM) deployment. The CTI service is required.
Set up the voicemail service if you have Unity Connection deployed and want to integrate voicemail access into Webex App.
Before you begin
| 1 |
Configure voicemail pilot number If you're configuring voicemail access for Webex App users, ensure that you identify a directory number in your Unified CM deployment to use for voicemail system access. |
| 2 |
The CTI UC service provides Webex App with the location of the CTI service, which retrieves a list of devices that are associated with the user. The voicemail service ties into your existing Unity Connection deployment and provides voicemail retrieval to users when they are associated with the corresponding service profile. |
| 3 |
Configure service profile with UC services After you add and configure Cisco Unified Communications Manager services, you add them to a service profile. You can apply additional configuration in the service profile. |
What to do next
Associate the service profile to end user accounts.
Configure voicemail pilot number
The voicemail pilot number designates the directory number that you dial to access your voice messages. Cisco Unified Communications Manager automatically dials the voice-messaging number when users press the Message button on their phones or access voicemail through Webex App. Each pilot number can belong to a different voice-messaging system.
| 1 |
From Cisco Unified CM Administration, go to . |
| 2 |
Configure the following settings:
|
| 3 |
Save your changes. |
Configure UC services
Add Cisco Unified Communications Manager services to specify the address and other settings for the service.
The CTI UC service provides Webex App with the location of the CTI service, which retrieves a list of devices that are associated with the user. The voicemail service ties into your existing Unity Connection deployment and provides voicemail retrieval to users when they are associated with the corresponding service profile.
| 1 |
Open the Cisco Unified CM Administration interface. |
| 2 |
Select . The Find and List UC Services window opens. |
| 3 |
Select Add New. The UC Service Configuration window opens. |
| 4 |
In the Add a UC Service section, select CTI from the UC Service Type drop-down list. |
| 5 |
Select Next. |
| 6 |
Provide details for the CTI service as follows: |
| 7 |
Save your changes, return to , and then click Add New. |
| 8 |
Choose Voicemail and then click Next. |
| 9 |
Provide details for the Voicemail service as follows: |
| 10 |
Save your changes. |
What to do next
Add UC services to the service profile.
Configure service profile with UC services
After you add and configure Cisco Unified Communications Manager services, you add them to a service profile. You can apply additional configuration in the service profile.
| 1 |
Open the Cisco Unified CM Administration interface. |
| 2 |
Select User Management > User Settings > Service Profile. |
| 3 |
Enter a name for the service profile in the Name field. |
| 4 |
Select Make this the default service profile for the system if you want the service profile to be the default for the cluster. |
| 5 |
Add your UC services under Voicemail Profile and CTI Profile. |
| 6 |
Set Credential source for voicemail service to Unified CM - IM and Presence. |
| 7 |
Complete any additional configuration and then click Save. |
What to do next
You must assign the configured service profile to end user accounts in Unified CM.
Voicemail Icon Indicators in Webex App
The Unity Connection server's web version of Visual Voicemail provides checkboxes for the following attributes when a voicemail is composed. The corresponding icons appear in Webex App next to the voice message entry in a user's visual voicemail list.
-
 Exclamation—Indicates an urgent, important voice message.
 -
 Lock—Indicates a secure voice message. Each time you play the message, it is downloaded and then the local file is deleted when you're finished.
 -
 Key—Indicates a private voice message. You cannot forward private messages to other people.
Service discovery options
Service discovery enables clients to automatically detect and locate services on your enterprise (internal) and MRA (external) network. You can configure service discovery using one of the following options.
|
Option |
Description |
|---|---|
|
The client automatically locates and connects to services. This is the recommended option. | |
|
Manual connection settings provide a fallback mechanism when service discovery is not used. |
We support SRV look up over internal and MRA environments. Service discovery enables clients to automatically detect and locate services on or outside your enterprise network. Clients query domain name servers to retrieve service (SRV) records that provide the location of servers. See the DNS SRV guidance that follows for internal and external environments.
Configure DNS SRV records
Before you begin
Review your SRV record requirements in the Service Discovery chapter of the Planning Guide for Cisco Jabber.
|
Create the SRV records for your deployment:
|
Example of an SRV record
_cisco-uds._tcp.DOMAIN service location:
priority = 0
weight = 0
port = 8443
svr hostname=_cisco-uds._tcp.example.com
What to do next
Test SRV records
After creating your SRV records test to see if they are accessible.
You can also use the SRV check tool on the Collaboration Solutions Analyzer site if you prefer a web-based option.
| 1 |
Open a command prompt. |
| 2 |
Enter nslookup. The default DNS server and address is displayed. Confirm that this is the expected DNS server. |
| 3 |
Enter set type=SRV. |
| 4 |
Enter the name for each of your SRV records. For example,
|
Authentication options
SAML SSO in the client
For more information about integrating SSO with Unified CM so that Webex App users can sign in using a single set of credentials, see the SAML SSO Deployment Guide for Cisco Unified Communications Applications. For cloud (Webex Control Hub) configuration, see Single Sign-On Integration With Webex Control Hub.
Authenticate with the LDAP server
Perform this procedure if you want to enable LDAP authentication so that end user passwords are authenticated against the password that is assigned in the company LDAP directory. LDAP authentication gives system administrators the ability to assign an end user a single password for all company applications. When users sign in to the client, Webex App routes that authentication to Cisco Unified Communications Manager. Cisco Unified Communications Manager then sends that authentication to the directory server.
| 1 |
Open the Cisco Unified CM Administration interface. |
| 2 |
Select . |
| 3 |
Select Use LDAP Authentication for End Users. |
| 4 |
Specify LDAP credentials and a user search base as appropriate. See the Cisco Unified Communications Manager Administration Guide for information about the fields on the LDAP Authentication window. |
| 5 |
Select Save. |
Set parameters on phone configuration for desktop clients
The client can retrieve configuration settings in the phone configuration from the following locations on Cisco Unified Communications Manager:
- Enterprise Phone Configuration
-
Applies to the entire cluster.
For users with only IM and Presence Service capabilities (IM only), you must set phone configuration parameters in the Enterprise Phone Configuration window.
- Common Phone Profile Configuration
-
Applies to groups of devices and takes priority over the cluster configuration.
- Cisco Unified Client Services Framework (CSF) Phone Configuration
-
Applies to individual CSF desktop devices and takes priority over the group configuration.
Configure Unified CM end users for Calling in Webex App (Unified CM)
For Calling in Webex App (Unified CM) to work, you must create new users or configure existing users on Unified CM with the following settings.
If you use LDAP synchronization, these settings may already be in place. If setting up a new LDAP synchronization, see LDAP Synchronization Overview
in the On-Premises Deployment for Cisco Jabber documentation at https://www.cisco.com/c/en/us/support/unified-communications/jabber-windows/products-installation-guides-list.html.
| 1 |
From Cisco Unified CM Administration, go to User Management > End Users, choose any criteria, click Find, and then open the user account that you want to configure. |
| 2 |
Verify that Mail ID contains the user's email address. If you're using Server Information for configuration and not SRV records, your users' Webex App email addresses must match their Unified CM email addresses—at a minimum, the user ID portion before the domain must match. |
| 3 |
Under the user's Service Settings, check the Home Cluster checkbox. Configure this setting on the Cisco Unified Communications Manager where each user is homed and where their devices are registered. |
| 4 |
(Optional) Choose your service profile from the UC Service Profile drop-down list that you created earlier (with CTI service and voicemail) if you need to make user-level overrides. |
| 5 |
Save your changes, and then you'll assign applicable roles to the user. |
| 6 |
Click Add to Access Control Group. |
| 7 |
Click the corresponding check box for each access control group that you want to assign to the end users. At a minimum you should assign the user to the following access control groups:
Certain phone models require additional control groups, as follows:
|
What to do next
Associate devices to the user.
Create softphones workflow
| 1 |
Use one of these options to create softphones for users:
We recommend using the auto-provisioning feature in Control Hub. This feature allows the users to self-provision the devices for Calling in Webex (Unified CM) with zero or minimal intervention. This feature avoids over-provisioning of multiple devices in Unified CM that helps to minimize the impact on cluster scaling and licensing usage. Devices are auto created in Unified CM, when a user provisioned for Calling in Webex (Unified CM) signs in with their registered email address or User ID to Webex Apps. Create at least one device for every user that wants to use Webex App in softphone mode. You can add one softphone device for any supported Webex App platforms that the users are on—for example, appropriate device types for desktop, mobile and tablet. |
| 2 |
Add a directory number to the device For each device you create, add a directory number. |
| 3 |
Associate users with devices. |
| 4 |
Configure the phone security profile for encrypted calls Complete this task to set up secure phone capabilities for all devices and Webex App. |
Create and configure Webex App softphone devices
To make the Webex App a softphone client, create at least one device for every user that you're configuring for Calling in Webex App (Unified CM). Webex App for desktop and mobile registers to Unified CM using the same softphone device types as Cisco Jabber.
If you want any user to only have desk phone control and no softphone functionality, you do not need to create a desktop CSF device for them.
| 1 |
Log in to the Cisco Unified CM Administration interface. | ||||||||||
| 2 |
Select .
Find and List Phones window opens.
| ||||||||||
| 3 |
Select Add New. | ||||||||||
| 4 |
From the Phone Type drop-down list, select the option that is applicable to the device type you are configuring and then select Next. For Webex App users, you can only create one type of device per platform for a user, although you can create multiple devices for each user. For example, you can create one dual mode mobile device and one CSF device but not two CSF devices.
For more information about how Webex App identifies Android devices, see Android Devices and Density-Independent Pixels. Users can be signed into phone service on one device type for each platform (for example, Webex App for a Windows device and Webex App for an iPhone). Users can't be signed into phone service on more than one device type on the same platform (for example, Webex App for an iPad and Webex App for an Android tablet). While Chromebook users require a TAB device to use Calling in Webex App (Unified CM), phone service does work for a user with both a Chromebook and an Android phone signed in at the same time. | ||||||||||
| 5 |
From the Owner User ID drop-down list, select the user for whom you want to create the device. | ||||||||||
| 6 |
In the Device Name field, use the applicable format to specify a name for the device:
You need to deploy Mobile and Remote Access (MRA) on Expressway if your Webex App users need to connect outside of the corporate network. | ||||||||||
| 7 |
For mobile devices only (TCT, BOT, and TAB), in the Product Specific Configuration Layout section, enter any designated emergency numbers in Emergency Numbers to route emergency calls through the user's mobile provider. You can enter a comma-separated list of additional emergency numbers that users can direct dial. These numbers must contain only numerical digits; we do not allow spaces, dashes, or other character.
Emergency numbers as defined on the device are always dialed direct using the mobile network instead of through the enterprise environment. Use direct-dial numbers for users who frequently travel to countries other than the country of their mobile network provider, if the emergency number differs depending on the location, or if your organization uses a dedicated security number. | ||||||||||
| 8 |
Select Save. | ||||||||||
| 9 |
Click Apply Config. |
What to do next
Add one or more Directory Numbers (lines) to the softphone device.
Android Devices and Density-Independent Pixels
Webex App uses density-independent pixels (dp) to identify Android devices. A dp is a unit of length for screen size, typically used in mobile software to scale an app display to different screen sizes. Devices with displays that are 600dp or greater are identified as tablets; devices with tess than 600dp are identified as phones.
-
Tablets (600dp or greater)—The device shows the Tablet UI (left and right layout, the right panel shows the space chat content or profile detail page), and we choose the TAB softphone device type in Unified CM.
-
Phones (less than 600dp)—The device shows the Phone UI (vertical layout), and we choose the BOT softphone device type in Unified CM.
For more information, see the Android developer documentation.
Add a directory number to the device
After you create and configure each device, you must add a directory number to the device. This topic provides instructions on adding directory numbers using the menu option.
Before you begin
Create a device.
| 1 |
Locate the Association Information section on the Phone Configuration window. |
| 2 |
Click Add a new DN. |
| 3 |
In the Directory Number field, specify a directory number. |
| 4 |
In the Users Associated with Line section, click Associate End Users. |
| 5 |
In the Find User where field, specify the appropriate filters and then click Find. |
| 6 |
From the list that appears, select the applicable users and click Add Selected. |
| 7 |
Specify all other required configuration settings as appropriate. |
| 8 |
Select Apply Config. |
| 9 |
Select Save. |
Associate users with devices
Before you begin
A softphone device for Webex App should not be associated to multiple users if you intend to use different service profiles for these users.
| 1 |
Associate users with devices. |
| 2 |
Set the User Owner ID field in the device configuration. |
Configure the phone security profile for encrypted calls
You can optionally set up secure phone capabilities for all devices and Webex App instances. Secure phone capabilities provide secure SIP signaling and secure media streams.
If you enable secure phone capabilities for users, device connections to Cisco Unified Communications Manager are secure. However, calls with other devices are secure only if both devices have a secure connection. Secure call support requires Unified CM 12.5 and later.
Before you begin
-
You must use Unified CM Release 12.5 or later and we support only SIP OAuth with Webex App. CAPF is not supported. For more details, see the chapter on SIP OAuth in the Feature Configuration Guide for Cisco Unified Communications Manager at https://www.cisco.com/c/en/us/support/unified-communications/unified-communications-manager-callmanager/products-installation-and-configuration-guides-list.html.
-
For conference calls, ensure that the conferencing bridge supports secure phone capabilities. If the conferencing bridge does not support secure phone capabilities, calls to that bridge are not secure. Likewise, all parties must support a common encryption algorithm for the client to encrypt media on conference calls.
| 1 |
In Cisco Unified Communications Manager, select . |
| 2 |
Select Add New. |
| 3 |
From the Phone Type drop-down list, select the option that is applicable to the device type you are configuring and then select Next.
|
| 4 |
In the Name field of the Phone Security Profile Configuration window, specify a name for the phone security profile. |
| 5 |
For Device Security Mode, choose Encrypted. The SIP connection is over TLS using AES 128/SHA encryption. The client uses Secure Real-time Transport Protocol (SRTP) to offer encrypted media streams. |
| 6 |
Check Enable Oath Authentication |
| 7 |
Click Save. |
What to do next
You can use Webex App for Windows or Mac to make a call and confirm the secure calling setup. During
the call, you'll see a lock icon ![]() at the top right of your calling window, letting you know that
the call is secure.
at the top right of your calling window, letting you know that
the call is secure.
Configure push notifications and recommended settings
With Push Notifications, your deployment uses Google or Apple's cloud-based Push Notification service to push voice calls, video calls, and instant message notifications to Cisco Webex App for iOS and Android clients that are running in the background.
If your calling environment uses voicemail and Single Number Reach (SNR), we also recommend some timer changes to optimize the overall configuration.
Before you begin
Make sure that Unified CM and Expressway are on a support minimum version for Push Notifications. See Call control environment requirements.
| 1 |
From Cisco Unified CM Administration, go to . |
| 2 |
Check Enable Push Notifications. For more information, see the Push Notifications Deployment Guide at https://www.cisco.com/c/en/us/td/docs/voice_ip_comm/cucm/push_notifications/cucm_b_push-notifications-deployment-guide.html. |
| 3 |
If you have voicemail configured, we recommend that you go to , and change No Answer Ring Duration (seconds) to 25 or greater. If a voicemail server is configured, the timer for no answer forward to voicemail is 12 seconds. Push notifications take approximately 8 seconds, which leaves only 4 seconds for ringing if the duration value isn't changed.
|
| 4 |
If you have SNR configured, we recommend that you go to Device > Remote Destination, open any entries, and then change the Wait seconds before ringing this phone when my business line is dialed to 13 or greater. Upon receive incoming call notification, Webex App must register to Unified CM quickly before this wait timeout. Otherwise, the call rings the phone itself and not Webex App. |
Set client configuration parameters (releases 12.5 and later)
Set client configuration parameters and assign to service profiles in Unified CM.
Before you begin
You must ensure the required Unified CM configuration is in place for the supported features. See the following documentation for guidance:
-
Hunt Groups in the System Configuration Guide for Cisco Unified Communications Manager.
-
Call Pickup in the Feature Configuration Guide for Cisco Unified Communications Manager.
| 1 |
Define configuration parameters Unified CM allows you to add, search, display, and maintain information about UC Services including client configuration. |
| 2 |
Assign Client Configuration to Service Profile Unified CM allows you to assign client configuration to users through service profiles. |
Define configuration parameters
Unified CM (Releases 12.5 and later) allows you to add, search, display, and maintain information about UC Services including Webex App client configuration, which is provided by the jabber-config.xml file.
| 1 |
Open the Cisco Unified CM Administration interface. |
| 2 |
Select . |
| 3 |
Choose one:
|
| 4 |
Select Next. |
| 5 |
Enter a name in the UC Service Information section, refer to Unified CM Help for more requirements. |
| 6 |
Enter the parameters in the Jabber Configuration Parameters section. For more information, see Policy parameters. |
| 7 |
Select Save. |
Assign Client Configuration to Service Profile
Unified CM allows you to assign client configuration to users through service profiles.
| 1 |
Open the Cisco Unified CM Administration interface. |
| 2 |
Select . |
| 3 |
Select Add New or select the existing service profile you want to assign the Webex App client configuration to. |
| 4 |
Select the name of the configuration you want to apply to the profile in the section Jabber Client Configuration (jabber-config.xml) Profile. |
| 5 |
Select Save. |
Create and host client configuration files (releases earlier than 12.5)
Create client configuration files and host them on the Cisco Unified Communications Manager TFTP service.
Before you begin
You must ensure the required Unified CM configuration is in place for the features that the config file supports. See the following documentation for guidance:
-
Hunt Groups in the System Configuration Guide for Cisco Unified Communications Manager.
-
Call Pickup in the Feature Configuration Guide for Cisco Unified Communications Manager.
| 1 |
Understand the proper formatting and other requirements for XML config files. |
| 2 |
Reference the table for the policy parameters that you can use to enable specific features for users. |
| 3 |
Configure the clients for users in your deployment. |
| 4 |
Apply different configuration to different set of users. |
| 5 |
Host the configuration files on your TFTP server. |
| 6 |
Restart the TFTP server before the client can access the configuration files. |
XML config file requirements
Note the following configuration file requirements:
-
Configuration filenames are case-sensitive. Use lowercase letters in the filename to prevent errors and to ensure that the client can retrieve the file from the TFTP server.
-
Use UTF-8 encoding for the configuration files.
-
The client cannot read configuration files that do not have a valid XML structure. Check the structure of your configuration file for closing elements and correct nesting of elements.
-
Use only valid XML character entity references in your configuration file. For example, use
&instead of&. If your XML contains invalid characters, the client cannot parse the configuration file.To validate your configuration file, open the file in Microsoft Internet Explorer.
-
If Internet Explorer displays the entire XML structure, your configuration file is valid.
-
If Internet Explorer displays only part of the XML structure, your configuration file likely contains invalid characters or entities.
-
Create global configurations
Calling in Webex App (Unified CM) leverages the existing Jabber configuration XML file functionality. You can use the file to enable specific calling features (hunt groups and call pickup) for Webex App users in your organization.
Before you begin
If you already deployed Jabber in the past, you have a jabber-config.xml file on your Unified CM TFTP server. You can confirm by opening http://tftp_server_address:6970/jabber-config.xml in your browser (where tftp_server_address is the server FQDN or IP address of your publisher) and see if a file downloads.
If you have the required policy parameters already specified, no further action is needed in the config file.
Webex App and Jabber share the same jabber-config.xml file. Webex App only honors a subset of Jabber parameters in that file, as documented in this guide.
| 1 |
Either create a file named jabber-config.xml with any text editor or open the file you downloaded.
Unified CM 12.5 and later lets you create the file in the administration interface. |
| 2 |
Define the required configuration parameters in jabber-config.xml under
|
Create group configurations
Group configuration files apply to subsets of users and are supported on Webex App for desktop (CSF devices) and on Webex App for mobile devices. Group configuration files take priority over global configuration files.
If you provision users with CSF devices, specify the group configuration filenames in the Cisco Support Field field on the device configuration. If users do not have CSF devices, set a unique configuration filename for each group during installation with the TFTP_FILE_NAME argument.
Before you begin
If the structure of your configuration file is not valid, the client cannot read the values you set. Review the XML samples in this chapter for more information.
| 1 |
Create an XML group configuration file with any text editor. The group configuration file can have any appropriate name; for example, |
| 2 |
Define the required configuration parameters in the group configuration file. |
| 3 |
Add the group configuration file to applicable CSF devices. |
| 4 |
Host the group configuration file on your TFTP server. |
Host configuration files
We recommend hosting configuration files on the Cisco Unified Communications Manager TFTP server, which is where the device configuration file resides.
| 1 |
From Cisco Unified OS Administration, go to , and then click Upload File. If your environment has multiple TFTP servers, ensure that the configuration file is the same on all TFTP servers. |
| 2 |
Click Browse, choose the You should leave an empty value in the Directory text box so that the configuration file resides in the default directory of the TFTP server. |
Restart TFTP server
You must restart your TFTP server before the client can access the configuration files.
| 1 |
From the drop-down on the top right, click Cisco Unified Serviceabilty, and then sign in. |
| 2 |
Click , and then choose your Unified CM publisher from the Server drop-down. |
| 3 |
Click Go, then scroll to CM Services, and click Cisco Tftp. |
| 4 |
Scroll to the top, click Restart, and then click OK. You'll see a message that the service restart was successful. If your environment has multiple TFTP servers, ensure that the configuration file is the same on all TFTP servers. |
What to do next
To verify that the configuration file is available on your TFTP server, open the configuration file in any browser. Typically, you can access the global configuration file at the following URL: http://tftp_server_address:6970/jabber-config.xml
Create global configurations
Calling in Webex App (Unified CM) leverages the existing Jabber configuration XML file functionality. You can use the file to enable specific calling features (hunt groups and call pickup) for Webex App users in your organization.
Before you begin
If you already deployed Jabber in the past, you have a jabber-config.xml file on your Unified CM TFTP server. You can confirm by opening http://tftp_server_address:6970/jabber-config.xml in your browser (where tftp_server_address is the server FQDN or IP address of your publisher) and see if a file downloads.
If you have the required policy parameters already specified, no further action is needed in the config file.
Webex App and Jabber share the same jabber-config.xml file. Webex App only honors a subset of Jabber parameters in that file, as documented in this guide.
| 1 |
Either create a file named jabber-config.xml with any text editor or open the file you downloaded.
Unified CM 12.5 and later lets you create the file in the administration interface. |
| 2 |
Define the required configuration parameters in jabber-config.xml under
|
Configuration file requirements
- Configuration filenames are case sensitive. Use lowercase letters in the filename to prevent errors and to ensure the client can retrieve the file from the TFTP server.
- You must use utf-8 encoding for the configuration files.
- The client cannot read configuration files that do not have a valid XML structure. Ensure you check the structure of your configuration file for closing elements and that elements are nested correctly.
- Your XML can contain only valid XML character entity references. For example, use
&instead of&. If your XML contains invalid characters, the client cannot parse the configuration file.Open your configuration file in Microsoft Internet Explorer to see if any characters or entities are not valid.
If Internet Explorer displays the entire XML structure, your configuration file does not contain invalid characters or entities.
If Internet Explorer displays only part of the XML structure, your configuration file most likely contains invalid characters or entities.
Configure moving a call into a meeting
When users are in the middle of a call, they may want to invite other coworkers into the discussion while making use of some advanced meetings features. Users can move that call to a meeting. From there, people can raise their hands when they want to share something important, add an emoji to let someone know visually that they agree with what's being said, make use of breakout rooms, and much more.
This feature requires specific Unified CM, Expressway, and Webex App site configuration, as detailed in the following steps.
Before you begin
Moving a call into a meeting won't work in the following Webex Meetings site configurations:
-
Encryption is set to End-to-End or PKI.
-
Telephony is disabled.
-
Video Mesh is deployed and media encryption is enabled.
-
The site is on the slow release channel. See Manage Software Release Channels for more information.
| 1 |
Configure SIP URI dialing on Unified CM. See You must configure a SIP Route Pattern in Unified CM to route calls to your
Webex App site, such as |
| 2 |
Configure a partition and Calling Search Space (CSS), and then use the CSS as a Reroute Calling Search Space (CSS), which evaluates the partition to see if the rerouted destination is allowed. This configuration is required for users who make a call and then want to bring a remote participant into a meeting.
A reroute CSS allows users to forward calls along a different path so that calls can be moved to meetings. The reroute CSS should have access to the SIP Route Pattern that you configured in the first step. |
| 3 |
Configure an Expressway pair to route calls from Unified CM to Webex App. On an Expressway-C, configure two neighbor zones—one for Unified CM, one for an Expressway-E which can reach Webex App. See Configure Expressway for Mutual TLS Authentication for more information. |
| 4 |
Ensure that your Webex Meetings site is on a minimum of 41.3 or later and that Telephony is Enabled. To check your meeting version, use the steps in Determine Your Webex Site Version in Cisco Webex Control Hub. |
| 5 |
Enable the full-featured meetings experience for any users who want to move calls to meetings.
|
| 6 |
Users must set their default Webex App site using these steps. |
| 7 |
In the jabber-config.xml file (Unified CM earlier than 12.5) or the Jabber
Client Configuration profile (Unified CM 12.5 and later), set the
For parameter configuration, see the relevant section in this chapter. For more information on parameters and their values, see Policy parameters in the Appendix. |
Users are enabled for moving calls to meetings in Webex App. The changes take effect immediately, but users in active calls won't be able to move them to meetings until the next call.
For end user information about how to use the feature, see Move a Call into a Meeting.
Calling experience for users workflow
Use these tasks to customize various aspects of the calling experience for users: set login behavior (for on-net and MRA, for example) and set calling behavior.
For information about additional customization features, such as setting virtual backgrounds and prioritizing calling options, see Configure extra features after deployment.
| 1 |
Your UC Manager Profile defaults to your organization's domain. This may mean that users need to manually specify a domain when they sign into Phone Services in Webex App. If you want to override the default and specify a domain, you can set up UC Manager Profiles for the whole organization or for user-level overrides. You can choose either the default option for your organization or manually create a new profile if you want users to sign into Webex App Phones Services with a different domain. |
| 2 |
You can edit your UC Manager Profiles in Control Hub at any time. |
| 3 |
Set up calling behavior and UC manager profiles in Control Hub Your UC manager profiles are tied in with the Calling Behavior setting (either organization-wide or user-level) in Control Hub. When you set the calling behavior, you can also choose the default option or a manual option for UC manager profiles. |
Create a UC manager profile
| 1 |
From the customer view in https://admin.webex.com, go to , and under UC Manager Profiles select Add Profile. |
| 2 |
Add a Profile Name, choose the necessary settings, and then select Save. Voice Services Domain : Enter the domain used for SRV records if the login email domain is not used for service discovery. This is also required for Mobile Remote Access (MRA). UDS Server : Enter the UDS server address if the Webex App account user ID does not match the Unified CM user ID, or if ILS (Intercluster Lookup Service) is not enabled in a multiple Unified CM cluster deployment. |
Set up calling behavior and UC manager profiles in Control Hub
You can use Control Hub to set the calling behavior for specific users in your organization or for your entire organization. For Calling Behavior, you configure this setting for users so that they can use the calling feature set. Webex App first connects to cloud services and retrieves its configuration, including the calling behavior setting.
By default, the Webex App sends DNS SRV queries based on the Webex organization domain (the user email domain). If the Webex domain does not match the existing Voice Services Domain or you have multiple domains without a DNS SRV record for each, you can specify a UC Manager profile as an override setting—either your organization's default or one that you manually configured if you want to specify a different domain for users assigned to a UC Manager profile.
The option is not available if Hybrid Calling is still enabled for users in your organization. You must remove Hybrid Calling from users before you can assign Calling Behavior. See the Prepare Your Environment
chapter for more information.
We recommend that you configure this setting based on your organization's needs—for example, you may want to enable specific users in your organization, have them test out the service, and then configure the service for your entire organization when you're ready.
More information
Control which calling application opens when users make the calls from the Webex App. You can configure the client's calling settings, including mixed-mode deployment for organizations with users entitled with Unified CM, Webex Calling, and users without paid calling services from Cisco.
Depending upon the user’s calling license, the calling behavior options can be set up.
-
For Unified CM licensed users, you can set up to make calls directly from the Cisco Jabber or through the Webex App, and choose the domain (organization domain or UC Manager profile) that gets applied to the users. You can configure the settings at organization level, group level, and user level.
-
For users without paid calling services from Cisco, you can set up third-party applications to initiate calls. By default, all calls through the Webex App use "Call on Webex" option. You can configure the settings at the organization level.
-
For Webex Calling licensed users, the Webex App is the default calling application to make calls. Hence, no specific calling behavior configuration is needed.
Enable calling behavior settings at the organization level
| 1 |
Log in to Control Hub at https://admin.webex.com |
| 2 |
Go to Services > . |
| 3 |
Go to Calling Behavior section and set the calling behavior options for Unified CM Users and Users without Paid Calling Services from Cisco. For Unified CM Users:
For Users without Paid Calling Services from Cisco:
|
Enable calling behavior settings at the group level
You can enable unified CM calling behavior organization settings for a user-group through a Calling template. You can create a template and assign to the user-group. The configuration in the template applies to all users in the group.
To create a template
Before you begin
Make sure that the user has the Unified CM license. For more information, see: Edit service licenses for individual users.
| 1 |
Log in to Control Hub at https://admin.webex.com. |
| 2 |
Go to |
| 3 |
Click Create template. |
| 4 |
In the General section, type the Template name and description. |
| 5 |
Go to the Calling behavior section and update following settings.
|
| 6 |
Click Create template and next. |
| 7 |
Search and select a group for this template in the search box. |
| 8 |
Click Done. To delete the template, click the template and select Delete from the Actions drop-down list. In the Delete template page, check the check box informing you that deleting a template is permanent, and then click Delete. To modify the template, click the template, modify the toggles, and click Save. |
To apply an existing template to a user-group
Few pointers to consider when applying the Calling templates:
-
When a user is on boarded to an organization, the user inherits the settings from the organization-level.
-
If the user is added to a user-group, then the settings from the Calling template apply.
-
If a user belongs to multiple user-groups, then the template with the highest rank (Rank 1) takes the highest precedence and that template settings apply.
-
If the user has individual user settings, then these settings take precedence over user-group or organization-level settings.
See Configure settings templates for more information about managing your templates.
You can apply the existing template either from Group section or Calling section.
To apply template from Group section, see: Configure settings template.
To apply from the Calling section, perform the following steps:
| 1 |
From the customer view in https://admin.webex.com, go to Services in the left navigation bar and then click . |
| 2 |
Click the … icon next to an existing template and then click Apply template. |
| 3 |
Type the group name to which you want to apply the template and then choose the group. |
| 4 |
Click Done. |
Override calling behavior organization settings at the user level
Before you begin
Make sure that the user has the Unified CM license. For more information, see: Edit service licenses for individual users.
| 1 |
Log in to Control Hub at https://admin.webex.com. |
| 2 |
Go to and select the user that you want to modify. |
| 3 |
Select . |
| 4 |
Toggle off the Use organization level settings to override the organization default settings with the user settings. To revert to the organization default settings, toggle on the Use organization level settings. The toggle is visible only when the user is not part of any group and overriding the organization level settings. |
| 5 |
Update the following calling behavior settings:
|
| 6 |
Click Save and confirm Yes. |
Override calling behavior group level settings at the user level
Before you begin
-
Make sure that the user has the Unified CM license. For more information, see: Edit service licenses for individual users.
-
Make sure that the user is a part of a user group with the calling template assigned.
| 1 |
Log in to Control Hub at https://admin.webex.com. |
| 2 |
Go to and select the user that you want to modify. |
| 3 |
Select . |
| 4 |
Update the following calling behavior settings:
|
| 5 |
Click Save and confirm Override setting. |
The Reset option is available only when the inherited settings are overridden for the user.
Manual connection settings
Manual connection settings provide a fallback mechanism when Service Discovery is not used.
When you start Webex App, you can specify the authenticator and server address in the Phone Services window. The app caches the server address to the local application configuration that loads on subsequent starts. Webex App prompts users to enter advanced settings on the initial start if the app cannot get the authenticator and server addresses from the service profile.
Authenticate with phone services in Webex App
If you have DNS SRV implemented, users will be autodiscovered for phone services in the Webex App and they can use their SSO or manual credentials to sign in. If you don't, you can still simplify their sign-in process by configuring a UC manager profile (covered earlier in the guide). If none of these options is in place, users must manually enter a server address for the UDS server or the UC domain (FQDN or IP address of Unified CM) that you provide to them.
Users are authenticated with phone services and can use Calling in Webex App (Unified CM) features.
What to do next
-
Train Your Users—You can direct users to the Supported calling options article or use it in your training materials to assist your users with learning how to use the feature set (such as putting a call on hold in Webex App or using desk phone control) in Calling in Webex App (Unified CM).
-
Troubleshoot Issues—If there are errors with registration, see the troubleshooting material in this guide for more information.
-
Reset Server Information—If the phone services information changes or you need Webex App users to reenter the server information for the Unified CM (for example, moving from a lab to production server), they must reset the database (for desktop, under ). For mobile apps, users must uninstall and reinstall on their devices to reset server information.
Configure extra features after deployment
These extra features are not mandatory for the first-time deployment of Calling in Webex App (Unified CM). However, after you complete the initial deployment steps, you can configure these features for more customization for you and your users. You can refer to the documentation that is linked for each feature for additional guidance.
|
Go to the article links to learn how to configure these additional features:
|
Known issues and limitations with Calling in Webex App (Unified CM)
You can also use the Known Issues article for information that is specific to the Webex App.
Mobile
-
These limitations apply to Wi-Fi to LTE call handoff on Webex for mobile (41.8):
-
This feature only supports active call handover of 1 call.
For multiple concurrent calls on the Webex mobile app, all calls end after the network switch.
-
The sharing capability is lost after the network switch, so the calling user cannot start or receive a share during that call.
-
An active call ends if the network does not recover within 20 seconds.
-
If Call recording is active, the recording is stopped and won't continue after handover.
-
Network handover does not support the following: midcall features (such as hold or transfer), screen share handover, conference call handover, call center features.
-
-
Calling in Webex App (Unified CM) for mobile and proximity pairing do not work together.
-
When running two instances of the app on a mobile platform, a message about another active connection appears.
-
For numbers in a contact card on the mobile apps, users must tap the green video icon to see other users' numbers.
-
For Webex App login and phone services, the web sessions are separated. For example, a user can be prompted two times for authentication even through the same IdP (SSO) is configured for components in your calling environment and the Webex cloud. To fix this issue, you can upgrade your Unified CM and Expressway environment to support the SSO redirect URI enhancement. See the Prepare Your Environment chapter for more information on this recommended configuration.
General
-
Calling in Webex App (Unified CM) does not work alongside Hybrid Calling or Webex Calling. You must disable Hybrid Calling or Webex Calling user enablement before you can enable Calling in Webex App (Unified CM) for your users. See the Prepare Your Environment chapter for more information on how to disable Hybrid Calling for users.
-
Certificates issued with a deprecated signature algorithm (such as SHA-1) do not work; you must use a supported secure signature algorithm such as SHA-256 or later, as documented in the Certificates chapter in the Administration Guide for Cisco Unified Communications Manager.
-
Cross-launch calling app functionality and Calling in Webex App (Unified CM) cannot be configured for a single user. You can use Control Hub to do overrides and set calling behavior for individual users—for example, you may want some users on Calling in Webex App (Unified CM) and some users on a Cisco Jabber app cross-launch.
-
Phone services and coexistence with Jabber:
-
Phone Services can only be used on one device of each type (desktop and mobile). Phone Services cannot be signed in on both Jabber and Webex App at the same time.
-
Jabber and Webex App each try to register as the same softphone device in Unified CM. A registration popup lets you choose which client you want to use for calling.
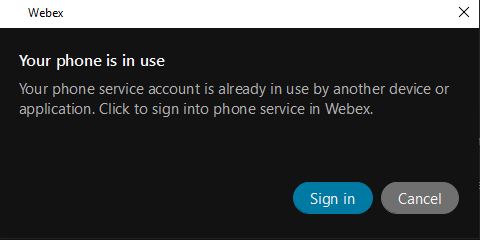
If a user is already registered on one client, and then somehow another client forces registration, that user does not see the dialog on the originally registered client
-
-
Calls through Calling in Webex App (Unified CM) do not leverage Webex Video Mesh nodes.
Manage Calling in Webex Teams (Unified CM)
Configure users to move Jabber contacts and common settings to Webex App
This feature is built into Cisco Jabber and provides a way to migrate contacts in the buddy list and other common user preferences from Jabber to Webex. The data is encrypted. You just need to configure some settings before users see this option pop up automatically in Jabber.
Access call statistics for Calling in Webex App (Unified CM)
During a call, you can access call statistics such as video frame rate, audio codec, packet loss, jitter, and bandwidth usage. An indicator also appears that shows the call environment that you're on (your administrator or support team may need this information for troubleshooting purposes).
Follow the steps or have your users follow the steps in Access call statistics to access statistics for a call in Webex App for desktop or mobile.
Edit a UC manager profile
| 1 |
From the customer view in https://admin.webex.com, go to , and under UC Manager Profiles select the ellipsis (…). |
| 2 |
Choose Edit. |
| 3 |
Make the necessary edits, and select Save. |
Diagnostics in the Webex App
The diagnostics available in the Webex App (desktop and VDI) help you and your users resolve connection issues, check media quality, and collect important troubleshooting information.
When you set up Calling in Webex App (Unified CM), you may encounter issues related to the connection or required settings (such as voice domain and UC services). Using this tool, you can diagnose what services are configured correctly and what is missing. This feature is useful for troubleshooting scenarios and reducing support cases, whether you're migrating to Calling in Webex App (Unified CM) or setting up new users.
When user experience issues, they can access the diagnostics view and export the data to share with you or support.
-
Unified CM Settings—Critical settings (for Jabber migration as well as new user setup) for phone services to work correctly, such as:
-
Unified CM version
-
UC service domain
-
SSO
-
UC services such as voicemail
-
Expressway for MRA
-
-
Media quality—Quality for video, audio, and sharing in both directions
-
Devices—Device information, when users are connected to devices
For shortcut keys to show the diagnostics window, see Keyboard and navigation shortcuts.
Manage Cisco headsets in Control Hub
In the Control Hub devices view, you can get a list of all the Cisco headsets that are registered in your organization for tracking purposes. You can find further details and management options for each headset entry. This information can help you make decisions on whether headsets need to be replaced or troubleshooted.
For more information, see Manage Cisco headsets in Control Hub.
Connection is lost to the Webex cloud
If https://status.webex.com or the health checker show a Webex App cloud full or partial outage, Calling in Webex App (Unified CM) still works for users who are already signed in, as long as the call type is a Unified CM call and goes through Unified CM infrastructure.
Unified CM calling can't happen in the following scenarios when sign in is blocked:
-
First day sign-in for the user
-
Sign out of Webex App then sign in again
Unified CM calling can happen in the following scenarios where the app remains signed in:
-
Quit or exit Webex App and then relaunch—cached data remains (contacts, call history, messages). Unified CM registration and calling aren't affected, but presence when on a call is not sent to other users.
-
Reboot the device that Webex App is running on—cached data remains (contacts, call history, messages). Unified CM registration and calling aren't affected, but presence when on a call is not sent to other users.
Single Number Reach (SNR) workaround
If Unified CM is not reachable from Webex App, users can use the Self Care Portal (a link is available in Webex App) to set up Single Number Reach (SNR) so that calls get routed to mobile through the PSTN. For administrative steps, see the Cisco Unified Mobility Features chapter in the Feature Configuration Guide for Cisco Unified Communications Manager. For user self-care configuration, see the Self Care Portal User Guide.
Troubleshoot issues with Calling in Webex App (Unified CM)
If you see registration issues when trying to use Calling in Webex App (Unified CM), go through these checklist items before you submit a ticket.
| 1 |
Verify that any CTI-RD or Cisco Spark-RD was removed from Unified CM for the user; if not, delete any stray remote devices. |
| 2 |
If your organization is enabled for a different call behavior (such as a cross-launch to another calling app) in Control Hub, disable this feature and reselect Calling in Webex App (Unified CM) because Unified CM registration and cross-launch cannot be enabled together. |
| 3 |
Exit Jabber if it's installed on the same machine, because Jabber and Webex App cannot both be registered to Unified CM in softphone mode at the same time. |
| 4 |
Check other configuration on Unified CM. Some common culprits include the following:
|
What to do next
If you addressed all of these steps and issues still persist, restart Webex App and then choose to submit logs and open a case for the support team to investigate.
Error messages in Webex App
A warning icon appear in the app if Webex App failed to register to Unified CM because of a sign in failure or other reason. A summary of the reason appears next to the icon.

You can hover over the icon to show an error message that may give you clues about what to troubleshoot. You can also click the icon to see if there are any next steps that you have to take to resolve the issue (such as sign into phone services or start a new session).
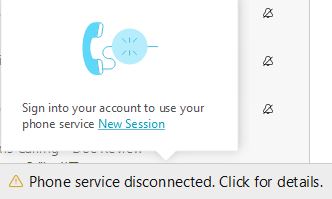
See the Error messages documentation for more information on the errors that may appear in Webex App and how to resolve the problem.


