- Home
- /
- Article

Thanks for your feedback.


 In this article
 Feedback?
Webex Contact Center for salesforce Service Cloud Voice integrates Cisco's robust CCaaS (Contact Center as a Service) with Salesforce's CRM, allowing businesses to manage omnichannel customer interactions (voice, digital) within the Salesforce interface, using Webex AI for virtual agents, transcription, and intelligent routing, transforming agents into "super-agents" with unified data for better customer experiences.
Overview
Webex Contact Center for Salesforce Service Cloud Voice
Webex Contact Center for Service Cloud Voice is an out-of-the-box integration solution that brings the power of Webex Contact Center into the Salesforce Service Cloud Voice Omni-channel agent console.
Before proceeding with the installation, see the following section:
to learn about pre-requisites and limitations of Salesforce Service Cloud Voice and ensure your Salesforce Org is ready to enable and install Webex Contact Center for Service Cloud Voice package.
SCV Voice Connector Release 1 is generally available. This guide includes the setup procedures, partner telephony provisioning, and single sign-on (SSO) configuration.
Pre-requisites and Limitations
Pre-requisites (sub-topic)
User Interfaces: Service Cloud Voice is available in Salesforce Lightning Experience only.
Service Cloud Voice is available in these editions:
- Enterprise
- Unlimited
- Developer
Licenses
-
Customers need to purchase the new A-SF-VOICE add-on license per logged in agent in addition to the Flex 3 Standard or Premium Licenses for Webex Contact Center. For more information see the Flex 3 ordering guide.
- Salesforce Voice for Partner Telephony
Before you turn on Voice, you have to set up the prerequisite services in your org.
- Navigate to Company Information > Permission Set License
- Check for Service Cloud Voice User (Partner Telephony).
All Developer Editions now come with 5 Partner Telephony Licenses available for testing.
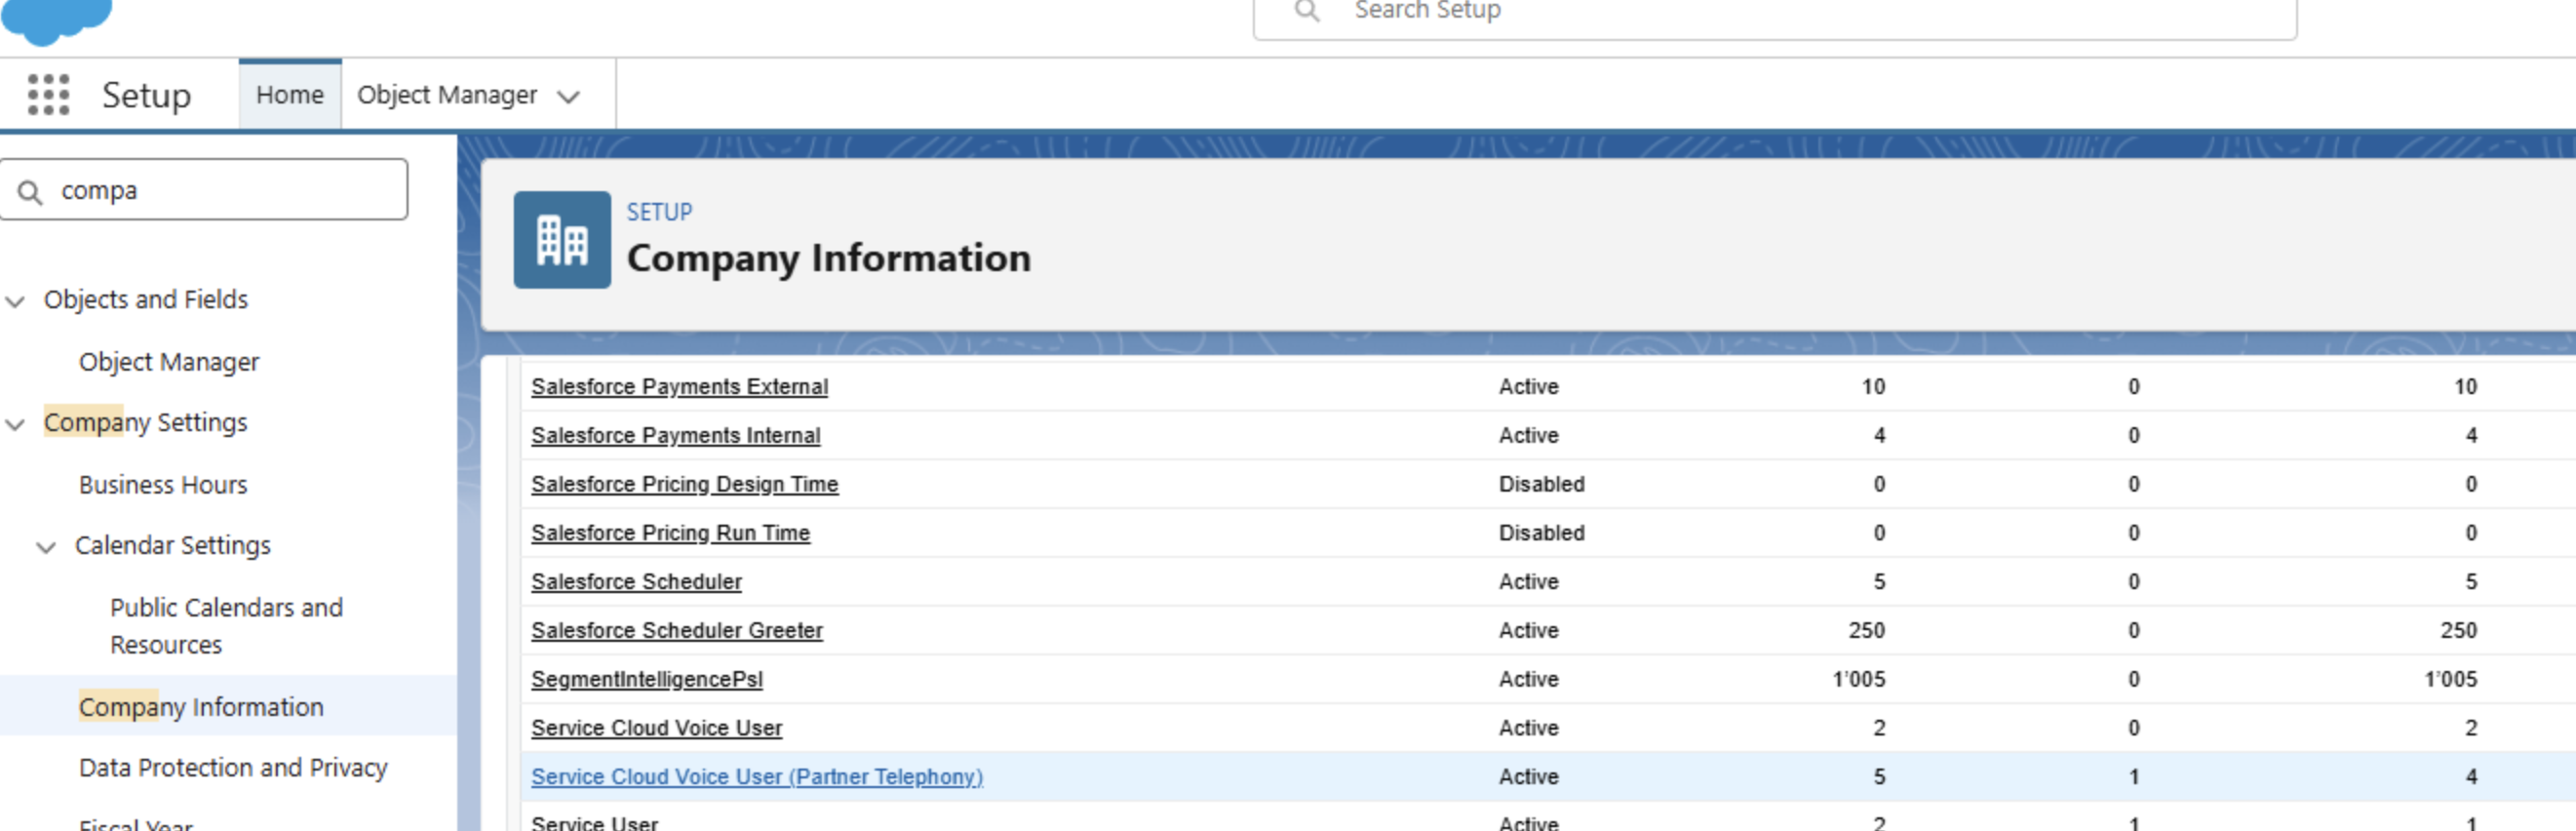
- Check for Service Cloud Voice User (Partner Telephony).
- Alternatively, you can verify this by going to Salesforce Setup and search for
"voice" in the left sidebar.
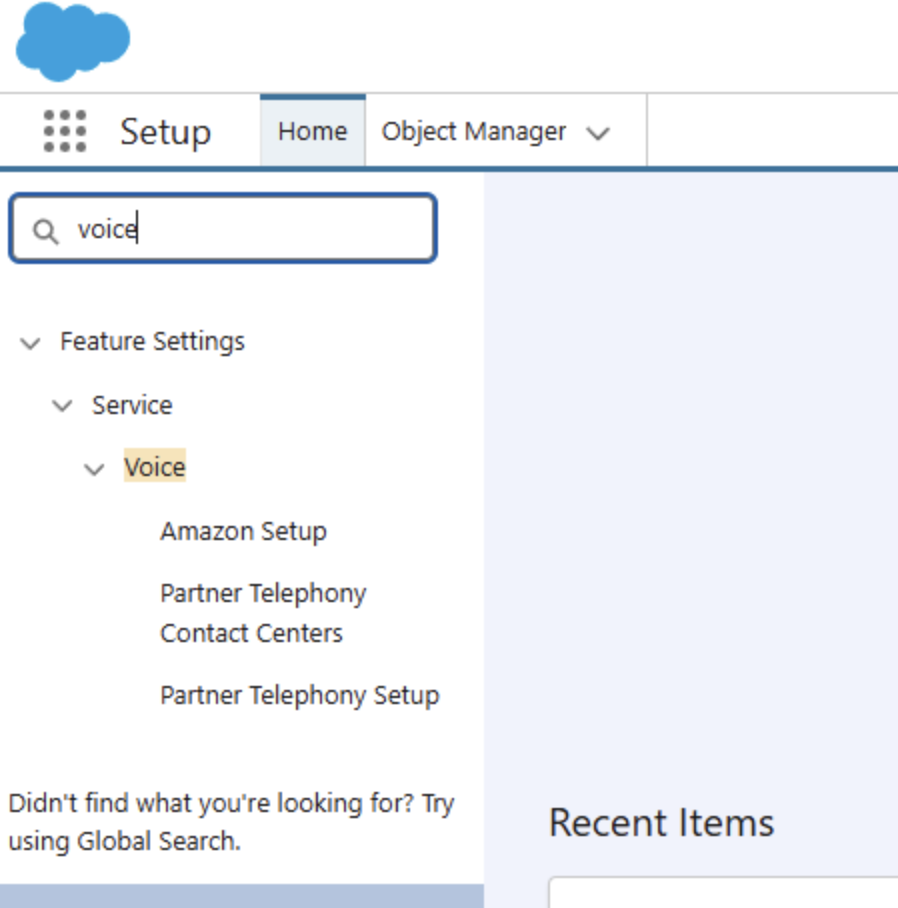
- If "Partner Telephony Contact Centers" appears, you have the SCV license.
- If "Partner Telephony Contact Centers" option is not visible then
"Enable Service Cloud Voice" by following the steps below.
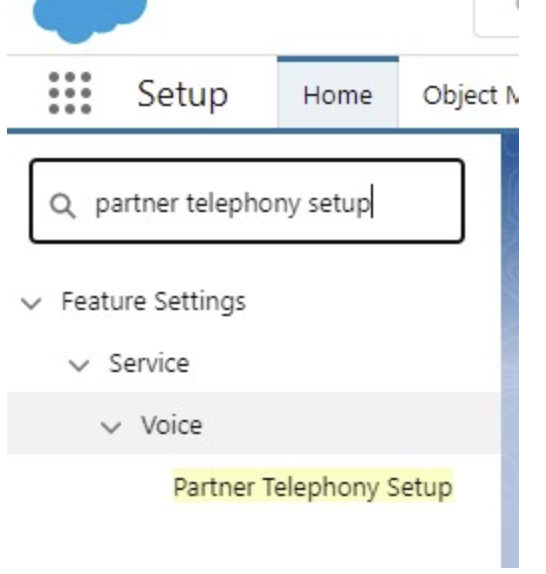
- Go to Salesforce Setup and search and select "Partner Telephony Setup"
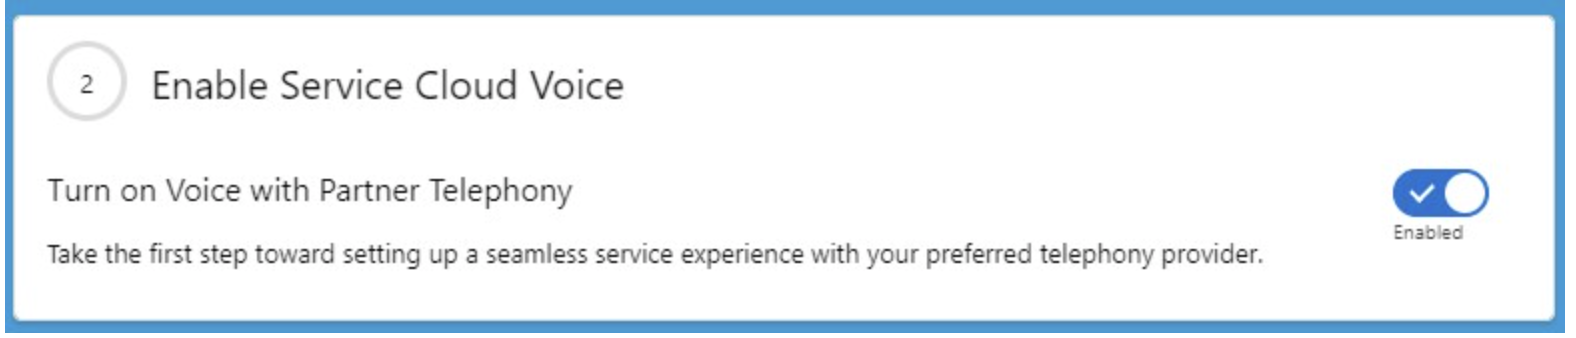
and toggle the button to "Enable Service Cloud Voice".
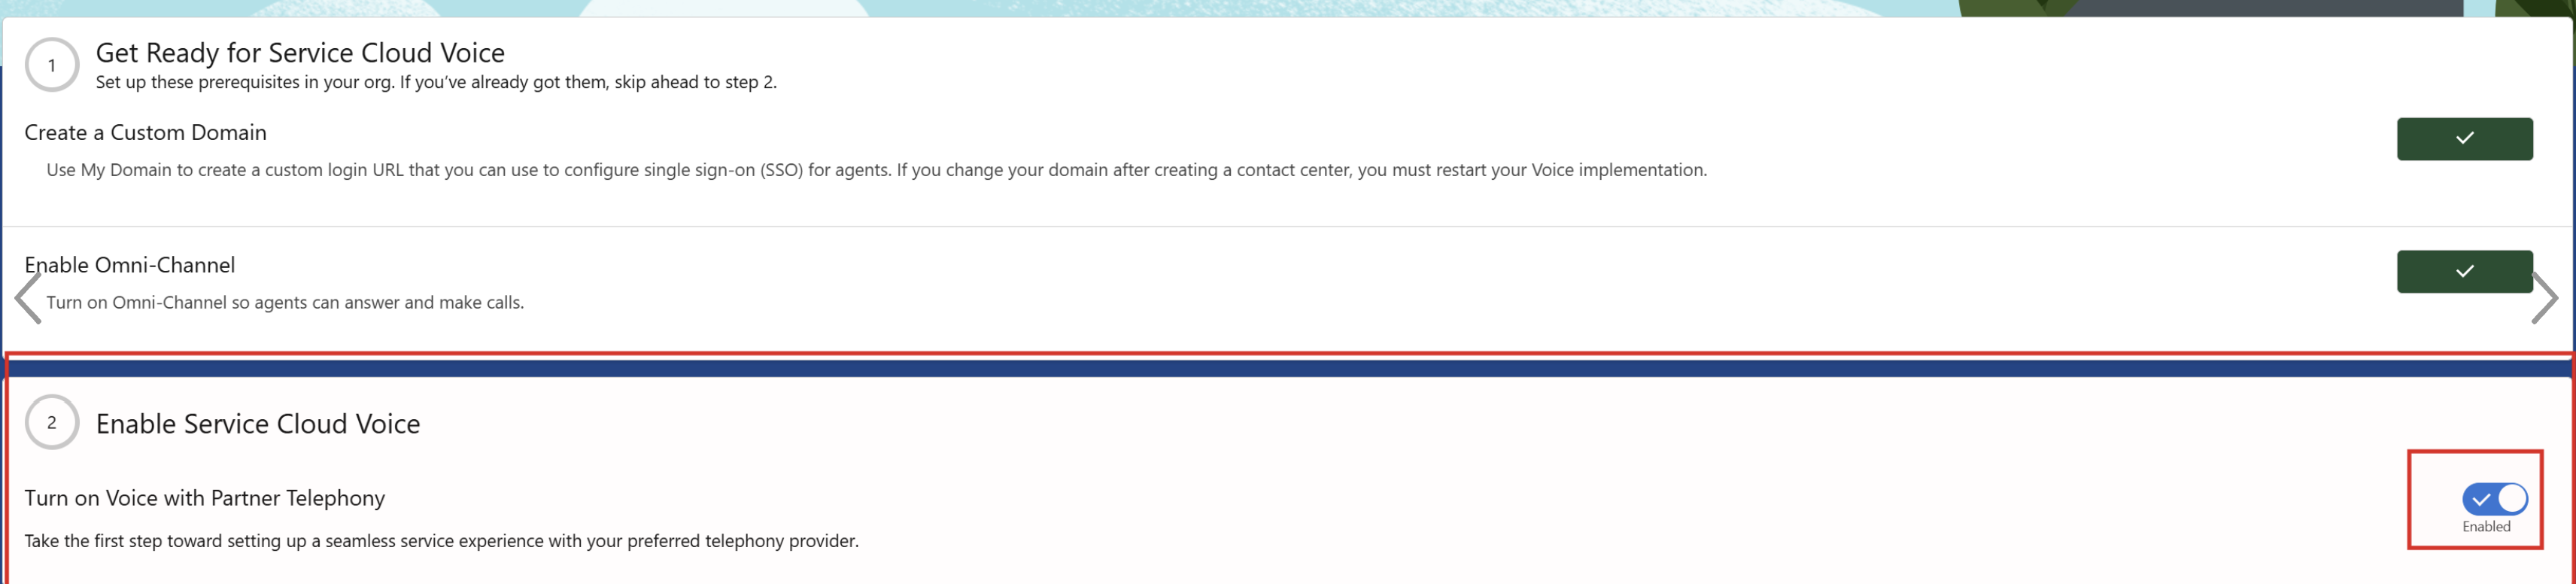
- Enable Omni-Channel to let your agents make and receive calls.
- Go to Salesforce Setup and search and select "Partner Telephony Setup"
and toggle the button to "Enable Service Cloud Voice".
Enable Omni-Channel
If Omni-Channel is already enabled in your org, skip this step.
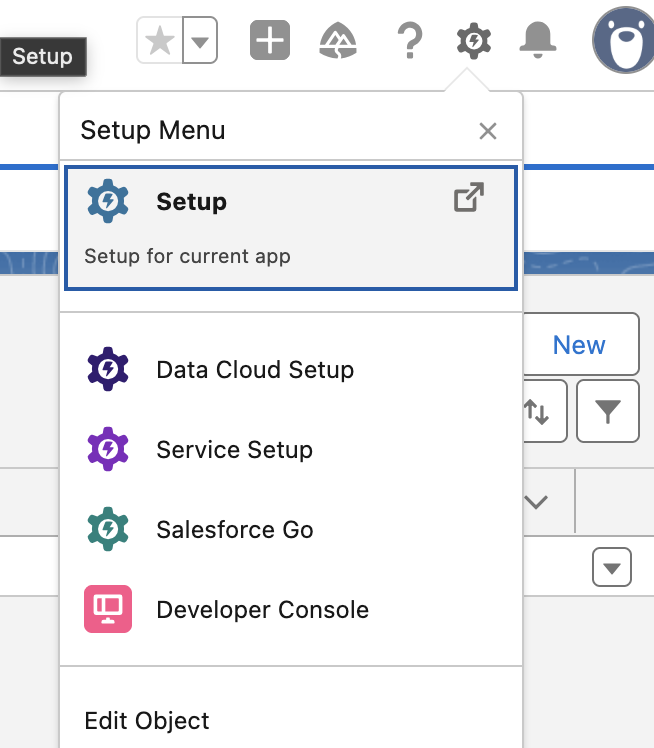
- From Setup, enter Omni-Channel Settings in the Quick Find box,
then select Omni-Channel Settings.
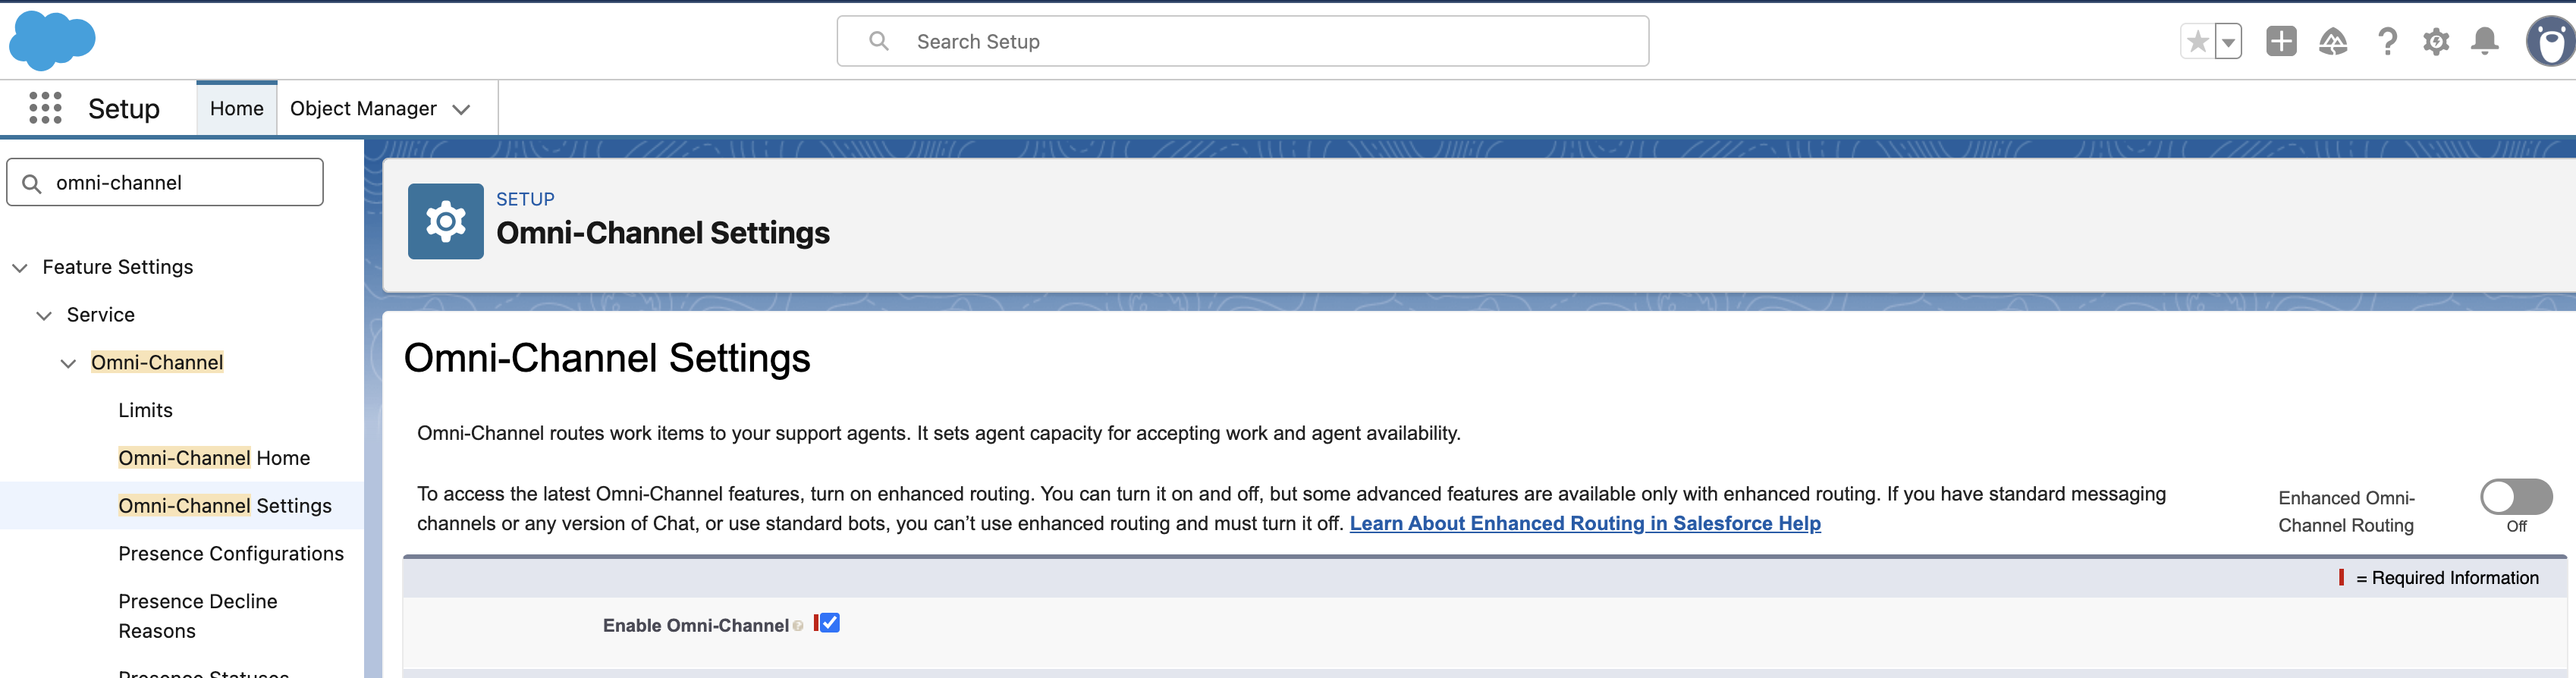
- Select Enable Omni-Channel.
- Click Save.
Limitations
- Voice is available only in Lightning Experience.
- Voice is supported on Service Cloud and Sales Cloud as an add-on license.
- Voice isn’t supported on Salesforce Mobile or on iPad Safari.
- Voice is supported only on the Google Chrome, Microsoft Edge (Chromium) and Mozilla Firefox web browsers. Cookies must be enabled to allow single sign-on (SSO).
- Standard Navigation is not supported.
- Telephony is highly regulated, so check with your Salesforce representative about the availability of Voice in your region.
- Multiparty conference is not supported with the Salesforce Service Cloud Voice connector.
Requirements
Salesforce Package 1.2 and later
For Salesforce Package 1.2 or later, deployment must account for digital and voice integration and WebSocket keep-alive handling.
Idle Codes
Find Idle Codes
| 1 |
Log into the Management Portal. |
| 2 |
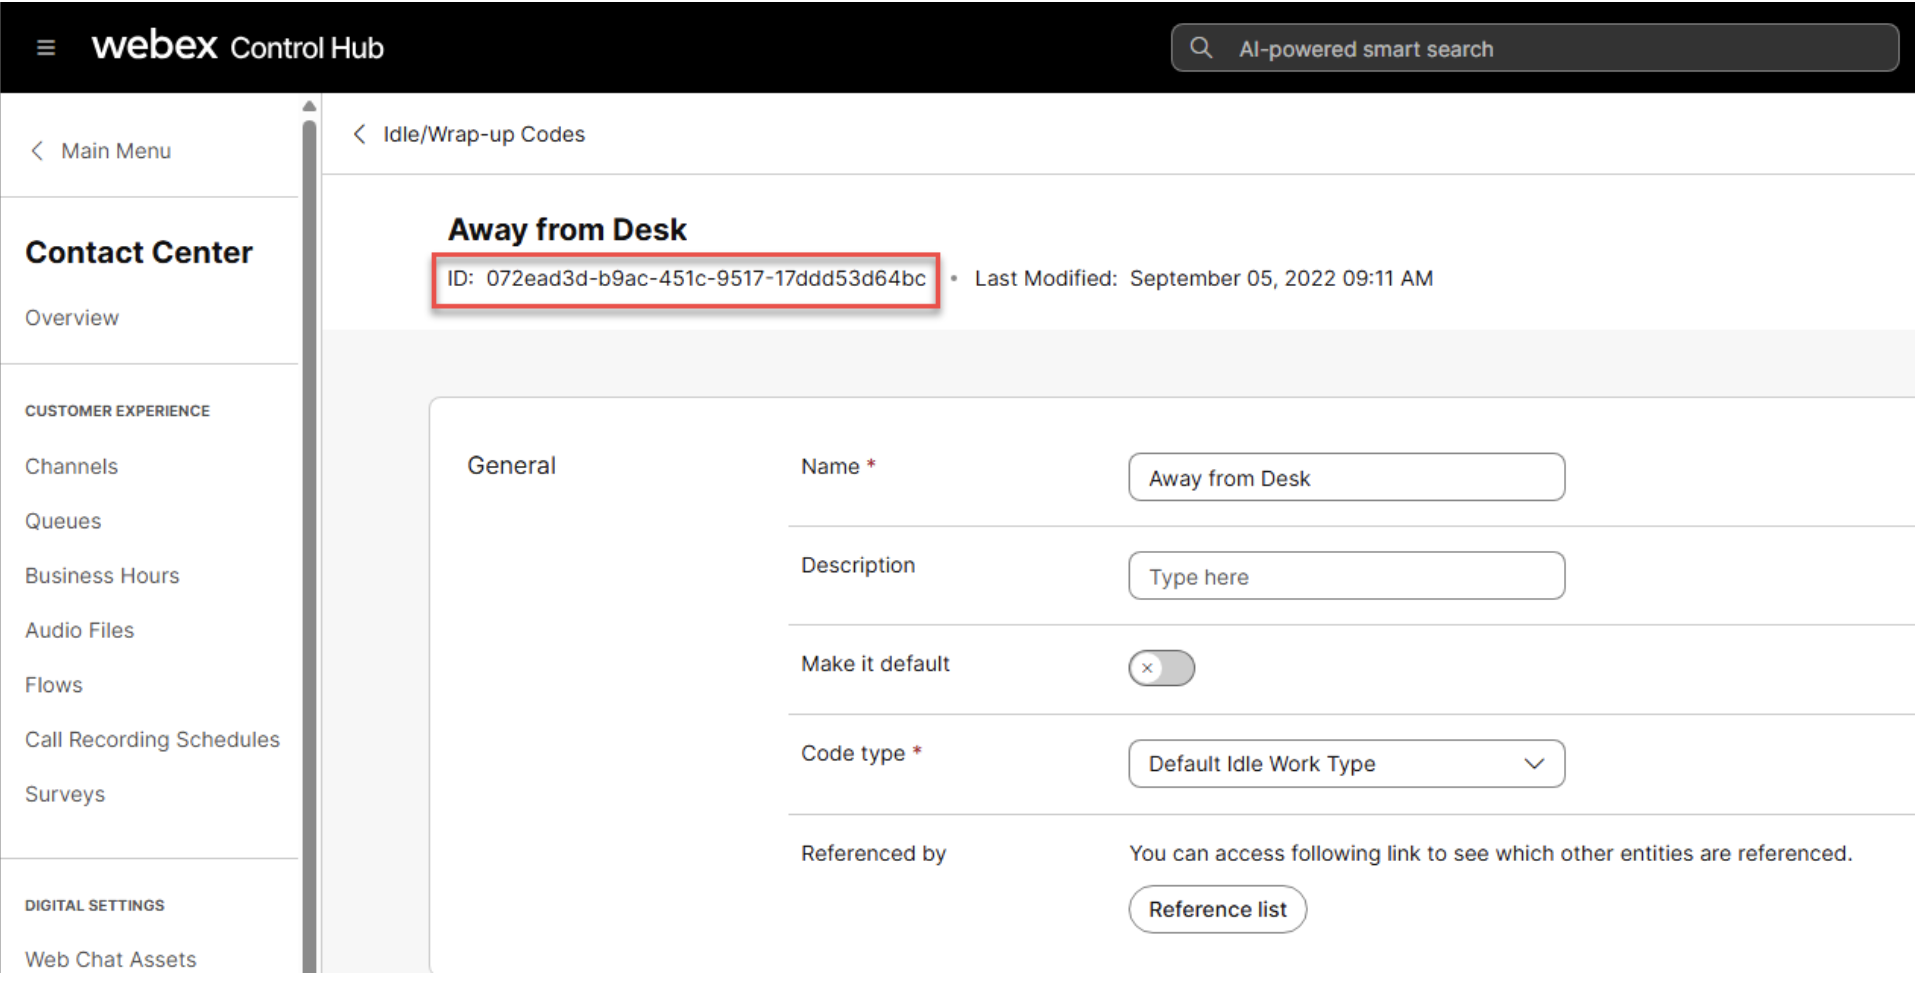
Navigate to Contact Center > DESKTOP EXPERIENCE > Idle/Wrap-up Codes. |
| 3 |
Make sure that the Idle Codes are displayed, otherwise click the filter drop-down button and select Idle Code at the top of the page. |
| 4 |
Click on an Idle Code to open the detail view. There you can find the Idle Code ID.
The IDs can be copied and then used for the Presence State Mapping configuration. One of the IDs has to be used as the Default Cisco Not Ready Reason. |
Rate Limits
This section only applies to the Early Access Package in case a higher number of agents are being tested on the Early Access Package (e.g 0.2). This is NOT required for the GA package.
Webex Contact Center applies standard API rate limits to the Contact Center organization integration. See API Rate Limits for details.
The rate limit needs to be increased. To achieve this:
- Create a ticket with Webex Contact Center Support.
- Specify the Webex Contact Center organization and the required standard integration API rate limit (for calculation, see below).
- Mention that the increase of the API Rate Limit is needed because you are using Webex Contact Center for Service Cloud Voice.
Webex Contact Center for Service Cloud Voice, 15 requests per agent per minute for the Contact Center organization integration. To calculate a good starting point for your rate limit, you can use the following formula:
Rate limit per minute = 15 * maximum number of agents working in parallel in the Webex Contact Center organization
Integrate
Installation
Before proceeding with the installation, see Pre-requisites and Limitations section to learn about pre-requisites and limitations of Salesforce Service Cloud.
Install and Configure Webex Contact Center for Service Cloud Voice
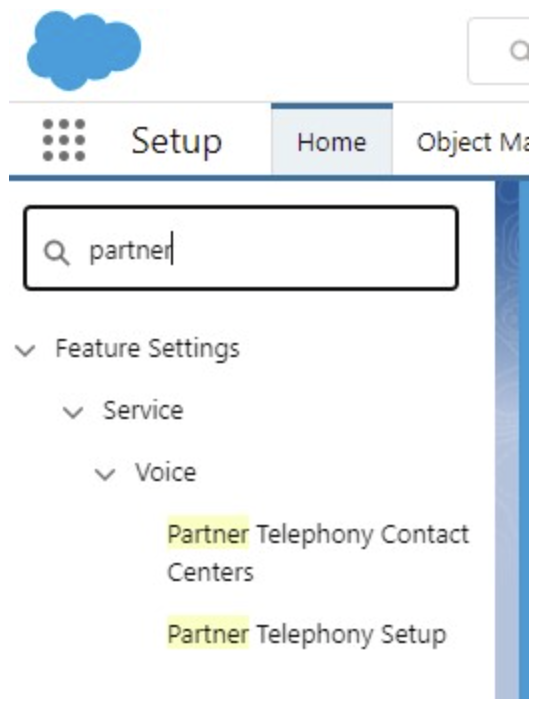
When a Service Cloud Voice for Partner Telephony license is obtained, the Partner Telephony Setup page appears in the Setup menu.
Further information can be found in the Salesforce official reference ( direct link).
| 1 |
From Setup, enter
|
| 2 |
Enable Turn on Voice with Partner Telephony. The Partner Telephony Contact Centers page appears in the Setup menu.
If you plan to deploy the package in a Salesforce sandbox, replace the
|
Install the package
To install the package:
| 1 |
Open the provided link of the package to start the installation. |
| 2 |
Login to the Salesforce organization where the package should be installed. |
| 3 |
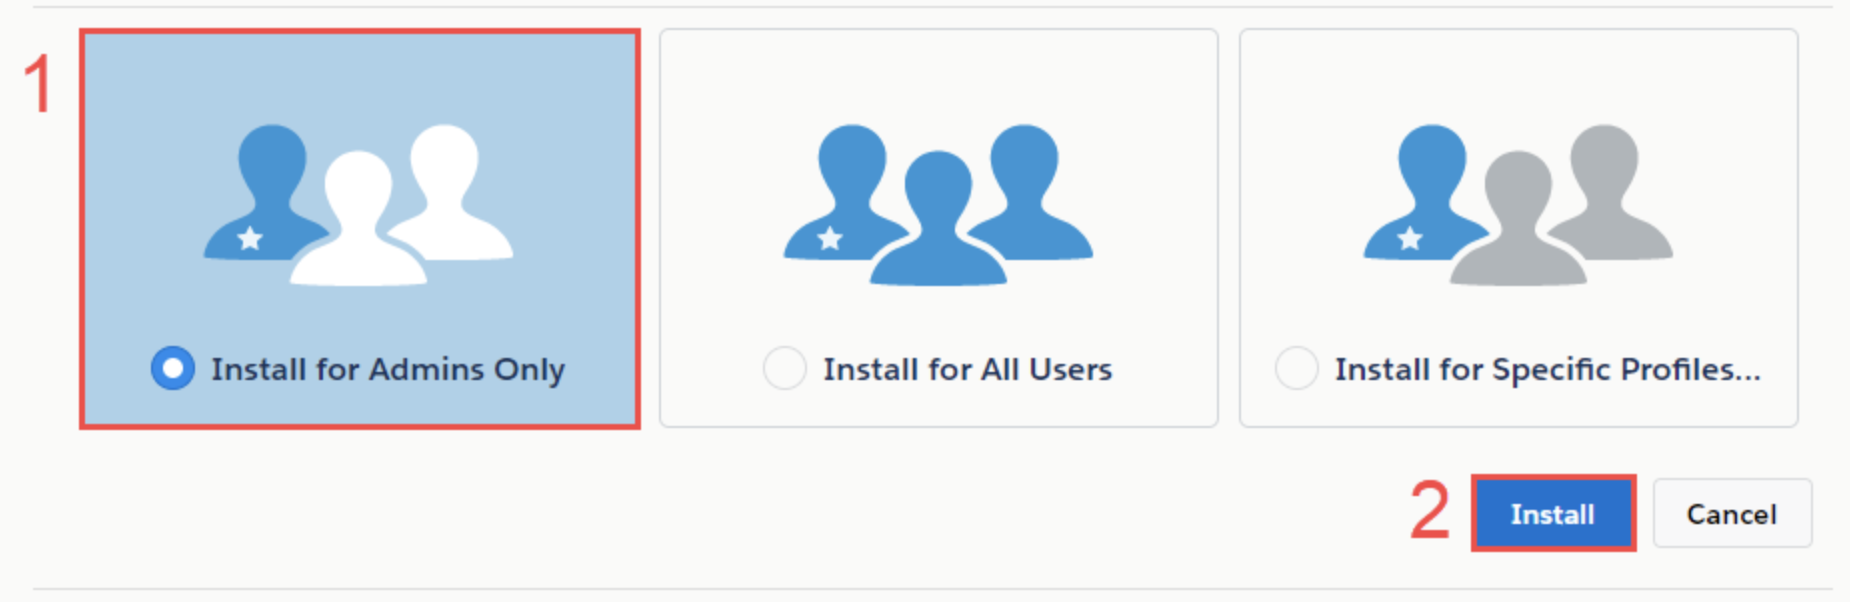
In the installation wizard, choose the security option "Install for Admins Only" (1) and click Install (2). Determine which users get certain permissions to the objects and components that come with the Webex Contact Center for Service Cloud Voice package. Additionally, grant them these permissions; the Permission Sets that come with the Webex Contact Center for Service Cloud Voice package aid this process. Package installation wizard – Welcome screen appears: The installation package is not directly accessible via Salesforce AppExchange. Customers must use the AppExchange listing's 'Get it Now' button, which opens a contact form to request the installation link and Cisco activation. |
| 4 |
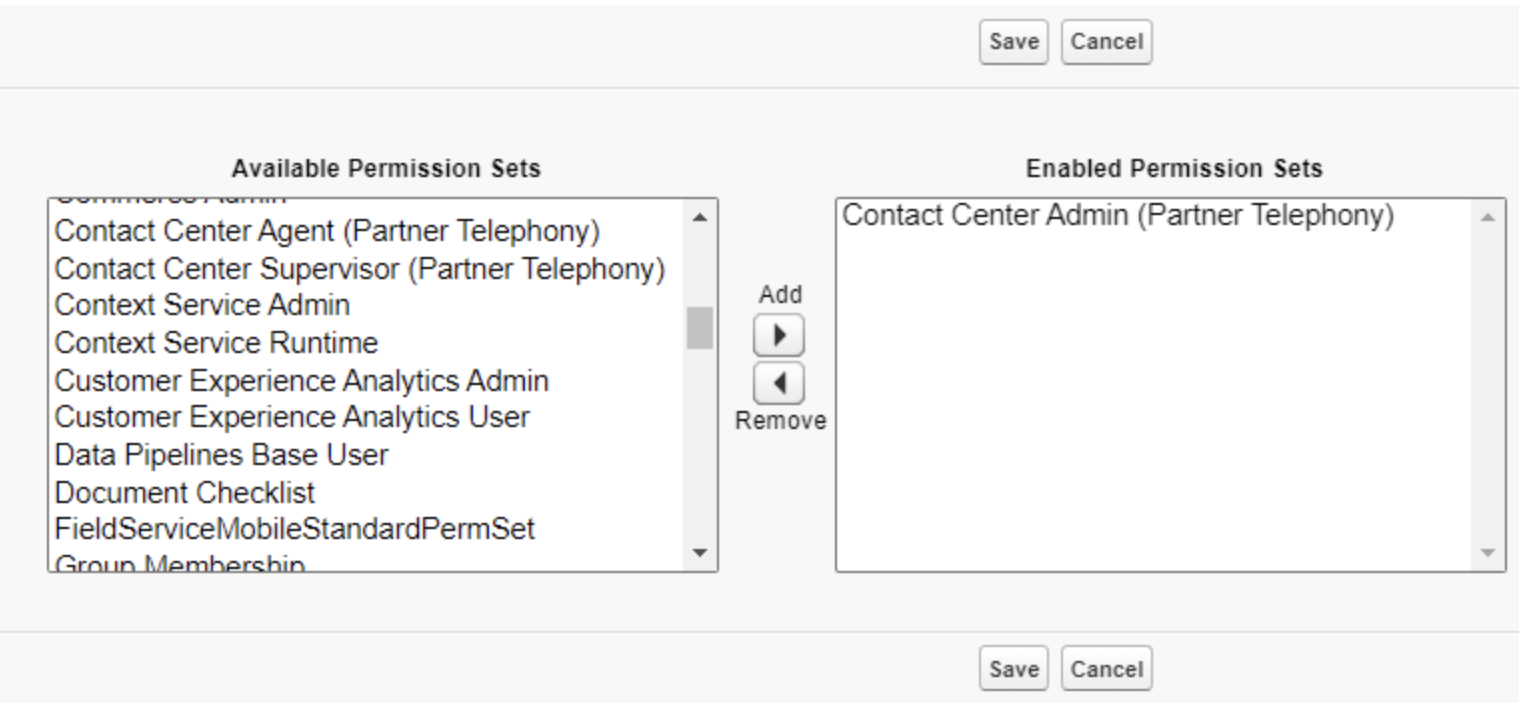
Grant the following permission sets to at least one user, so you can create the Contact Center: |
| 5 |
Click Setup | Users | Users. |
| 6 |
Search and a select user. |
| 7 |
Scroll down to “Permission Set Assignments”. |
| 8 |
Click on Edit Assignments |
| 9 |
For Contact Center Admins: assign the Contact Center Admin (Partner Telephony) Permission Set.
|
| 10 |
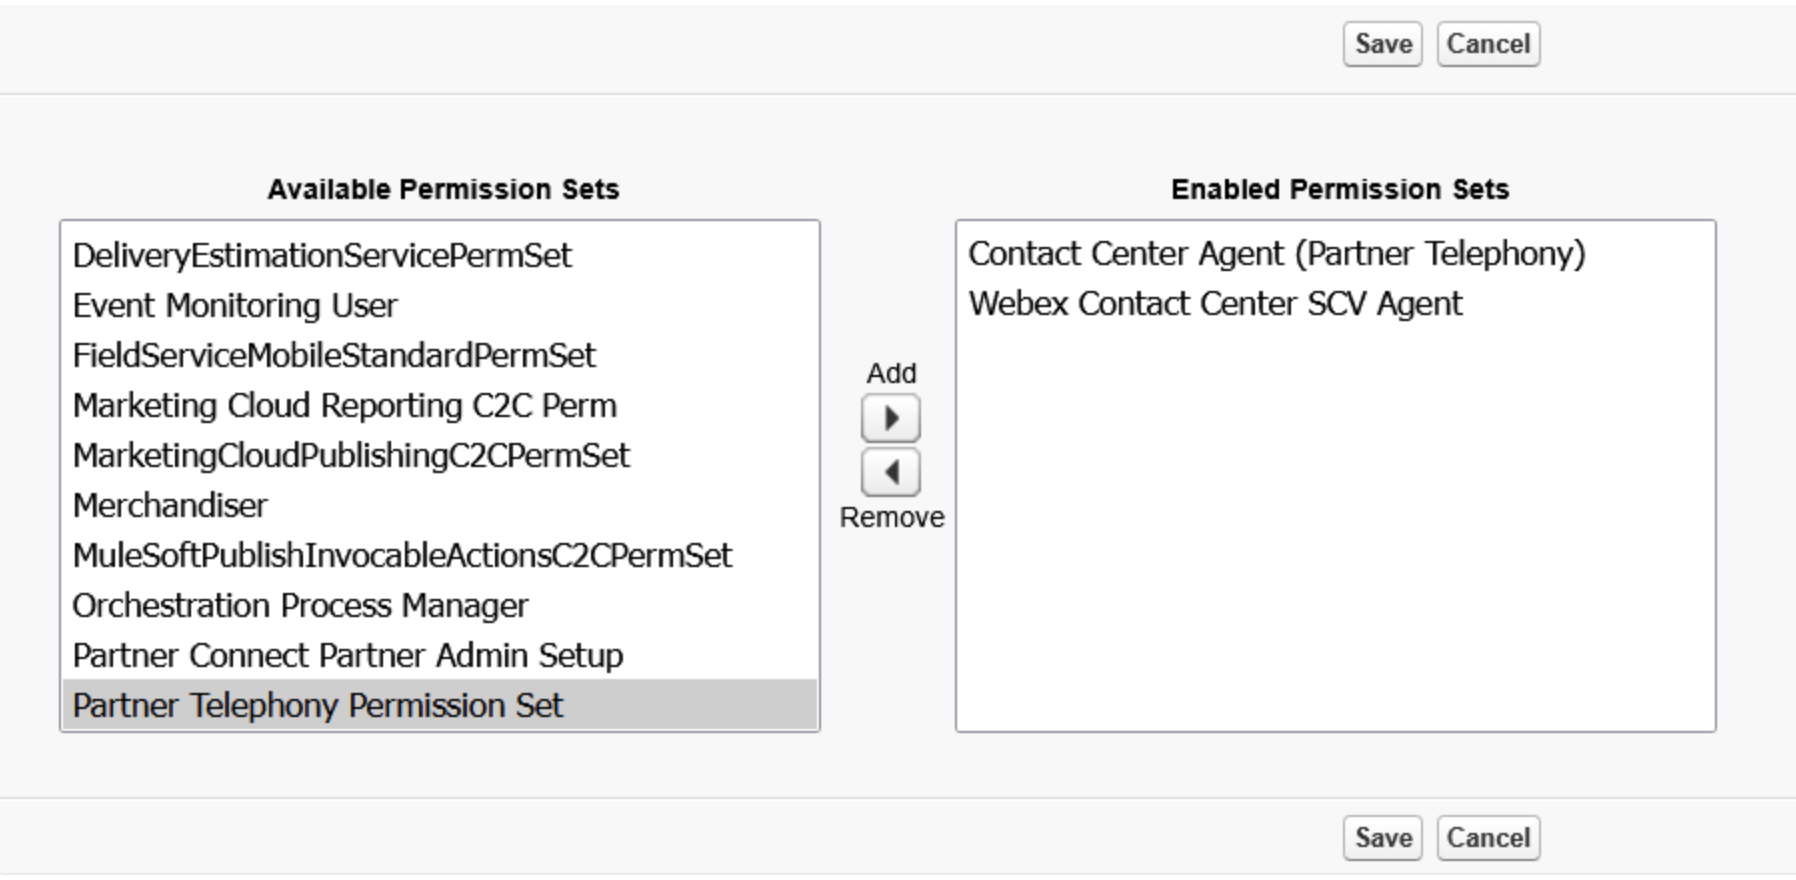
For Contact Center Agents: assign the Contact Center Agent (Partner Telephony) Permission Set and the Webex Contact Center SCV Agent Permission Set.
It is not recommended choosing the Install for All Users option, as this grants all permissions (read, create, edit and delete) on the package components and objects to any user who uses a custom User Profile. |
| 11 |
Assign a package license for users to work with Connects for Service Cloud Voice.
|
| 12 |
Alternatively, you can click Setup | Users | Users.. |
| 13 |
Search and select user. |
| 14 |
Scroll down to Managed Packages. |
| 15 |
Click Assign Licenses. |
| 16 |
Choose Webex Contact Center for Service Cloud Voice package from the list. |
| 17 |
Click Add. |
| 18 |
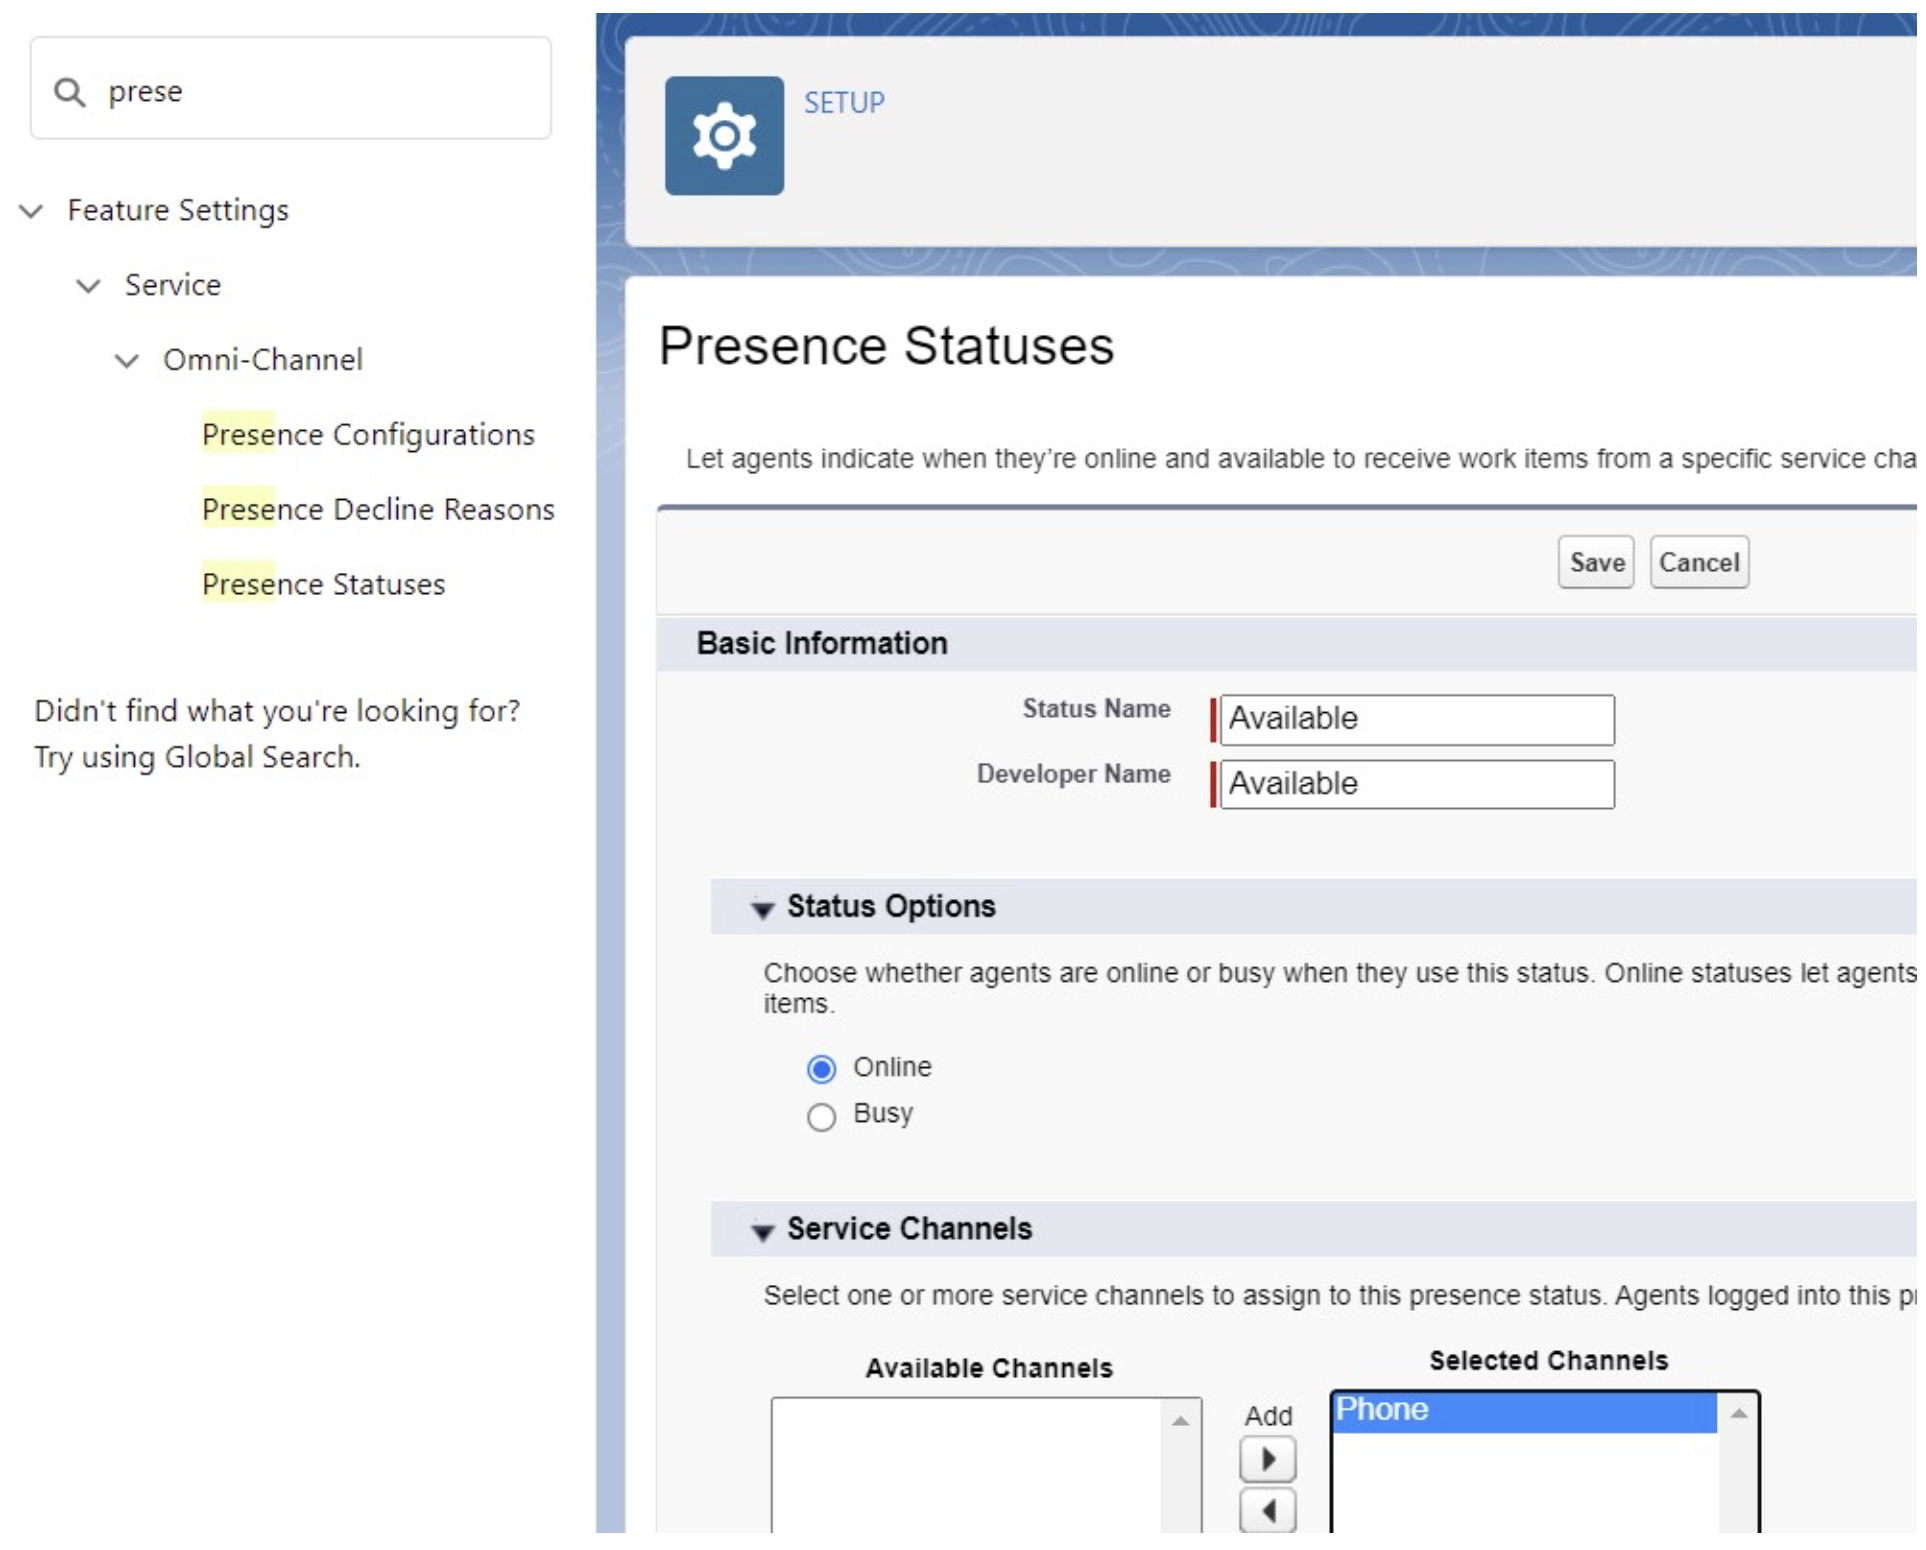
Create the Presence Statuses to define which service channels are assigned to different statuses. Agents can sign into Omni-Channel with different statuses depending on the kind of work that they’re entitled to receive. |
| 19 |
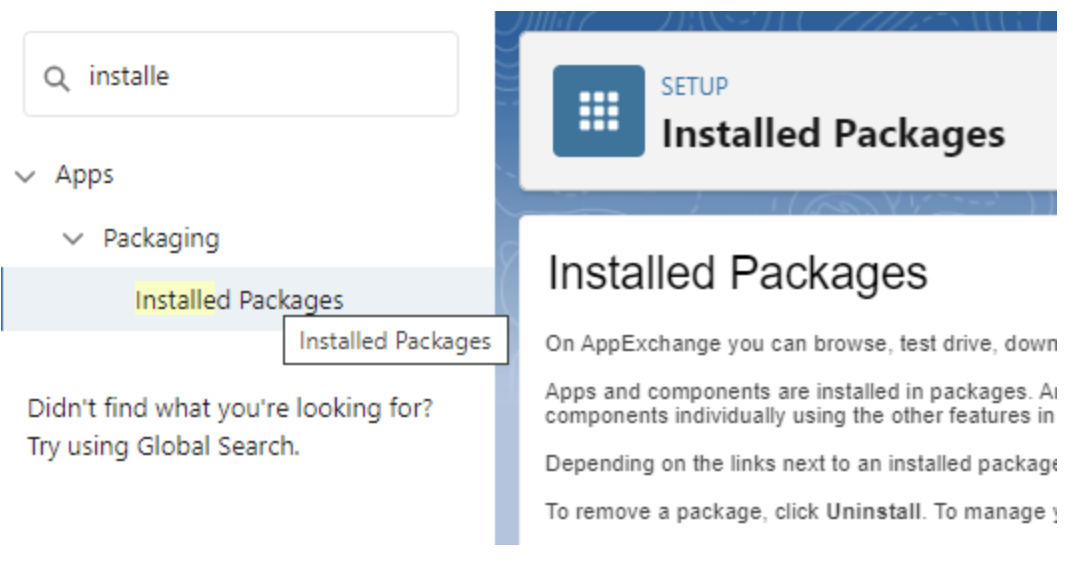
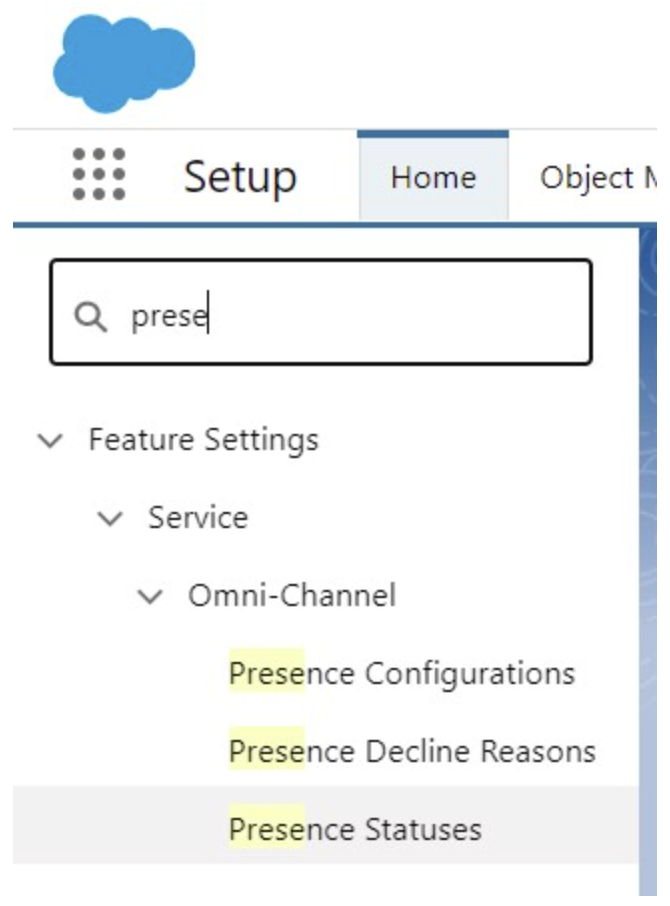
From Setup, enter
|
| 20 |
Click New. Create at least one status for "Online" and one for "Busy".
|
Assign the presence status(es) to agents
| 1 |
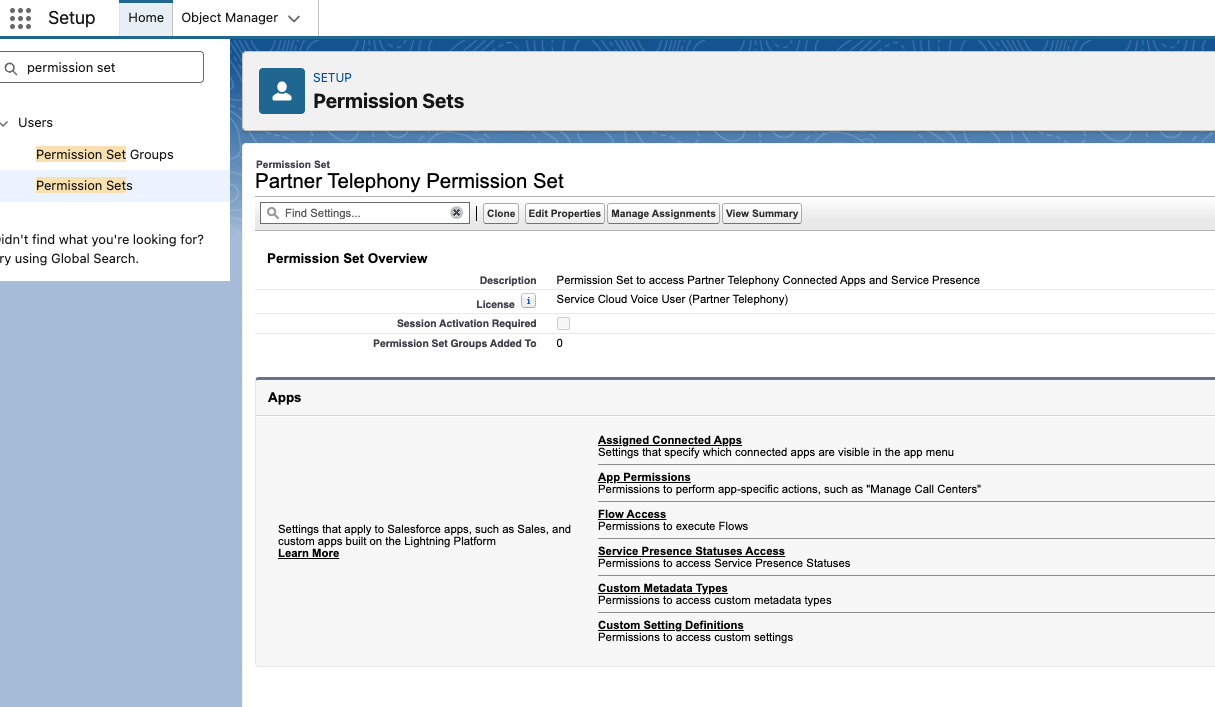
From Setup, enter Permission Sets in the Quick Find box, then select Permission Sets. |
| 2 |
Click to open Partner Telephony Permission Set. |
| 3 |
Click Service Presence Statuses Access. |
| 4 |
Click Edit. |
| 5 |
In the Available Service Presences list, select the presence status(es) previously created and click Add to associate them with the permission set. Agents who are assigned to this permission set can sign into Omni-Channel with any of the presence statuses made available to them. |
| 6 |
Click Save. |
| 7 |
Click Manage Assignments in the same page. Then click Add Assignment in the top right corner, select the desired user, click Next, select an Expiration Option for the assigned users (Optional) and then click Assign. Service Cloud Voice uses an external domain to operate with the VoiceCall record. The following URLs must be added to the "Remote Site Settings" in Setup ( click here to open the official documentation):
Example: How to find Instance URL. |
| 8 |
Look at the URL in your browser's address bar after logging in. The instance URL is the part before ".my.salesforce.com" or ".salesforce.com" or .” lightning.force.com”. For example, if your URL is https://orgfarm-54a38e30ad-dev-ed.develop.my.salesforce-setup.com/, then "orgfarm-54a38e30ad-dev-ed.develop" is your instance URL. Example: Origin org URL: https://cisco.lightning.force.com Example: URL to add:
|
| 9 |
The Omni-Channel utility item is required in the Lightning Service Console App for the agent to use Service Cloud Voice.
The official reference from Salesforce can be found by clicking on the Let's Do This button that opens the Configure the Agent Experience for Service Cloud Voice with Partner Telephony page in Salesforce Help Portal ( direct link). |
| 10 |
From Setup, enter Partner Telephony Setup in the Quick Find box, then select Partner Telephony Setup. |
| 11 |
Scroll down to section 5 More Voice Settings. |
| 12 |
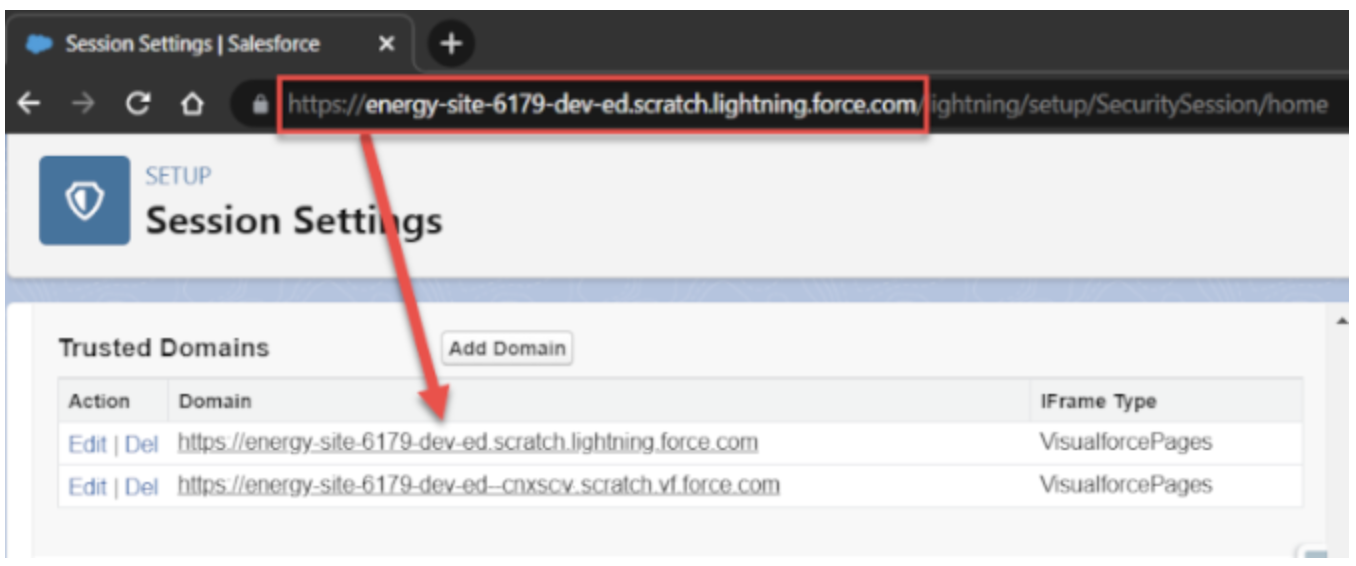
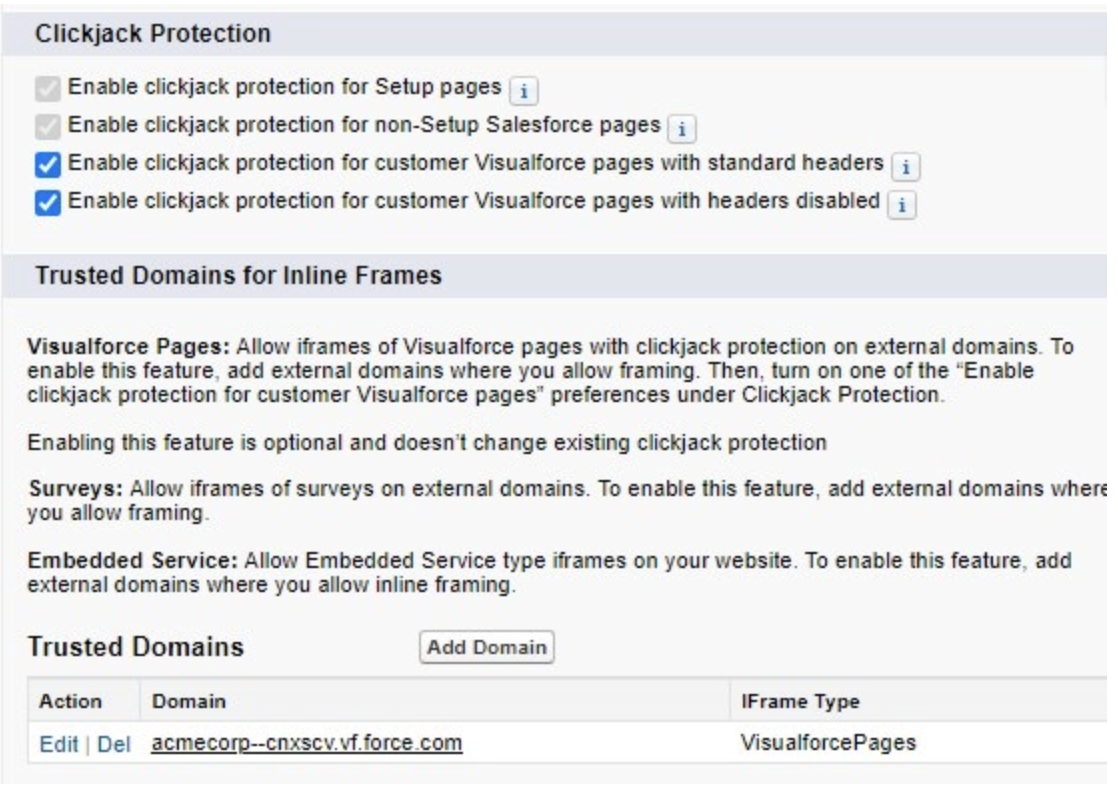
In order to Enable clickjack protection for Visualforce pages with headers disabled while working with the softphone in Lightning Experience, you must add the domains the softphone and custom toolbars are loaded from as trusted domains, in addition to the Salesforce instance URL. These settings and the Trusted Domains list can be found under Setup | Security | Session Settings. To retrieve the correct Visualforce domain, navigate to Setup | Custom Code |
Visualforce Pages and click on the Preview button for
Example: MyDomainName--cisco_wxcc_scv.vf.force.com To get the Salesforce Instance domain, copy the URL displayed in the browser URL bar and add it to the Trusted Domains for Inline Frames List list selecting Visualforce Pages as IFrame Type. Example: MyDomainName.lightning.force.com
If you don’t have a My Domain deployed in your org, your URL format is different. If you have a My Domain deployed and enhanced domains aren’t enabled in your org, your URL format is different. If enhanced domains aren’t enabled, the Stabilize URLs in Visualforce, Experience Builder, Site.com studio, and content files My Domain setting also affects this format. For details, see My Domain URL Formats in Salesforce Help. Clickjack Protection and Trusted Domains settings for Lightning Experience
|
| 13 |
In order to display the recording controls during calls, agents need the
To assign it, add it to the permission set created in the Presence Statuses step.
|
Configuration
Create Webex Contact Center credential custom metadata record
| 1 |
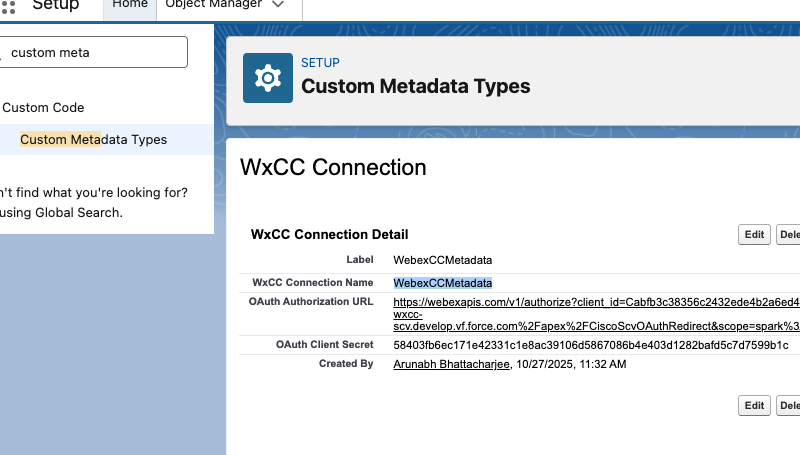
From Setup, enter Custom Metadata type in the Quick Find box, then select Custom Metadata Types. |
| 2 |
In the list, find the WxCC Connection Custom Metadata Type. |
| 3 |
Click Manage Records in front of the WxCC Connection, and then New. |
| 4 |
Enter a name. Example: WebexCCMetadata |
| 5 |
Enter the standard WxCC authentication URL and client secret for your organization. For Salesforce telephony setup, follow Configure the Salesforce Connector in Webex Control Hub. |
| 6 |
Click Save. |
| 7 |
Remember the WxCC Connection Name you need this name in the Contact Center configuration.
|
Contact Center
A Contact Center definition file specifies a set of fields and values that are used to define a contact center in Salesforce for a particular CTI system. Salesforce uses Contact Center definition files to support the integration with multiple CTI system vendors.
Further information can be found in Salesforce's official documentation ( direct link).
Import the Contact Center
Download the latest version of the Contact Center here.
Upgrading from Beta: This guide describes a clean installation of the General Availability (GA) release of the Webex Contact Center integration for Salesforce Service Cloud Voice.
If you are upgrading from a Beta version of the integration, do not reuse an existing Partner Contact Center record. Instead:
- Import the Partner Contact Center XML file included with the GA release.
- Create a new Partner Contact Center record using the imported XML.
- Update your configuration to use the newly created Partner Contact Center.
The GA Partner Contact Center XML contains updated configuration values, including the correct Connector URL and other metadata. Reusing a Partner Contact Center record created from Beta XML may retain outdated configuration values and prevent the integration from functioning correctly.
| 1 |
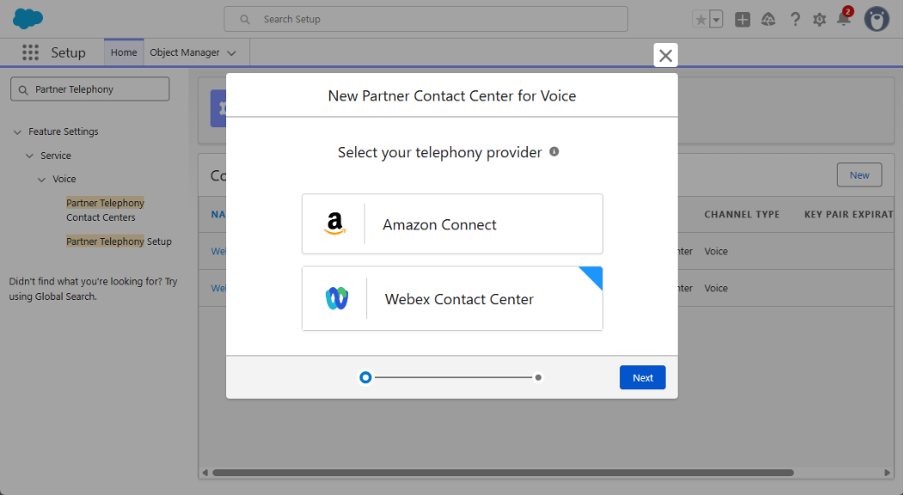
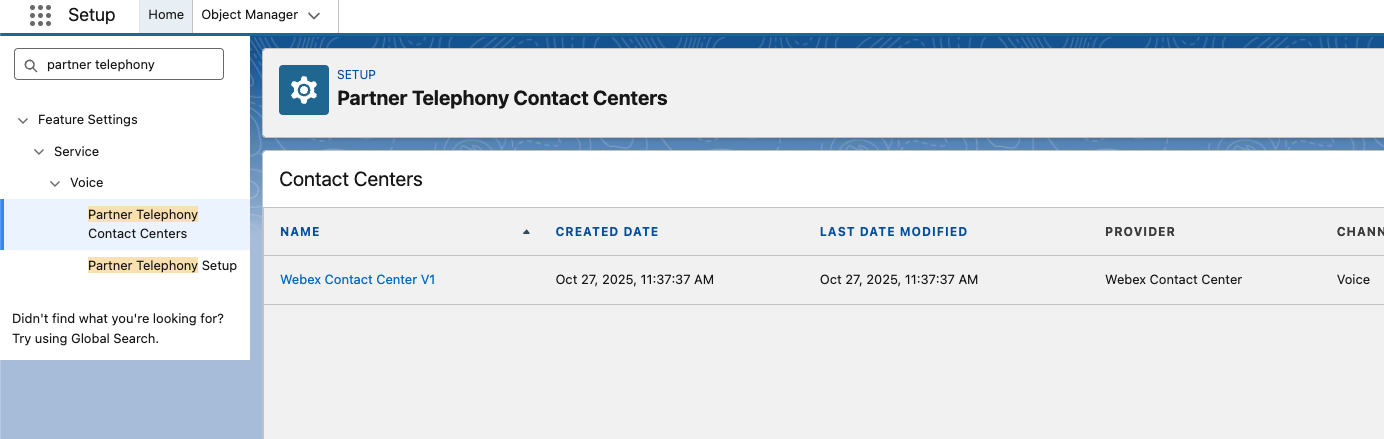
From Setup, enter Partner Telephony Contact Centers in the Quick Find box, then select Partner Telephony Contact Centers. The list of existing (if any) Contact Centers is displayed.
|
| 2 |
Click Create Contact Center on the right side of the page. |
| 3 |
Select Webex Contact Center as your telephony provider. Then click Next.
A file browser opens.
|
| 4 |
Select the |
| 5 |
Click Open. The file is imported.
|
| 6 |
Check whether your Contact Center is shown in the Contact Centers list view.
|
Configure the Contact Center
| 1 |
From Setup, enter Partner Telephony Contact Centers in the Quick Find box, then select Partner Telephony Contact Centers. | ||||||||||||||||||||||||||||||
| 2 |
Click the Contact Center previously imported. | ||||||||||||||||||||||||||||||
| 3 |
Click Edit.
| ||||||||||||||||||||||||||||||
| 4 |
At the bottom of the Contact Center page, click Add button under Contact Center Users section. | ||||||||||||||||||||||||||||||
| 5 |
Click + next to the users having access to the open Contact Center. Only users having |
Customize
External Client App for Webex Contact Center integration
Configure the External Client App for Webex Contact Center Salesforce Connector
To use Service Cloud Voice to its full extent, the Contact Center call flow can be adapted to create the Voice Call record and to execute a Salesforce Omni-Channel flow while the call is on the IVR.
Create Certificate
Ensure that you've already created a digital certificate as per your organization's security policy.
To generate a digital certificate, see the Salesforce documentation at https://developer.salesforce.com/docs/atlas.en-us.voice_pt_developer_guide.meta/voice_pt_developer_guide/voice_pt_generate_certificate.htm.
Example
openssl genrsa -des3 -passout pass:<password> -out server.pass.key 2048
openssl rsa -passin pass:<password> -in server.pass.key -out server.key
rm server.pass.key
openssl req -new -key server.key -out server.csr

    Country Name (2 letter code) [AU]:CH
    State or Province Name (full name) [Some-State]:
    Locality Name (eg, city) []:
    Organization Name (eg, company) [Internet Widgits Pty Ltd]:
    Organizational Unit Name (eg, section) []:
    Common Name (e.g. server FQDN or YOUR name) []:
    Email Address []: my-api-user@my-example-org.com
    Please enter the following 'extra' attributes
    to be sent with your certificate request
    A challenge password []:<password>
    An optional company name []:

openssl x509 -req -sha256 -days 365 -in server.csr -signkey server.key -out server.crt
server.crt => Certificate for the Salesforce External Client App
server.key => Private key for the Salesforce Connector in Webex Control Hub
Permission Set for the SCV Integration User
The following Permission Set grants access to Apex classes used by Connects for SCV for the integration with Contact Center IVR flows and Webex Contact Center for Salesforce for SCV.
The following is an example configuration and describes the minimum required permissions for the Contact Center / IVR integration to work.
- From Setup, navigate to Users | Permission Sets.
- Click on New button.
- Enter a Label, for example: IVR Access to SCV Apex Classes
- API Name is automatically filled out
- License: None
- Click the Save button.
- The new Permission Set opens.
- Navigate to Apex Class Access.
- Click the Edit button and add the following Apex classes:
- cisco_wxcc_scv.ServiceRouting
- Navigate to System Permissions.
- Click the Edit button and enable the following Permissions:
- Apex REST Services
- API Enabled
Minimum Access - API Only Integrations Profile
This Profile is used to integrate with Webex Contact Center for Salesforce for SCV to create Voice Call records and Execute Omni-Flow from the IVR flow.
The following is an example configuration and describes the minimum required permissions for the Contact Center / IVR integration to work.
This is a clone from the Minimum Access - API Only Integrations profile.
- From Setup, navigate to Users | Profiles.
- In the Profiles list, search for the Profile Minimum Access - API Only Integrations.
- Click the profile name to open the Minimum Access - API Only Integrations profile.
- On the Minimum Access - API Only Integrations profile, click the Clone button.
- Enter a new Profile Name, for example: SCV Integration.
- Click on Save button.
- The new Profile opens.
- Verify that your Minimum Access – API Only Integrations profile has all permissions removed from the profile itself.
- Navigate to System Permissions.
- Make sure the following Permissions are enabled:
- API Enabled
- Api Only User
SCV Integration User
The following is an example configuration and describes the minimum required permissions for the Contact Center / IVR integration to work. No Salesforce Service Cloud Voice license or Webex Contact Center for Salesforce for SCV license is required for the SCV Integration User.
- From Setup, navigate to Users | Users.
- Click on New User button.
- Enter First Name, Last Name, and all other mandatory fields.
- User License: Salesforce Integration
- Profile: select the profile created in the previous step ("SCV Integration profile", clone of Minimum Access - API Only Integrations profile)
- Click on Save button.
- Open the new User record.
- Assign the Permission Set created before ("IVR Access to SCV Apex Classes").
- Assign the Permission Set License Salesforce API Integration.
Create the Salesforce External Client App
Currently, Connected Apps creation is a functionality controlled by the Allow creation of connected apps preference, which is disabled by default for new orgs and can be enabled in the settings page of the new External Client Apps Setup menu section.
- From Setup, search External Client Apps | Settings.
- Under the Connected apps set the Allow creation of connected apps checkbox to On to enable the New Connected App button.
- Click on New Connected App button.
If the New Connected App button does not show in the External Client Apps menu, go to Apps | App Manager | New Connected App.

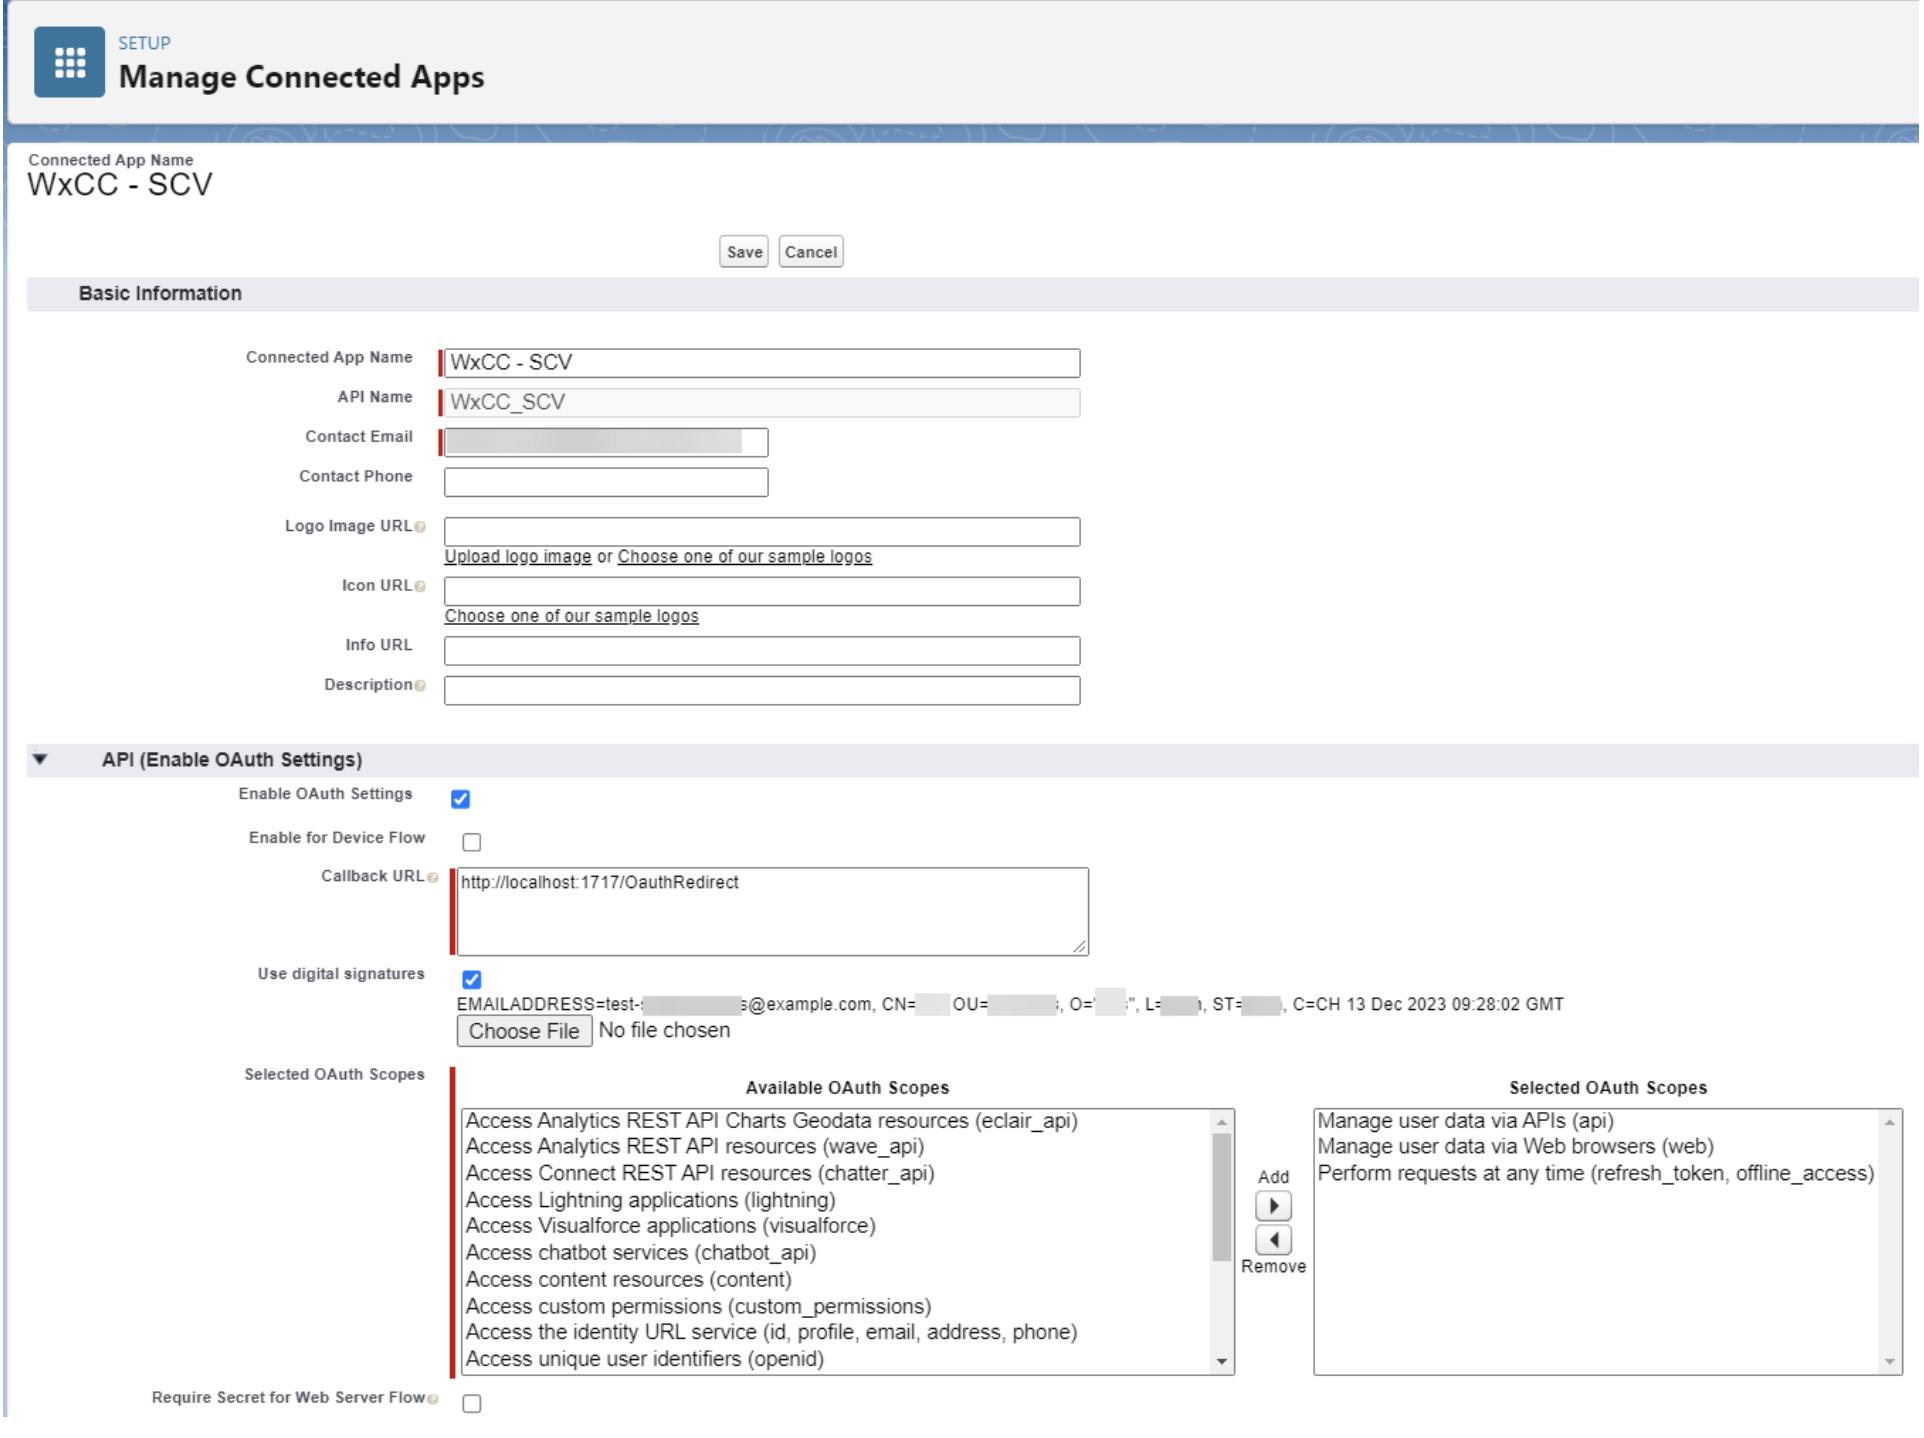
Configure the Salesforce Connected App that is used by Cisco Webex Contact Center. Also see the article: Configure Connected App for Webex Contact Center Salesforce Connector at https://help.webex.com/en-us/article/n26v7heb/Configure-Connected-App-for-Webex-Contact-Center-Salesforce-Connector.
| 1 |
For a new Connected App, enter the following details:
|
| 2 |
Click Save and then Continue. |
| 3 |
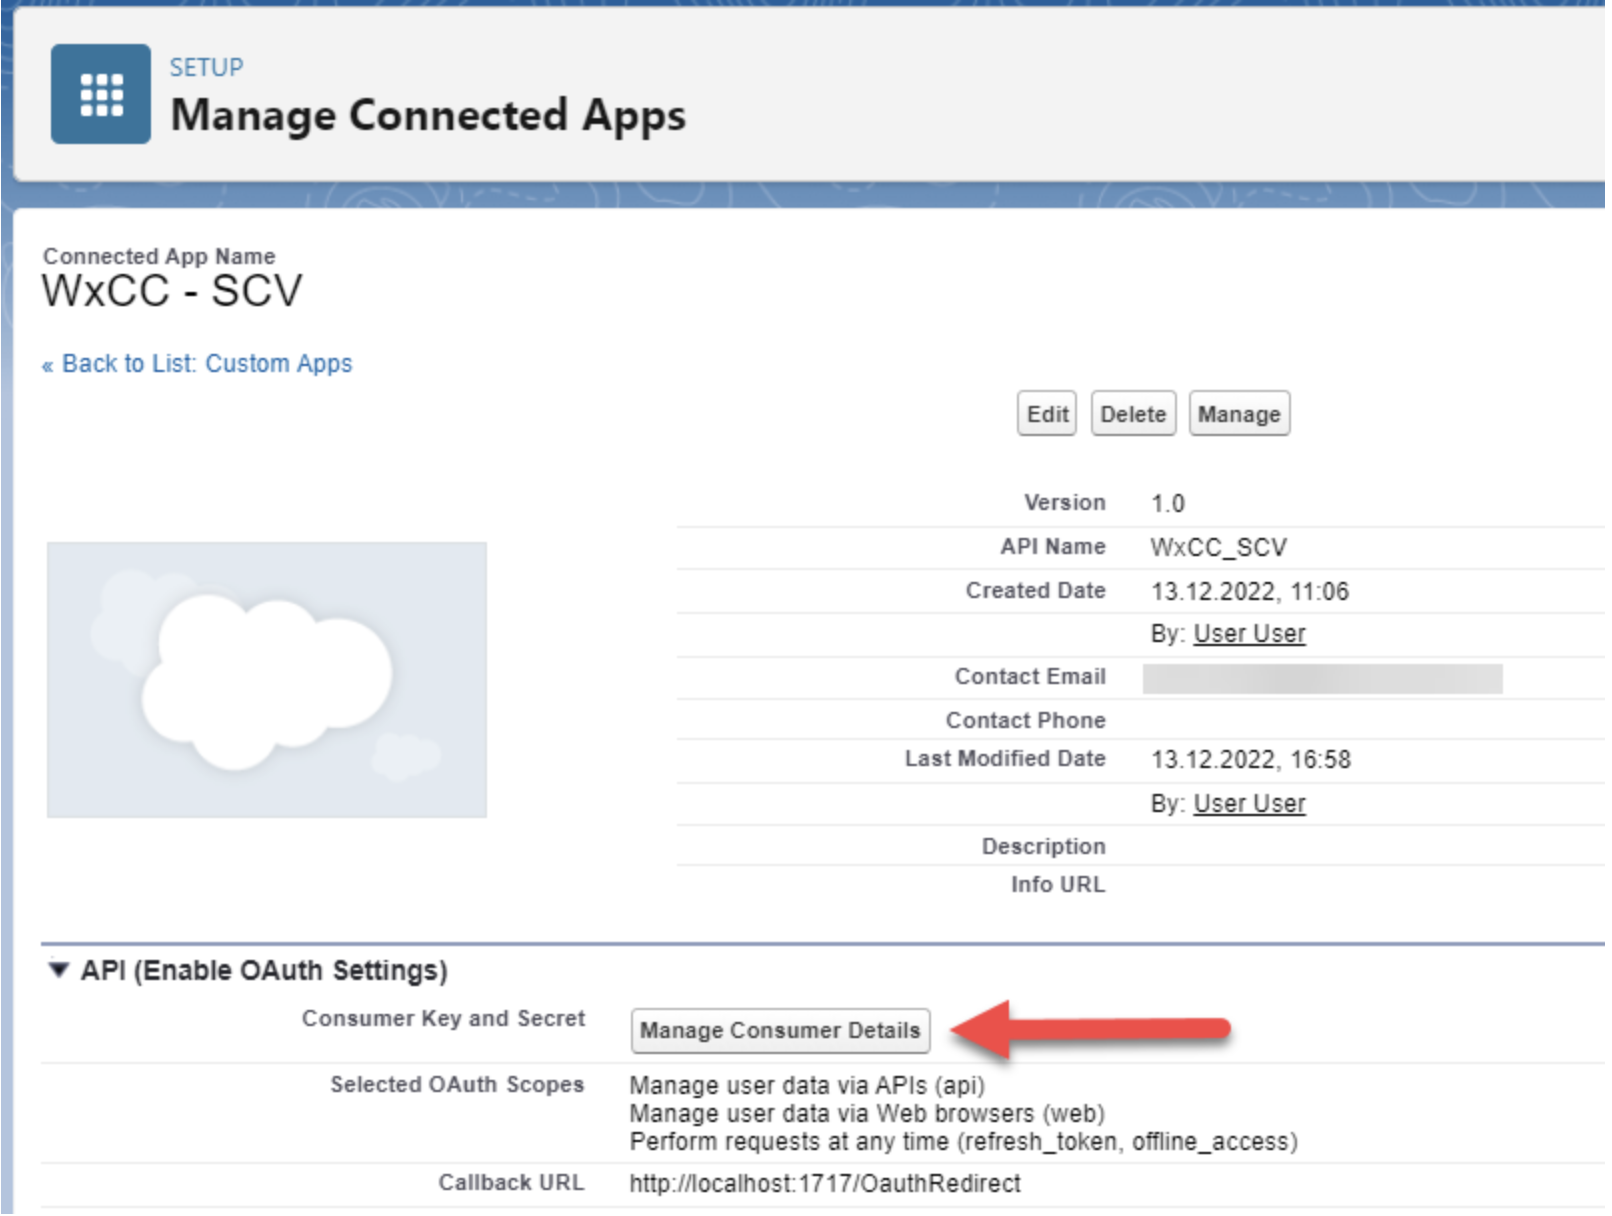
From the API (Enable OAuth Settings) section, click Manage Consumer Details.
|
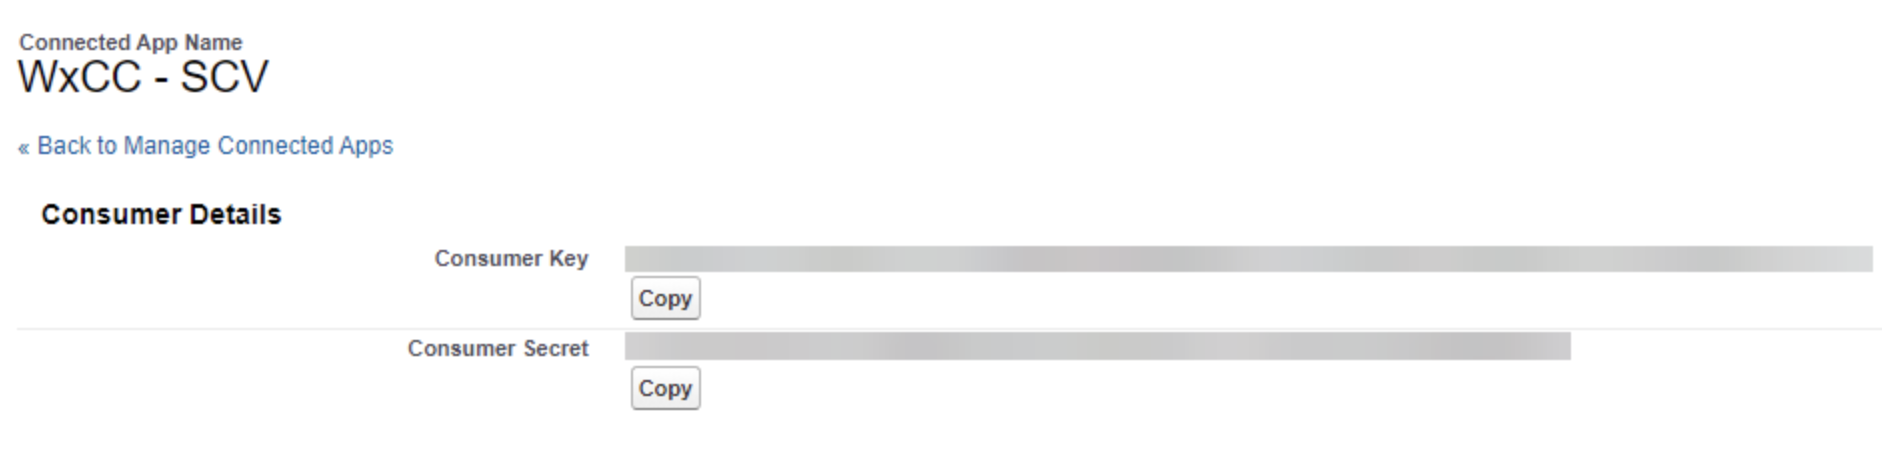
| 4 |
Click Copy and save the Consumer Key. The consumer key is used later to create the Salesforce Connector on Webex Contact Center Control Hub.
Important: Maintain Security by Periodically Rotating Secrets Ensure that your ClientIDs and Client Secrets tokens are being periodically rotated. See R otate the Consumer Key and Consumer Secret To ensure that your existing integrations do not break, update the newly generated Client ID and Client Secret in all Contact Center flows and IVR scripts where these secrets are used. |
| 5 |
Click Back to Manage Connected Apps. |
| 6 |
Click Manage.
|
| 7 |
Click Edit Policy. |
| 8 |
In the OAuth Policies section, select Admin approved users are pre-authorized for Permitted Users.
|
| 9 |
Click Save. |
| 10 |
Scroll down to section Permission set and click on Manage Permission Sets button. Assign the Permission Set created before ("IVR Access to SCV Apex Classes").
|
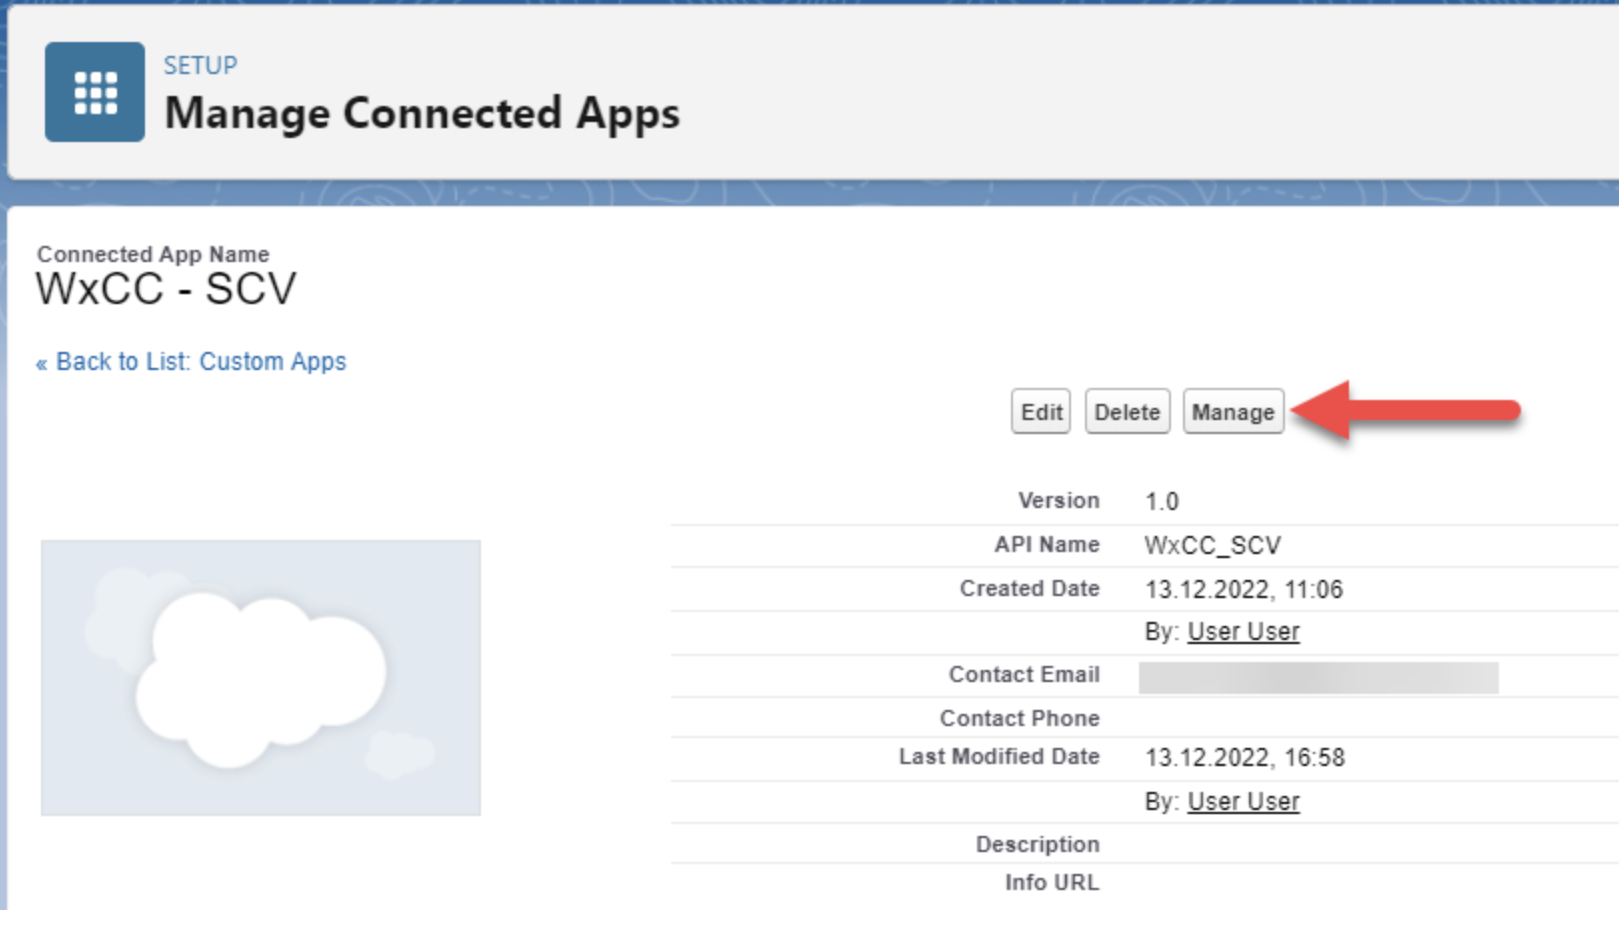


Create Salesforce External Client App
Create a new External Client App
There are two options to connect your Salesforce data with third-party applications. Both Connected Apps and External Client Apps are frameworks to integrate data. External Client Apps are the next generation of connected apps.
To configure the Salesforce External Client App that is used by Cisco Webex Contact Center:
- From Setup, navigate to Apps | External Client Apps | External Client App Manager.
- Click on New External Client App.
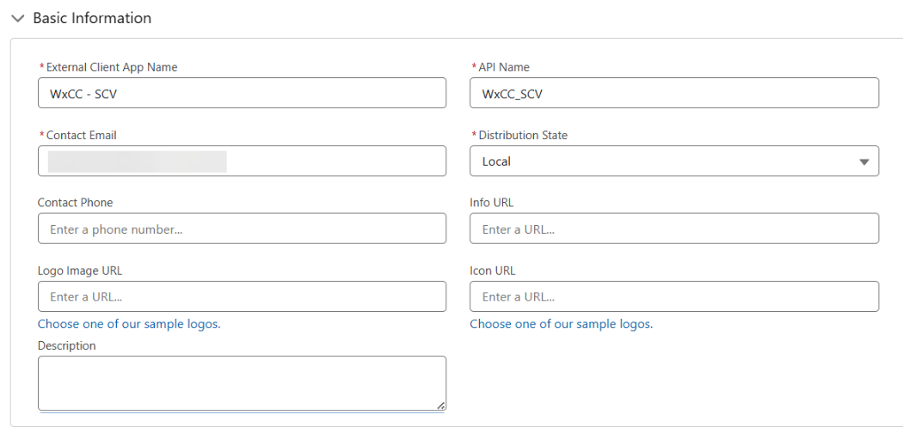
- External Client App—Basic Information
- External Client App Name: WxCC - SCV
- API Name: WxCC_SCV
- Contact Email: < your email >
- Distribution State: select Local
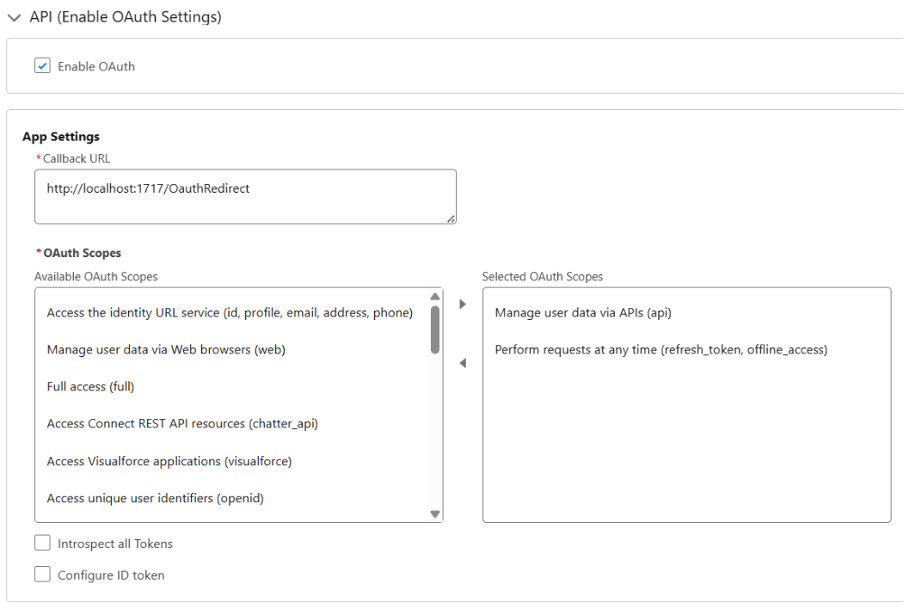
External Client App—API (Enable OAuth Settings)
- Select: Enable OAuth
- App Settings
- Callback URL: http://localhost:1717/OauthRedirect as a sample callback URL
- OAuth Scopes
- Select OAuth scopes:
- Manage user data via APIs (api)
- Perform requests at any time (refresh_token, offline_access)
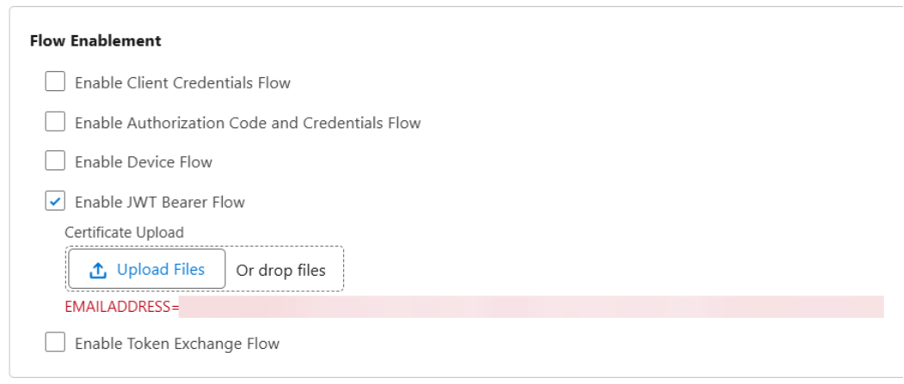
Flow Enablement
- Select: Enable JWT Bearer Flow
- Click Upload Files and upload the
server.crtfile that contains your digital certificate.
Security
Uncheck the Require secret for the Web Server Flow option.
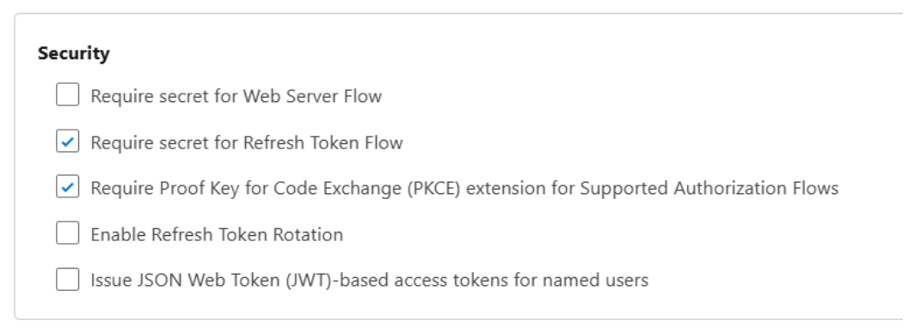
- Click on Create button.
- Change to Tab Policies and then click on Edit button.
- Policies—OAuth Policies
- Plugin Policies
- Permitted Users: select Admin approved users are pre-authorized
- Confirm the change
- App Authorization
- Refresh Token Policy: select Immediately expire refresh token
- IP Relaxation: select Enforce IP restrictions
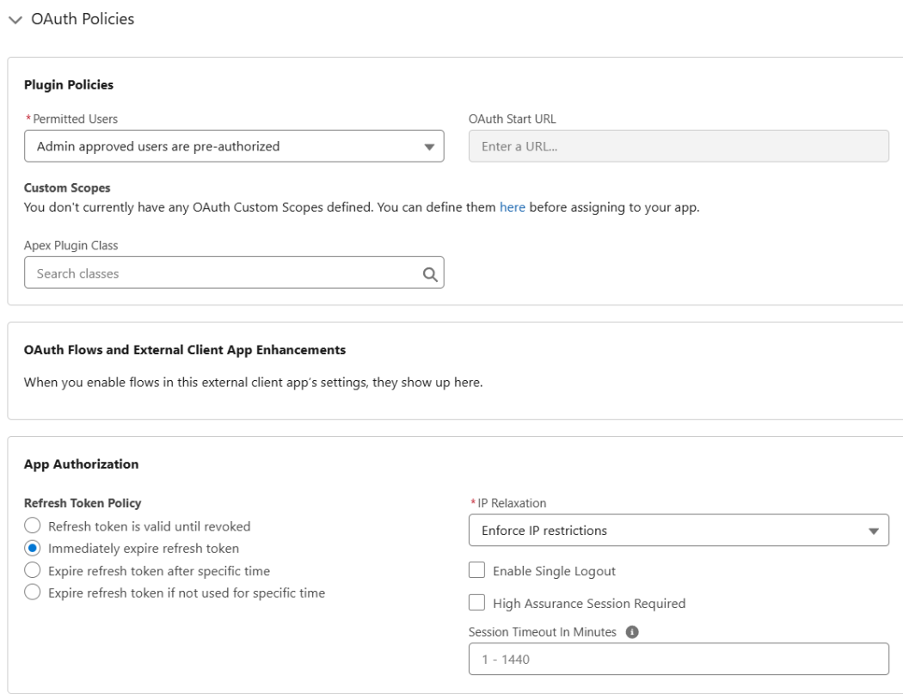
- Plugin Policies
- Policies—App Policies
- Start page—none
- Select Permission Sets—Assign the Permission Set created before ("IVR Access to SCV Apex Classes")
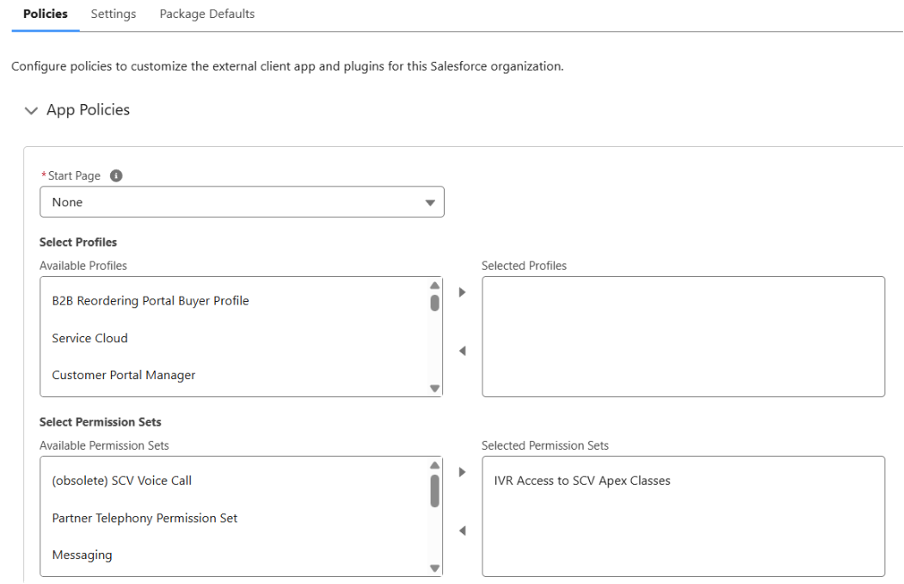
- Click Save.
- Change to Tab Settings.
-
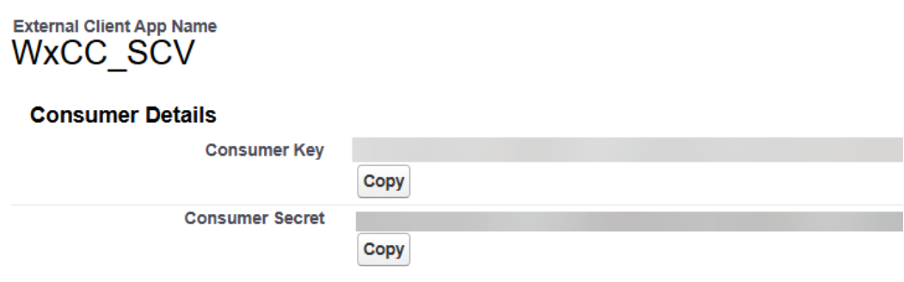
Section OAuth Settings, click Consumer Key and Secret button; wait for email and verify your identity. A new browser tab opens a screen with consumer details.
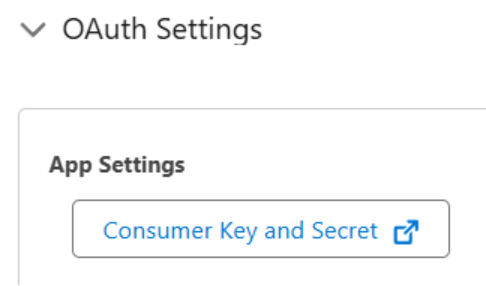
- Click Copy and save the Consumer Key. The consumer key is used later to create the Salesforce Connector on Webex Contact Center Control Hub.
-
Webex Contact Center Configuration and script to create Voice Call records
To get the full value of Salesforce Service Cloud Voice, the call flow in Webex Contact Center must be modified to create the Voice Call record in Service Cloud Voice as soon as the call arrives in the Contact Center.
An optional Omni-Flow can be executed for routing decisions and automation in Salesforce.
For details about the used APIs, see Service Cloud Voice API Wrapper.
Pre-requisites
In order to use the Service Cloud Voice API Wrapper, a Salesforce External Client App for IVR integration must be configured.
Configure the Salesforce Connector in Webex Control Hub
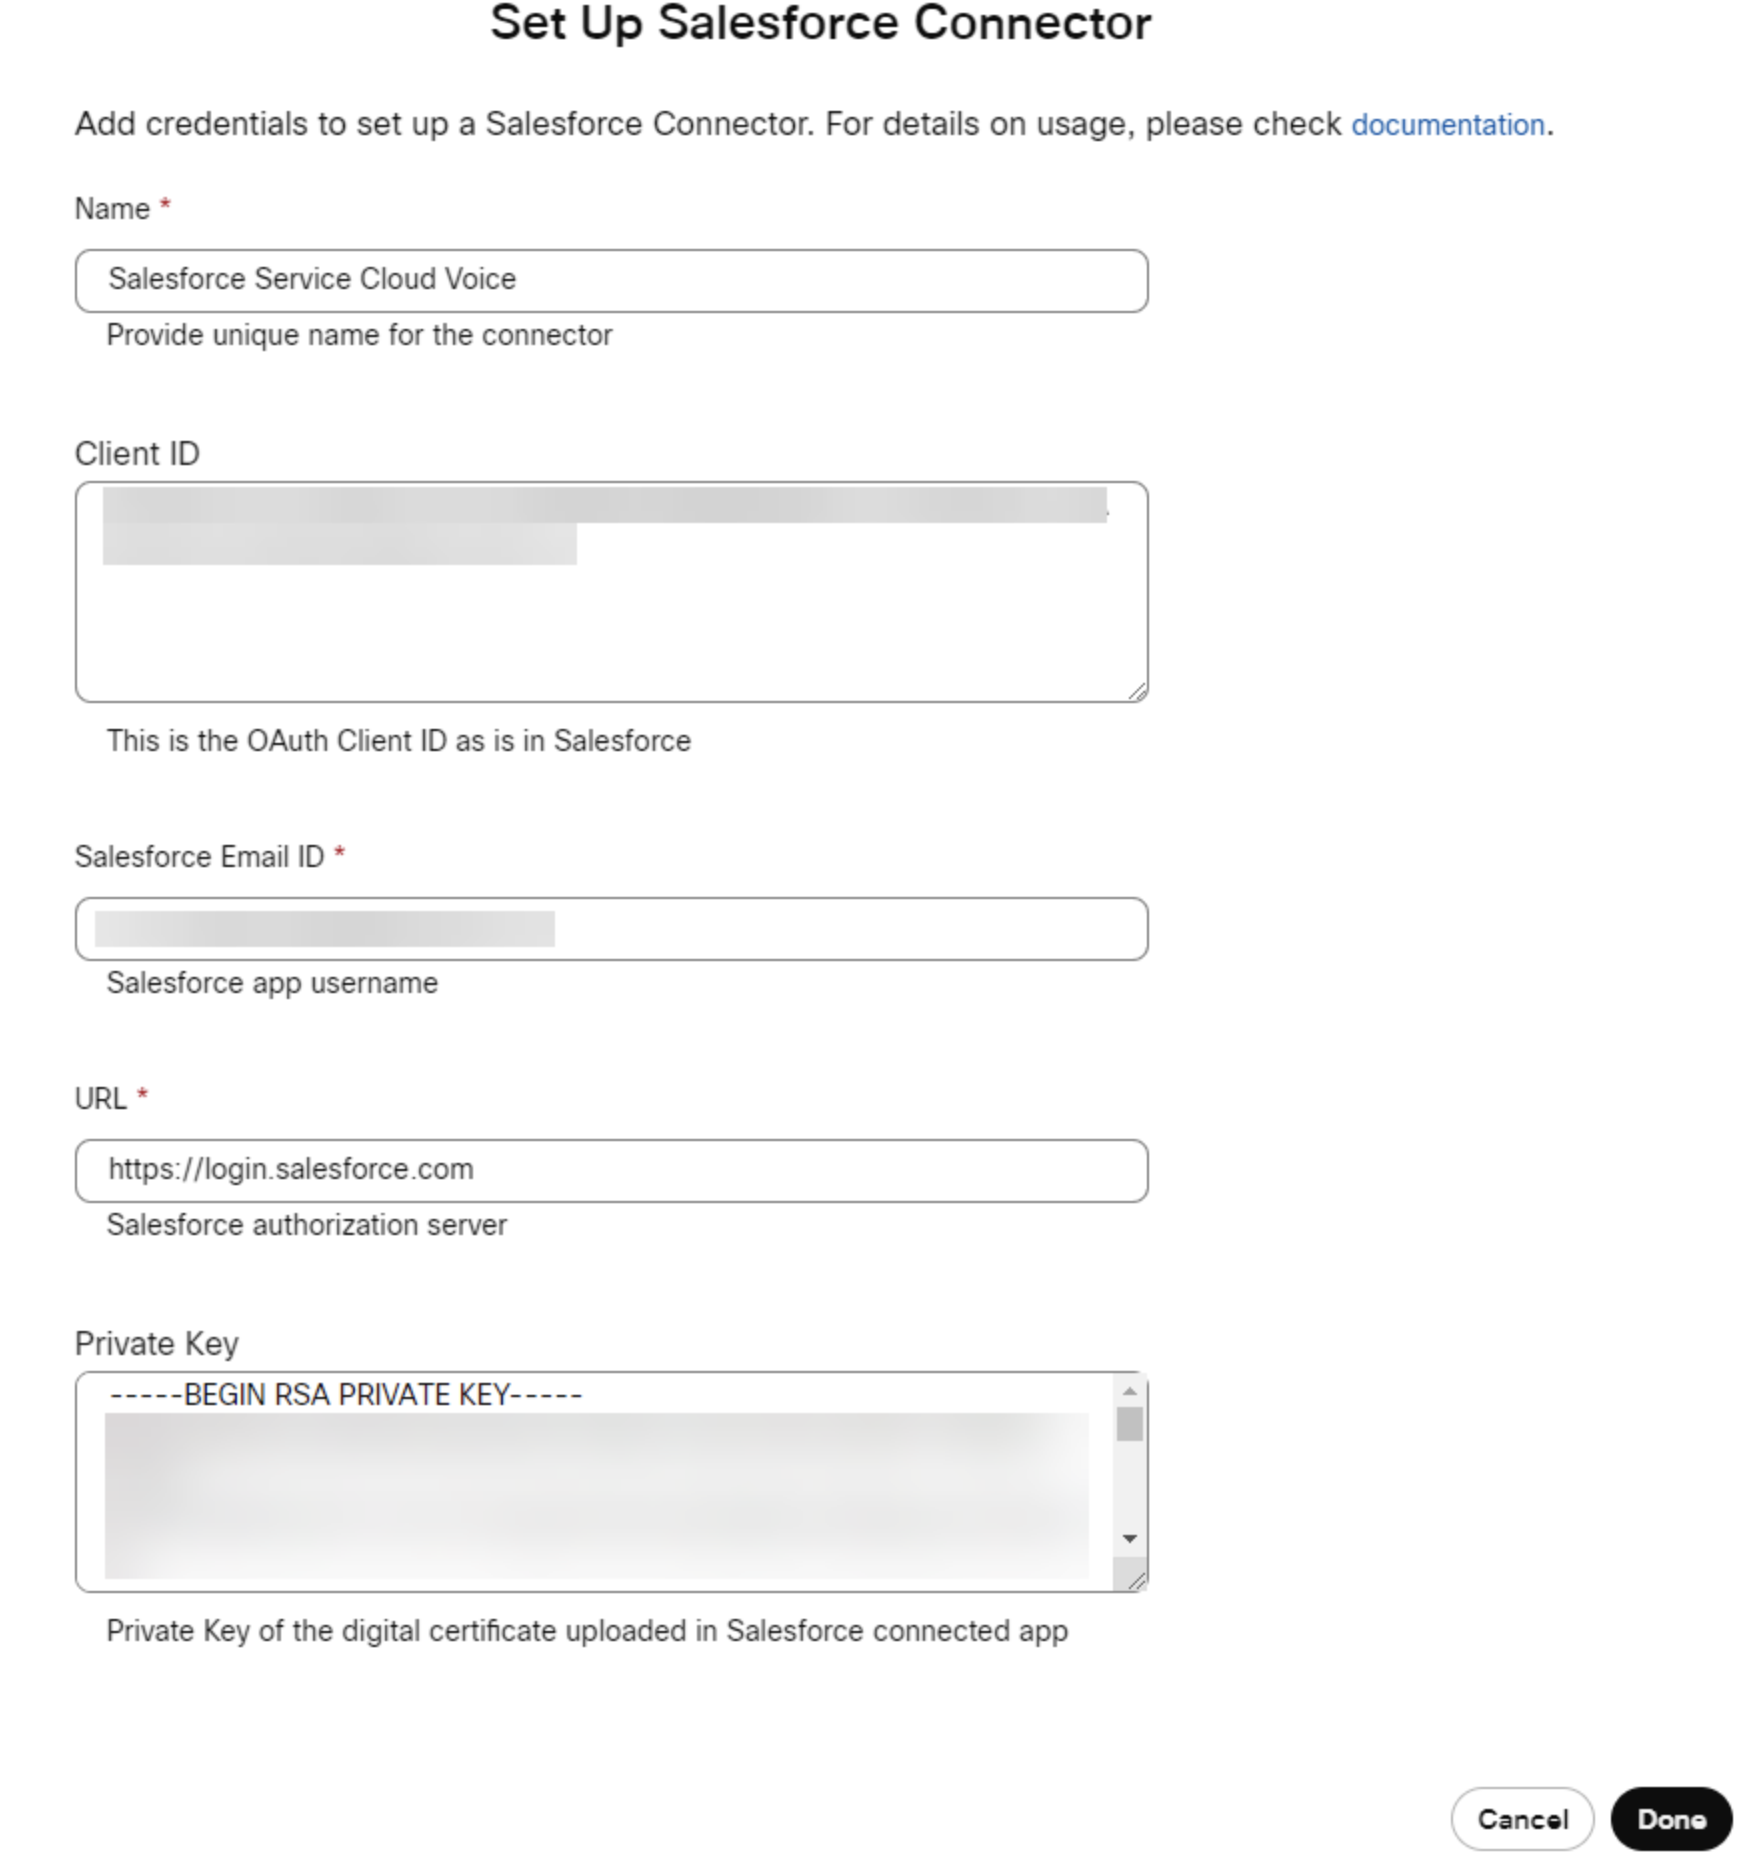
Set up the Salesforce Integration Connectors for Webex Contact Center as described in the article at https://help.webex.com/en-us/article/7fuy63/Set-Up-Integration-Connectors-for-Webex-Contact-Center#id_133211.
| 1 |
Log in to your customer organization at https://admin.webex.com and navigate to Services > Contact Center > Tenant Settings > Integrations>Connectors. |
| 2 |
On the Salesforce card, click Set Up or Add Connector.
IMPORTANT: MAINTAIN SECURITY BY PERIODICALLY ROTATING SECRETS Make sure you regularly rotate your Private Key and Certificate to keep your integrations secure. Update the Private Key in the Contact Center Connector in Webex Hub and the Certificate in the External Client App in Salesforce. Troubleshooting tip After you click Done, and the connector doesn’t save:
|
Webex Contact Center Main Flow
| Flow Variable | Description |
|---|---|
| Flow variable for Voice Call record ID | Unique Id to identify the call. Required to create the Voice Call
record. Format: wxcc_<Interaction Id> Example: wxcc_fc4ec7d8-4c91-49aa-b764-081fbba344a8
|
| Local variable for the call start Time |
Used to create the Voice Call record and when updating the voice call.
|
| Local variable for Queue name/id |
Returned by Execute Omni Flow, used for call routing. This variable is only required when using Execute Omni Flow
|
| Local variable for Agent name/id |
Returned by Execute Omni Flow, used for call routing. This variable is only required when using Execute Omni Flow
|
Main Flow overview
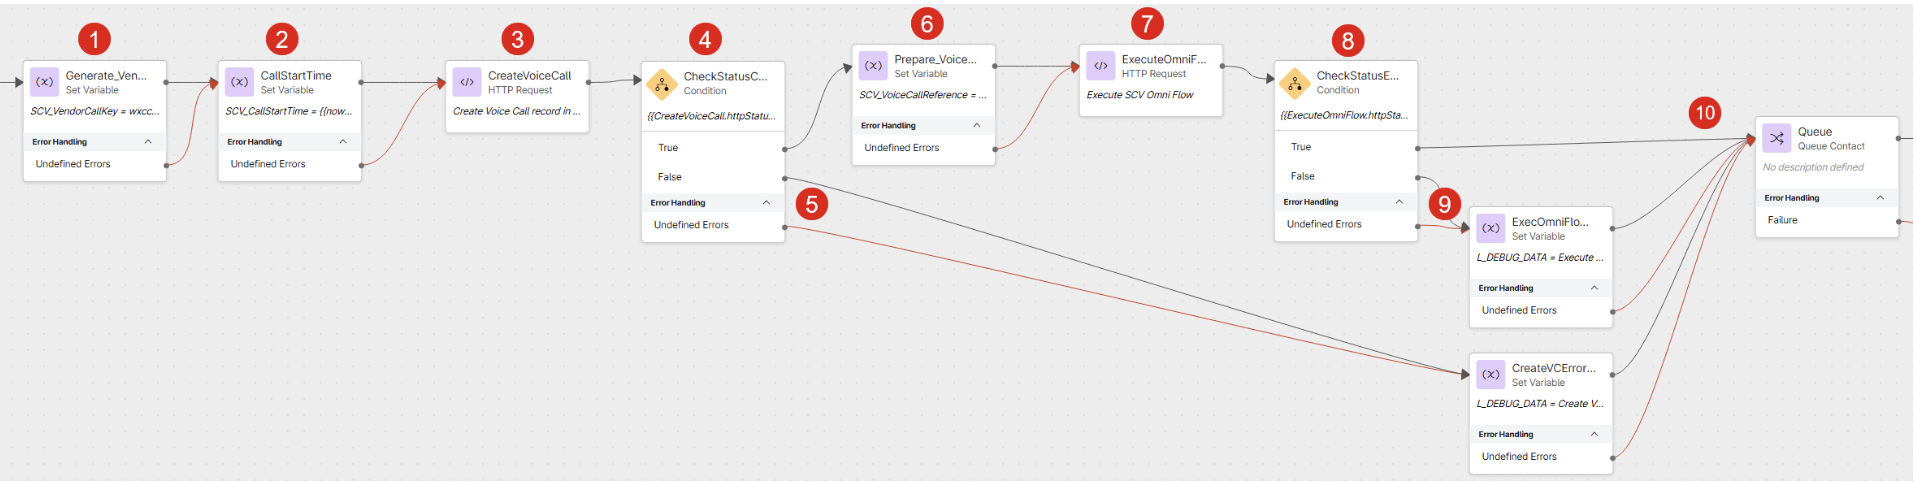
- Generate Vendor Call Key
- Set Call Start Time
- HTTP Request: Create Voice Call record
- Evaluate HTTP Response for Create Voice Call record
- Error handling for Create Voice Call record
- HTTP Request: Execute Omni Flow
- Evaluate HTTP Response for Execute Omni Flow
- Error handling for Execute Omni Flow
- Continue with call routing
| Flow | Description |
|---|---|
| Generate Vendor Call Key |
Every call handled in Service Cloud Voice creates a Voice Call record in Salesforce and requires a unique ID called Vendor Call Key. For Voice Call records created in Webex Contact Center, the Vendor Call Key must be defined in the WxCC Flow and then passed along with the call to the Agent using a Flow Variable. The vendorCallKey value must comply with the following rules:
|
| Set Call Start Time |
UTC timestamp of the call start time. This timestamp is used to create the Voice Call record and to update the Voice Call record if the caller hangs up before being routed to the agent.
|
| HTTP Request: Create Voice Call record |
This step is required for every call. After the Voice Call record is created, the Voice Call record ID must be passed with the call to the agent in a variable, together with the Vendor Call Key. Configure the used variable in the Contact Center configuration in Service Cloud Voice. |
| HTTP Request Settings |
|
HTTP Request: Create Voice Call record
This step is required for every call. After the Voice Call record is created, the Voice Call record ID must be passed with the call to the agent in a variable, together with the Vendor Call Key. Configure the used variable in the Contact Center configuration in Service Cloud Voice.
HTTP Request Settings
- Activity Label: CreateVoiceCall
- Use Authenticated Endpoint: Enabled
- Connector: Salesforce Connector created in the previous step
-
Request Path:
/services/apexrest/cisco_wxcc_scv/voice/v1/createVoiceCall - Method: POST
- Request Content Type: Application/JSON
Request Body
When creating the Voice Call record, you can also update custom fields on the Voice Call record with call data. Below are two examples of the request body, one with all the required fields but without updating custom fields, and one with custom fields.
Without updating custom fields on Voice Call record:
{
  "callCenterDevName": "<Contact Center API name>",
  "certDevName": "<cert dev name>",
  "vendorCallKey": "{{SCV_VendorCallKey}}",
  "to": "{{NewPhoneContact.DNIS}}",
  "from": "{{NewPhoneContact.ANI}}",
  "initiationMethod": "Inbound",
  "startTime": "{{SCV_CallStartTime}}",
  "participants": [
    {
      "participantKey": "{{NewPhoneContact.ANI}}",
      "type" : "END_USER"
    }
  ]
}
Example with updating custom fields on the Voice Call record:
{
  "callCenterDevName": "<Contact Center API name>",
  "certDevName": "<cert dev name>",
  "vendorCallKey": "{{SCV_VendorCallKey}}",
  "to": "{{NewPhoneContact.DNIS}}",
  "from": "{{NewPhoneContact.ANI}}",
  "initiationMethod": "Inbound",
  "startTime": "{{SCV_CallStartTime}}",
  "participants": [
    {
      "participantKey": "{{NewPhoneContact.ANI}}",
      "type" : "END_USER"
    }
  ],
  "callAttributes": "{\"custfield1__c\": \"<value1>\",\"custfield2__c\": \"<value2>\",\"custfield3__c\": \"<value3>\"}"
}
Parameters
| Property name | Value |
|---|---|
| callCenterDevName | Contact Center Developer Name |
| certDevName | API Name of Certificate (as configured in Contact Center) |
| vendorCallKey | Unique call id: {{SCV_VendorCallKey}} |
| to | CalledNumber/DNIS: {{NewPhoneContact.DNIS}} |
| from | CallingNumber/ANI: {{NewPhoneContact.ANI}} |
| startTime | UTC timestamp {{SCV_CallStartTime}} (to be set right after the
call is accepted in the script) |
| callAttributes |
Use Do not use Example:
|
Parse Settings
- Content Type: JSON
- Output Variable: SCV_VoiceCallRecordId
-
Path Expression:
$.data.voiceCallId
Voice Call record id, to be passed to the agent.
Evaluate HTTP Response for Create Voice Call record
Check the HTTP Status of the Create Voice Call http request:
- Label: statusCodeCreateVoiceCall
- Variable: CreateVoiceCall.httpStatusCode
If status code == 200 => successful else => request failed, error handling
Error handling for Create Voice Call record
For demo / debug only, play message depending on http status code.
If Create Voice Call was successful, continue with Execute Omni Flow. Otherwise, continue with call routing.
HTTP Request: Execute Omni Flow (optional step)
Use Execute Omni-Flow when you want to:
- run automated tasks, for example search for or create records, and link the records with the Voice Call record
- search for records and do screen-pop
- synchronize Salesforce and Cisco queues
- let Service Cloud Voice make the routing decision
This request always returns the "queue" or "agent" to where the call must be routed.
After executing this request, make sure you send Clear Routing if the caller hangs-up before being answered by an agent. See Webex Contact Center Event Flow.
HTTP Request Settings
- Activity Label: ExecuteOmniFlow
- Use Authenticated Endpoint: Enabled
- Connector: Salesforce Connector created in the previous step
- Request Path:
/services/apexrest/cisco_wxcc_scv/voice/v1/executeOmniFlow - Method: POST
- Request Content Type: Application/JSON
Request Body
Apart from the required fields, you can pass additional data as input variables to the Omni-Flow. Below are two examples of the request body. First without additional flow parameters, required fields only, the second with two input variables.
Example with Omni-Flow parameters:
{
  "callCenterDevName": "<Contact Center API name>",
  "certDevName": "<cert dev name>",
  "voiceCallId": "{{SCV_VoiceCallRecordId}}",
  "dialedNumber": "{{NewPhoneContact.DNIS}}",
  "flowDevName": "<flow api name>",
  "fallbackQueue": "<fallback queue name>"
}
Example with updating the custom fields on Voice Call record:
{
  "callCenterDevName": "<Contact Center API name>",
  "certDevName": "<cert dev name>",
  "voiceCallId": "{{SCV_VoiceCallRecordId}}",
  "dialedNumber": "{{NewPhoneContact.DNIS}}",
  "flowDevName": "<flow api name>",
  "fallbackQueue": "<fallback queue name>",
  "flowInputParameters":
  {
    "param1": "value1",
    "param2": "value2"
  }
}
Parameters
| Property name | Value |
|---|---|
| callCenterDevName | Contact Center Developer Name |
| certDevName | API Name of Certificate (as configured in Contact Center) |
| voiceCallId | ID of the voice call record, created in the previous step:
{{SCV_VoiceCallRecordId}}
|
| dialedNumber | CalledNumber/DNIS: {{NewPhoneContact.DNIS}}
|
| flowDevName | Developer name of the Omni-Flow to execute |
| fallbackQueue | Queue ID or Queue API name of the fallback Salesforce queue |
| flowInputParameters |
Additional inputs to the Omni-Channel flow (key-value pair). Example:
|
Parse Settings
Queue
- Content Type: JSON
- Output Variable: SCV_OmniFlowQueue
- Path Expression:
$.data.queue
"Queue" returned from Execute Omni-Flow can be used for routing.
Agent- Content Type: JSON
- Output Variable: SCV_OmniFlowAgent
- Path Expression:
$.data.agent
"Agent" returned from Execute Omni-Flow, can be used for routing.
Evaluate HTTP Response for Execute Omni Flow
Check the HTTP Status of the Execute Omni Flow http request:
- Label: statusCodeExecuteOmniFlow
- Variable: ExecuteOmniFlow.httpStatusCode
If status code == 200 => successful else => request failed, error handling.
Error handling for Execute Omni Flow
For demo / debug only, play message depending on http status code.
If Execute Omni Flow was successful, variables SCV_OmniFlowQueue and SCV_OmniFlowAgent are not set. Routing decision in call flow.
Continue with call routing
Continue in call flow, route call to agent. Optional, use SCV_OmniFlowQueue and SCV_OmniFlowAgent to select queue and agent.
Webex Contact Center Event Flow
If the caller hangs the call up before it is answered by an agent, we must update Service Cloud Voice and terminate the call.
- If Execute Omni-Flow was used, send Clear Routing to delete the Pending Service Routing (PSR)
- Send Update Voice Call, to update the start and end times on the Voice Call record and to change the status from New to Completed

- PhoneContactEnded - This event is triggered when a live call is disconnected, and all participants are removed.
- HTTP Request: Clear Routing
- HTTP Request: Update Voice Call
HTTP Request: Clear Routing
- Label: ClearRouting
- Use Authenticated Endpoint: Enabled
- Connector: Salesforce Connector created in the previous step
- Request Path:
/services/apexrest/cisco_wxcc_scv/voice/v1/clearRouting - Method: POST
Request Content Type: Application/JSON
Request Body
{
  "callCenterDevName": "<Contact Center API name>",
  "certDevName": "<cert dev name>",
  "voiceCallId": "{{SCV_VoiceCallRecordId}}"
}
Parameters
| Property name | Value |
|---|---|
| callCenterDevName | Contact Center Developer Name |
| certDevName | API Name of Certificate (as configured in Contact Center) |
| voiceCallId | ID of the voice call record, created in the previous step: SCV_VoiceCallRecordId |
Parse Settings
None.
HTTP Request: Update Voice Call
- Label: UpdateVoiceCall
- Use Authenticated Endpoint: Enabled
- Connector: Salesforce Connector created in the previous step
-
Request Path:
/services/apexrest/cisco_wxcc_scv/voice/v1/updateVoiceCall - Method: POST
- Request Content Type: Application/JSON
Request Body
{
  "callCenterDevName": "<Contact Center API name>",
  "certDevName": "<cert dev name>",
  "voiceCallId": "{{SCV_VoiceCallRecordId}}",
  "startTime": "{{SCV_CallStartTime}}",
  "endTime": "{{now() | replace({'[UTC]': ''})}}",
  "disconnectReason": { "value": "Abandoned in queue", "isError": true }
}
When you provide both startTime and endTime,
Salesforce calculates CallDurationInSeconds. Do not pass
CallDurationInSeconds in callAttributes.
Parameters
| Property name | Value |
|---|---|
| callCenterDevName | Contact Center Developer Name |
| certDevName | API Name of Certificate (as configured in Contact Center) |
| voiceCallId | ID of the voice call record, created in the previous step: SCV_VoiceCallRecordId |
| startTime | UTC timestamp of call start {{SCV_CallStartTime}} (as used
to create the Voice Call record) |
| endTime | Current UTC timestamp `{{now() |
| disconnectReason | Reason for disconnecting the call. The property isError
needs to be set to true for it to display properly. |
Parse Settings
None.
References
Language Translation
(Optional) Enable Translation Workbench
This setting is applicable only if you use Translation Language settings.
| 1 |
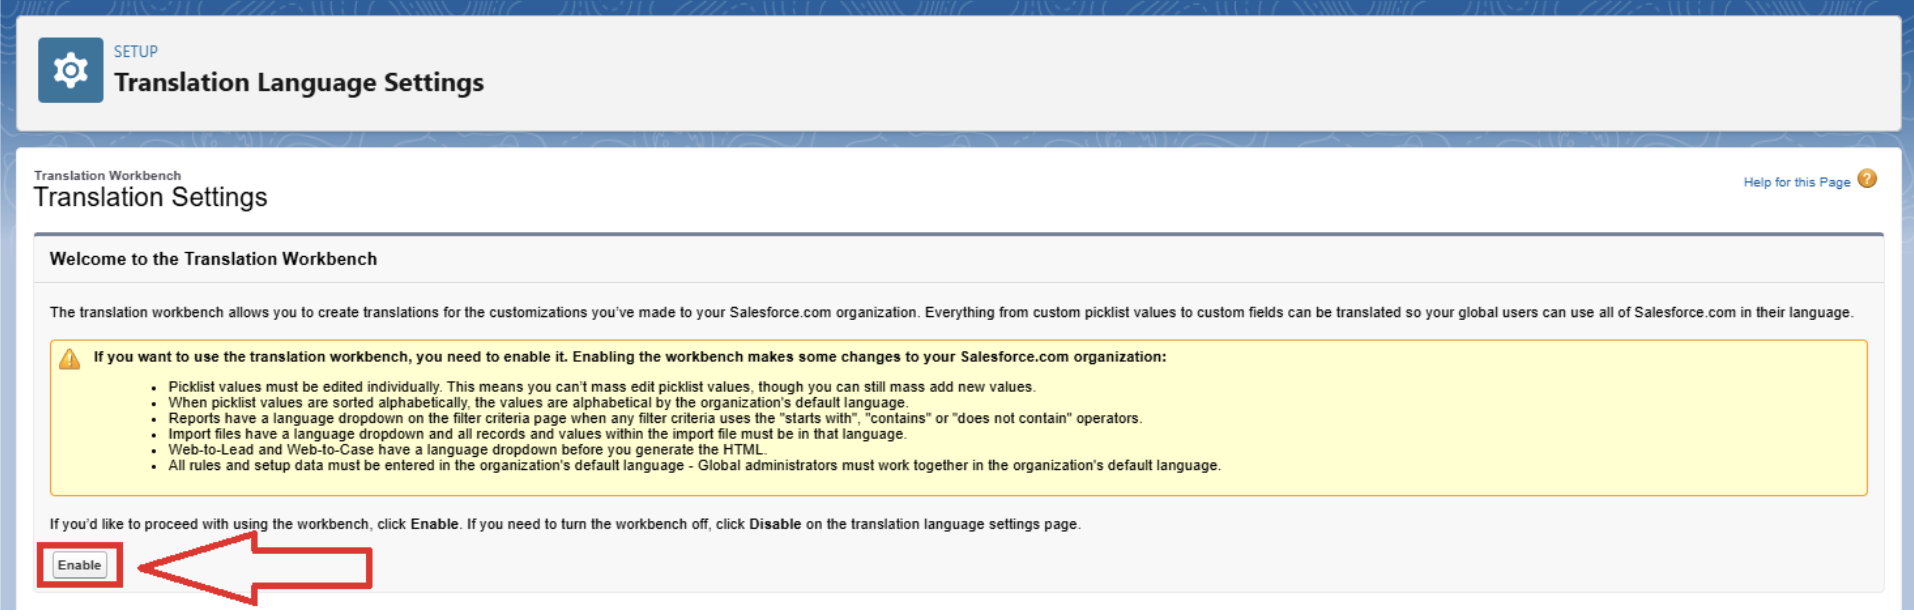
Go to Setup → Translation Workbench → Translation Language Settings. |
| 2 |
Click Enable to select translation language.
|
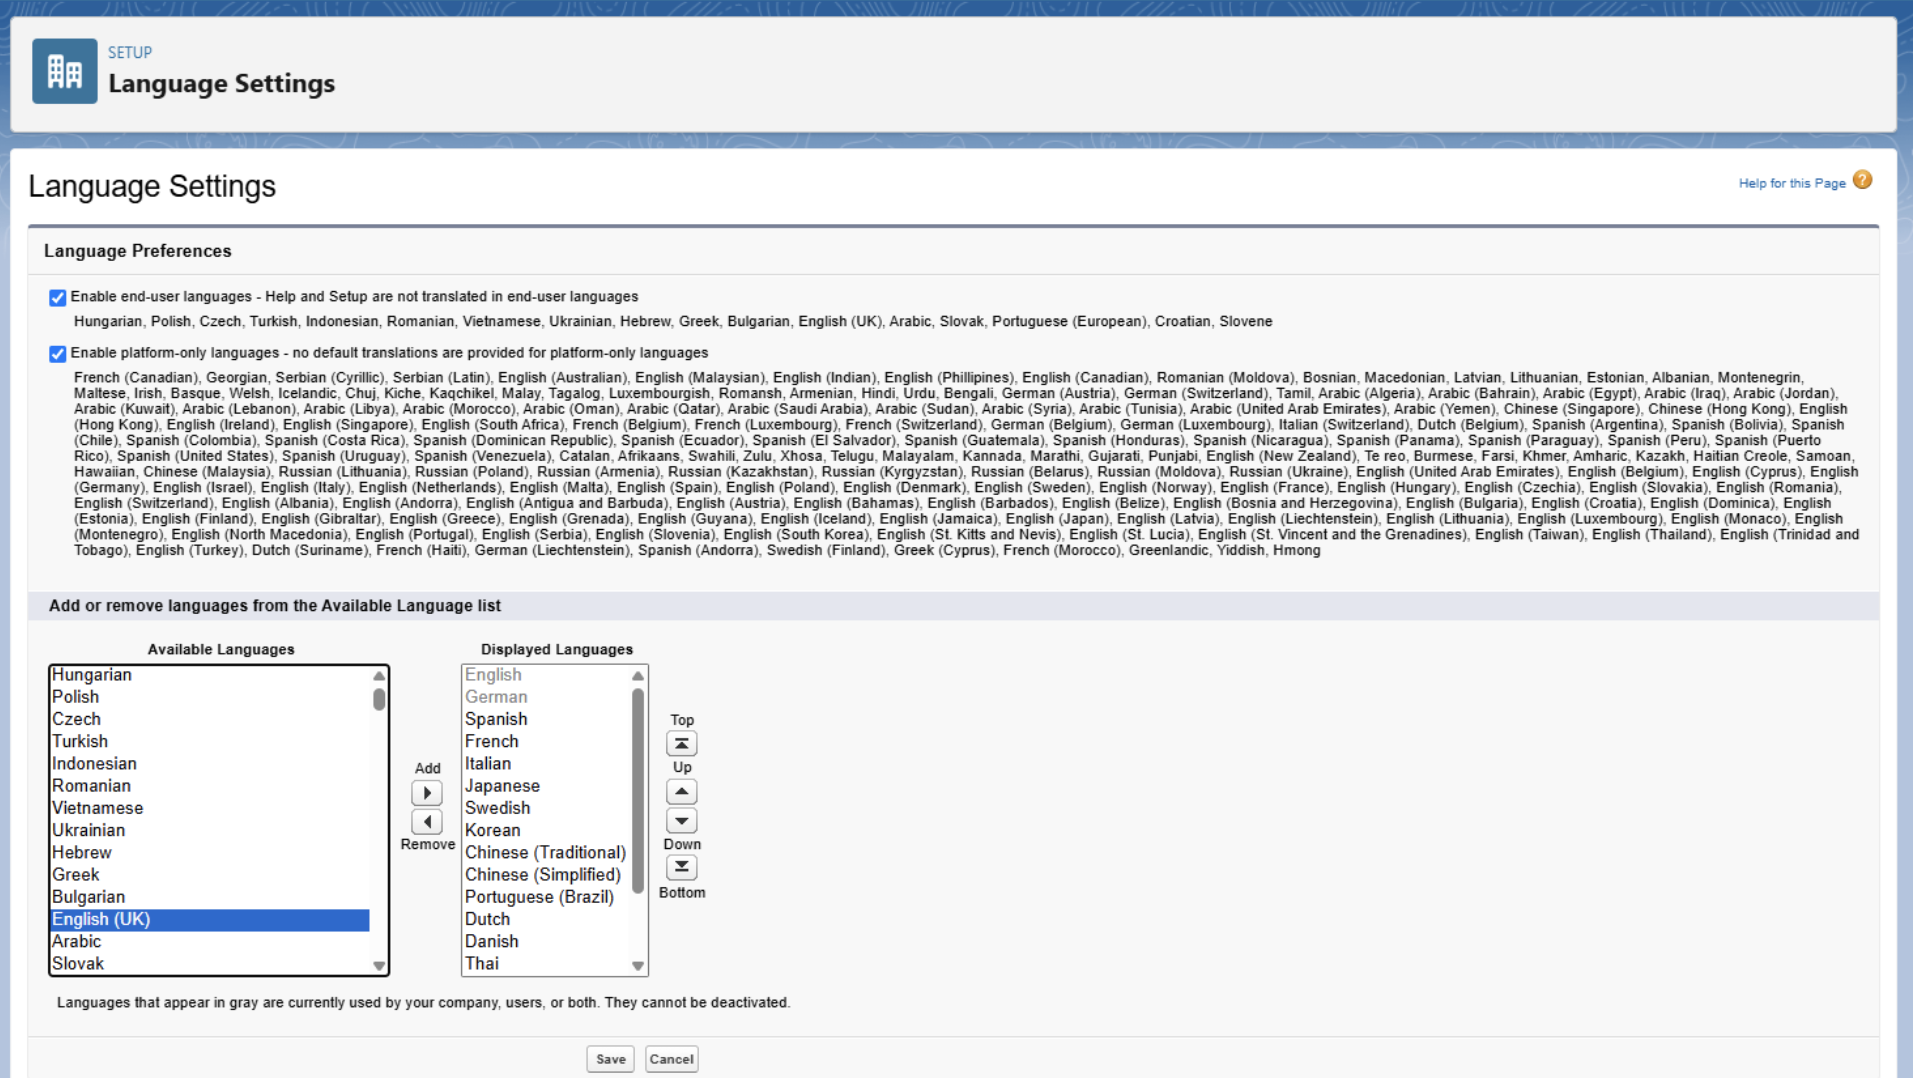
(Optional) Enable Platform-only languages
This setting is applicable only for languages other than EN-US.
| 1 |
Go to Setup → Company Settings → Language Settings. |
| 2 |
Choose the required languages. |
| 3 |
Select the following checkboxes:
|
| 4 |
Save your changes.
|
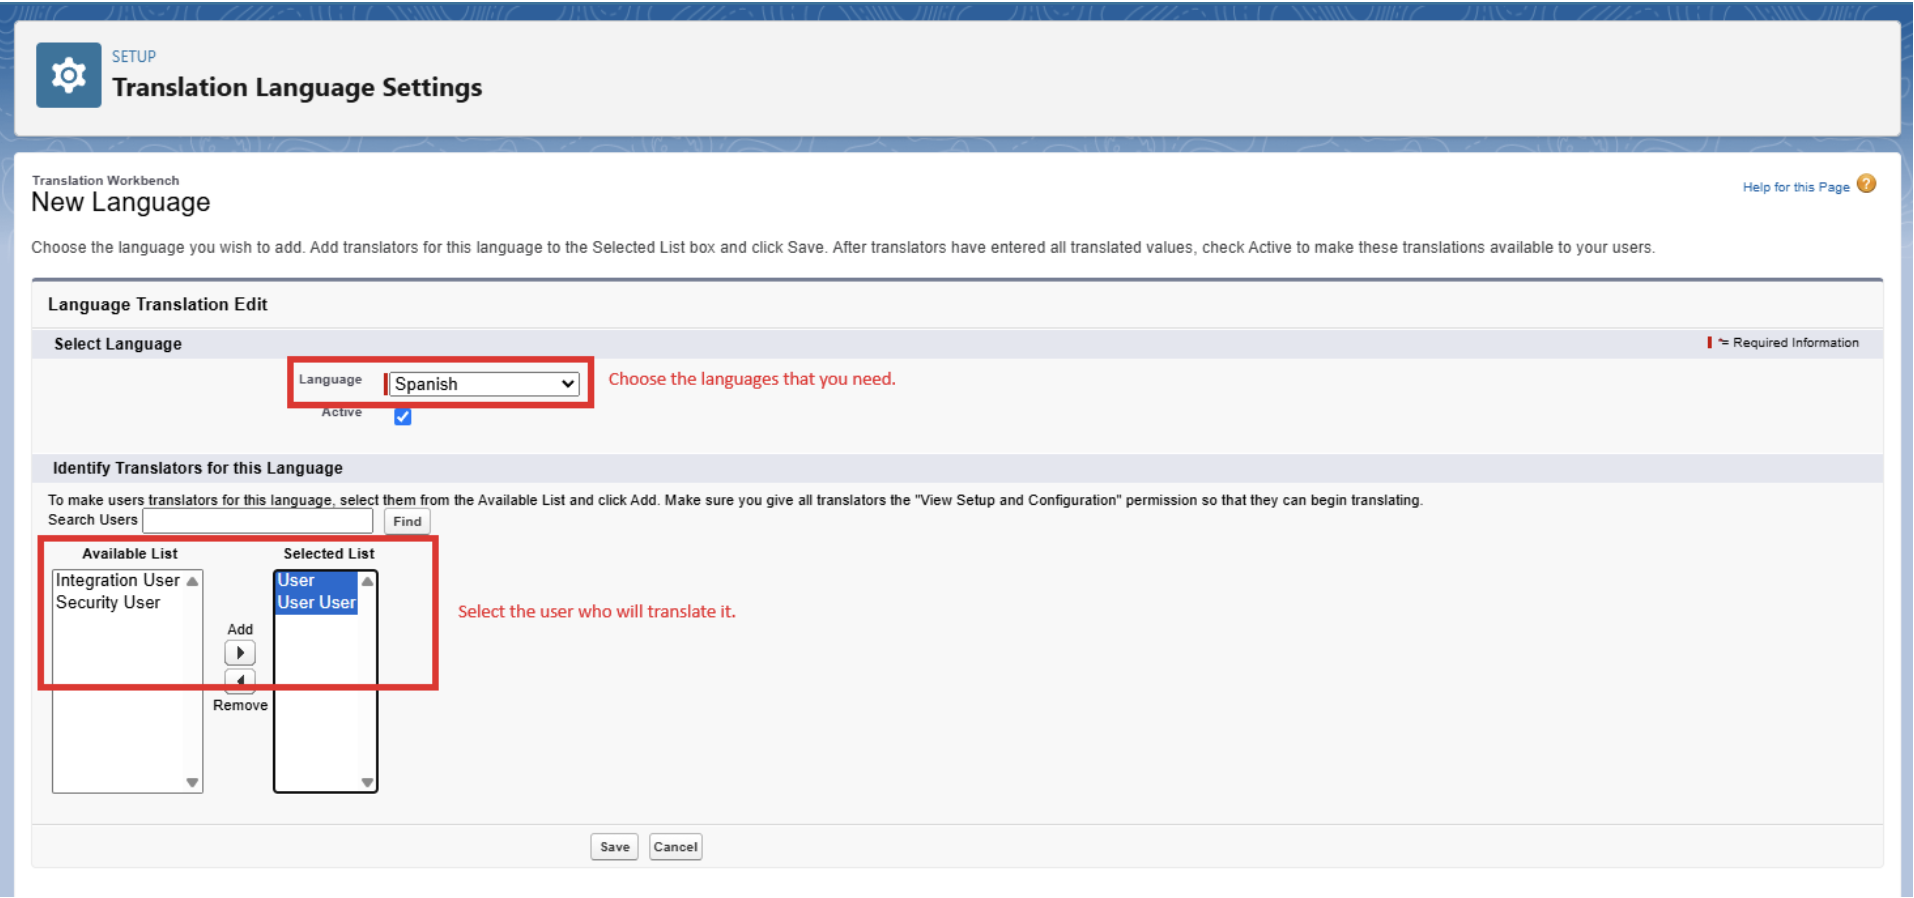
Activate the language and select the user (task)
| 1 |
Go to Setup → Translation Workbench → Translation Language Settings. |
| 2 |
Choose the language and select the user who will translate it. |
| 3 |
Save your changes.
|
Multi-Language Settings
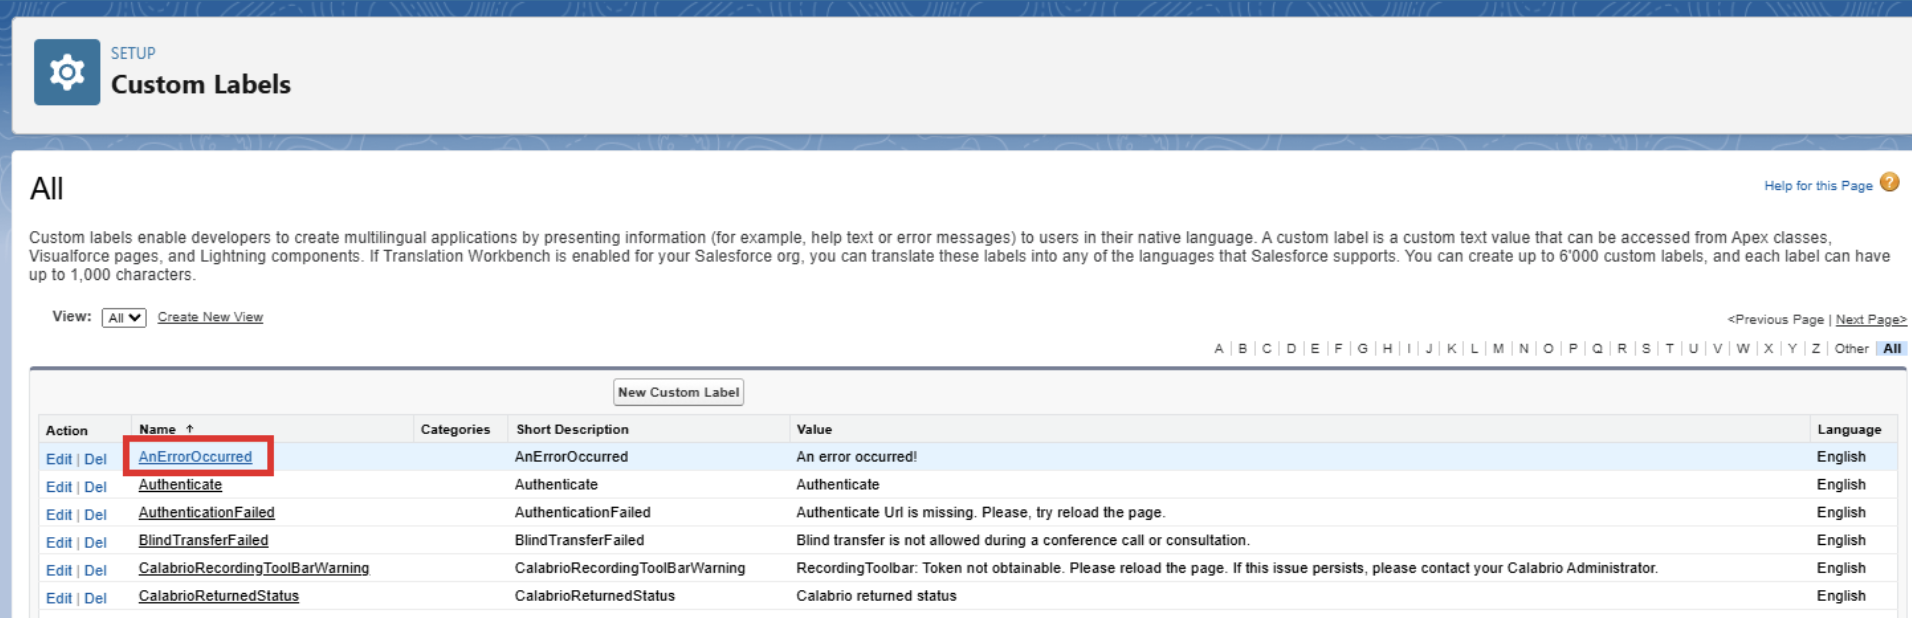
Translate Custom Labels
| 1 |
Go to Setup → Custom Labels. |
| 2 |
Select the name of the custom label to open.
|
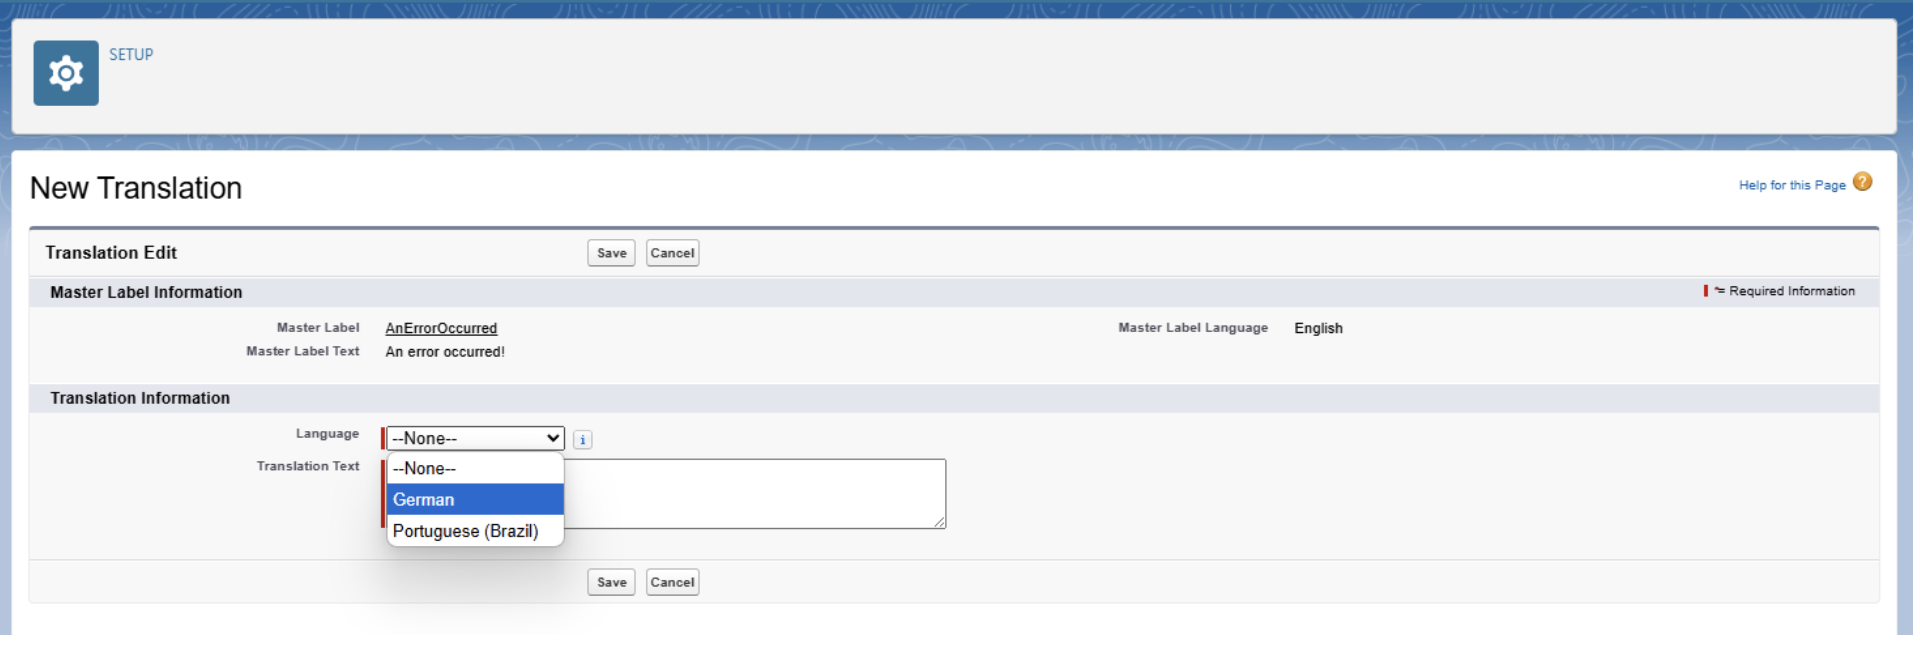
| 3 |
In the related Translations list, click |
| 4 |
Select the Language you are translating into.
|
| 5 |
Enter the translated value into the Translation Text field. This text overrides the value specified in the label's Value field when a user's default language is the translation language. |
| 6 |
Save your changes. |
Salesforce Permissions Required By User Function
The Webex Contact Center SCV Agent Permission Set contains all permissions required to work with the Webex Contact Center Gadget and the integrations developed for agents.
Apex Class Access (section)
- cisco_wxcc_scv.CiscoScvWxcc
- cisco_wxcc_scv.ServiceResponseHandler
- cisco_wxcc_scv.ServiceRouting
- cisco_wxcc_scv.TelephonyIntegrationHandler
Custom Metadata Type Accesses (section)
- cisco_wxcc_scv.WxCC Connection
Visualforce Page Access (section)
- cisco_wxcc_scv.CiscoScvLoginWxCC
- cisco_wxcc_scv.CiscoScvMainWxCC
- cisco_wxcc_scv.CiscoScvOAuthRedirect
- cisco_wxcc_scv.CiscoScvSwLoader
Service Cloud Voice API Wrapper
Pre-requisites
In order to use the Service Cloud Voice API Wrapper, a Salesforce External Client App for IVR integration must be configured.
Use the Service Cloud Voice API Wrapper
Service Cloud Voice (SCV) for Salesforce uses the Telephony Integration REST API to create and update VoiceCalls, execute Omni-Channel flows and delete PendingServiceRouting records associated to a VoiceCall. This service requires JWT authorization and the use of the PATCH HTTP method, which is currently not supported by the Cisco IP Interactive Voice Response (IVR).
In order to simplify the usage of the Telephony Integration REST API for SCV in (not only) an IVR system, a new set of APIs have been made available, which wrap the existing Salesforce API and are accessible directly from the Salesforce Org where the Webex Contact Center for Service Cloud Voice package is installed.
The Service Cloud Voice API Wrapper removes the need of authenticating a JWT token, implements additional checks on the data required by the Salesforce API and improves the response objects.
Retrieve the Access_Token
Execute a POST request to https://<your-domain-name>.my.salesforce.com/services/oauth2/token
Sending the following parameters in the body:
{
 "grant_type": "client_credentials",
 "client_id": "<consumer key of the connected app>",
 "client_secret": "<consumer secret of the connected app>"
 }
If the request is successful, the following JSON response will be returned:
{
 "access_token": "<your-access-token>",
 "instance_url": "<your-org-base-url>",
 "id": "https://login.salesforce.com/id/<id>/<id>",
 "token_type": "Bearer",
 "issued_at": "<timestamp>",
 "signature": "<unique-signature-code>"
 }
Execute the requests
The instance URL must contain my.salesforce.com.
Example of a correct instance url: https://abc-123.my.salesforce.com
Using any other domain as instance URL (i.e. https://abc-123.lightning.force.com) results in a 401 Unauthorized status with a INVALID_SESSION_ID errorCode returned.
Create Voice Call (section)
Creates a VoiceCall record containing the participants (that is, the caller and recipient) for the VoiceCall record. When you create a VoiceCall record, a conversation is created in Salesforce. Only use this API in a real-time context, which means that you should invoke this API only when a call is initiated. This API can also be used to create VoiceCall records for transfer and conference calls by including the parentVoiceCallId parameter in the request payload.
Endpoint URI
<instance_url>/services/apexrest/cisco_wxcc_scv/voice/v1/createVoiceCall
HTTP Method
POST
Headers
Authorization: Bearer <access_token>
Content-Type: application/json
Parameters
{
 "callCenterDevName": "contactCenterDevName123",
 "certDevName": "certDevName123",
 "vendorCallKey": "5324881f-1e84-4367-8930-f69a74b30ca6",
 "to": "8002345678",
 "from": "4081456688",
 "initiationMethod": "Inbound",
 "startTime": "2019-07-02T17:32:28Z",
 "participants": [
 {
 "participantKey": "4081456688",
 "type" : "END_USER"
 }
 ],
 "callAttributes": "{\"devscv24__AAA_Test__c\":\"field value\",\"Other_Field__c\":\"other value\"}",
 "parentVoiceCallId": "fsdfzuhsdfsa-43556fgef3-56g44gv4ew",
 "callOrigin": "Preview",
 "queue": "queue123"
 }
Use callAttributes only for custom fields on the VoiceCall object.
Standard VoiceCall fields, such as Description and
CallDurationInSeconds, are not updated through
callAttributes. To populate
CallDurationInSeconds, provide startTime and
endTime so Salesforce can calculate the value.
Response (successful)
{
 "data": {
 "voiceCallId": "00X000012345abc"
 },
 "errors": null,
 "success": true
 }
Response (with errors)
{
 "data": null,
 "errors": ["Error message 1", "Error message 2"],
 "success": false
 }
Update Voice Call
Updates the VoiceCall after the call has ended. Use this API to update call-related parameters that are unavailable during the VoiceCall creation stage. The Update VoiceCall API is an asynchronous operation. You can’t query for the status of the API call.
This endpoint can also be used to create a VoiceCall even after the call has ended. This behavior is useful in scenarios where you want to log a record in Salesforce for abandoned or missed calls, or for any other scenario where a VoiceCall wasn’t already created.
Endpoint URI
<instance_url>/services/apexrest/cisco_wxcc_scv/voice/v1/updateVoiceCall
HTTP Method
POST
Headers
Authorization: Bearer <access_token>
Content-Type: application/json
Parameters
{
 "callCenterDevName": "contactCenterDevName123",
 "certDevName": "certDevName123",
 "voiceCallId": "00X000012345abc",
 "startTime": "2020-08-26T21:21:14Z",
 "endTime": "2019-08-26T21:21:34Z",
 "isActiveCall": true,
 "fromNumber": "1234",
 "callOrigin": "Preview",
 "enqueueTime": "2019-08-26T21:21:34Z",
 "acceptTime": "2019-08-26T21:21:24Z",
 "numberOfHolds": 20,
 "queue": "queue123",
 "agent": "agent123",
 "agentInteractionDuration": 12,
 "longestHoldDuration": 10,
 "totalHoldDuration": 21,
 "recordingLocation": "Bern",
 "totalRecordingDuration": 55,
 "callAttributes": "{\"devscv24__AAA_Test__c\":\"field value\",\"Other_Field__c\":\"other value\"}",
 "disconnectReason": {
 "value": "TELECOM_PROBLEM",
 "isError": true
 }
 }
A detailed description about the parameters accepted by this request can be found in the Salesforce official documentation under the "Parameters" section.
Response (successful)
{
 "data": {
 "status": "pending"
 },
 "errors": null,
 "success": true
 }
The Update VoiceCall API is an asynchronous operation. You can’t query for the status of the API call.
Response (with errors)
{
 "data": null,
 "errors": ["Error message 1", "Error message 2"],
 "success": false
 }
Execute Omni-flow
Executes the Omni-Channel flow to route calls. It passes the call ID (Salesforce VoiceCallId or telephony vendor ContactId) as parameters to the flow and returns the agent or queue routing instructions to the contact flow. By default, Service Cloud Voice uses the Omni-Channel flow (or fallback queue) specified for the phone channel that matches the dialed number. If the dialed number doesn’t match an existing phone channel, you can optionally set a new dialed number, Omni-Channel flow, and fallback queue as input parameters to this API call.
Service Cloud Voice uses this order of precedence to route calls:
- Uses the Omni-Channel Flow and Fallback Queue settings for the phone channel that matches the dialed number. The flow takes precedence. If the flow fails, the fallback queue is used.
- Uses the flowDevName and fallbackQueue parameters specified in the Execute Omniflow API call.
Endpoint URI
<instance_url>/services/apexrest/cisco_wxcc_scv/voice/v1/executeOmniFlow
HTTP Method
POST
Headers
Authorization: Bearer <access_token>
Content-Type: application/json
Parameters
{
  "callCenterDevName": "contactCenterDevName123",
  "certDevName": "certDevName123",
  "voiceCallId": "00X000012345abc",
  "dialedNumber": "+18445791189",
  "flowDevName": "Route_VoiceCall",
  "fallbackQueue": "00G111222333444",
  "flowInputParameters":
  {
    "Input1": "one",
    "Input2": "two"
  }
}
- The voiceCallId parameter is the Salesforce voiceCallId or the telephony vendor’s contact ID.
- A detailed description about the parameters accepted by this request can be found in the Salesforce official documentation under the "Parameters" section.
Response (successful)
{
  "data": {
    "queue": "queue info",
    "agent": "agent info"
  },
  "errors": null,
  "success": true
}
AGENT_INFO and QUEUE_INFO correspond to the ExternalId field in the CallCenterRoutingMap
Response (with errors)
{
 "data": null,
 "errors": ["Error message 1", "Error message 2"],
 "success": false
 }
Clear routing
Deletes the PendingServiceRouting (PSR) record for a voice call. This API doesn’t need to be called for most scenarios; the PSR record is automatically deleted when the call is no longer being routed. However, there are some scenarios, like for missed or abandoned calls when using partner telephony systems where you must explicitly call this API to clear the PSR record.
Endpoint URI
<instance_url>/services/apexrest/cisco_wxcc_scv/voice/v1/clearRouting
HTTP Method
POST
Headers
Authorization: Bearer <access_token>
Content-Type: application/json
Parameters
{
 "callCenterDevName": "contactCenterDevName123",
 "certDevName": "certDevName123",
 "voiceCallId": "00X000012345abc"
 }
- The voiceCallId parameter is the Salesforce voiceCallId or the telephony vendor’s contact ID.
- A detailed description about the parameters accepted by this request can be found in the Salesforce official documentation under the "Parameters" section.
Response (successful)
{
 "data": {
 "status": "Success"
 },
 "errors": null,
 "success": true
 }
Response (with errors)
{
 "data": null,
 "errors": ["Error message 1", "Error message 2"],
 "success": false
 }
Phone Number Translations
Various interaction between Service Cloud Voice and Webex Contact Center depend on Phone number translations. Due to international differences and customer specific applications, a customizable tool is needed to transfer phone numbers from format A to format B.
The Webex Contact Center for Service Cloud Voice solution automatically removes all characters except numbers, hashtags (#), asterisks (*), commas (,) and leading plus signs (+). It also removes the first occurrence of (0). This will be done BEFORE your Phone Number Translations are applied.
This guide describes how to configure phone number translations.
Fields
Phone number translations are stored in Name-Value fields. This allows you to configure an unlimited amount of rules per feature.
The configuration is stored as a JSON string.
Note that backslashes need to be escaped e.g. \d+ becomes \\d+.
{"Remove all characters but digits":"[1,17]->[^\\d]+","To internal number":"[7,17]->(\\d{7})(\\d{4})->$2"}The field Name is technically not used. It is there to add a human readable string in order to quickly identify the purpose of this rule. Good names are for example: Remove all leading zeros, Add leading plus etc.
Creating translation rules
Rules are provided as Regular Expressions. To be more accurate: The JavaScript implementation of Regular Expressions.
A good way to start is by reading the RegExp document from the MDN web docs.
Nevertheless, creating complex Regular Expressions is often cumbersome. Therefore, we added extra syntax to make configuration as easy as possible.
The figure below shows the general syntax of a phone number translation rule:

Predicate
The predicate is used to specify an interval defining the length of the number to match.

The predicate above specifies that all numbers with a length between 7 and 11 characters (including edges + spaces) match.
Predicates always match the original length of the number. This helps in simplifying the configuration by reducing the risk of colliding rules for internal / external numbers.
Pattern
The Pattern specifies the format of the number to match.

The pattern above states that the number must consist of digits only and selects them.
Selector
Selectors define the final format of the number. If characters / digits need to be added which were not originally present, this is the place to do it.
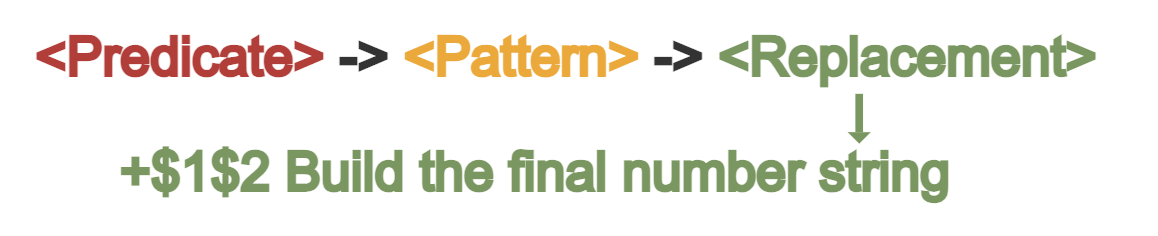
The selector is the last step in building the number. Based on the pattern output, the selector builds up the new number.
Example 1
The following example shows how to transfer a number received from the Contact Center in the format of 0319175200 to the Swiss E164 format +41 31 917 52 00.
This example uses two translation rules (1. and 2.)

The first rule in this example actually does not change the number. For numbers between 1 and 17 characters in length, anything else but digits would be removed. Since there is no non-digit present, nothing changes.
The second rule applies to numbers which are exactly 10 characters long (originally). 0319175200 matches and therefore the rule gets applied. The pattern specifies that the number must start with a group of one digit (\d{1}), followed by a group of two digits (\d{2}), followed by a group of three digits (\d{3}), and so on.
The selector then accesses the pattern groups to define the new number string. This means $2 references the first (\d{2}) and therefore contains 31.
Example 2
The following example shows how to transfer a number received from the Contact Center in the format +14693150217 to the US E164 format +1 469 315 0217.
This example uses two translation rules (1. and 2.)

- This number is exactly 12 characters long, so the rule “Add spaces to US Numbers” is applied.
- (\+1) says that the number must start with +1. If the number is 12 characters long, but does not start with a +1, the rule is canceled and nothing is changed.
- (\d{3}) says that +1 must be followed by 3 digits.
- (\d{3}) says that the last 3 digits must be followed by another 3 digits.
- (\d{4}) says that the last 3 digits must be followed by 4 digits.
If any of this does not match, the number will not be changed.
So, all the rules apply to “+14693150217”. Therefore, the number is changed by “$1 $2 $3 $4”:
- $1 refers to the group (\+1), the number to send to Service Cloud Voice looks like +1.
- $2 refers to the first of the two (\d{3}), the number to send to Service Cloud Voice looks like +1 469.
- $3 refers to the second of the two (\d{3}), the number to send to Service Cloud Voice looks like +1 469 315.
- $4 refers to the last group (\d{4}), the number to send to Service Cloud Voice looks like +1 469 315 0217.
The spaces in the replacement part of the rule “$1 $2 $3 $4” are used directly. So if you use “$1-$2-$3-$4” the number would be translated to: +1-469-315-0217
And you are also allowed to remove groups: [12, 12]->(\+1)(\d{3})(\d{3})(\d{4})->$2 $3 $4 will be translated to: 469 315 0217. [12, 12]->(\+1)(\d{3})(\d{3})(\d{4})-> $3 $4 will be translated to: 315 0217.
It is also possible to convert an international US number to a local one like: [12, 12]->(\+1)(\d{3})(\d{3})(\d{4})->($2) $3-$4.
Then the incoming number “+14693150217” will be translated to: (469) 315-0217.
Example 3
The following example shows how to transfer a number received from the Contact Center in the format of +491515555531 to the German E164 format +49 151 5555 531.
This example uses two translation rules (1. and 2.)

- This number is exactly 13 characters long, so the rule “Add spaces to German Numbers” is applied.
- (\+49) says that the number must start with +49. If the number is 13 characters long, but does not start with a +49, the rule is canceled and nothing is changed.
- (\d{3}) says that +49 must be followed by 3 digits.
- (\d{4}) says that the last 3 digits must be followed by 4 digits.
- (\d{3}) says that the last 4 digits must be followed by 3 digits.
If any of this does not match, the number will not be changed.
So all the rules apply to “+491515555531”. Therefore, the number is changed by “$1 $2 $3 $4”:
- $1 refers to the group (\+49), the number to send to Service Cloud Voice looks like +49.
- $2 refers to the first of the two (\d{3}), the number to send to Service Cloud Voice looks like +49 151.
- $3 refers to the second of the two (\d{4}), the number to send to Service Cloud Voice looks like +49 151 5555.
- $4 refers to the last group (\d{3}), the number to send to Service Cloud Voice looks like +49 151 5555 531.
The same applies to rule one. You can use the replacement part $1 $2 $3 $4 to choose what to use from the number.
More Translation Regex examples
| Description | Translation Regex |
|---|---|
| Remove all characters but digits | [1,17]->[^\d]+ |
| Remove all characters but digits & + | [1,17]->[^+\d]+ |
| Description | Translation Regex |
|---|---|
| Remove +1 | [12,12]->(.{1})(\d{1})(\d{10})->$3 |
| Remove +1 | [10,12]->(^\+1+)(\d+)->$2 |
| Remove +49 | [10,15]->(^\+49+)(\d+)->$2 |
| Remove +49 | [10,15]->(.{1})(\d{2})(\d{9})->$3 |
| Remove +41 | [10,13]->(^\+41+)(\d+)->$2 |
| Remove +41 | [10,13]->(.{1})(\d{2})(\d{9})->$3 |
| Remove +XX | [10,14]->(^\++)(\d{2})(\d+)->$3 |
| Description | Translation Regex |
|---|---|
| Remove + and replace it with zeros US E164 | [10,12]->(.{1})(\d{1})(\d{10})-> 001 $3 |
| Remove +1 and replace it with zeros US E164 | [10,12]->(^\+1+)(\d+)-> 001$2 |
| Remove + and replace it with zeros DE E164 | [12,15]->(.{1})(\d{2})(\d{10})-> 0049 $3 |
| Remove +49 and replace it with zeros DE E164 | [10,12]->(^\+49+)(\d+)-> 0049$2 |
| Remove + and replace it with zeros CH E164 | [10,13]->(.{1})(\d{2})(\d{9})-> 0041 $3 |
| Remove +41 and replace it with zeros CH E164 | [10,12]->(^\+41+)(\d+)-> 0041$2 |
| Description | Translation Regex |
|---|---|
| US Number with Space | [12,17]->(\d{1})(\d{3})(\d{3})(\d{4})->+1 $2 $3 $4 |
| US Number with Space | [12,17]->(\+1)(\d{3})(\d{3})(\d{4})->$1 $2 $3 $4 |
| DE Number with Space | [12,17]->(\d{2})(\d{3})(\d{4})(\d{3})->+49 $2 $3 $4 |
| DE Number with Space | [12,17]->(\+49)(\d{3})(\d{4})(\d{3})->$1 $2 $3 $4 |
| CH Number with Space | [12,17]->(\d{2})(\d{2})(\d{3})(\d{2})(\d{2})->+41 $2 $3 $4 |
| CH Number with Space | [12,17]->(\+41)(\d{2})(\d{3})(\d{2})(\d{2})->$1 $2 $3 $4 |
VoiceCall Page Configuration
Configure the VoiceCall record page
The VoiceCall record page comes pre-configured by default, with a 3-column layout and the following components:
- Actions & recommendations
- Call Notes
- Call details
- Recordings
Components can be freely removed or added to the page, depending on business needs. Different page layouts can also be used, but some components, such as the Call Recording Player and Conversation Body, can fit only on medium and large areas on the template.
Display the Wrap-Up Reason component
The Wrap-Up Reason component must be displayed during the call and during Wrap-Up.
Add the Cisco Wrap-Up Reason component to the VoiceCall record page:
- Drag the Cisco Wrap-Up Reason Lightning web component from the Custom area of the Lightning Components list into the VoiceCall Record Page.
- Click Save.
- Click Activate.
- Click Assign as Org Default.
- Click Save.
- Click Save again, then click Back arrow to return to the page.
The Cisco Wrap-Up Reason component will automatically display during the call and during WrapUp:
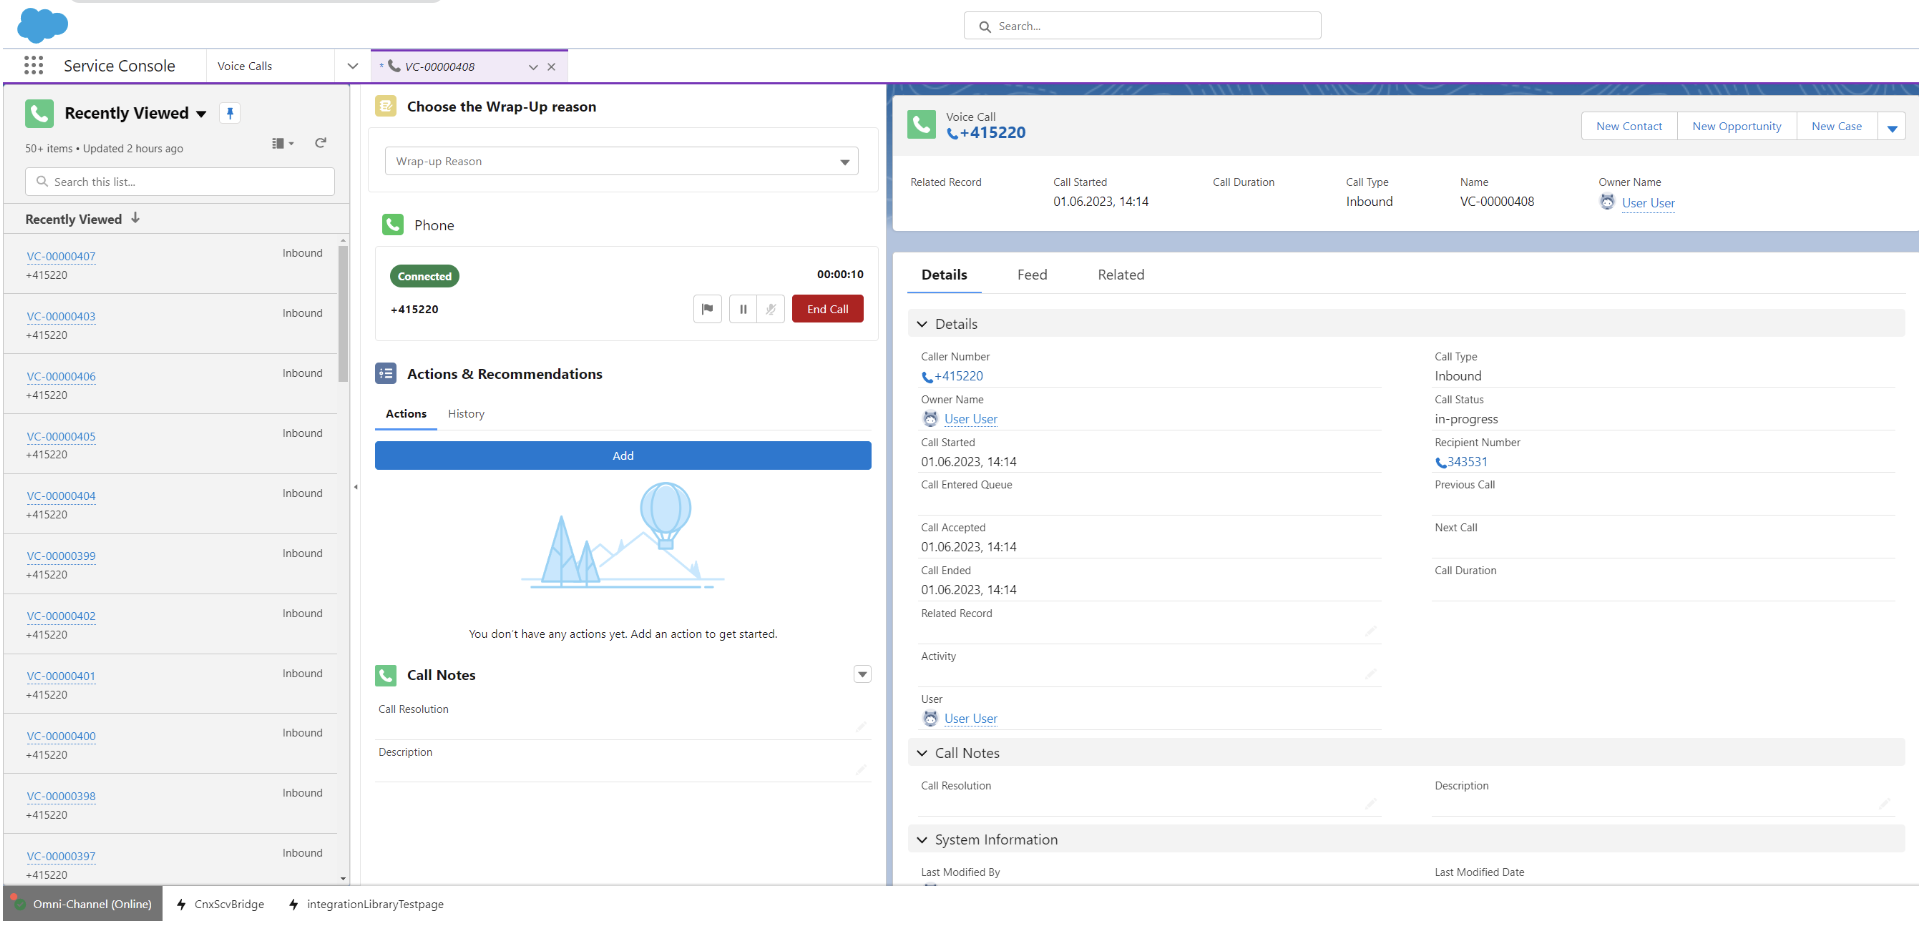
If added to the page, the Cisco Wrap-Up Reason component is displayed for every call, also if no Wrap-Up is configured in Cisco Contact Center.
Display the Call Recording Player
The Call Recording Player will be displayed if a recording link has been saved for the corresponding Voice Call.
Follow these steps to add the Call Recording Player component to the VoiceCall Record Page:
- Drag the Call Recording Player Lightning Web Component to the VoiceCall Record Page
- Click Save.
- Click Activate.
- Click Assign as Org Default.
- Click Save.
- Click Save again, then click Back arrow to return to the page.
Webex Admins
Flow Configuration
Screen Pop
A "Screen Pop" node is available in the Webex Contact Center Flow. It can be used to trigger a screen pop inside Service Cloud Voice or in a separate window.
Further information on this function can be found in the Flow Designer documentation .
Screen Pop in a separate window
To open the screen pop in a separate window an absolute URL must be provided in the "Screen Pop" node. The queryParameters will be appended as search parameters to the URL.
The following modes are supported:
- New browser tab - Always opens a new browser tab.
- Existing browser tab - On the first Existing browser tab screen pop, a new browser tab is opened. That tab will be the dedicated tab for subsequent Existing browser tab screen pops and the URL will be refreshed within that specific browser tab.
- Inside Desktop - Is handled the same way as New browser tab.
The currently opened page can prevent a redirect. In that case an Existing browser tab screen pop opens in a new browser tab.


