
Thanks for your feedback.
Virtual extension configuration in Control Hub
 Feedback?
You may have remote workers on a separate telephony system or a key customer you want to reach easily. First, you can associate an extension with their external phone number. Then, you can contact them using their extension just like you would contact anybody else in your organization with an assigned extension. For calls from external phone numbers associated with a virtual extension, the virtual extension and the name assigned to that virtual extension are presented on the called destination within Webex Calling.
There are two modes of operation for virtual extensions. The mode you choose applies to your entire organization. The majority of customers uses default mode (Standard). The steps presented here apply to Standard mode. You can select the other available mode (Enhanced). However, virtual extensions won't function correctly unless your PSTN provider supports particular network signaling extensions (edge case). For more information, see Change your virtual extension mode section.
In Standard mode, virtual extensions must be associated with a valid E.164.
You can set up virtual extensions at the organization or location level. The organization level enables everyone across your organization to dial the same extension number to reach someone. You can use the location level virtual extension like any other extension assigned to the specific location.
Users at the specific location can dial the extension. However, users at other locations can reach the virtual extension by dialing the location routing prefix plus the extension.
| 1 |
Sign in to Control Hub. |
| 2 |
Go to , and then click Add New to create Virtual Extension.
|
| 3 |
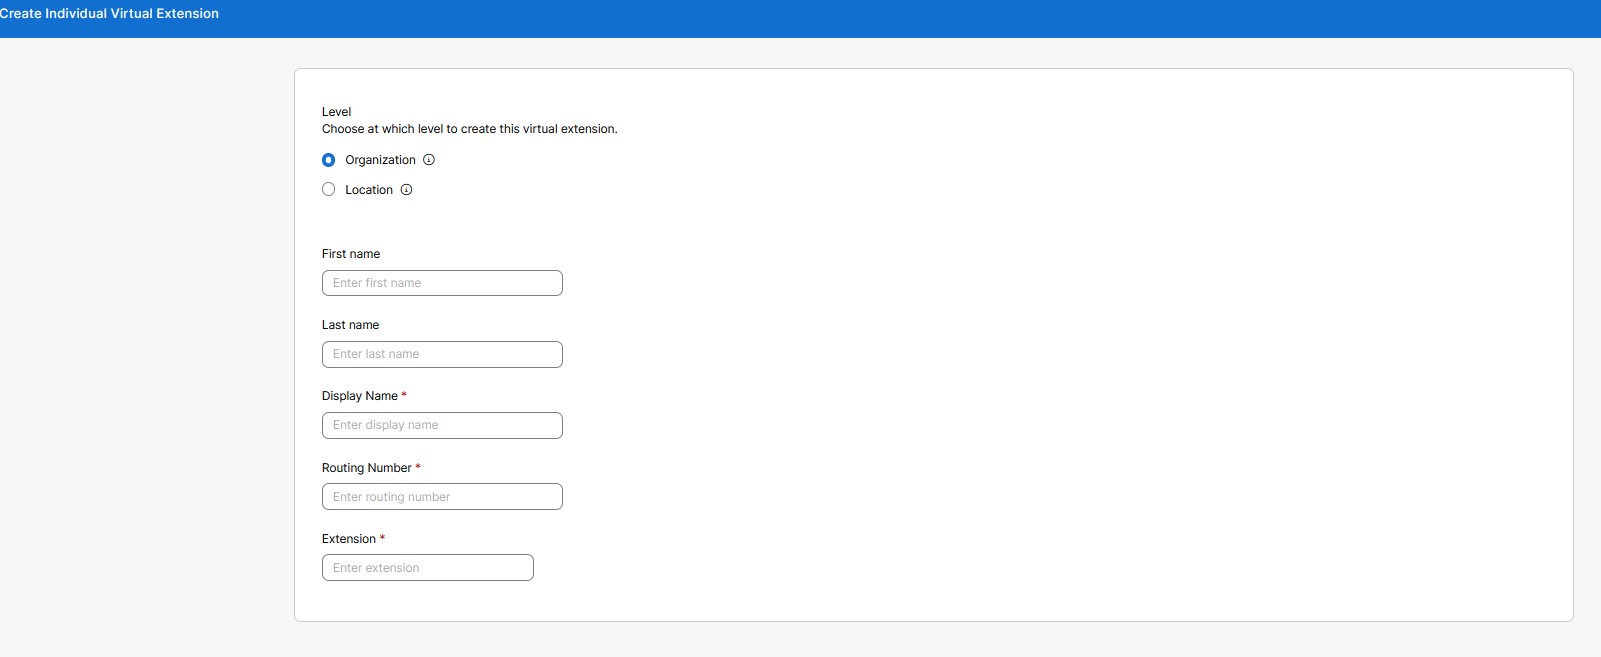
Choose at which level to create this virtual extension:
|
| 4 |
Fill in these details to display in directories and caller ID for incoming calls:
Define the extension of the person that you wish to reach and the E.164 telephone number. Then click Save. The Display Name, Routing Number, and Extension are mandatory fields. The first and last name fields are optional. The search function is based on the Display Name, First Name, and the Last Name.
|
Use this option to create bulk extensions for external numbers. You can create up to 3000 virtual extensions for an organization, and up to 3000 extensions at each location.
| 1 |
Sign in to Control Hub. |
| 2 |
Go to On the Prefer to create Virtual Extensions in bulk message, click Open the bulk editor. The Manage Individual Virtual Extension window displays. 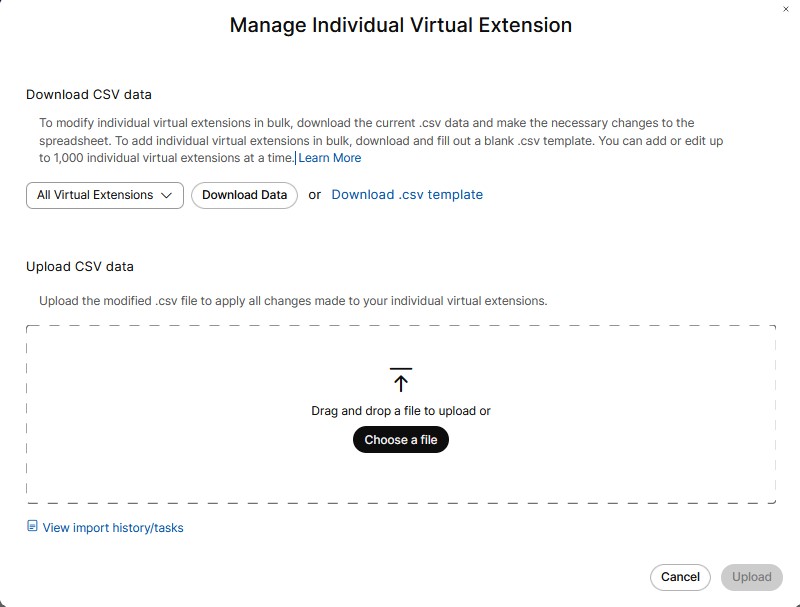
|
| 3 |
From the drop-down menu list, choose a location to add multiple extensions with convenience. |
| 4 |
Click Download Data or Download .csv template to verify that your CSV file is properly formatted, making sure to fill in the required information. |
| 5 |
Make sure to fill in an extension at the organization or location level. The location name, if assigning an extension at the location level. Enter the first and last name, display name, phone number, and extension. Upload the CSV file by dragging and dropping or clicking Choose a file. |
| 6 |
Click View Import history/Tasks to view the status of your CSV import and see whether you've encountered any errors. The display column name is mandatory in the virtual-extension-template.csv while the first and last name columns are optional. |
| 1 |
Sign in to Control Hub. |
| 2 |
Go to . |
| 3 |
In the Virtual Extension page, select the desired virtual extension name from the list. This displays a side panel. You can edit any specific virtual extension. |
| 4 |
Click Save to retain the changes. Or Click Cancel to exit. |
You can delete single or multiple virtual extension entries.
| 1 |
Sign in to Control Hub. |
| 2 |
Go to . |
| 3 |
In the Virtual Extension page, you can select multiple Virtual Extension to delete the virtual extension entries. Under Actions, click ... and select Delete. This deletes a single virtual extension. Or Select multiple check boxes, click Delete. A confirmation message appears. |
| 4 |
Click Delete to remove the virtual extension. Or Click Cancel to exit. |
By default, the virtual extensions that you create use the Standard mode. Another mode, enhanced signaling mode, is available to all customers, however, virtual extensions won't function properly in this mode unless your PSTN provider supports special network signaling extensions and there aren't many PSTN providers that do.
| 1 |
From the customer view in https://admin.webex.com, go to . |
| 2 |
Scroll down to Virtual Extensions Mode, select Enhanced signaling mode, and then click Save. 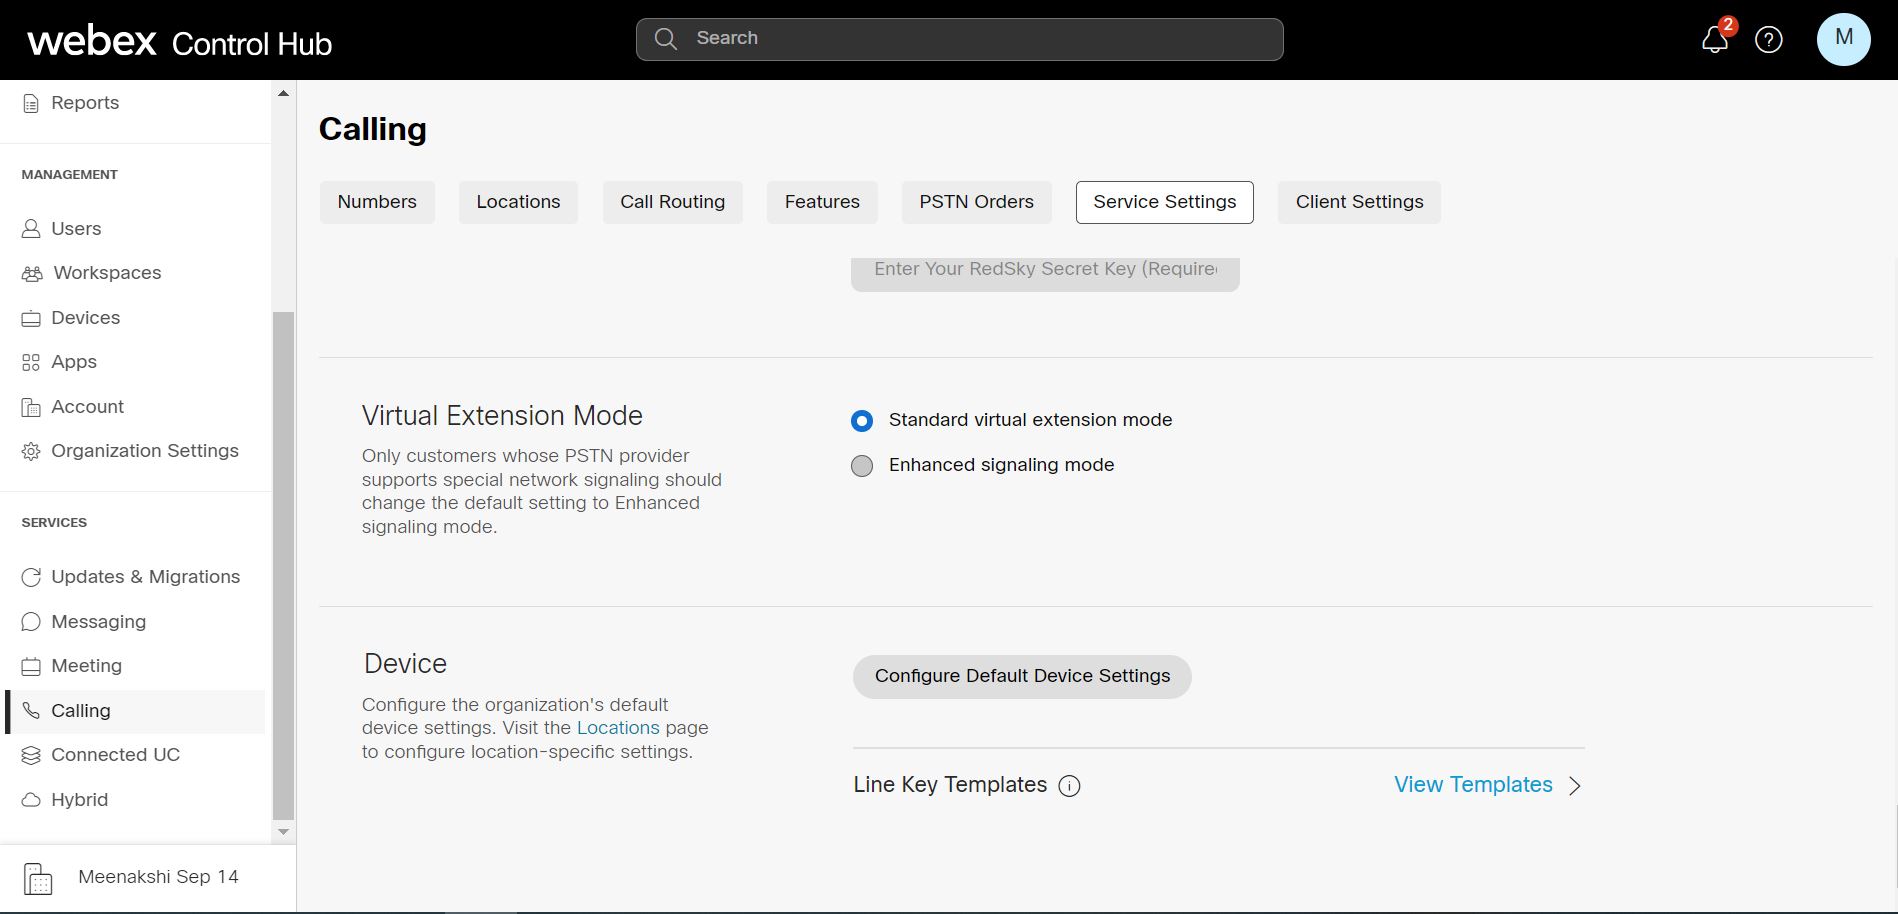
|
Virtual extension integrates remote workers on a separate telephony system into Webex Calling and enables extension dialing. The current limitation of virtual extensions is 3000 per location or organization level. Virtual extension ranges help scale routing for a range greater than 3000. Using these ranges, you can define patterns that can be used to route calls at a location level or at an organization level. You are allowed to define ranges in addition to individual extensions. This works in both Standard and Enhanced modes.
Virtual extension ranges allow scaling beyond the limit of 3000 individual virtual extensions. It also reduces the setup effort, as a single range may cover many extensions.
The main differences are:
|
|
Directory Search |
Extension, Routing Number |
|---|---|---|
|
Individual virtual extensions |
Contacts are searchable by name within each entry. |
A specific extension and routing number are configured for each entry. |
|
Virtual extension ranges |
There is no search for contacts since they are general patterns. |
An extension is dynamically matched via an extension pattern, and the routing number is dynamically created or matched using a prefix + matched extension pattern. |
| 1 |
Sign in to Control Hub. |
| 2 |
Go to , and click Manage. |
| 3 |
Click Virtual Extension Range. |
| 4 |
In the Create Virtual Extension Range page, choose at which level you want to create the virtual extension. As with individual virtual extensions, you can create this range at an Organization level or Location level. |
| 5 |
In the Name field, enter the name you want to define. You can enter up to 1-40 Unicode characters. The name must be unique. Another virtual extension range can’t duplicate it. |
| 6 |
In the Prefix field, enter the prefix. Follow these guidelines when you’re entering the values:
Prefix works in two modes -
|
| 7 |
In the Extension Patterns section, enter an extension pattern. You can add up to 100 patterns at a time. Extension patterns can include one or more right-justified wildcards “X” matching any digit.
Extension patterns have different length restrictions based on the range level.
You can add multiple extension patterns within an extension range. Extension patterns
The precedence order is identical, within the virtual extension range match, to that within the individual virtual extension match.
The most specific match (fewest 'X' wildcards) within each step is used when multiple matches are found. |
You can modify patterns. You can also modify the prefix used for an extension range and extension patterns associated with the prefix.
| 1 |
Sign in to Control Hub. |
| 2 |
Go to . This page lists the defined ranges, and you can select a scope for it. |
| 3 |
In the Virtual Extension Range page, choose All Virtual Extension Ranges or Location or Organization from the drop-down menu list. This displays a list of locations.
|
| 4 |
Select the desired virtual extension range name from the list. This displays a side panel. You can edit a particular virtual extension range. |
| 5 |
Click Save. Or Click Cancel to exit. |
You can delete single or multiple virtual extension range entries.
| 1 |
Sign in to Control Hub. |
| 2 |
Go to . |
| 3 |
In the Virtual Extension Range page, you can select multiple Name check boxes to delete the virtual extension range entries. Under Actions, click ... and select Delete. This deletes a single virtual extension range entry. Or Check multiple check boxes, click Delete to delete the selected entries. A confirmation message appears. |
| 4 |
Click Delete Extension Range to remove the entries. Or Click Cancel to exit. |
Bulk upload refers to changes performed with a comma-separated values (.csv) template. You can bulk add, modify, or export operations using the CSV template. The fields in the Web User Interface are mapped to specific columns in the CSV template. You can download and upload the ranges as well as the patterns. The following is a list of columns mapped to the respective fields in the CSV template.
Administrators can bulk manage user calling data with bulk inserts or updates for features using CSV file, see Manage user calling data.
|
Field or Column Name |
Description |
|---|---|
|
The following fields or columns cannot be modified through bulk management: Name, Level, and Location Name. | |
|
Name |
The name of the virtual extension range. |
|
Level |
The level (Location or Organization) of the virtual extension range. |
|
Location Name |
The location name for a location level virtual extension range. Not set for an organization level virtual extension range. |
|
Prefix |
The prefix for the virtual extension range. |
|
Extension Pattern Action |
Indicates the action to be performed for the extension patterns:
|
|
Extension Pattern 1-20 |
20 columns, each may contain an extension pattern. |
You can also perform the following tasks:
Download CSV data
You can download current data in .csv format to make bulk changes to virtual extension ranges. You can also download and fill out a blank .csv template to add virtual extension ranges simultaneously. Up to 1000 CSV rows can be added. The CSV can contain multiple rows for the same range, as each row can hold a maximum of 20 extension patterns. Hence, it might need multiple rows for one range.
-
Go to .
-
Choose Location or Organization from the drop-down menu list.
-
Click Download Data or Download .csv template to download data in .csv format.
Upload CSV data
You can upload the modified .csv file to apply all changes to your virtual extension ranges.
You can either drag and drop the file to upload or choose a file to upload. Click Upload.
View import history or tasks
You can view the import history or tasks.


