
Thanks for your feedback.
Get started with your Cisco Video Phone 8875
 Feedback?
Cisco Video Phone 8875 is a video phone with a high-definition camera, a touch screen, and is designed for video calls and meetings in work offices and home offices.
For details about your phone specifications and features, see Cisco Video Phone 8875 product page.

The following items came with your Cisco Video Phone 8875. If any items are missing, contact your administrator.
-
A handset
-
A foot stand
-
A handset cable
-
An Ethernet cable
-
A pointer card containing product help and compliance information
If your network doesn't support Power over Ethernet (PoE), order the power cube and a compatible cord. For the available power cube and cords, see the Ordering information section in Cisco Video Phone 8875 Data Sheet.
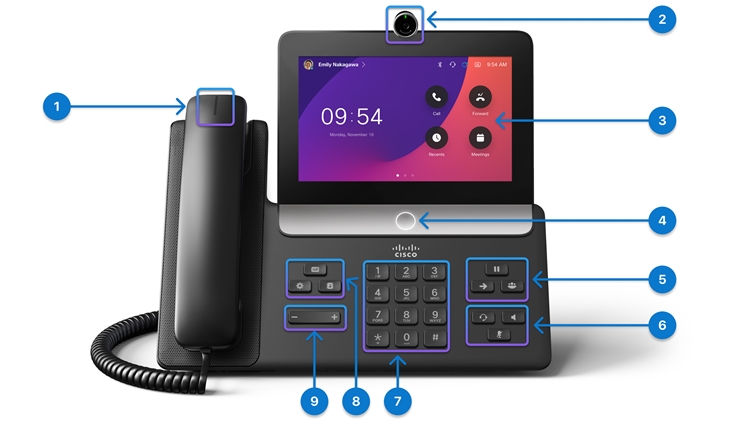
Hardware and buttons
Your phone has several buttons that allow you to access to the phone features.
Use the following figures to identify the phone buttons and hardware items.
|
Hardware Feature |
Purpose |
|---|---|
|
1. Handset and Handset light strip |
Indicates call states: Indicates whether you have an incoming call (flashing red) or a new voice message (steady red). |
|
2. Camera |
The high-definition camera with a physical shutter and a vertically adjustable hinge. Use the camera for video calls |
|
3. Touchscreen |
The LCD touchscreen (6.7 in, 1024 x 600 resolution) Use the touchscreen to use and configure the phone features. |
|
4. Home button |
Press it to go back to the Home screen. |
|
5. Hold/Resume, Conference, and Transfer |
Hold/Resume
Conference
Transfer |
|
6. Headset, Speakerphone, and Mute |
Headset
Speakerphone
Mute |
|
7. Alphanumeric keypad |
Use the keypad to input characters. |
|
8. Messages, Settings, and Contacts |
Messages
Settings
Contacts |
|
9. Volume button |
|
 : Adjust the handset, headset, and speakerphone volume (off hook), and the ringer volume (on hook and when the phone is idle).
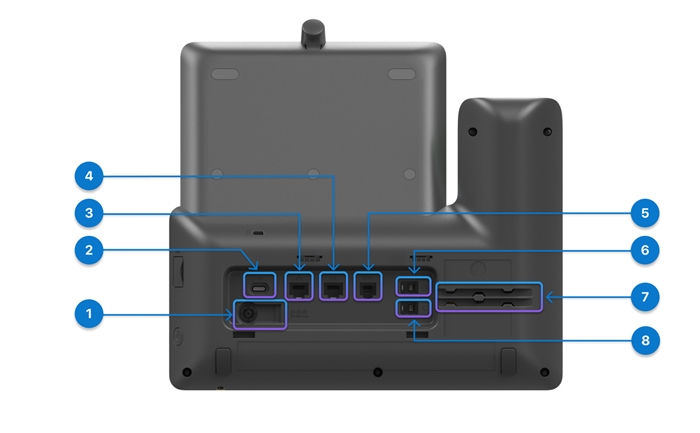
|
Port |
Description |
|---|---|
|
1. Power port |
Connect the shipped AC adapter to this port to power up your phone. |
|
2. USB-C port |
Connect your USB-C headset to this port. |
|
3. Ethernet port |
Connect this port to your Ethernet port on the wall or on your router with the shipped Ethernet cable. |
|
4. PC port |
Used for getting network connection from your laptop or another IP phone. |
|
5. Auxiliary port |
Connect your AUX headset to this port. |
|
6. Analog headset port |
Connect your RJ-9 headset to this port. |
|
7. Cable sockets |
Used for holding the analog headset cable and the handset cable. |
|
8. Handset port |
Connect your handset to this port with the shipped handset cable. |
|
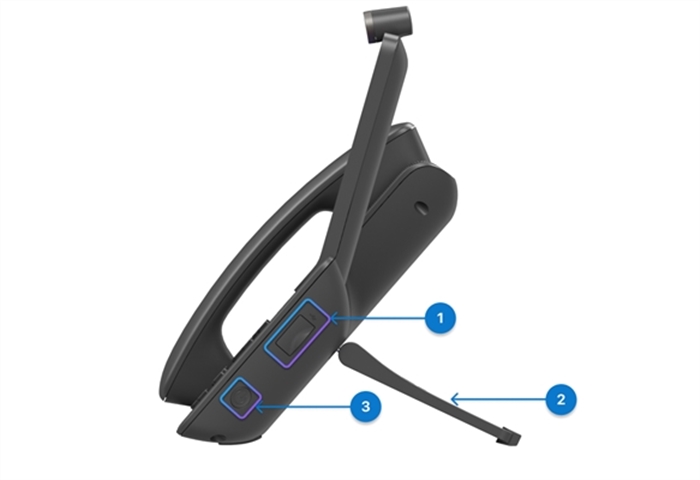
Port |
Description |
|---|---|
|
1. USB-A port |
Connect your USB-A headset to this port. |
|
2. Foot stand |
Supports your phone standing on a desk. |
|
3. Power button |
Press it to turn on or off your phone. |
Get your phone ready by installing the components and get it connected to the network and power.
The phone register process varies with deployment ways. Your phone may get registered automatically when you connect it to the network. Otherwise, you must get the activation code from your administrator to register your phone.
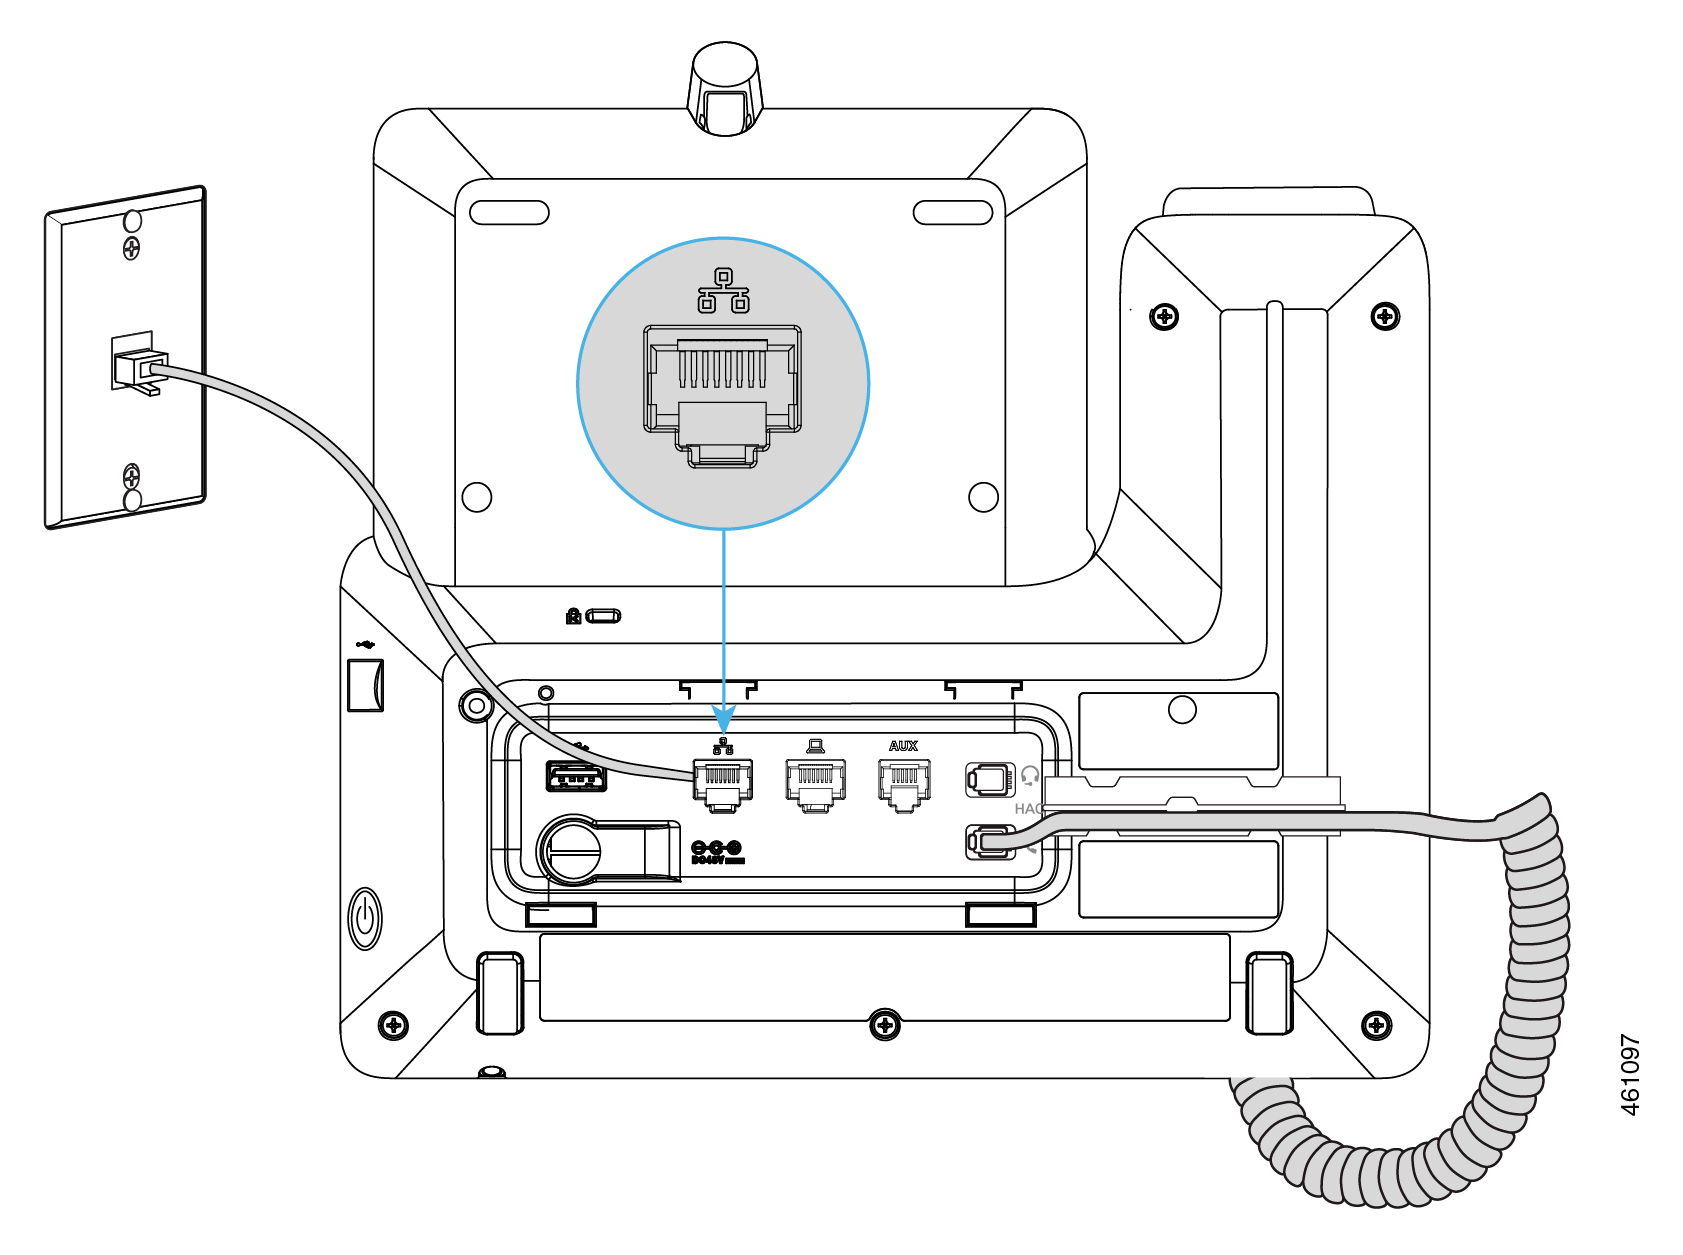
Use the information in this section to connect your phone in a wired network.
Your phone supports Power over Ethernet (PoE). If your network supports PoE, an Ethernet connection powers up your phone and connects it to the network. You don't have to connect the shipped power adapter.
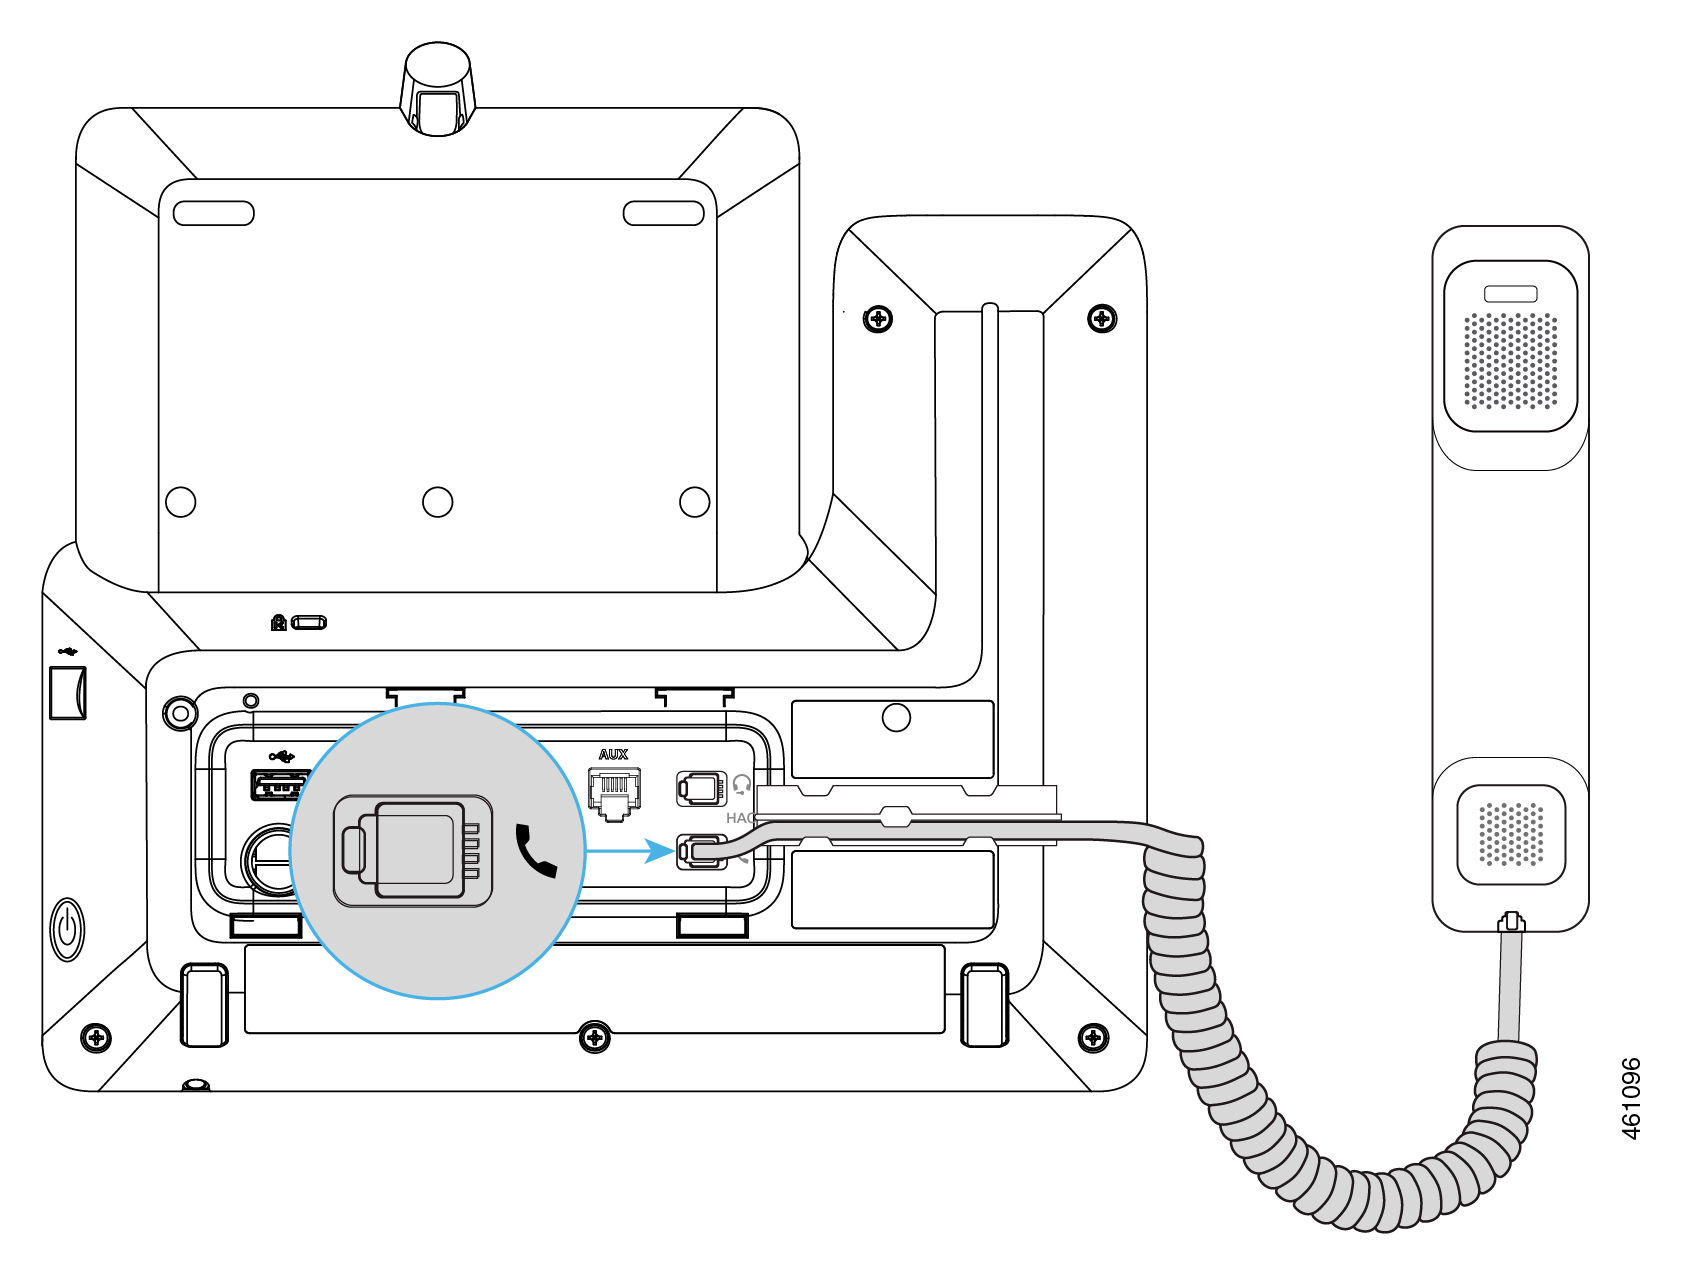
| 1 |
Connect the shipped handset to the handset port.
|
| 2 |
Insert the foot stand to the slots on the back of the phone. For you to easily read the screen and eliminate glare on the screen, adjust the foot stand to change the phone to a proper angle.
|
| 3 |
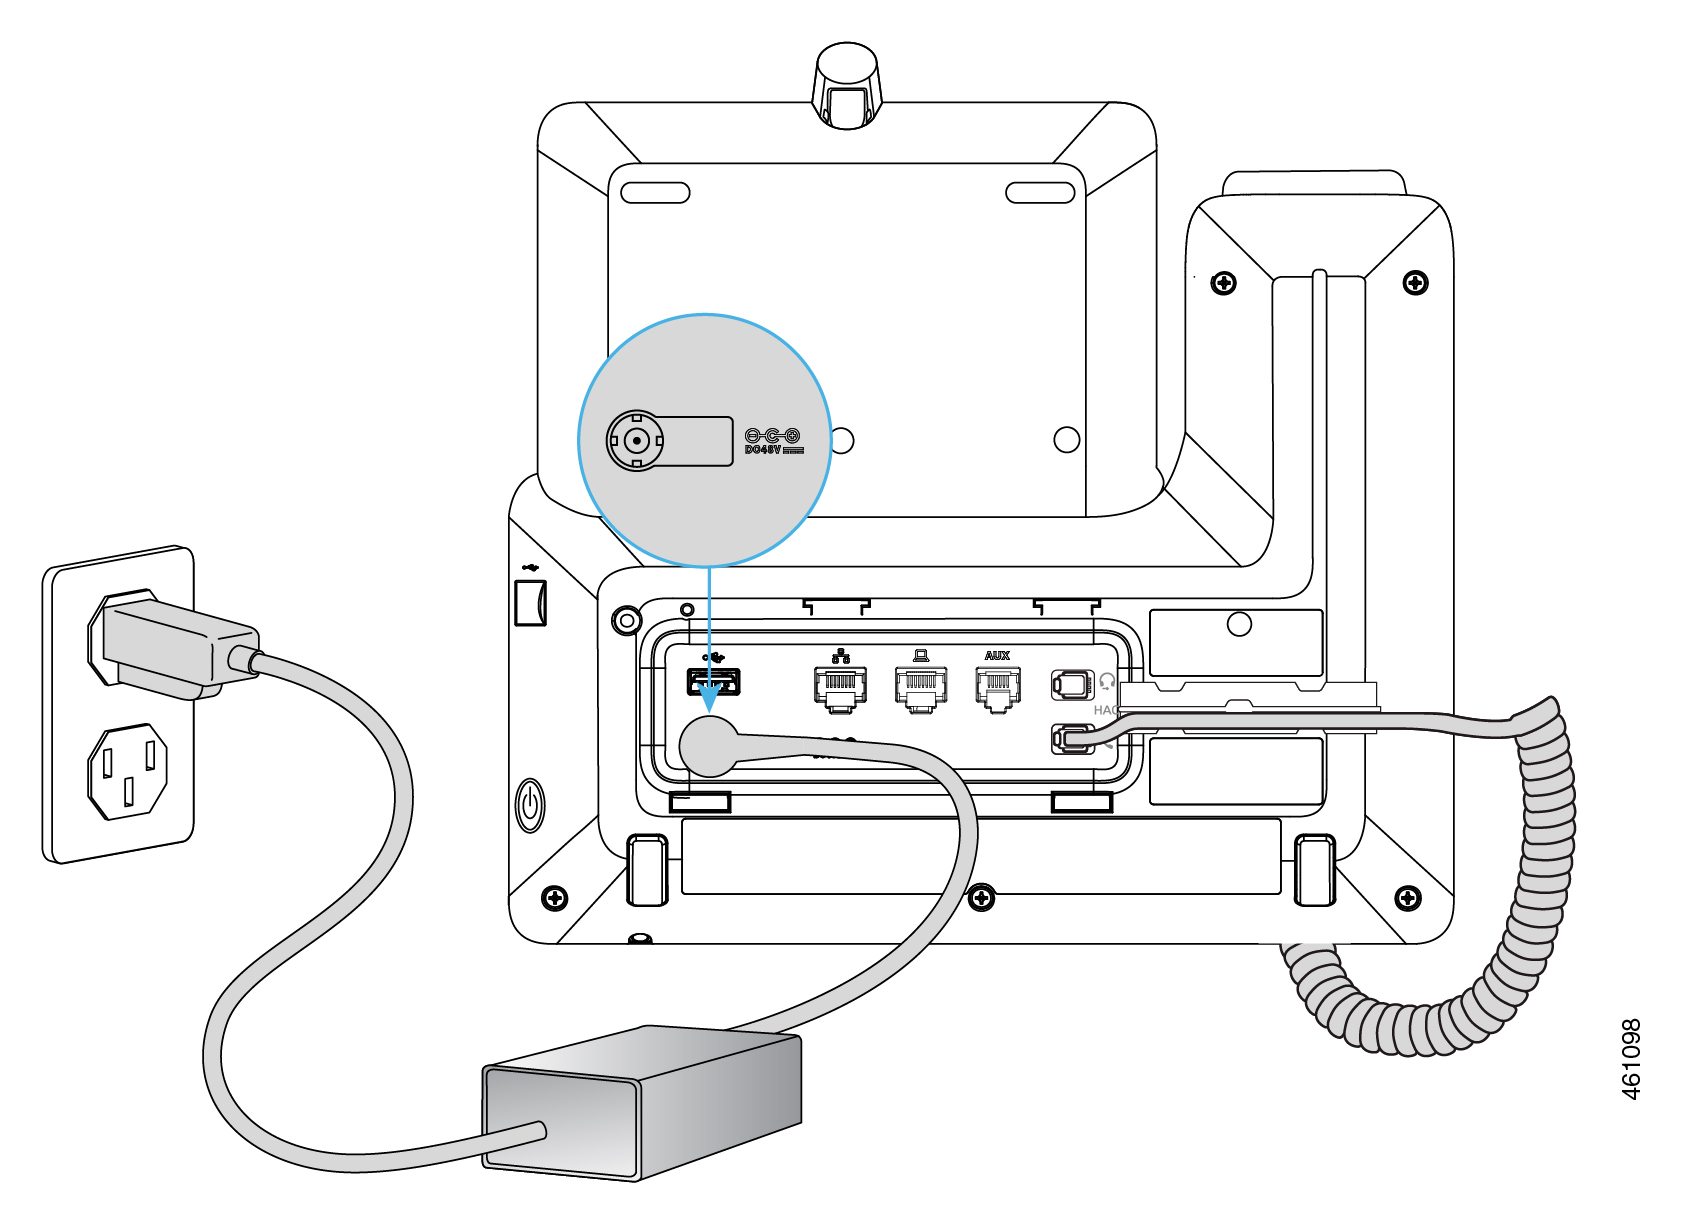
Connect your phone to the network with the shipped Ethernet cable. Your phone boots up automatically when it connects to the power source.
If your network supports PoE, your phone powers up when you connect it to the network. Otherwise, go to the next step to connect the power adapter.
|
| 4 |
Connect your phone to a power socket with the shipped power adapter. Your phone boots up automatically when it connects to the power source.
If your network supports PoE, skip this step.
|

What to do next
Follow the steps in this section to connect your phone in a wireless network.
| 1 |
Connect the shipped handset to the handset port.
|
| 2 |
Insert the foot stand to the slots on the back of the phone. For you to easily read the screen and eliminate glare on the screen, adjust the foot stand to change the phone to a proper angle.
|
| 3 |
Connect your phone to a power socket with the shipped power adapter.
Your phone boots up automatically when it connects to the power source.
|
| 4 |
Press Start on the Welcome screen. |
| 5 |
Choose your wireless network from the list, enter the username and password, and press Apply. |
What to do next
Depending on how your administrator configures your phone on the call control system, you might use one of the following methods to register your phone:
- Method 1: No action is required during the phone registration. The registration is done automatically.
- Method 2: A 16-digit activation code is required during the phone registration. You can get it from your administrator in advance. Enter the activation code when you are prompted for it.
- Method 3: A service domain and user credentials (user ID and password) are required if you select domain during the phone registration. You can get it from your administrator in advance. Enter the service domain and then user credentials when you are prompted for it.
- Method 4: An alternate TFTP server address is required if your phone is missing a TFTP address. You can get it from your administrator when this situation occurs. You need to manually enter the alternate TFTP server to continue the registration.
-
Method 5: For Cisco Desk Phone 9800 Series, you can scan the NFC tag on the phone
for the registration. The NFC reader/writer can be preconfigured with necessary information
to deploy or provision the phone.
Cisco Desk Phone 9811, 9841NR, 9851NR, 9861NR, and 9871NR don't support NFC onboarding.
- During registration, the phone checks the DHCP options in the default sequence of 66, 160, 159, and 150 to obtain the URL of the provisioning server. The first valid configuration response it receives (which includes a 401 authorization request), will determine its provisioning server. Ensure that your server is properly configured to process phone registrations successfully.
-
By default, 802.1X authentication is disabled on your phone.
If your network uses the 802.1X protocol, ensure that you enable 802.1X authentication on your phone by accessing Settings
 > Network and service > Security settings. Otherwise, your phone will fail to connect to the network.
 - If your phone has HTTP connection issues during the registration, you might be prompted to set up an HTTP proxy server on the phone. The HTTP proxy setting is only required for the phones registered to Webex Calling or BroadWorks. For more information about how to set up the HTTP proxy, see HTTP proxy settings.
Your phone gets registered automatically when it boots up and connects to the network. In this scenario of auto registration, you don't need to enter any input as the whole registration proceeds automatically.
Before you begin
- You have turned on your phone.
- Your phone connects to the corporate network.
- Your administrator configures your phone on the call control system.
| 1 |
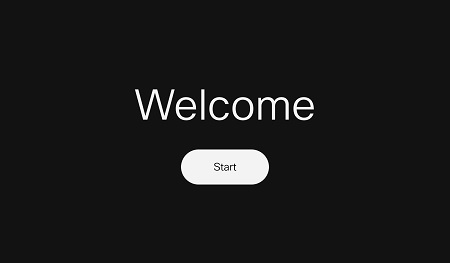
Tap Start. If you don't take any action, the phone goes to the next step at timeout.
Your phone tries to connect to the network. If you use the wireless network, perform the next step. Otherwise, skip it. |
| 2 |
(Optional) Choose your wireless network from the list, enter your credentials, and tap Apply. |
| 3 |
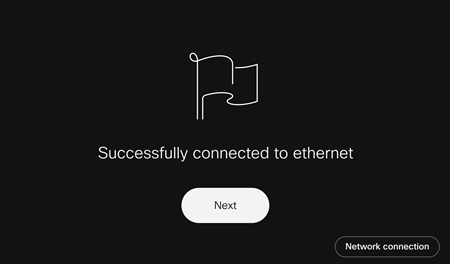
Tap Next on the phone screen showing that your phone successfully connects to ethernet or WiFi. If you don't take any action, the phone goes to the next step at timeout. Then the phone starts checking the configuration, and then starts the registration automatically.
If you are prompted to choose a call service, do one of the following actions:
Contact your administrator if you don't know which service
should be selected. Typically, the registration takes about 3 minutes depending on the network condition. During the registration, we recommend that you should not press the power button. After the registration succeeds, your primary line name or number displays on the top left of the phone screen. |
| 4 |
When the registration is complete, you will be prompted to enable or disable the noise removal feature. If you don't take any action, the phone enables the feature at timeout.
This feature can filter out background noises during a call. If you choose to disable
the feature now, you can still enable it later.
|

After your phone boots up, it checks the configuration automatically, and you will be prompted to enter an activation code. Activation codes are used to set up your new phone.
You can get an activation code from you administrator. If you are adding the phone as a Webex device, you can also generate an activation code from your Webex App.
You might be prompted to choose a call service during the registration, depending on your network condition and your administrator's configurations on the call control system.
Before you begin
-
You have turned on your phone.
-
Your phone connects to a wired or wireless network.
-
Get an activation code.
| 1 |
Select Start on the Welcome screen. If you don't take any action, the phone goes to the next step at timeout. Your phone tries to connect to the network. If you use the wireless network, perform the next step. Otherwise, skip it. |
| 2 |
(Optional) Choose your wireless network from the list, enter your credentials, and select Apply. |
| 3 |
Select Next on the phone screen showing that your phone successfully connects to the network. If you don't take any action, the phone goes to the next step at timeout. Then the phone starts checking the configuration, and then starts the registration automatically. If you are prompted to choose a call service, do one of the following actions
according to your network environment and the platform where the phone will be
registered:
Contact your administrator if you don't know which service to select. |
| 4 |
When prompted for an activation code, enter your activation code, and select Activate. Your phone starts the registration immediately. Typically, it takes about 3 minutes depending on the network condition. After the registration succeeds, your primary line name or number displays on the top left of the phone screen. |
| 5 |
When the registration is complete, you will be prompted to enable or disable the noise removal feature. If you don't take any action, the phone enables the feature at timeout.
This feature can filter out background noises during a call. If you choose to disable
the feature now, you can still enable it later.
|
After your phone boots up, it checks the configuration automatically. If you're prompted to enter an activation code, but you want to use the domain credentials for this registration, select Domain. If you don't have a valid service domain and user credentials, contact your administrator.
- You might be prompted to choose a call service during the registration, depending on your network condition and your administrator's configurations on the call control system.
- This registration method is only available for the phones registered to Cisco Unified CM.
Before you begin
- You have turned on your phone.
- Your phone connects to a wired or wireless network.
- Get a service domain, user ID, and password from your administrator.
| 1 |
Select Start on the Welcome screen. If you don't take any action, the phone goes to the next step at timeout. Your phone tries to connect to the network. If you use the wireless network, perform the next step. Otherwise, skip it. |
| 2 |
(Optional) Choose your wireless network from the list, enter your credentials, and select Apply. Cisco Desk Phone 9811, 9841NR, 9851NR, 9861NR, and 9871NR don't support Wi-Fi. |
| 3 |
Select Next on the phone screen showing that your phone successfully connects to the network. |
| 4 |
When prompted to choose a call service, select . |
| 5 |
When prompted for an activation code, select Domain to switch to the domain activation screen. |
| 6 |
Enter a valid service domain, and select Continue. |
| 7 |
Enter your user ID and password, and press Sign in (on 9811/9841/9851/9861) or tap Apply (on 9871/8875). Your phone starts the registration immediately. Typically, it takes about 3 minutes depending on the network condition. After the registration succeeds, your primary line name or number displays on the top left of the phone screen. |
| 8 |
When the registration is complete, you will be prompted to enable or disable the noise removal feature. If you don't take any action, the phone enables the feature at timeout. This feature can filter out background noises during a call. If you choose to disable the feature now, you can still enable it later. |
In some situation, the Cisco DHCP server doesn't contain the network information of the TFTP servers. To accomplish the registration, you need to manually enter an alternate TFTP server address that your administrator provides.
Before you begin
-
You have turned on your phone.
-
Your phone connects to a wired or wireless network.
-
Get a TFTP server address from your administrator.
-
Get a 16-digit activation code from your administrator, if needed.
| 1 |
Tap Start. If you don't take any action, the phone goes to the next step at timeout.
Your phone tries to connect to the network. If you use the wireless network, perform the next step. Otherwise, skip it. |
| 2 |
(Optional) Choose your wireless network from the list, enter your credentials, and tap Apply. |
| 3 |
Tap Network connection.
The screen shows the message depending on how your phone connects to the
network.
|
| 4 |
Tap Ethernet on the Network connection screen. |
| 5 |
Toggle on Alternate TFTP. |
| 6 |
Enter an IP address in TFTP Server <n>, where <n> represents the type of the TFTP server.
TFTP Server 1 is the primary server, TFTP Server
2 is the secondary server.
|
| 7 |
Tap Apply. The registration starts automatically. If your phone requires an activation code to
continue, do the following:
Typically, the registration takes about 3 minutes depending on the network condition. During the period, we recommend that you should not press the power button. After the registration succeeds, your primary line name or number displays on the top left of the phone screen. |
| 8 |
When the registration is complete, you will be prompted to enable or disable the noise removal feature. If you don't take any action, the phone enables the feature at timeout.
This feature can filter out background noises during a call. If you choose to disable
the feature now, you can still enable it later.
|
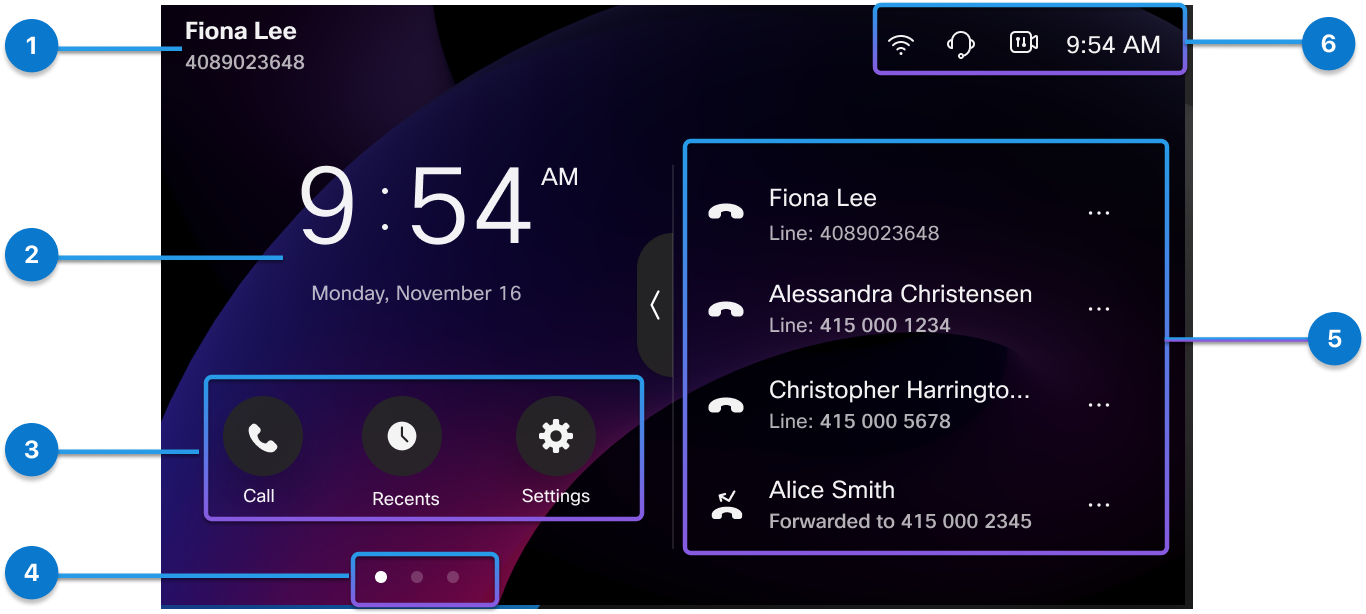
Depending on configurations, your phone can have a single line or multiple lines. The features are organized differently. Use the following sections to know how to navigate the features on your phone.

| UI element | Description |
|---|---|
| 1. Line name and number | Shows the line name and line number. |
| 2. Time and date | Displays the current time and date. |
| 3. Navigation buttons | Tap the buttons to navigate between screens. The number of buttons varies with the configured features. |
| 4. Feature buttons | Tap an item to access the feature. The available feature buttons vary with your administrator's configurations. |
| 5. Header | The screen header displays the system status, such as Wi-Fi signal, the active audio path and the current time. You can also change the audio path and camera exposure (for Video Phone 8875 only) in the header. |
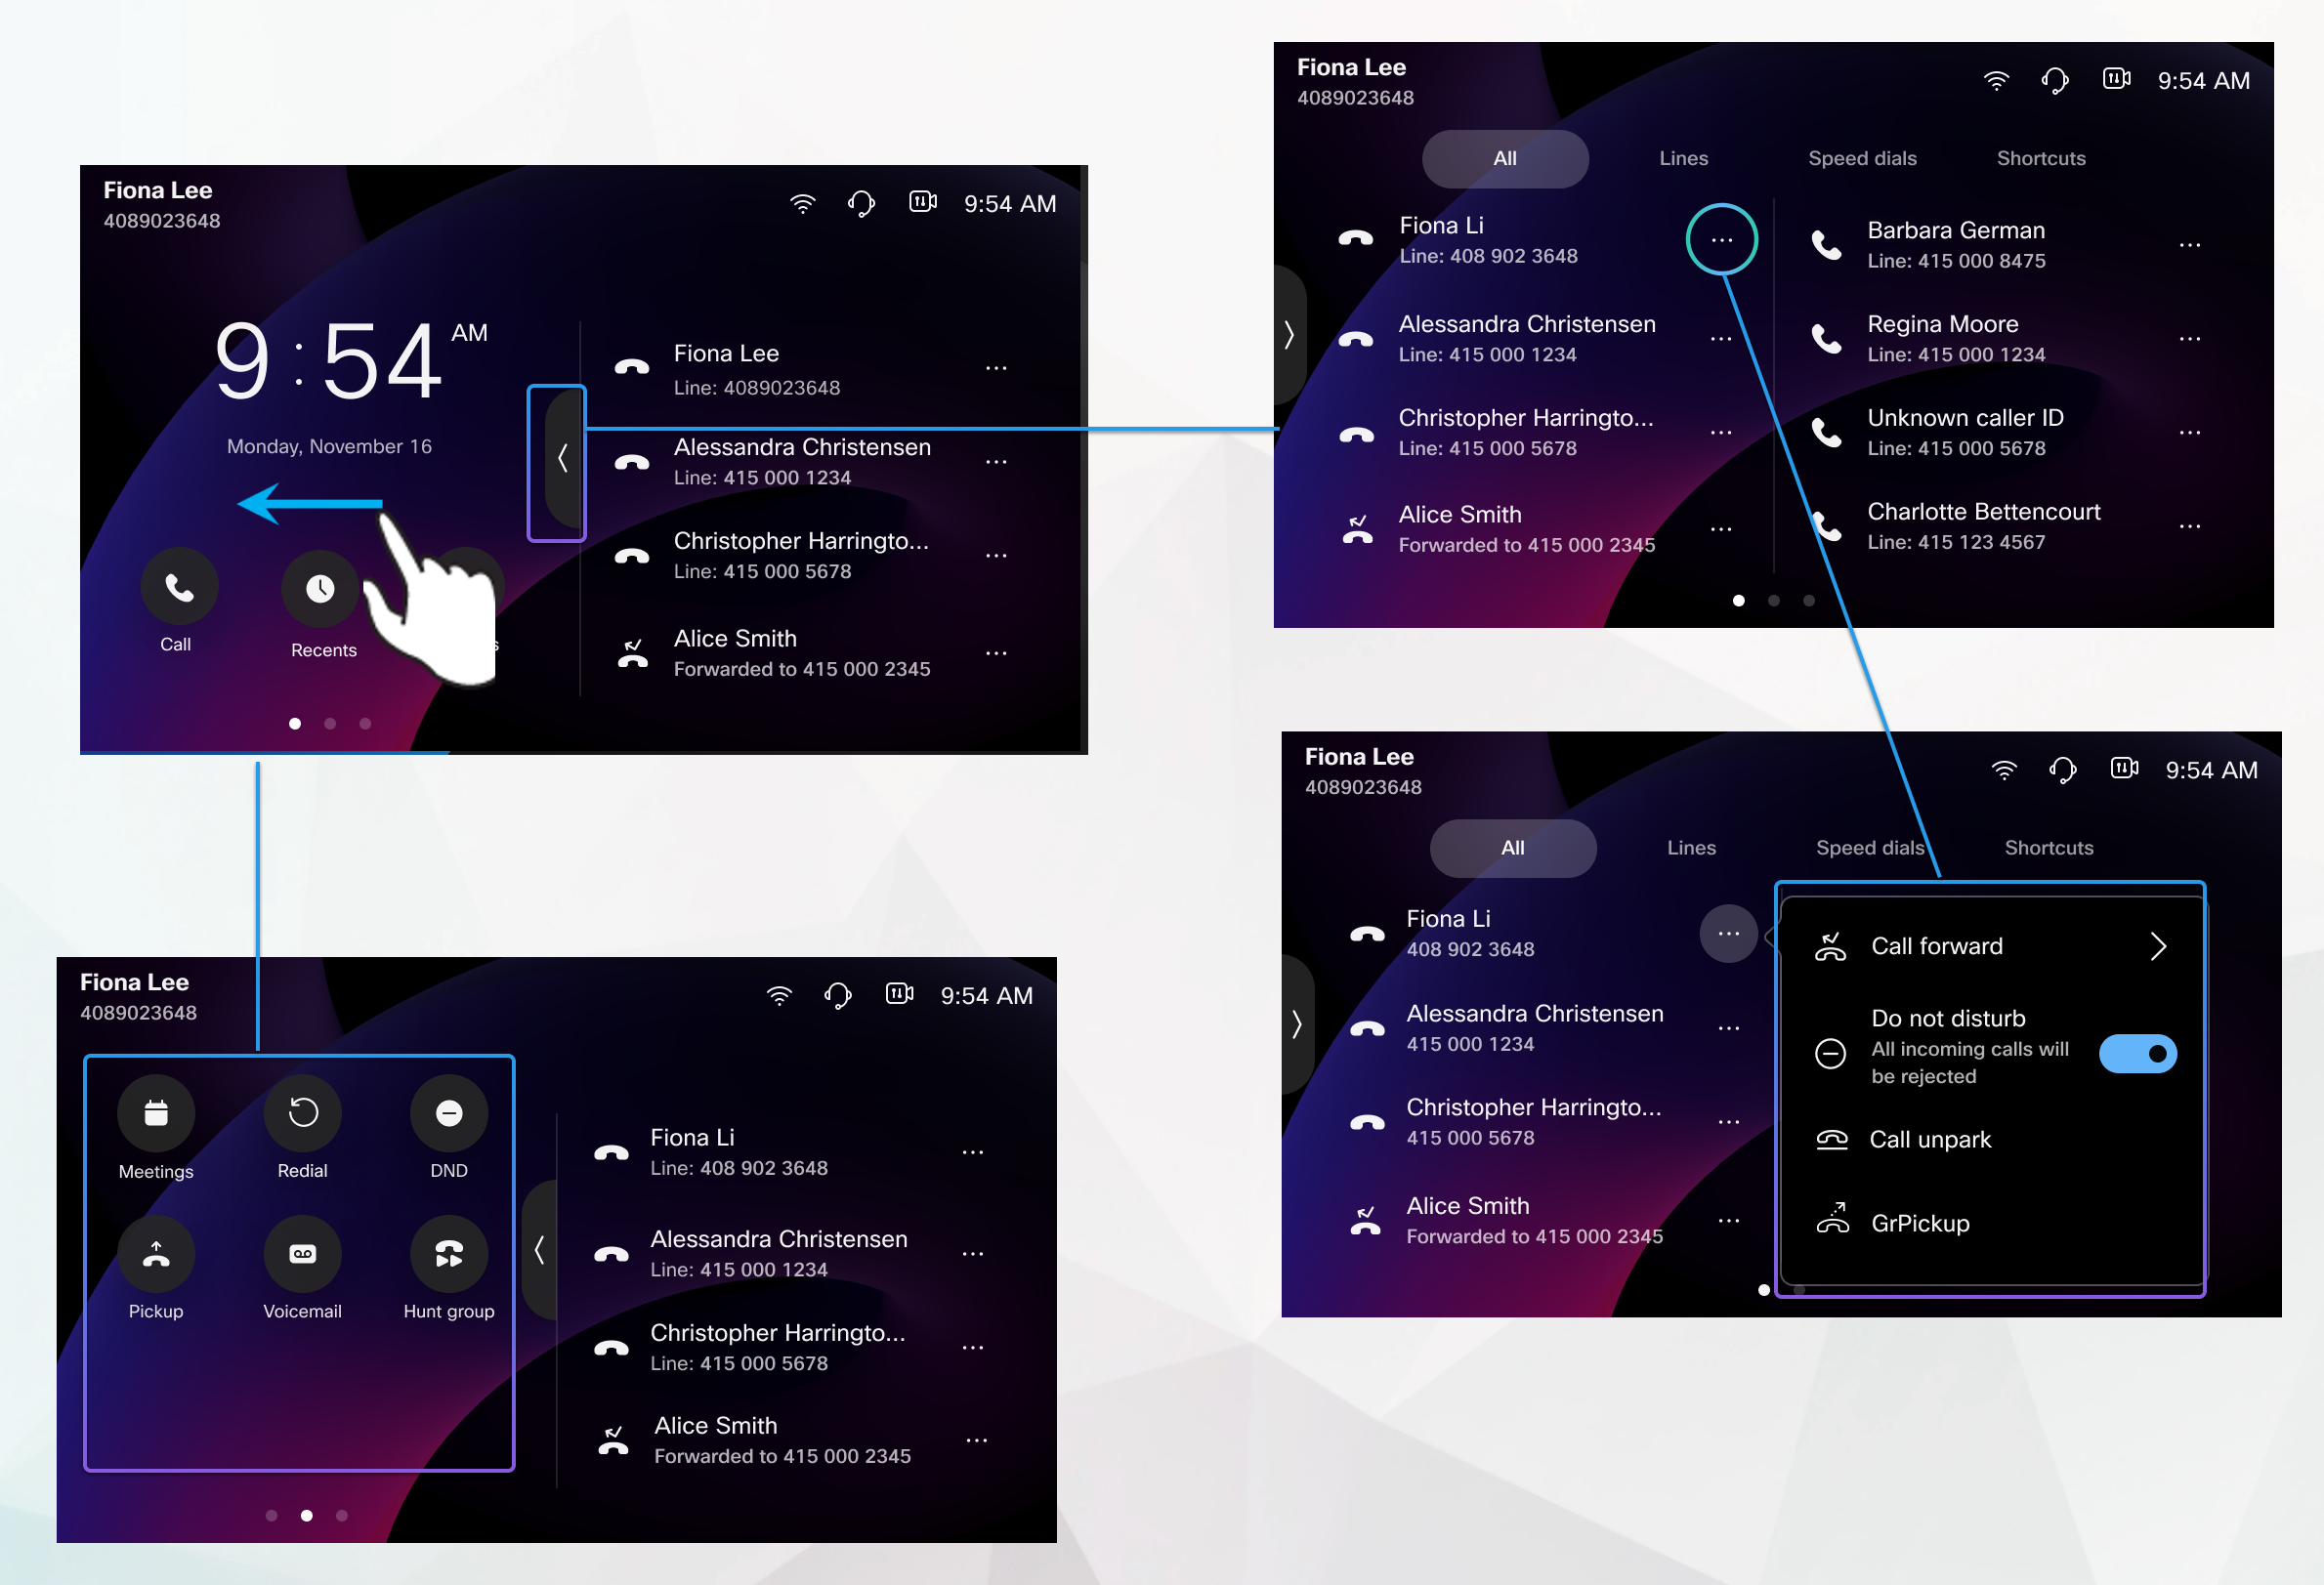
Swipe on the screen to navigate between screens. Tap a button to access a feature.
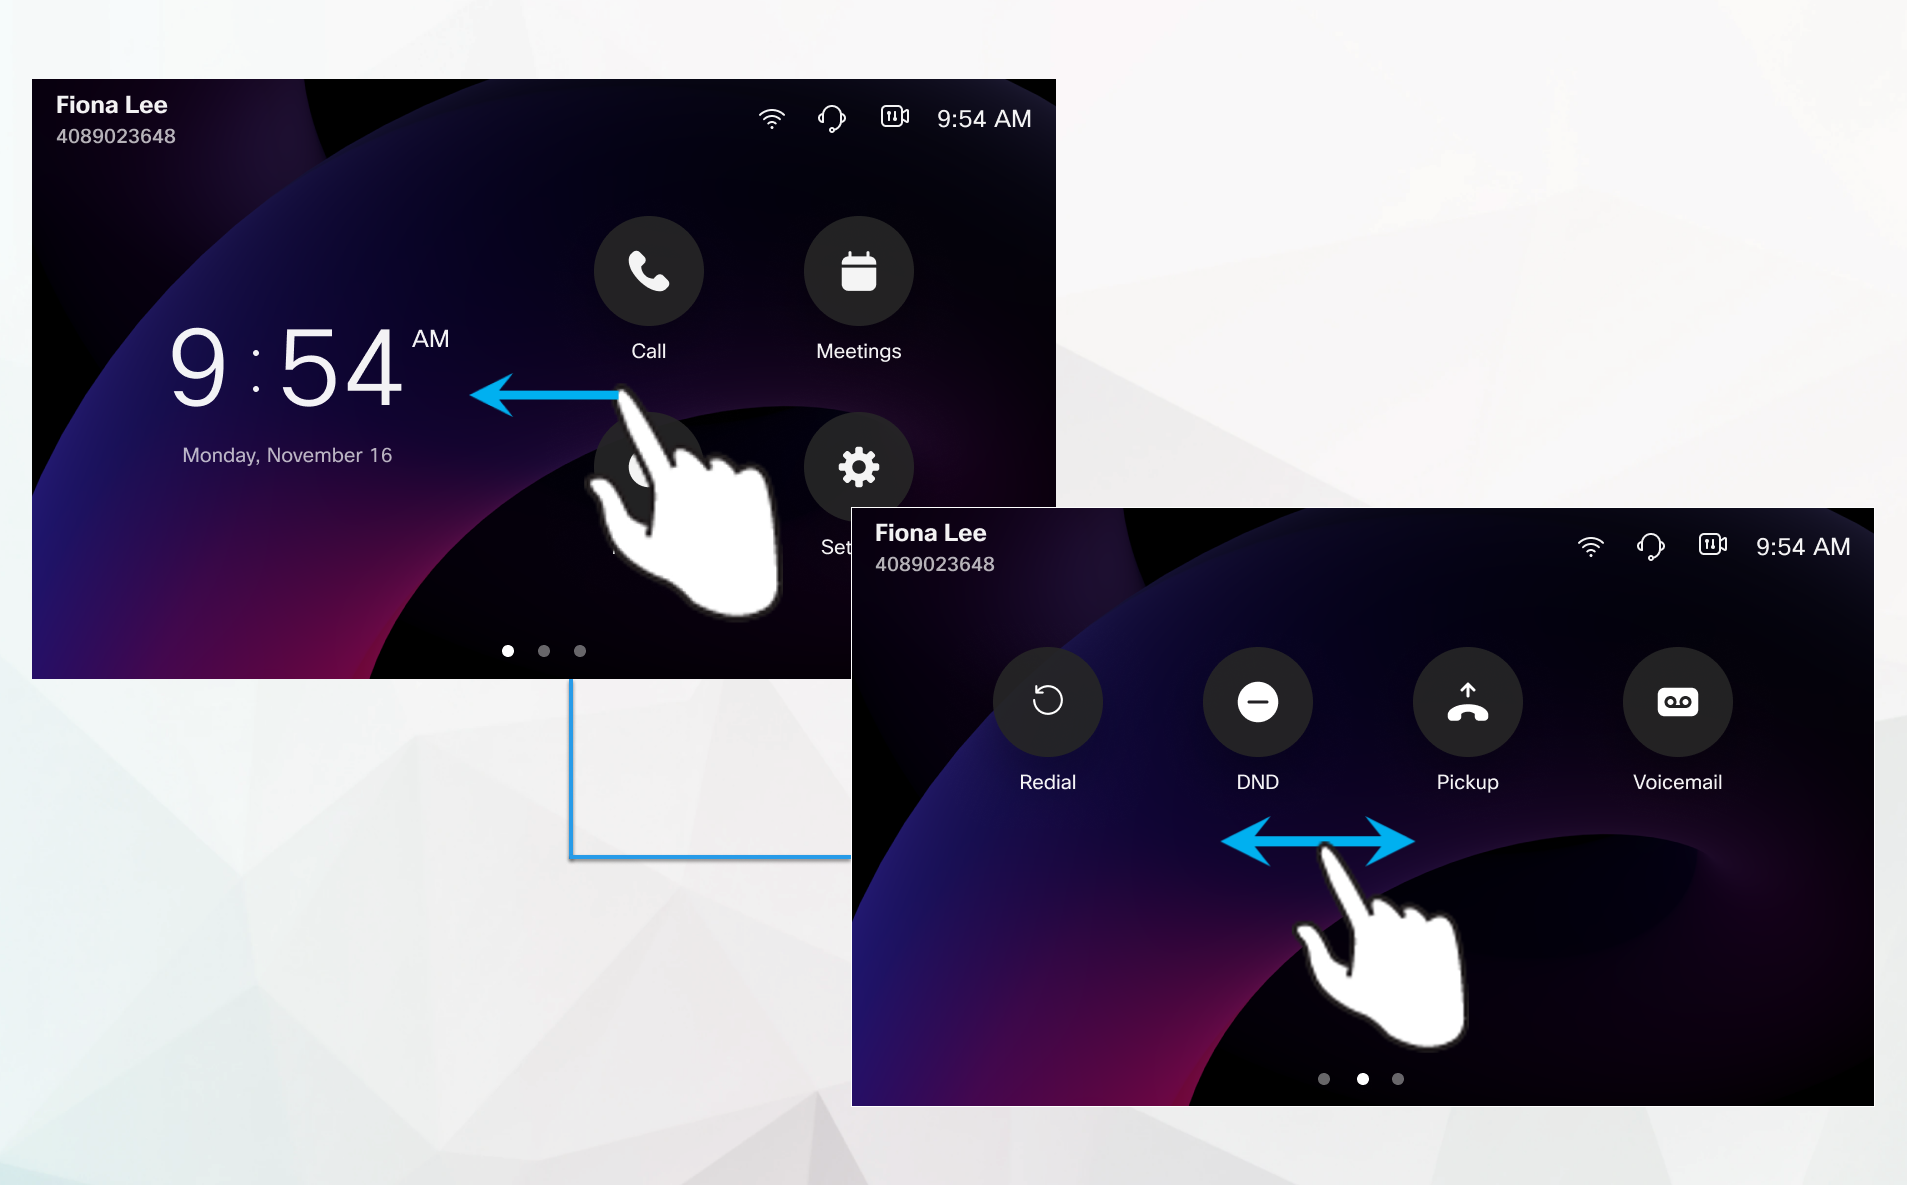
On the right half of the home screen, you can see the registered lines and certain features, if your administrator has configured them. Your primary line displays at the top of the list.
| UI element | Description |
|---|---|
| 1. Primary line name and number | Shows the name and number of the primary line. |
| 2. Time and date | Displays the current time and date. |
| 3. Feature buttons | Tap an item to access the feature. The available feature buttons vary with configurations. |
| 4. Navigation buttons | Tap the buttons to navigate between screens. The number of buttons varies with the configured features. |
| 5. Lines | Use the registered lines for calls. The area can also include configured features that display under the registered lines. |
| 6. Header | The screen header displays the system status, such as Wi-Fi signal, the active audio path and the current time. You can also change the audio path and camera exposure (for Video Phone 8875 only) in the header. |
Do the following actions as needed:
- Swap on the left half of the screen to navigate the features.
- Tap Expand
 to use the full-screen mode.
Tap Fold
 to exit the full-screen mode.
 - Tap a button to access a feature.
Tap More
 on a line to access a feature.
 - Tap a line to call your contacts.
See the following sections for more help information:
-
To look for more documentation about your phone, go to Help Center.
-
To look for technical support, go to Cisco technical support.
-
For information about how to use and configure KEM, see Cisco Desk Phone 9800 Key Expansion Module.
-
To view the hardware warranty terms, go to Cisco one-year limited hardware warranty terms.
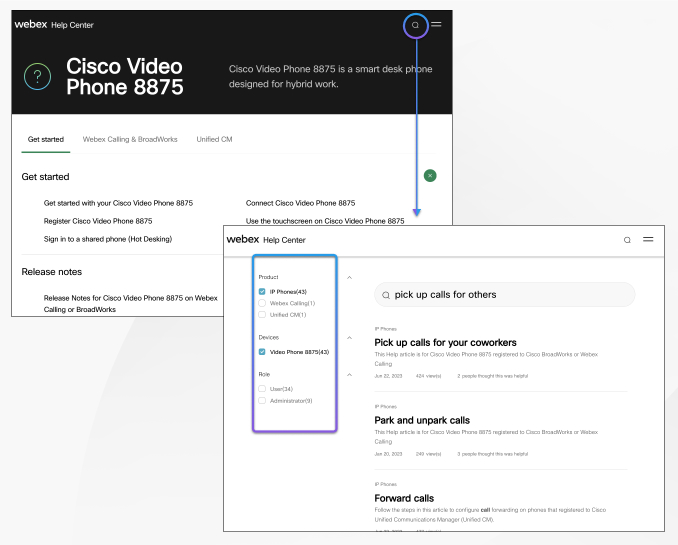
Help Center
Go to the Cisco Video Phone 8875 Help home page to get more help content about your phone. If you don't find the topic of your interest there, try to search for it and use the filters on the left to narrow down the results, if necessary.
Technical support
Cisco provides around-the-clock technical support services, both online and over the phone to all customers, partners, resellers, and distributors who hold valid Cisco service contracts.
You should have your Cisco.com User ID, Contract, and Serial numbers ready when you contact Cisco Support to prevent any delays with your support request.
In addition, support staff need the following information:
-
Serial number—Every device has a serial number on the back.
-
Time and date issue occurred—Support staff use device logs or cloud metrics to troubleshoot issues. It is helpful to have the approximate local time and date.
-
Device Logs—Support staff may require the device logs to identify the root cause of your issue.
-
A brief description—Include any actions prior to the incident.
Most firmware issues can be resolved by support staff without a Return Material Authorization (RMA). It is best to use the RMA process for hardware issues.
You can find a list of Cisco worldwide support centers at https://www.cisco.com/c/en/us/support/web/tsd-cisco-worldwide-contacts.html.
Cisco one-year limited hardware warranty terms
Special terms apply to your hardware warranty and services that you can use during the warranty period.
Your formal Warranty Statement, including the warranties and license agreements applicable to Cisco software, is available at Product Warranties.


