- Home
- /
- Article

Thanks for your feedback.

Migrate Unified CM data to Webex Calling
 In this article
 Feedback?
Migrate Unified CM settings for users, devices, numbers, and locations to Webex Calling platform for a better user experience and also to leverage the enterprise-grade Cisco Webex cloud calling, mobility, messaging, and calling services.
Overview
Migrate users, devices, numbers, and locations from Unified CM to the Webex Calling platform for a better user experience and also to use the enterprise-wide Cisco Webex cloud Calling, mobility, and Messaging services.
(Webex for Government only) The commercial license generation process is now supported for FedRAMP organizations. When this option is selected, the device’s MAC address is sent to the Cisco corporate network to verify eligibility and generate the migration license. If you prefer not to have the MAC address sent automatically, you can follow FedRamp device migration process, Migrate your phone to Webex Calling.
The steps outlined here is applicable to Dedicated Instance also.
Migration readiness assessment
Use Migration Insights (Control Hub → Services → Upgrades & Migrations → Migration Insights) to make an informed decision about migrating to Webex Calling. Based on that information, you can confidently migrate to Webex Calling.
For more information on how to generate the migration insights report, see Migration Insights.
Once you export and download the .zip file, you get the list of output CSV files included in this zip file.
To get the full list of the export zip file, see Export ZIP file.
SharedlineGroupMigrationReport.csv and HuntGroup_CallQueue_CallPark_CallPickUpGroups.csv should be used to identify which users are in relationship with each other for group features and should migrate together.
Migrate Unified CM to Webex Calling
Before you begin
Before you start your migration, make sure that you meet the following requirements:
-
Make sure that you have an active subscription with Webex Calling as a cloud deployment option.
When selecting Webex Calling, you receive an entitlement PID A-FLEX-P-CALL on your subscription. The PID A-FLEX-P-CALL allows entitlement to temporary licensing obtained from GLO for up to 18 months while making the transition from on-premises UC Manager to Webex Calling in the cloud. This entitlement gives basic level support on both Calling environments for up to 18 months while customers transition to Webex Calling.
To open a case with GLO, see Licensing Support, under the Licensing Administration Portal section.
-
Access Control Hub as an organization administrator. For more information, see Assign Organizational Account Roles in Cisco Webex Control Hub.
-
Obtain the BAT/CSV files for the Unified CM users and devices. For more information, see Cisco Unified Communications Manager Bulk Administration Tool (BAT) .
-
Ensure phones on Unified CM that you're migrating are using Phone Load version 14.1 or later. For more information, see Install or Upgrade Cisco IP Phone Firmware.
-
Ensure all your end users from Unified CM are provisioned as Webex Users through Cisco Directory Connector or other means. For more information, see Install Cisco Directory Connector.
-
Login to Control Hub, go to Services → Upgrades & Migrations.
- Click Get started on the Migrate Unified CM to Webex Calling tile.

To move any or all of your users, workspaces, and devices from on-premises calling to Webex Calling, follow:
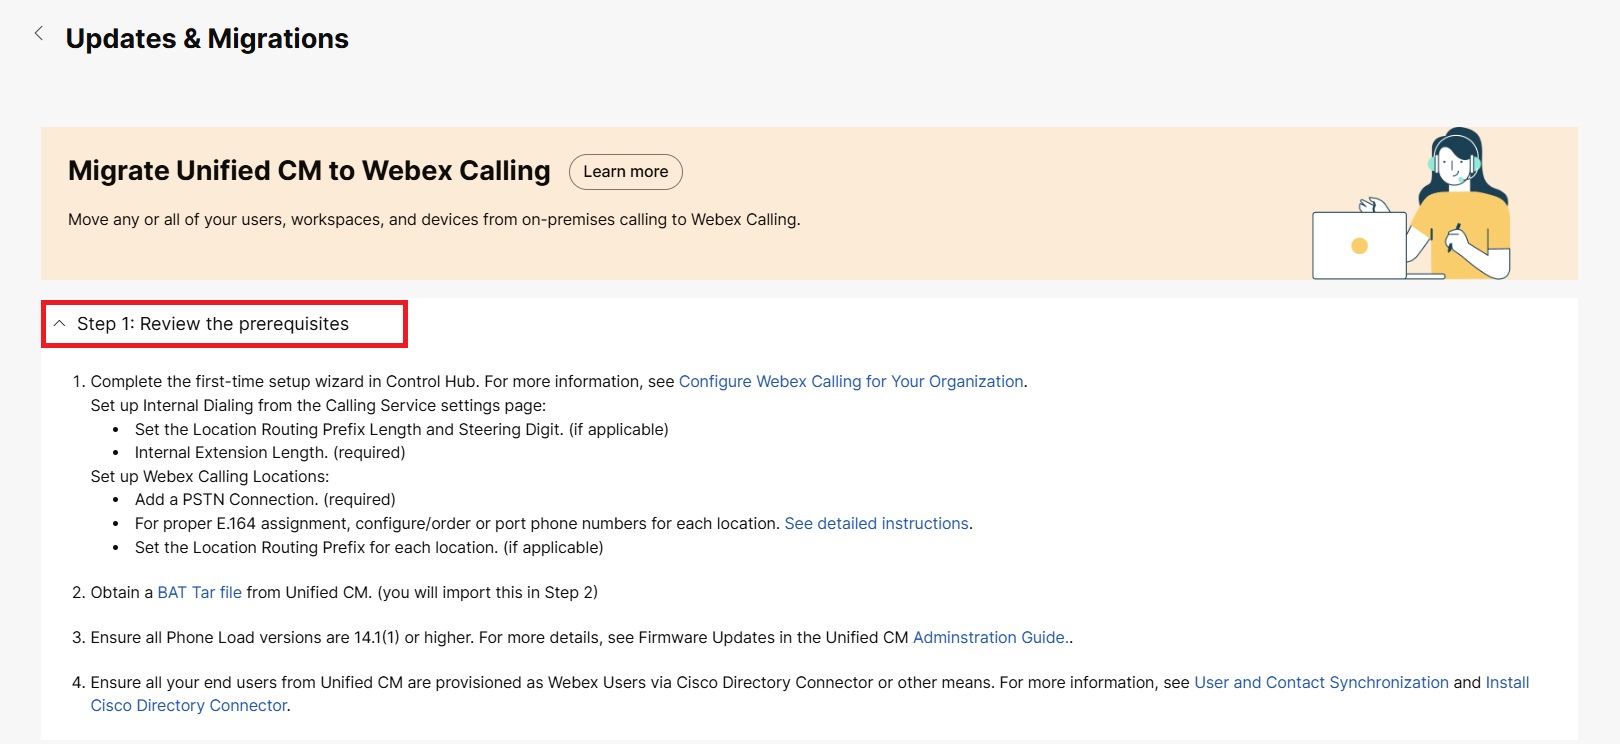
Step 1: Review the prerequisites
Click the Step 1 drop-down to view the list of prerequisites. Make sure to read and complete all prerequisite tasks before you proceed to Step 2: Import data.
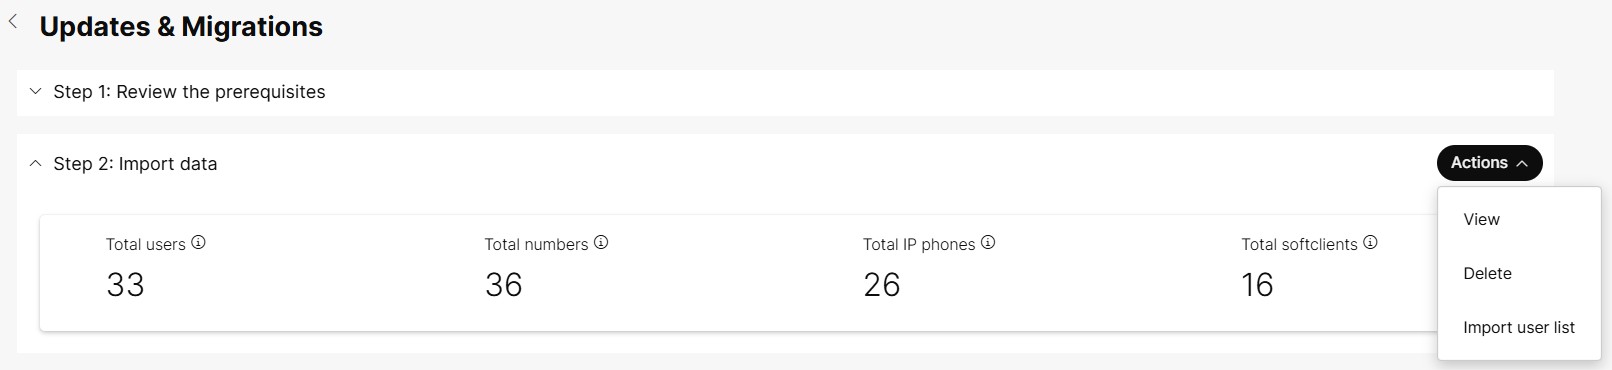
Step 2: Import Data
| 1 |
Click Step2: Import data drop-down → Action → Import user list. | ||||||||||||||||||
| 2 |
To upload the .tar file, drag and drop the .tar file or click Choose a file to browse to the location of the tar file, select the file, and then click Open. After the upload is successful and complete, the Create a New Task button in Step 3: Migrate to Webex Calling is enabled. | ||||||||||||||||||
| 3 |
On the Action button, you can see the following options:
|
Step 3: Migrate to Webex Calling
After you import the .tar file, click Step 3: Migrate to Webex Calling → Start New Task.

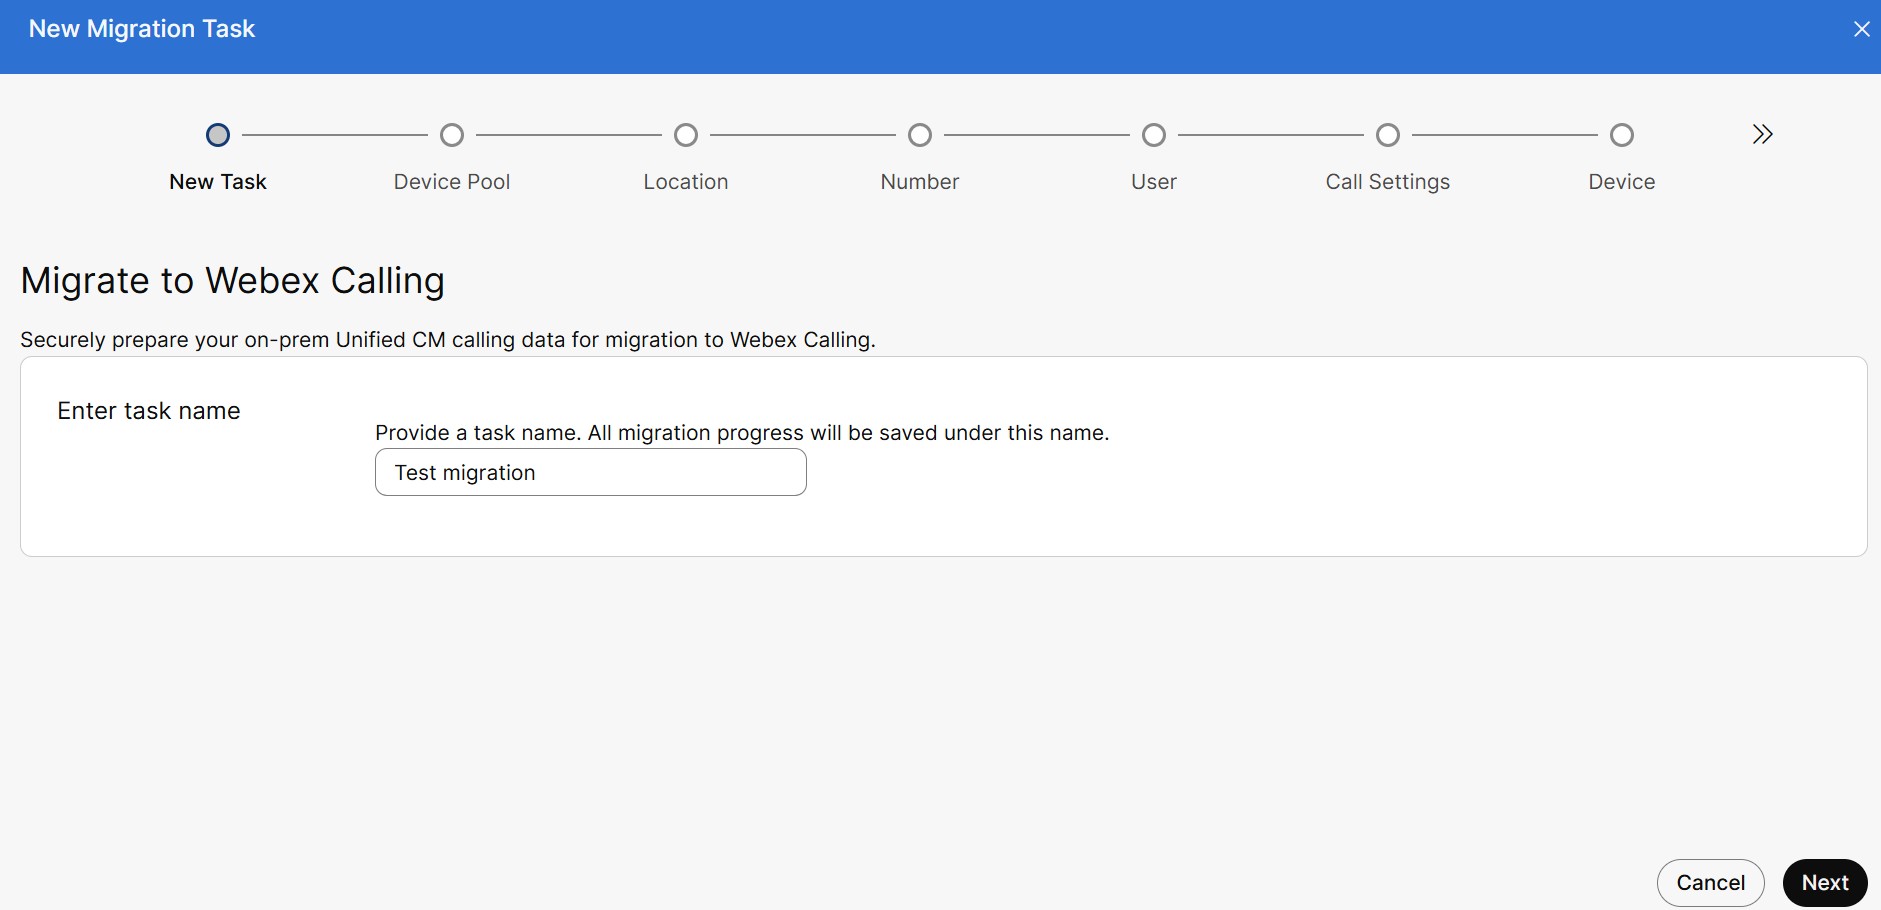
Create a new task
Create a migration task to migrate your Unified CM settings.
| 1 |
In the New Migration Task window, enter the unique name of the task in the Enter task name field. The task name should contain a minimum of 8 characters.
You can migrate a maximum of 1000 users and 1000 devices in a single task. You must
create multiple migration tasks to migrate over 1000 users or devices.
|
| 2 |
Click Next. |
Map device pool to locations
You can choose how your Unified CM device pools map to a Webex Calling location. Assign a Webex Calling Location to a Unified CM Device pool or leave it Undefined to do it later. Unified CM DNs that are mapped to a single device pool can be migrated. This page also lists the device pools that are migrated or pending for migration to a particular location.
If you do not want to include a location in this task, you can leave it undefined. For more information, see Configure Cisco Webex Calling for Your Organization.

| 1 |
You can view the following details in the Map Unified CM device pool to a Webex Calling location page:
|
| 2 |
Click the Search field and type the device pool or location to filter and view the respective data. |
| 3 |
Click the Webex Calling location drop-down list to choose a location and click Next. |
Assign a location
Make sure that the phone numbers and extensions are assigned to the correct location, and then choose the places that you want to include in the migration task.
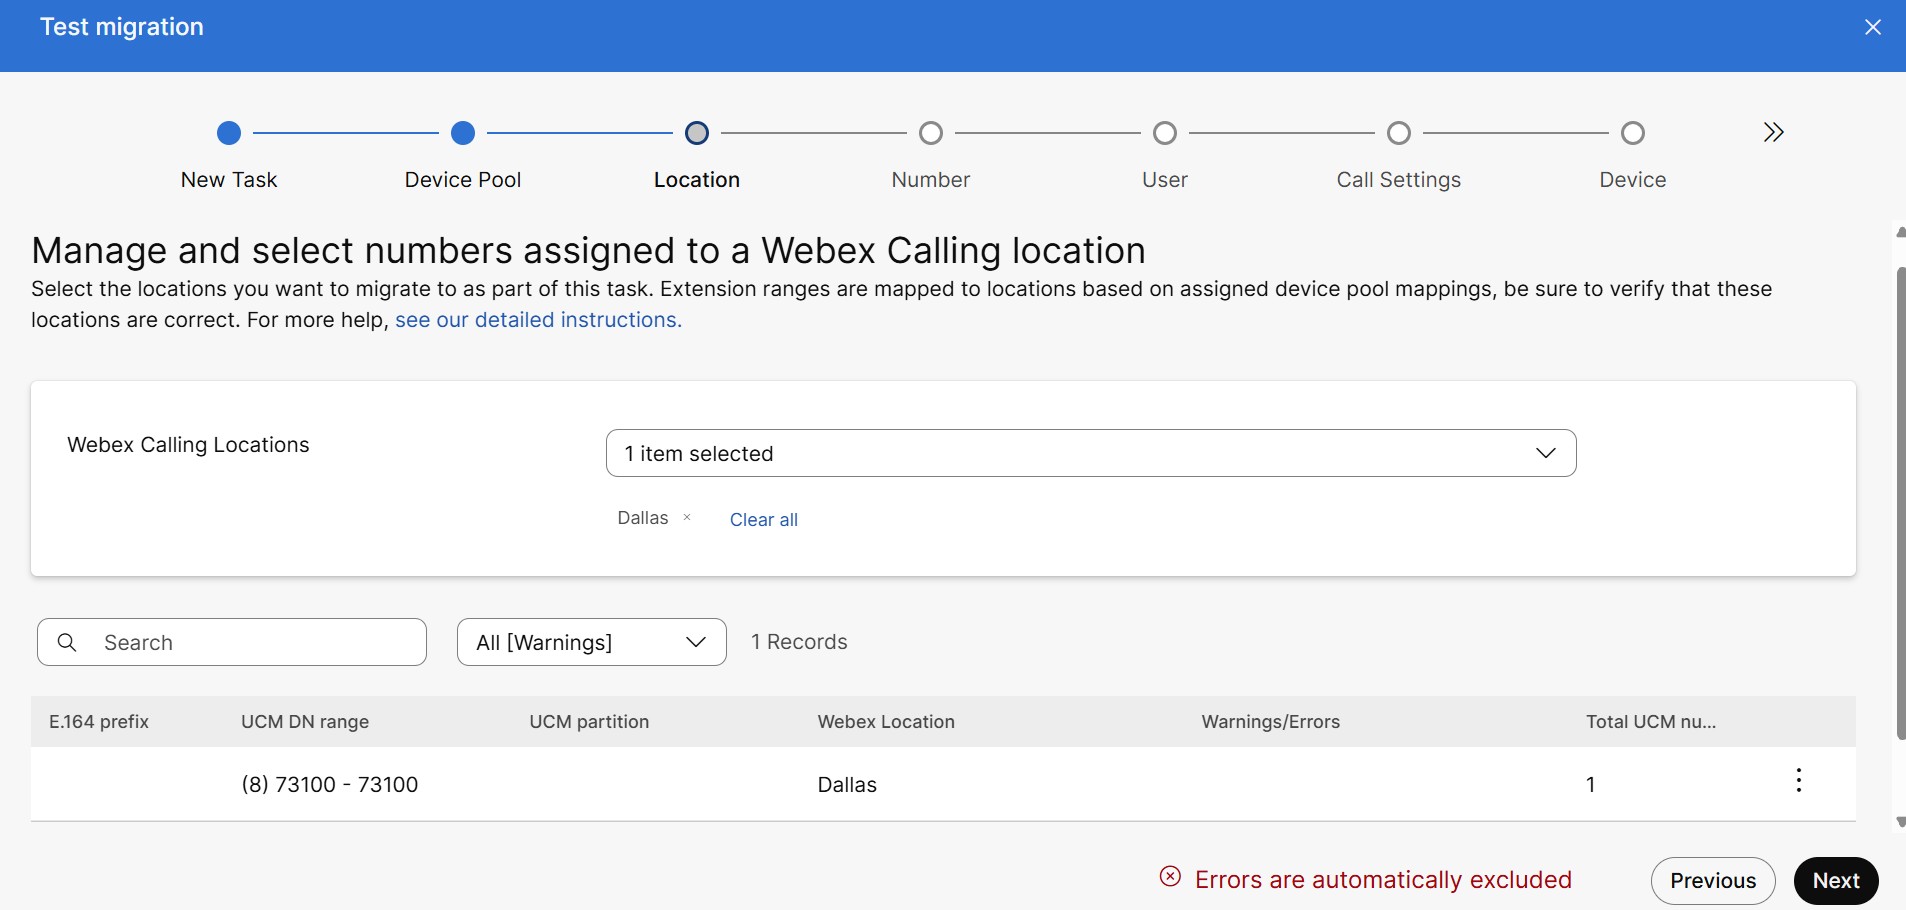
| 1 |
Click Webex Calling Locations drop-down list to choose a location. You can see the records of the selected locations. The record field are common prefix (E.164), Unified DN range of phone numbers and extensions, UCM partition, Webex location, warning/errors, and total UCM number. If there are same device associated with multiple location, you should resolve the mandatory warning. Any other warning messages such as unsupported or conflicting length of the phone number extension are for information only. You can also click the All (Warnings) drop-down list to view the list of all warnings. |
| 2 |
To move the total UCM line count between locations, click the ellipsis icon and select the desired destination from the list. |
| 3 |
Click Next. |
Manage numbers in location
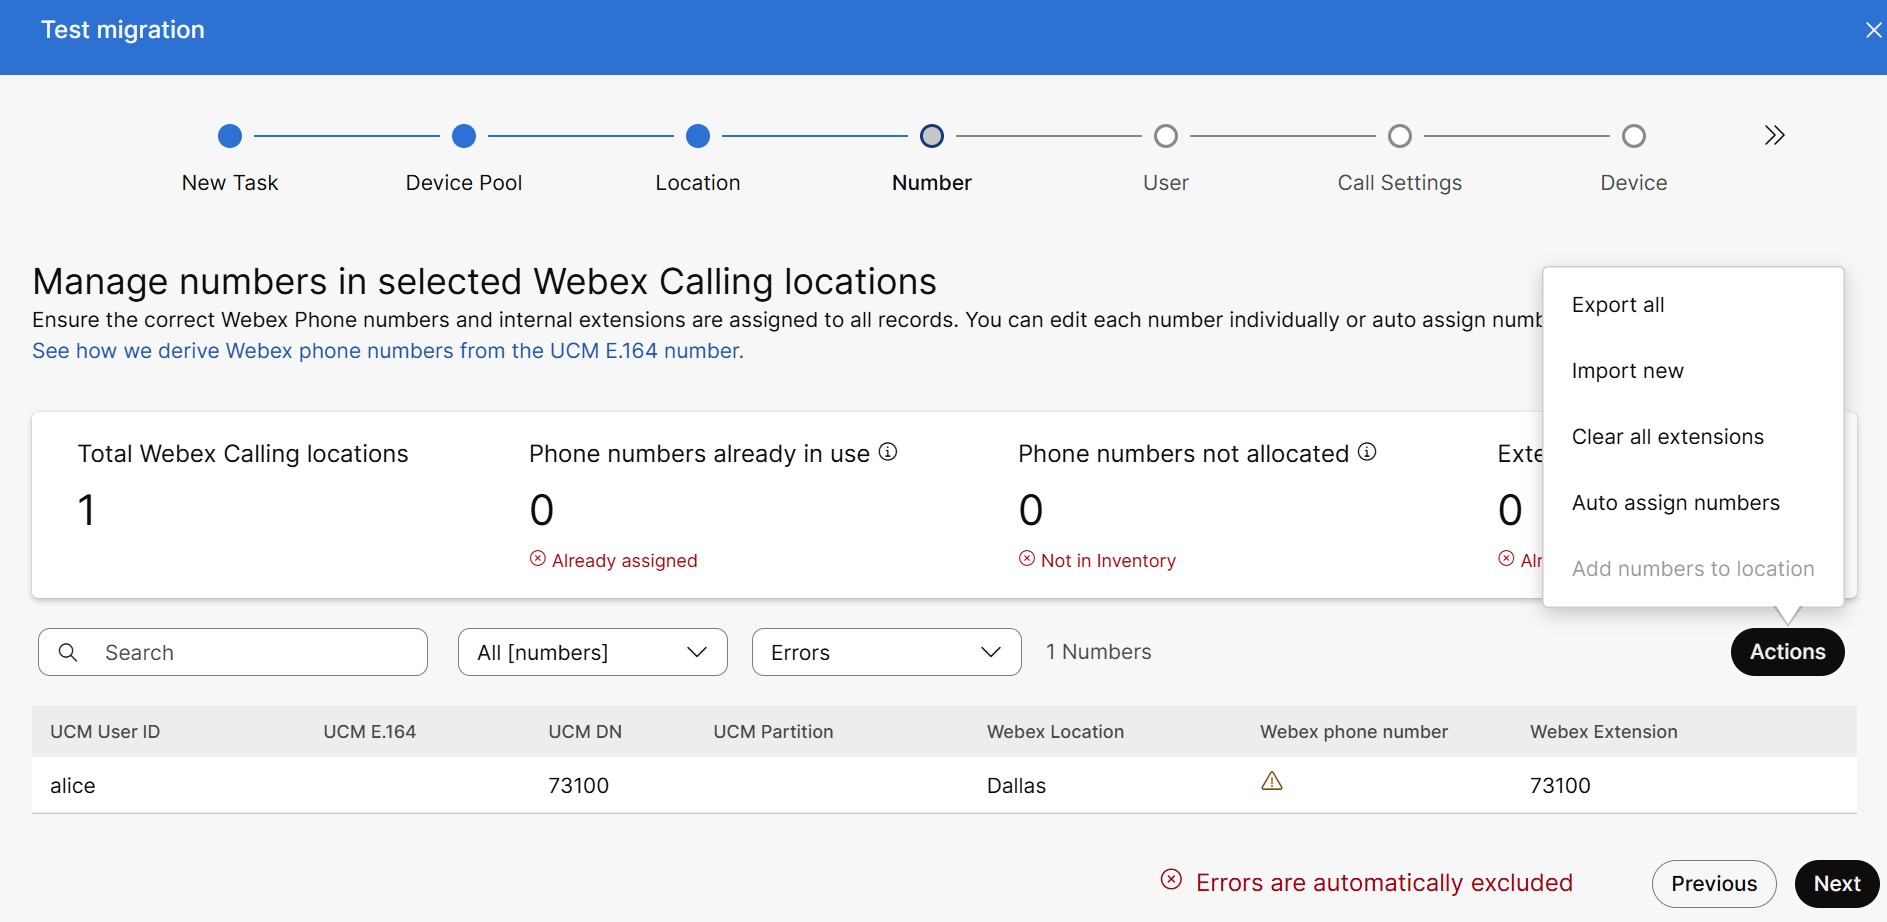
| 1 |
On the Manage numbers in selected Webex Calling locations page, the following details appear:
|
| 2 |
To assign a Webex phone number to a workspace,
|
| 3 |
You can see the following tasks in the Action icon.
Scenarios for Auto Assign numbers and Add numbers to location Scenario 1: In the migration flow, if all the Webex location is local gateway, you can see the option of Add numbers to location enabled, Auto assign numbers greyed out. Click Add numbers to location. This action will configure derived Webex phone numbers for premises-based PSTN into Webex Calling location. To continue with auto-configuration of phone numbers click Accept and continue. Enable the Activate numbers to activate the number now, else it can be activated through the Numbers page. Scenario 2: In the migration flow, if all the Webex locations are Cloud connected PSTN or Cisco PSTN, you can see the option Auto-assign numbers enabled, Add numbers to location is greyed out. If you do not want to use the existing UCM number and extensions, use the Auto-assign numbers option to pick any available number from this location and assign it. Enable the Generate Extensions to generate the extensions and click Accept and Continue. Scenario 3: In the migration flow, if the Webex location is a mix of premises-based PSTN and Cloud connected PSTN or Cisco PSTN. Add numbers to location and Auto assign numbers are greyed out. |
Assign numbers to a user or a workspace
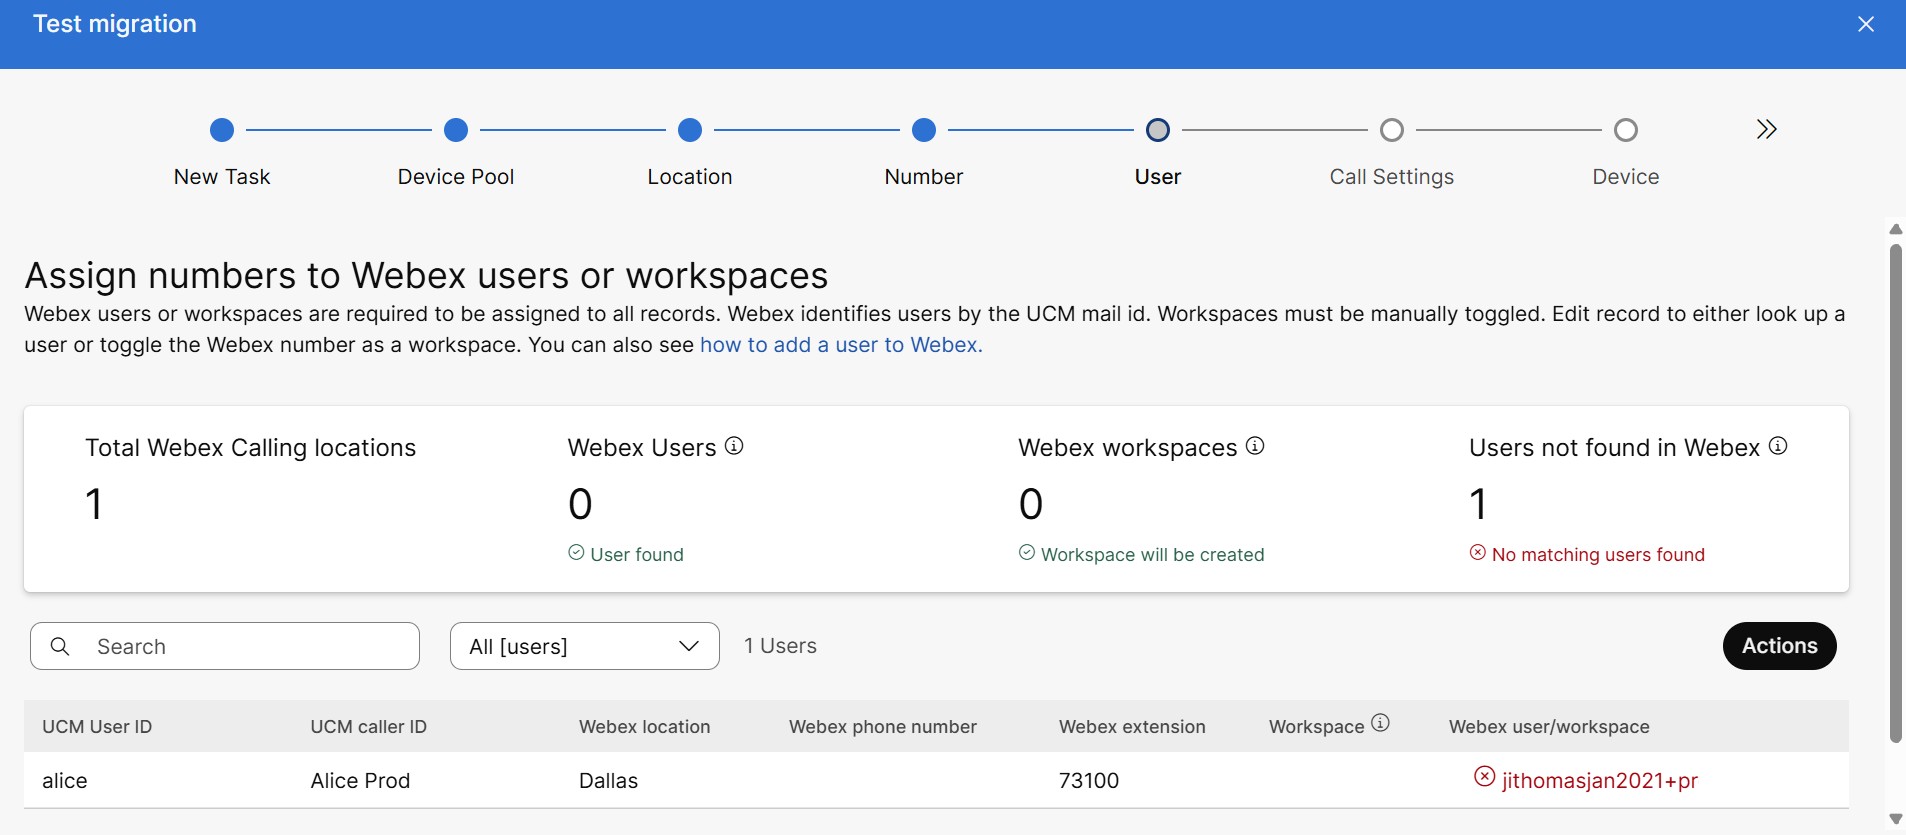
| 1 |
To assign a workspace, hover over the end of the desired row to click Edit icon, and enable the Workspaces toggle. | ||||||||||||||||||||
| 2 |
To remove a record from migration process, click - icon and click Cancel or Remove on the confirmation pop-up window. | ||||||||||||||||||||
| 3 |
You can see he following tasks in the Action icon,
| ||||||||||||||||||||
| 4 |
Click Next. The Call Settings page appears.
|
Call settings
Set options for users and workspaces where applicable.
You can choose the calling license and calling permissions for user and workspace based on the subscription id's.
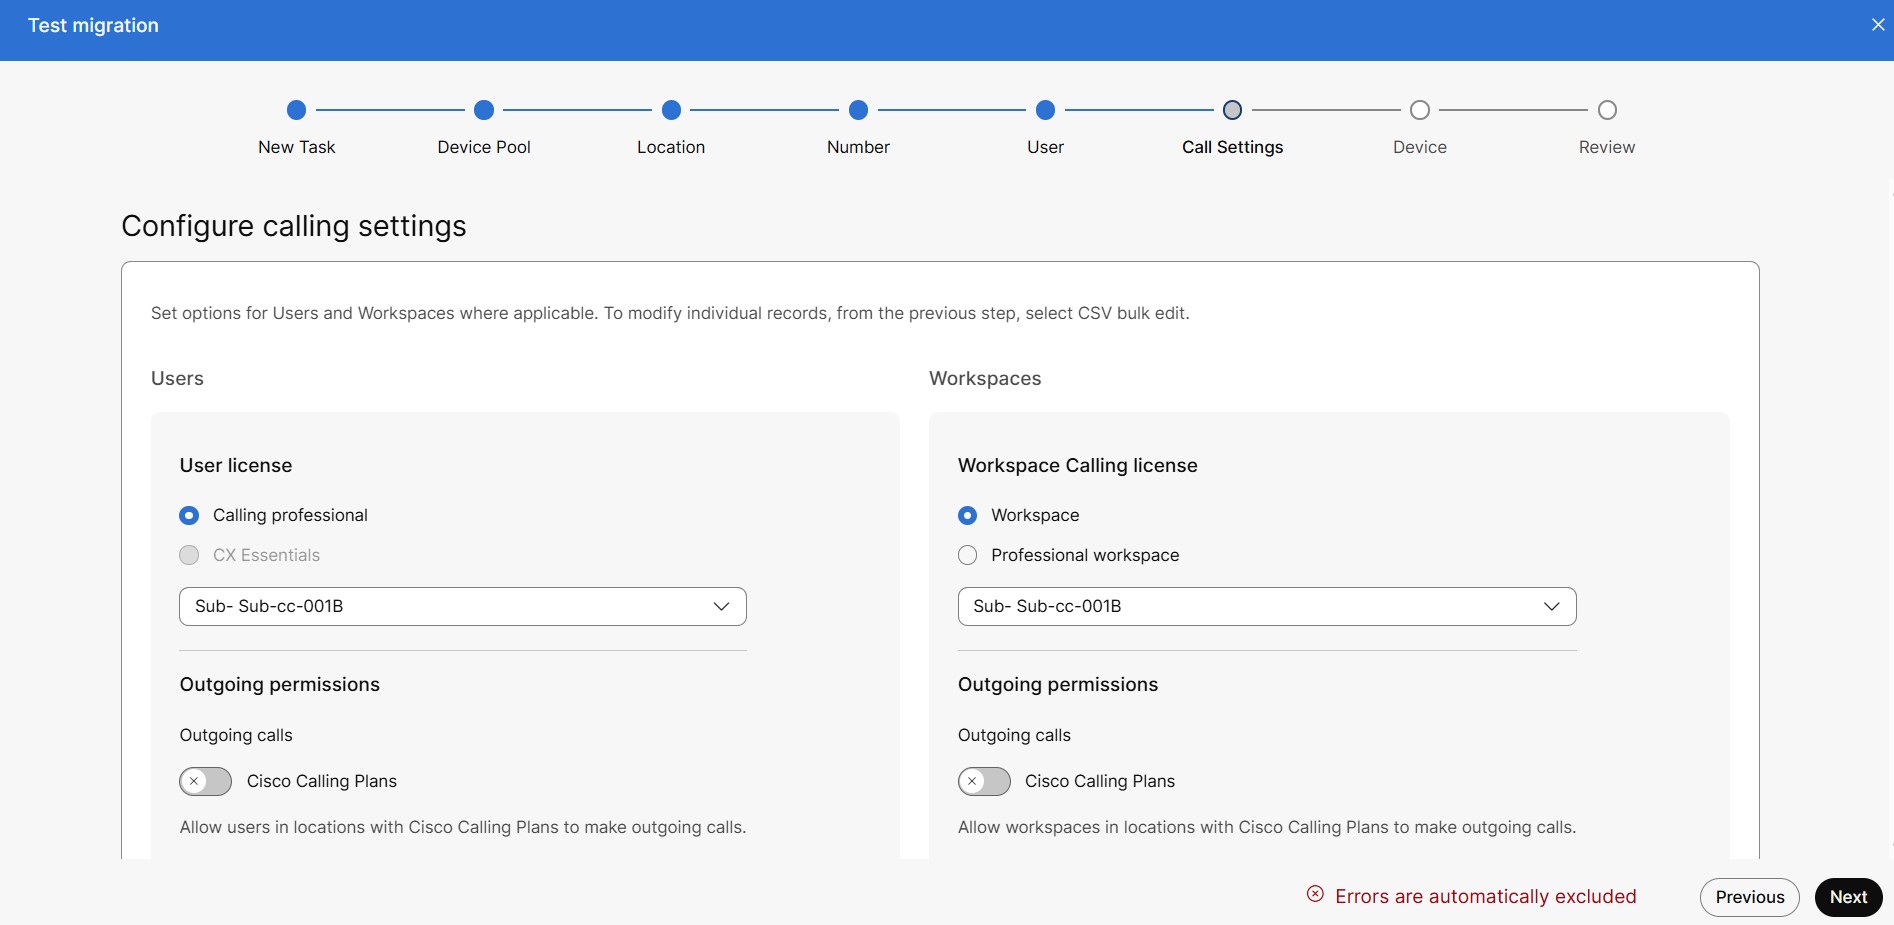
In User Calling license: when users migrate from Unified CM to Webex Calling using the migration tool, they can only be assigned Calling professional or CX Essentials licenses. When you need to assign a Webex Standard license during migration then don't use this tool. To assign the standard license, use a user CSV file and then use the Migrate features from the Unified CM tool to migrate the rest of the data from Unified CM to Webex.
In Workspace Calling License: when workspace migrates from Unified CM to Webex using a migration tool, they can be assigned Workspace or Professional Workspace licenses.
The radio buttons are enabled or disabled based on the subscription id's.
Check Device Eligibility
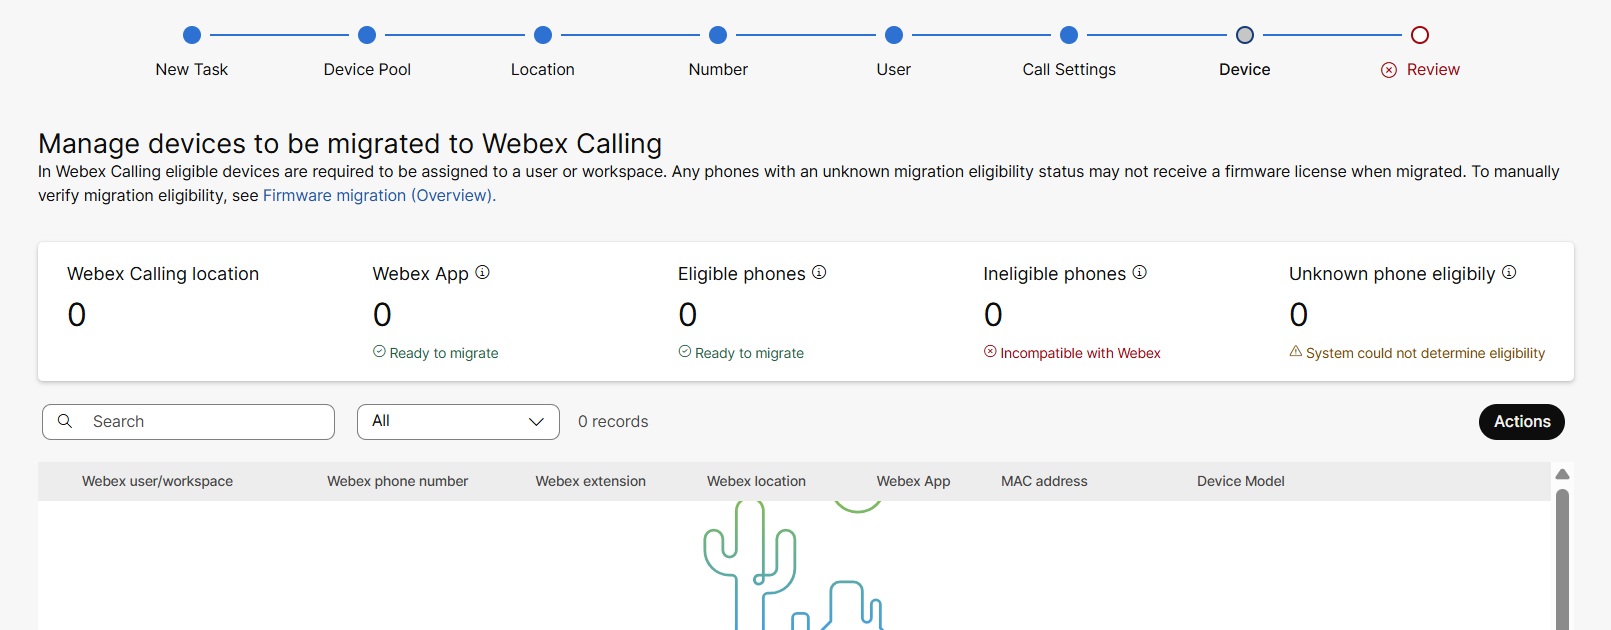
| 1 |
On the Manage devices to be migrated to Webex Calling page, the following details appear:
|
| 2 |
To update the MAC address of the device or modify the device model, click the device row, click the edit icon and then modify the MAC address on the Device MAC text box. |
| 3 |
Click Actions to use the Export and Import functions and modify the records. |
| 4 |
Click Next, the Review page appears. |
Review
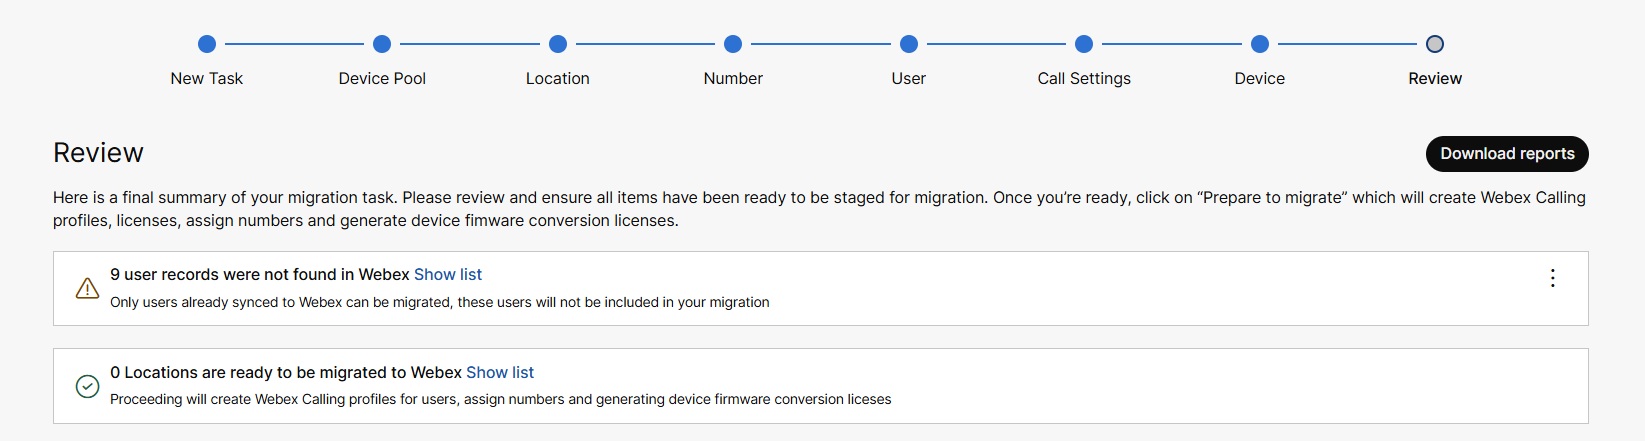
| 1 |
Click Show list next to the excluded or included items to expand and view the details about the reason for inclusion or exclusion. | ||||||||||||
| 2 |
Choose one of the following options:
| ||||||||||||
| 3 |
Click Prepare to Migrate. The Ready for migration page appears. The migration tool does
these premigration activities:
| ||||||||||||
| 4 |
Click Close. The Migrate Unified CM to Webex Calling page appears with a
list of tasks that are in different status.
The following table lists the task status and description:
| ||||||||||||
| 5 |
Click Complete migration to download the manifest file
in .zip format which contains the MAC address of phones in a
If Cloud-Connected UC is enabled, it takes up the device migration. |
Start Migration
You need to log into Cisco Unified CM and upload the CSV file with the device details to start the migration. Make sure that you’ve the CSV file that contains the user and phone details that you want to import from Unified CM to Webex Cloud calling service.
Upload files to start migration
| 1 |
Log in to Cisco Unified CM. |
| 2 |
From Cisco Unified CM Administration, go to Bulk Administration > Upload/Download Files. |
| 3 |
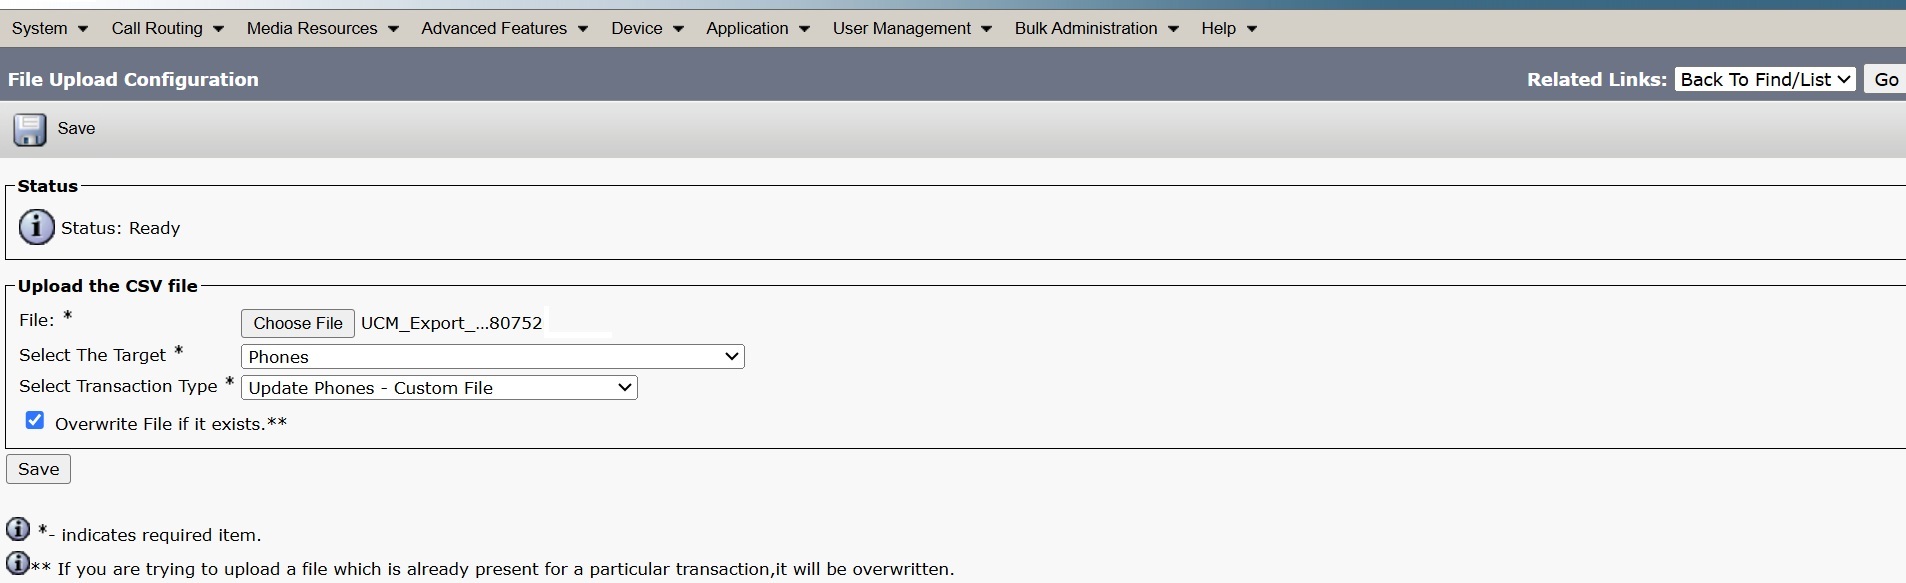
Click Add New. The File Upload Configuration window appears.
|
| 4 |
In the File text box, enter the full path of the file to upload from the downloaded manifest file or click Browse and locate the file. |
| 5 |
From the Select the Target drop-down list, choose the target as Phone. |
| 6 |
From the Transaction Type drop-down list, choose the transaction type as Update Phone - Custom File. |
| 7 |
Check the Overwrite File if it Exists check box, if you want to overwrite an existing file with the same name. |
| 8 |
Click Save. The upload status appears.
|
| 9 |
Repeat steps 4 to 8 for all the generated files. |
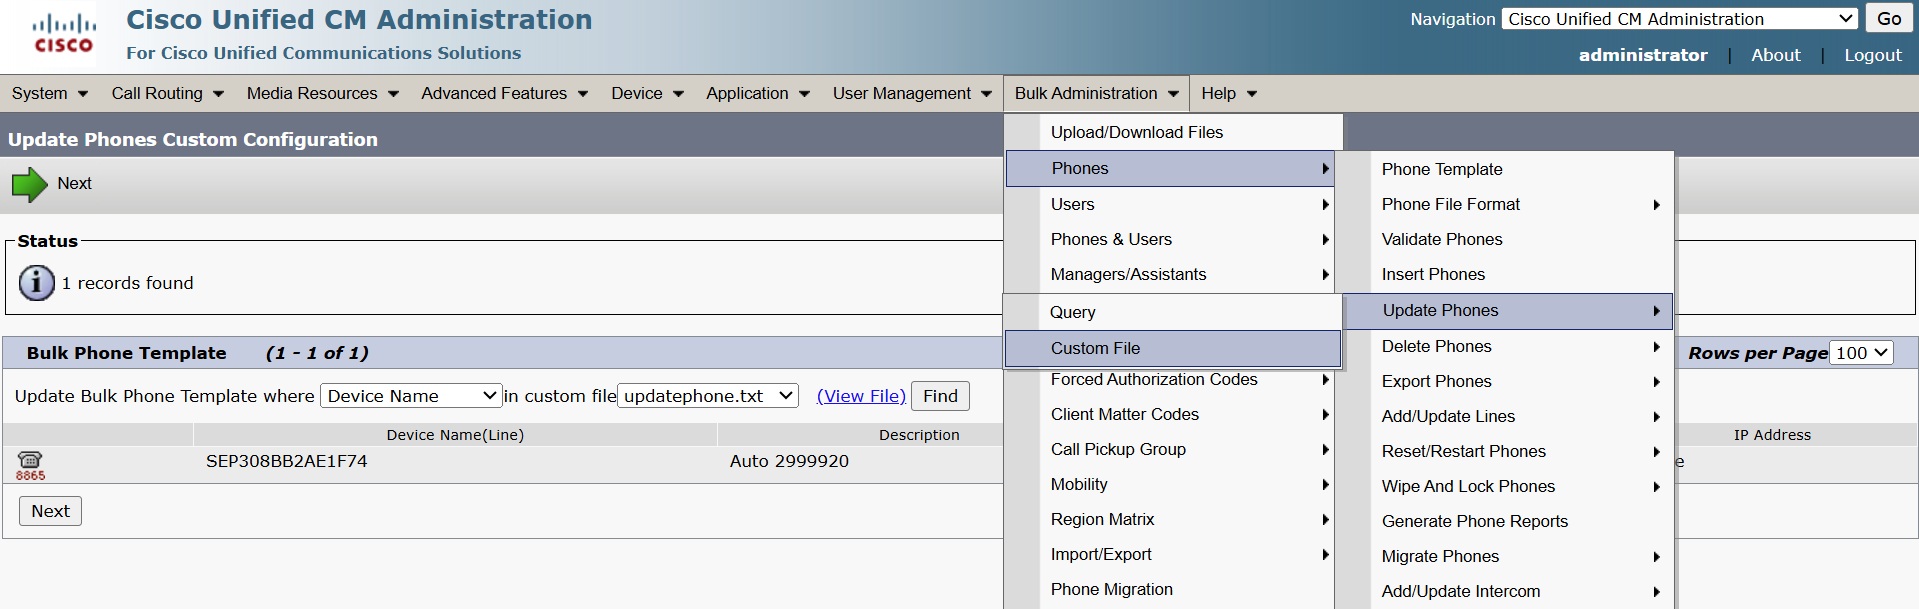
Update phones using custom files
Use this procedure to migrate users and devices without an Enterprise license. The migration tool automatically converts the license of these users and devices.
| 1 |
From Cisco Unified CM Administration, choose Bulk Administration > Phones > Update Phones > Custom File. The Update Phones Custom Configuration page appears.
|
| 2 |
From the Update Bulk Phone Template where drop-down list, choose Device Name. |
| 3 |
Click Find. The phones that are listed in the files, if available, appear on this page. |
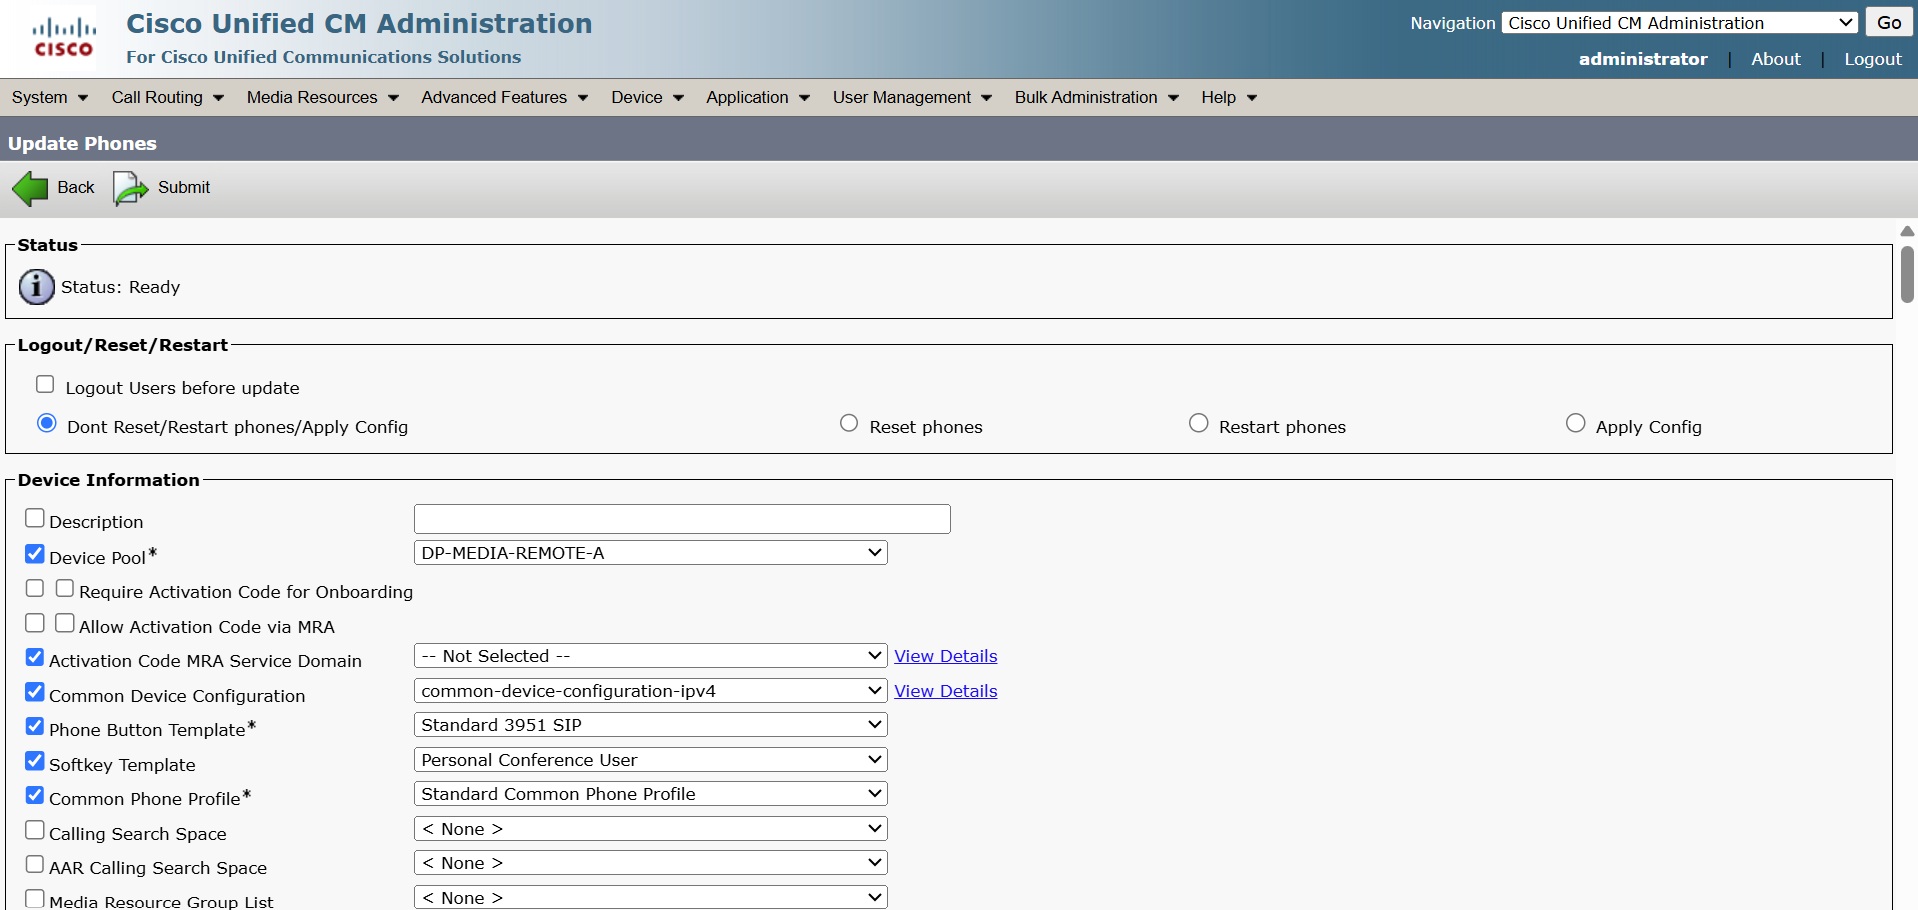
| 4 |
Click Next. |
| 5 |
Check the required parameters check boxes and update the details such as description, phone load name, load server, and so on, in the respective fields. |
| 6 |
From the Job Information section, choose one of the following options.
|
| 7 |
Click Submit. |
| 8 |
Repeat steps 1 to 7 for all the generated files. |
| 9 |
To view the status of the submitted job, go to Cisco Unified CM Administration → Bulk Administration → Job Scheduler. |
| 10 |
Select your job to view the job status. |