- Home
- /
- Article

Thanks for your feedback.

 In this article
 Feedback?
Use this article to set up voice channel capabilities for Webex Contact Center.
Set up voice channel for Webex Contact Center
This article guides you through setting up voice channels for your Webex Contact Center. Ensure you have completed the initial setup of your Webex Contact Center tenant by following the instructions in the Get Started with Webex Contact Center article.
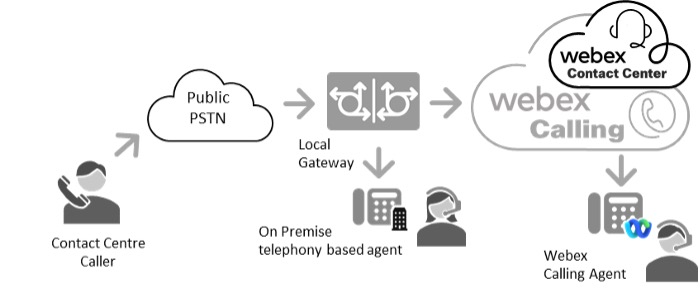
You must decide how you integrate Public Switched Telephone Network (PSTN) services and agents to your Webex Contact Center.
A Webex Contact Center Tenant must be connected to the PSTN. A PSTN provider allows inbound and outbound calls to and from your Webex Contact Center customers.
You must provide voice connectivity for your agents to allow them to receive and make calls. The method used to connect your agents is dependent on the type of endpoints they're using for voice services.
Connect to Webex Contact Center with Webex Service
Webex operates a globally available media network that provides access to multiple services, including Webex Calling, Contact Center and Meetings.
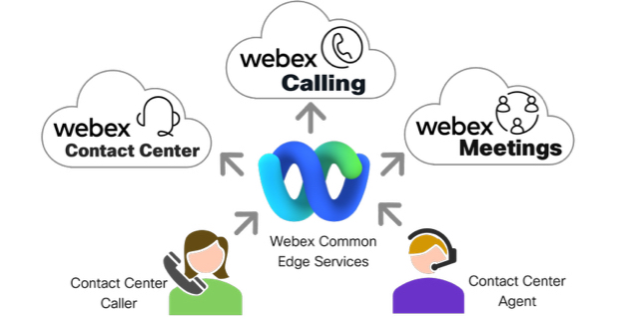
You can utilize this cloud connection to provide PSTN services, and your agents can connect to the Webex service to manage calls.
We recommended this method to integrate your telephony into the Webex cloud. This method provides a secure and reliable connection directly into the Webex infrastructure. It allows you to use self-service provisioning and configuration through Webex Control Hub.
Webex Calling Subscription
If you have an active Webex calling subscription, it is used to connect voice services into Webex Contact Center also.
Connect to Webex Contact Center with Webex Cloud Common Edge services
Webex Contact Center and Webex Calling share a global network of edge access services for routing calls into Webex Cloud.
Calls are routed into Webex Contact center using Webex Calling PSTN services. This service allows you to route calls to your contact center without a Webex Calling subscription.
All new Webex Contact Center subscriptions include Webex Calling PSTN services that are automatically added to all orders.
If your tenant was provisioned before October 2024, then you may need your partner to add Webex Calling PSTN service to use Common Edge services.
Connect to Webex Calling Services
You must determine your approach for providing PSTN services and how your agents connect to the Webex Contact Center.
PSTN Services
This section guides you through connecting Public Switched Telephone Network (PSTN) and agents to voice channels in your Webex Contact Center. Administrators need to plan and determine the best way to deliver PSTN services and establish agent connections to voice channels.
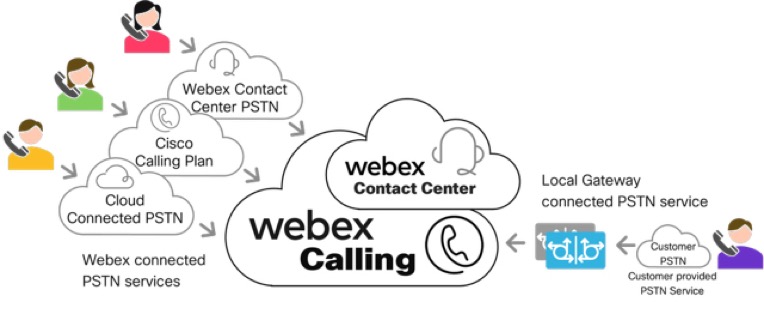
Administrators can choose from the following Webex Cloud PSTN interconnectivity options:
- Webex Contact Center PSTN (available in the contiguous United States and Canada only)
- Webex Cloud Connected PSTN
- Cisco Calling Plan (supported with Webex Contact Center in regions where Webex Calling supports service numbers and for Webex Contact Center Trials Only)
Administrators can also choose to use on-premise PSTN Connectivity:
- Webex Calling Local Gateway (premise-based or partner-hosted PSTN)
With Local Gateway, you can connect to the Webex Global Media cloud using an encrypted connection over the internet (OTT), or with a private connection using Webex Edge Connect.
Your Webex Contact Center must have at least one PSTN connection to receive and place calls. The remainder of this section details the available Webex PSTN connectivity options.
Webex Contact Center PSTN
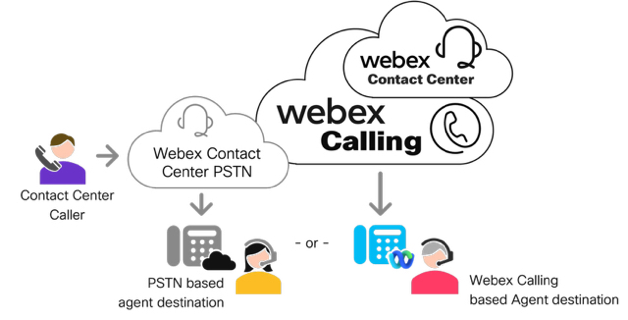
Customers in the contiguous United States and Canada can choose to purchase their Contact Center PSTN service through Cisco as a PSTN bundle with their Webex Contact Center. This service has been created with a tariff structure that allows customers to deliver PSTN calls into your Contact Center but also deliver calls to agents at PSTN destinations such as a home worker. You can order the service with regular numbers or toll-free numbers for an additional charge. Billing for the service as is charged directly by Cisco to the customer.
Webex Contact Center PSTN doesn’t support International Dialing capabilities. You can deliver calls to and from any North American Numbering Plan destination in the contiguous lower 48 states or Canada only.
Webex delivers the Contact Center PSTN as a cloud-connected PSTN service configured in the Webex Control Hub. An administrator would create a location in the Control hub and select Webex Contact Center PSTN as the PSTN service for the location.
Webex Contact Center PSTN orderability information can be found in the Webex Contact Center Ordering Guides. For more information, see Cisco Collaboration Contact Center Ordering Guide.
Webex Calling Cloud Connected PSTN (Cloud Connect, CCP, or CCCP)
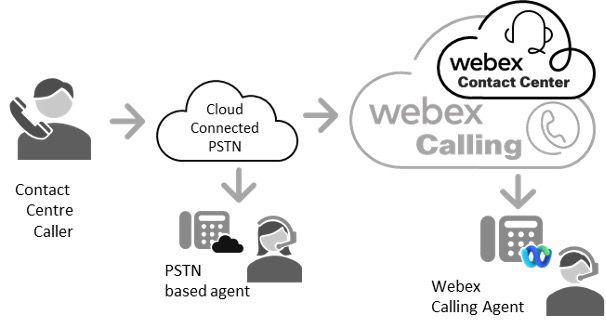
Webex Cloud Connected PSTN, or CCP, provides connectivity in over 65 countries through Certified Calling Providers. With Cloud Connected PSTN a highly reliable connection is established between the Webex Calling cloud and the selected PSTN provider.
When you select an authorized Cloud Connected PSTN Partner (CCPP) for your PSTN service, inbound and outbound calls are routed over this established connection into Webex Calling, providing quick, easy, and reliable calling for your enterprise.
In this connectivity model, inbound calls arrive via Cloud Connected PSTN into Webex Calling and are delivered to Webex Contact Center. Outbound calls are delivered to agents on Webex Calling Devices such as IP phones, Webex App, WebRTC, or to PSTN-based agents using CCP Provider PSTN inter-connectivity.
For more information, see Cloud Connected PSTN.
For information about the list of available countries and certified Cloud Connected PSTN providers, see https://www.webex.com/products/calling-global-availability.html.
In this model, customers using Webex Calling are required to partner with a Cloud Connected PSTN (CCP) provider. This partnership includes the initiation and activation of services, billing, and allocating phone numbers. The CCP provider is responsible for setting up the connection to your Webex Calling organization.
Cloud Connected PSTN (CCP) providers are provisioned to support +E.164 format PSTN numbers. This applies to both Direct-Inward-Dial (DID) as well as Toll-Free numbers. When you configure your CCP’s DIDs or Toll-Free numbers in Control Hub, they will be saved in +E.164 format.
Webex Calling Local Gateway (LGWY)
The Webex Calling Local Gateway enables you to retain your current on-premises PSTN carrier while providing access in over 140 markets globally.
The Local Gateway, which is the customer's Session Border Controller (SBC), registers with Webex Calling. It routes calls between Webex Calling and the on-premises resources behind an enterprise PBX, such as agents or the customer's existing on-premises PSTN connectivity.
In this connectivity model, inbound calls arrive through an existing on-premises PSTN carrier and are forwarded via the customer SBC into Webex Calling to reach Webex Contact Center. Outbound calls are delivered to Agents on Webex Calling Devices such as IP Phones, Webex App, WebRTC, or back to the on-premises environment via Local Gateway to reach on-premises agents or PSTN based agents.
For more information about the Local Gateway, see the Get started with Local Gateway article.
For configuring Local Gateway, see the Configure Local Gateway on Cisco IOS XE for Webex Calling article.
Webex Calling Local Gateway supports third-party SBC vendors. For more information about Additional vendor information including supported models and software can be found here:
https://www.webex.com/content/dam/wbx/us/aag/webex_calling_third_party_sbc_support_cm-5753.pdf
Calls routed into Webex Calling or Webex Contact Center from a Registration or Certificate based Local Gateway are provisioned as +E.164 format numbers in Control Hub. This applies to both Direct-Inward-Dial (DID) as well as Toll-Free numbers. When you configure your Premise-based PSTN DIDs or Toll-Free numbers in Control Hub, they will be saved in +E.164 format.
Cisco Webex Calling Plan

This PSTN option is currently available for Webex Contact Center trials and in the regions where Cisco supports service and/or inbound toll-free numbers.
Cisco Calling Plans provide a bundled solution that simplifies your cloud calling experience. As a Webex Calling customer, you have the option to order new PSTN numbers or port existing numbers to Cisco, supported fully by Cisco and our partners.
In this method of connectivity, Webex Calling provides PSTN Connectivity and DID or toll-free numbers. All provisioning is achieved via the Control Hub, including number ordering and activation. A single bill solution is achieved as Cisco operates as the PSTN Carrier.
Inbound calls arrive via Cisco Calling Plan into Webex Calling and are delivered to Webex Contact Center. Outbound calls are delivered to Agents on Webex Calling Devices such as IP Phones, Webex App, WebRTC, or to PSTN-based agents via Cisco Calling Plan PSTN interconnectivity.
Additional information regarding Cisco Calling Plan can be found in Cisco Calling Plans article.
A list of available countries and regions for Cisco Calling Plan can be found in Calling Global Availability article.
Agents Connection
Administrators must decide how agents are connected to Webex Contact Center. Agents may be connected via Webex PSTN inter-connectivity options or additional options such as Webex Calling devices, Webex App, premise-based PBX devices, or Microsoft Teams-based agents.
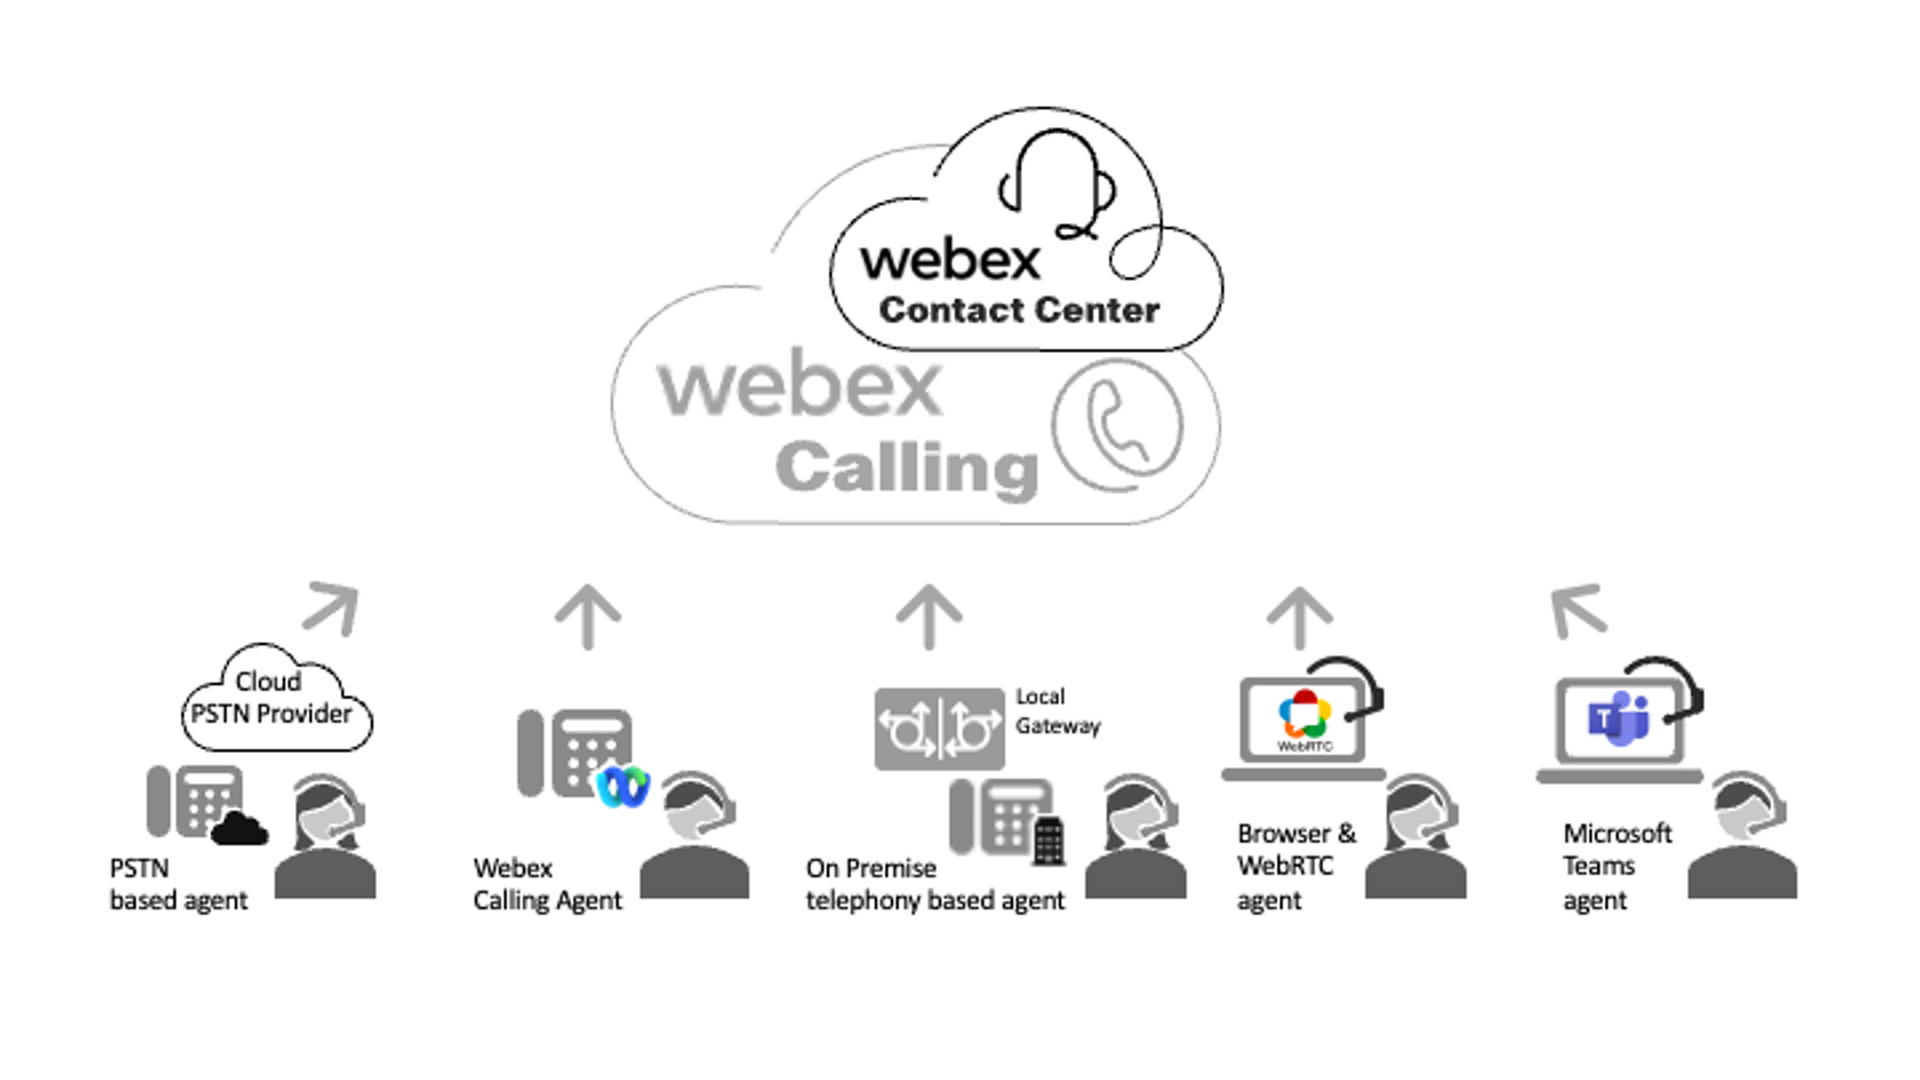
Agent connection methods include:
- Webex PSTN Inter-connectivity — this includes PSTN based agents with Direct Inward Dial (DID) numbers or agents who are on cellular devices.
- Webex Calling — this includes Webex Calling registered endpoints (MPP-based Devices or Webex App) via the internet or Webex edge connect service. A valid Webex Calling subscription is required to route calls to these agents.
-
WebRTC Agent Desktops — You can deliver calls to your agents using WebRTC enabled agent desktops. WebRTC delivers voice media directly to an agent’s web browser. A WebRTC connection is made over the internet and doesn’t require a local gateway to deliver calls to the agent.
WebRTC Desktop Support is currently unavailable for Contact Center customers hosted in our Japan data center.
- Premise-Based Agents or PSTN — this includes premise-based PBX agents or premise-based PSTN connectivity. Agents can use a telephony device connected to a Private Branch Exchange (PBX) such as Cisco Unified Communications Manager (CUCM) or agent-based calls can route via premise-based PSTN connectivity to a PSTN based agents DID or cellular device.
- Microsoft Teams Agents via Local Gateway Services – You can deliver calls to your agents using Microsoft Teams Desktop Application, Mobile Device, or Web Application via Local Gateway Direct SIP Routing Integration. This integration provides a SIP Trunk between your Webex Calling Local Gateway and your Microsoft Teams tenant and clients.
Your Webex Contact Center tenant must have at least one method of delivering calls to agents.
+E.164 Globalized Call Routing Support for Multinational Contact Center Deployments
Webex Contact Center supports +E.164 Number formats. This capability allows larger Multinational Contact Centers utilizing multiple dial plans, on-premise PBX interoperability, and PSTN carriers to simplify their global and hybrid Contact Center dial plans and call routing schemas.
Webex Calling by default supports +E.164 Number formats when utilizing Cloud Connected PSTN or Local Gateway connectivity and you provision Numbers in Control Hub. All PSTN Numbers (Direct-inward-dial or Toll-Free) are saved in Control Hub in +E.164 format.
Local Gateways such as Cisco CUBE or approved third-party SBCs can be configured to support +E.164 format and globalization to interoperate with on-premises PBXs such as Cisco Unified Communications Manager and On-Premise PSTN services.
Agent Destination Selection in Webex Contact Center
When logging in to Webex Contact Center, agents are prompted to specify their preferred destination for receiving calls. Destinations can be defined as a Dial Number, Extension, or Desktop. Administrators can manage and customize this behavior using desktop profiles, which allow for the predefinition of agent destinations.
-
Dial Number: A Dial Number is a free-form numeric entry that can represent an enterprise Direct Inward Dialing (DID) number, including those associated with Webex Calling, Microsoft Teams, mobile destination or public PSTN numbers. A dial number is typically entered in +E.164 format, this is not mandatory. The specified number must be reachable through Webex PSTN and routing.
- Extension: An Extension is a short-form internal number, which may correspond to a Webex Calling or Unified Communications endpoint. Upon entry, the login screen attempts to match the extension with a registered Webex Calling endpoint. If a match is found, additional phone control features become available to the agent, including the ability to select a preferred device.
- Desktop: If available, selecting Desktop enables agents to use WebRTC-based calling directly from their browser.
-
Ensure that all dialed numbers and extensions are properly configured and reachable within Webex PSTN and Routing and your organization's telephony (if applicable).
-
The Desktop (WebRTC) option currently isn't available for customers hosted in Japan data center.
Cisco Preferred Architecture for Webex Calling
It is recommended that Webex Calling customers deploy PSTN services according to best practices and guidelines published as part of the Cisco Preferred Architecture for Webex Calling document found here: https://www.cisco.com/c/dam/en/us/td/docs/solutions/CVD/Collaboration/hybrid/AltDesigns/PA-WbxCall.pdf
Webex Calling Provisioning and Configuration for Webex Contact Center
When deploying Webex Calling with Webex Contact Center, customers should fully configure Webex Calling including all applicable control hub settings, licensing, PSTN interconnectivity, and deployment of agent endpoints such as Webex Calling Devices (MPP IP Phones), Webex App (soft phones) prior to the configuration of the Webex Contact Center tenant. Pre-configuring the above Webex Calling components significantly accelerates the deployment and simplifies the configuration process for Webex Contact Center.
Additional Information regarding the Configuration of Webex Calling can be found here:
https://help.webex.com/en-us/article/njvdjf2/Configure-Webex-Calling-for-your-organization
A Webex Calling Configuration Workflow can be found here:
https://help.webex.com/en-us/article/32gfts/Webex-Calling-Configuration-Workflow
Webex Calling Network and Port Reference Guide:
https://help.webex.com/en-us/article/b2exve/Port-Reference-Information-for-Webex-Calling
Before deploying Webex Contact Center, you should successfully make inbound and outbound calls using your chosen Webex Calling PSTN connectivity option, before completing the remaining tasks.
Webex Calling Configuration Checklist for Webex Contact Center
When setting up Webex Contact Center integrated with Webex Calling, certain configurations must be made to ensure a seamless communication experience. Below is a comprehensive checklist that can be used to guide you through the necessary configurations and verifications for a successful Webex Contact Center implementation.
Verification of Webex Control Hub Account Information
Best practice recommends documenting your Webex Control Hub Account Information. This information includes your Organization ID and Name. This information will be required for opening Cisco Technical Assistance Center (TAC) cases or when coordinating with your Cisco Account Team, Customer Success Specialist, or Webex Contact Center resources. Having this information handy will speed up time to resolution when seeking assistance.
- Sign in to Control Hub.
- Navigate to Account > Organization Profile.
- Document your Organization Name and Organization ID.
Verification of Webex Subscriptions and Licensing
Best practice recommends documenting your Webex Control Hub subscription information. This information includes your subscription licenses for Webex Meetings, Messaging, Calling, and Contact Center. This information must be included when opening Cisco Technical Assistance Center (TAC) cases or when coordinating with your Cisco Account Team, Customer Success Specialist, or Webex Contact Center resources.
- Sign in to Control Hub.
- Navigate to Account > Subscriptions.
- Document the details on the License Summary page.
This page includes all Calling and Contact Center subscription licensing information.
- A valid Calling subscription is required for agents that use Webex devices or Webex App.
- A valid subscription is required for the number of Contact Center standard or premium agents you wish to enable. If you do not see an active subscription for Webex Contact Center Standard or Premium agents, please contact your Cisco Partner or Account team.
Configuration of Webex Contact Center PSTN Locations
Webex Contact Center PSTN interconnectivity must be assigned a dedicated location in Webex Control Hub. This location represents Webex Contact Center PSTN interconnectivity into and out of the Webex Global Media cloud.
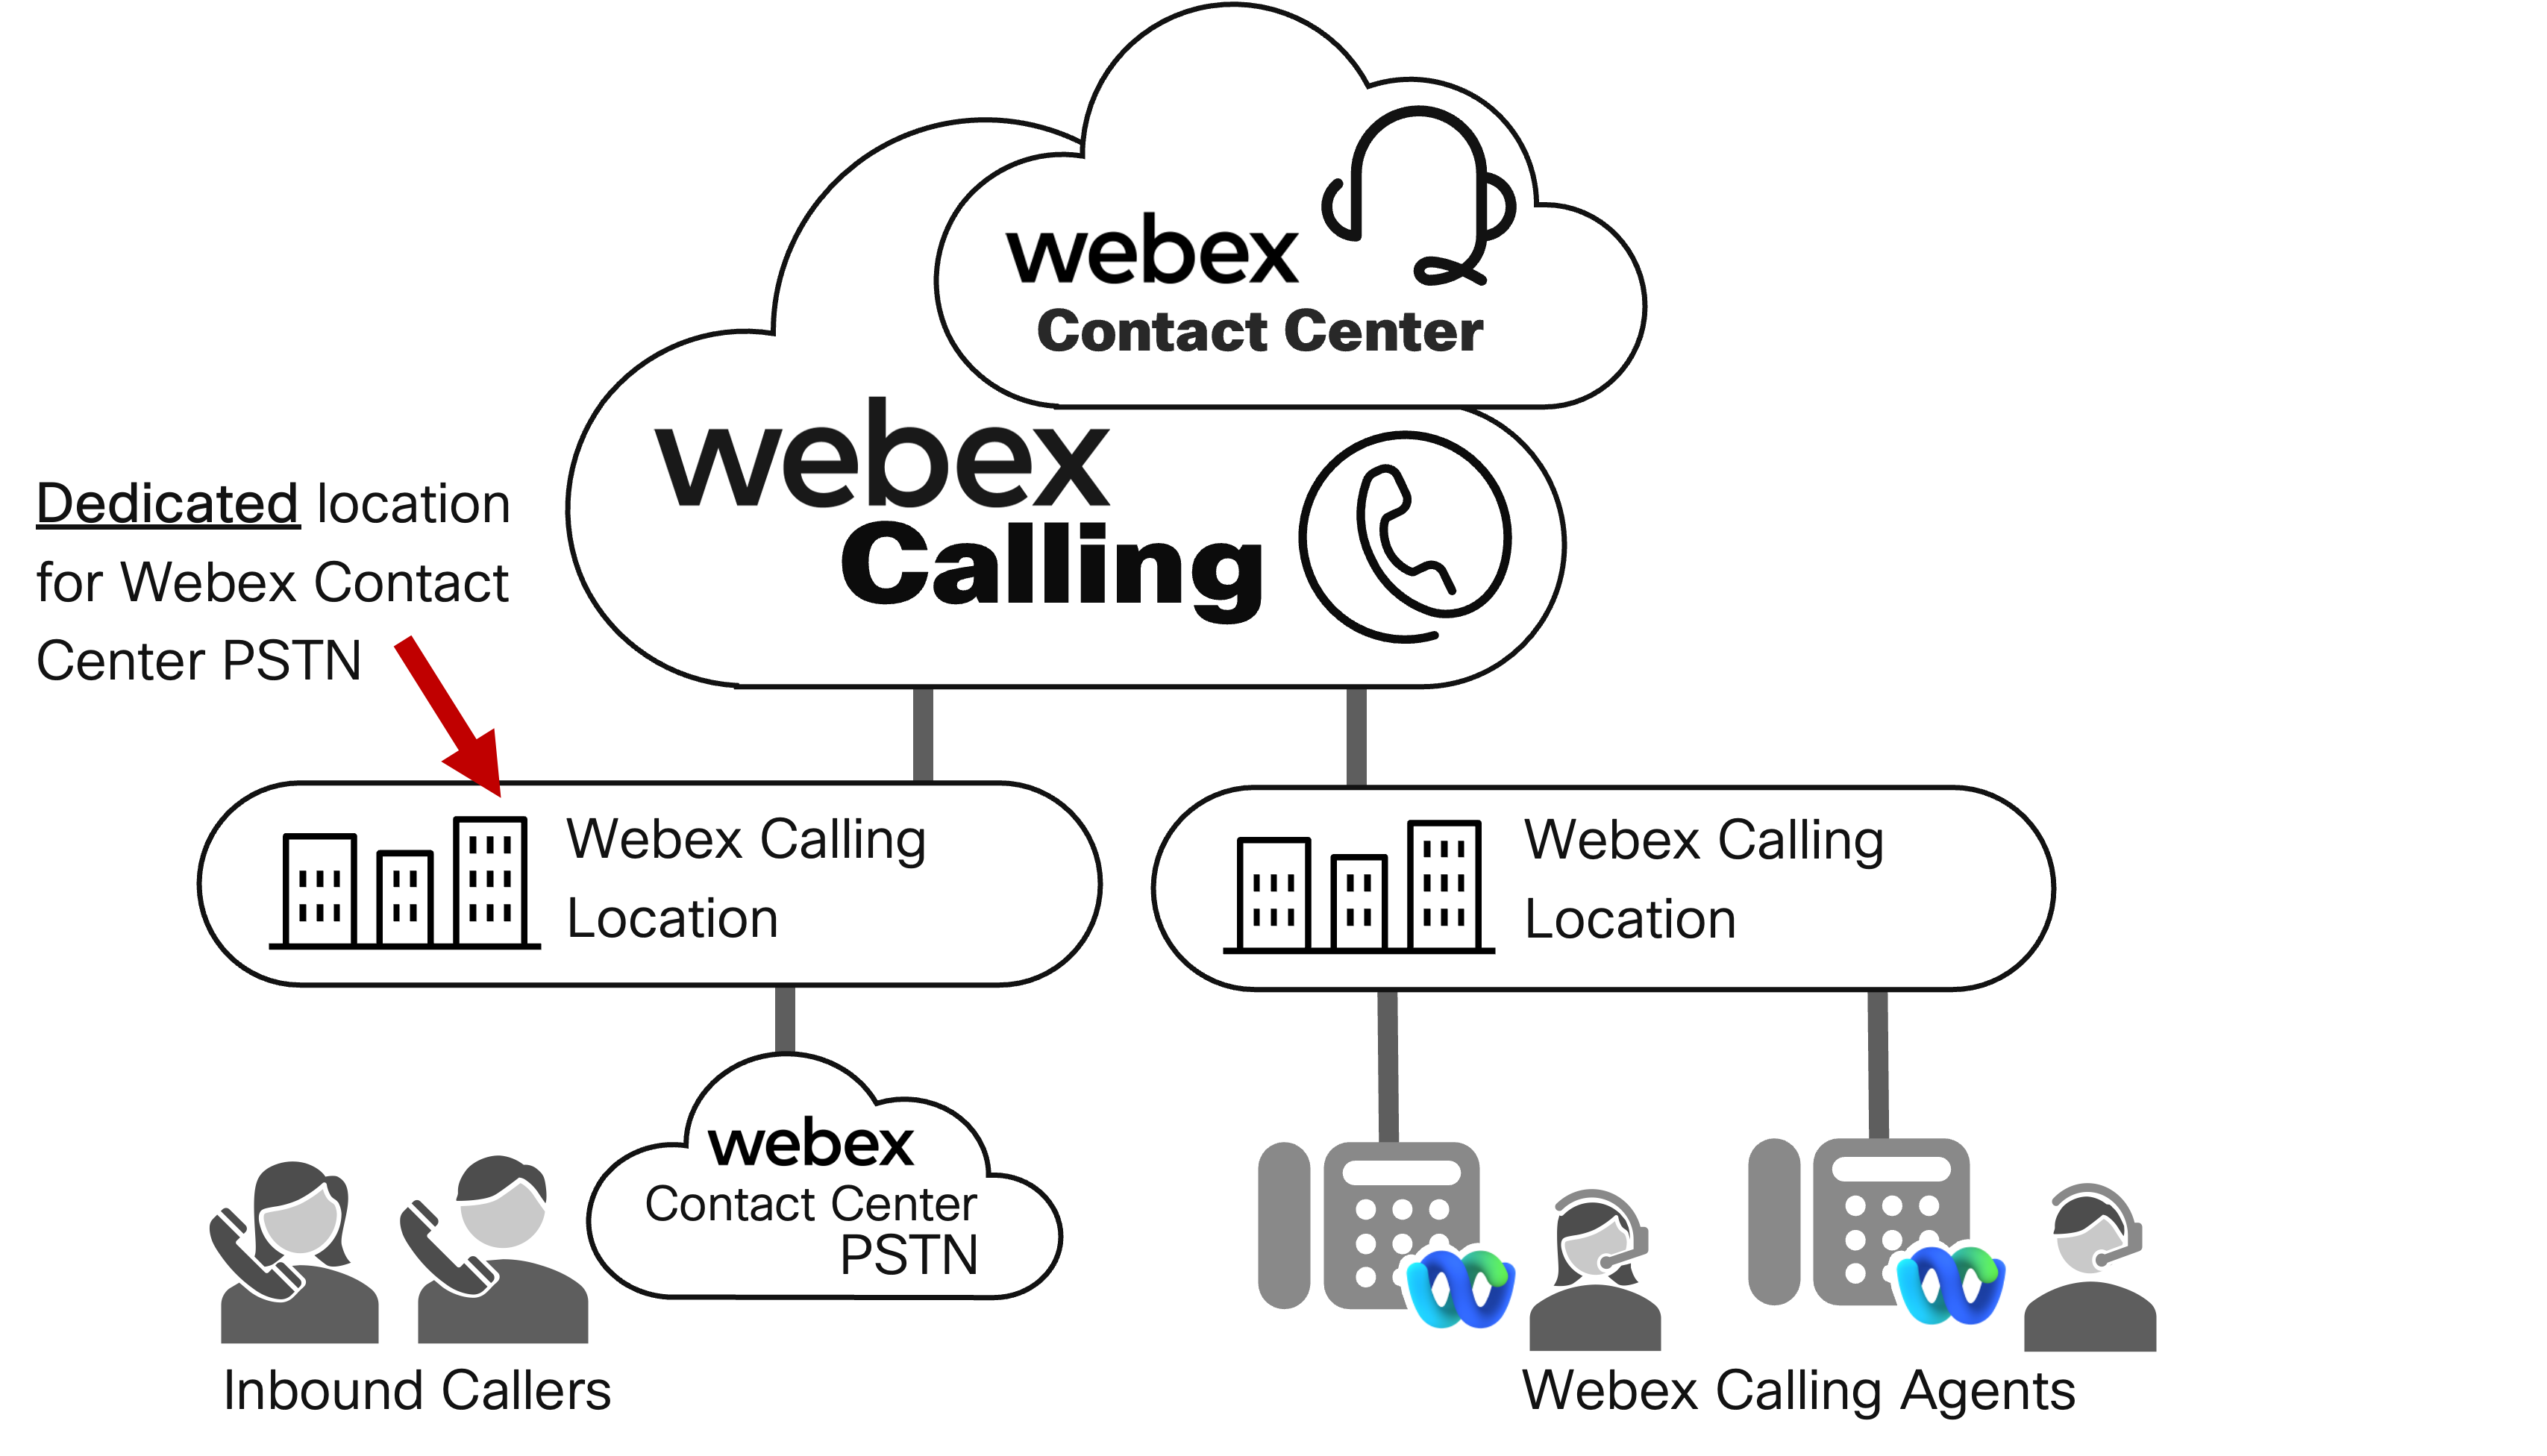
Cisco does not support endpoint devices in the same Webex Calling location as Webex Contact Center PSTN. Placing endpoints in the same location might result in unexpected customer overage charges on their Webex Contact Center subscription.
Administrators can configure more than one PSTN Location if your Webex Contact Center deployment requires access to more than one PSTN interconnectivity option. An example of this would be a dedicated location for Webex Cloud Connected PSTN and a separate location for Webex Local Gateway.
For deployments that span multiple nations or regions, you may need to configure additional locations to represent each geographical area and their corresponding PSTN connectivity options.
- Sign in to Control Hub.
- Navigate to Locations.
- Click the Manage location drop-down list and select Create manually.
- Enter the details and click Create.
In this step, map each PSTN connectivity option for Webex to a corresponding location that you create.
- On the Location creation summary page, click Close. You will add the Location PSTN Connectivity option during a later step.
- Repeat Step 4 for additional locations.
Configuration of Webex Calling Agent Locations (if applicable)
Webex Contact Center Agents using Webex Calling devices (MPP Devices or Webex App) for agent inter connectivity should be assigned a location in Webex Control Hub. This allows Administrators to configure a Location to represent Webex Contact Center Agent Interconnectivity into and out of the Webex Global Media cloud.
Administrators can configure more than one Agent Location for Webex Contact Center deployment. An example of this would be a dedicated call center facility, a remote location for work from home-based Agents, or premise-based locations. For deployments that span multiple nations or regions, you may need to configure additional locations to represent each geographical area.
- Sign in to Control Hub.
- Navigate to Locations.
- Click the Manage location drop-down list and select Create manually.
- Enter the details and click Create.
- On the Location creation summary page, click Close.
- Repeat Step 4 for agent locations.
Configuration of Webex Contact Center PSTN
For deployments of Webex Contact Center that uses Webex Contact Center PSTN, you must configure the Webex Contact Center PSTN Provider in the Control Hub.
With Webex Contact Center PSTN, Cisco acts as your PSTN provider and RESPBORG. This includes service onboarding and activation, billing, and number provisioning. The configuration of Webex Contact Center PSTN as a CCP provider establishes connectivity to your Webex Calling Organization.
The following section assists you in onboarding Webex Contact Center PSTN connectivity.Control Hub CCP activation
- Sign in to Control Hub
- Navigate to Locations.
- Choose a location that you wish to configure for Webex Contact Center PSTN connectivity by clicking on the particular record.
- Navigate to the Calling sub menu and click Set up calling.
- Under Connect Type, choose Cloud Connected PSTN and click Next.
- Choose Webex Contact Center PSTN Plan as the provider from the list and click Next.
This service is only available in the USA (Contiguous lower 48 states) and Canada currently. For this PSTN Connectivity type to be displayed a valid USA or Canadian address must be configured under your Location.
- Click Add Numbers Now on the PSTN connection saved dialog window.
- On the Choose a Location to Add Numbers page, click Next. This page defaults to the location and Webex Contact Center PSTN Provider that you have previously chosen.
- Enter the phone numbers provided by Cisco, these numbers should have been provided to you as part of your Webex Contact Center Tenant activation and onboarding process. You can list multiple numbers by separating them with commas. Acceptable formats include country codes, plus signs, dashes, or parentheses—for example: 4507832223, (450) 783-2223, 450-783-2223, or +1-450-783-2223.
Ensure that you only configure the numbers allocated to your Webex Contact Center PSTN Connection. Entering invalid numbers may result in call routing failures during subsequent steps. To activate numbers later, toggle on the Activate Numbers later option.
- Click Save after you have added the numbers.
- Click Close on the Summary page.
- Verify your numbers under . You should see the DIDs that you have added in Step 9. Note that these numbers appear in Globalize +E.164 format.
- Your recently added DID can be configured as a Webex Contact Center Entry Point / Directory Number (EP/DN) to route inbound calls into the Contact Center IVR. For additional configuration steps, see Configuration of Inbound Entry Points to Webex Contact Center.
Additional information regarding Cloud Connected PSTN can be found here: https://help.webex.com/article/nw3ygtq/Cloud-Connected-PSTN.
Configuration of Webex Cloud Connect PSTN
For deployments of Webex Contact Center that utilizes Webex Cloud Connected PSTN for PSTN interconnectivity, you must configure the CCP Provider in Control Hub.
With CCP, Webex Calling customers must establish a relationship with a Cloud Connected PSTN partner. This includes service onboarding and activation, billing, and number provisioning. The CCP provider will establish connectivity to your Webex Calling Organization.
The following sections assist you in onboarding CCP for Webex Contact Center connectivity. There are two main categories of configuration:
CCP Provider Activation
- Choose a Cloud Connected PSTN Provider. A list of providers can be found here: https://www.webex.com/products/calling-global-availability.html (click Cloud Connect tab and scroll to the bottom).
- Once you have selected a CCP Provider, click on the CCP Providers name. This redirects you to the CCP provider’s web page and provides additional information to request services.
Before moving to the Control Hub CCP Activation section below, ensure that you have completed the CCP Provider Activation process and that you have an active service, phone numbers, and billing set up with the CCP Provider. The provider will configure your connection to the Webex Global Media cloud and connect your CCP provider account to your Control Hub.
Control Hub CCP Activation
- Sign in to Control Hub.
- Navigate to Locations.
- Choose a location you wish to configure for CCP inter connectivity by clicking on the particular record.
- Navigate to the Calling sub menu and click Set up calling.
- Under Connect Type, choose Cloud Connected PSTN and click Next.
- Select a Cloud Connected PSTN provider from the list and click Next.
Depending on your geographical location, you may see various Cloud Connected PSTN (CCP) providers listed in your region. The list includes both certified and non-certified CCP Providers. Certified providers, in general, have completed a rigorous validation and accreditation process with Webex, ensuring that their connectivity, interoperability, and scalability meet the requirements of the Webex Global Media cloud.
- Click Add Numbers Now on the PSTN connection saved dialog window.
- On the Choose a Location to Add Numbers page, click Next. This page will default to the location and CCP Provider you have previously chosen.
- Enter the phone numbers provided by your CCP Provider. You can list multiple numbers by separating them with commas. Acceptable formats include country codes, plus signs, dashes, or parentheses—for example: 4507832223, (450) 783-2223, 450-783-2223, or +1-450-783-2223.
Ensure that you only configure the numbers specifically allocated to your Webex CCP Connection by your CCP provider. Entering invalid numbers may result in call routing failures during subsequent steps. To activate numbers at a later time, toggle on the Activate Numbers later option.
- Click Save after you have added the numbers.
- Click Close on the Summary page.
- Verify your numbers under Calling > Numbers. You should see the DIDs that you have added in Step 9. Note that these numbers will appear in Globalize +E.164 format.
- Your recently added DID can be configured as a Webex Contact Center Entry Point / Directory Number (EP/DN) to route inbound calls into the Contact Center IVR. For additional configuration steps, see Configuration of Inbound Entry Points to Webex Contact Center.
Additional information regarding Cloud Connected PSTN can be found here: https://help.webex.com/article/nw3ygtq/Cloud-Connected-PSTN.
Configuration of Webex Local Gateway
For deployments of Webex Contact Center that utilizes Webex Local Gateway for premise-based PSTN and/or premise-based agent interconnectivity, you must configure the Local Gateway in Control Hub.
With Local Gateway, an on-premises based Session Border Controller (SBC) establishes a connection with Webex Calling. Customer provided premise based PSTN can be leveraged to route calls into Webex Contact Center. In addition, agents can be premise-based behind a PBX such as Cisco Unified Communications Manager. The configuration of the on-premises SBC is the responsibility of the Webex Contact Center Administrator or customer voice engineering staff.
The following sections assist you in onboarding Local Gateway for Webex Contact Center connectivity. For Local Gateway connectivity, there are two categories of configuration — Control Hub Local Gateway Activation and Session Border Controller Configuration.
Control Hub Local Gateway Activation
- Sign in to Control Hub.
- Navigate to Calling > Call Routing > Trunk.
- Click Add Trunk.
-
Configure the Trunk Location, Name, and Trunk Type and click Save.
For Webex Contact Center deployments requiring greater than 250 concurrent calls (IVR + Agent concurrent calls), you must select Certificate Based trunk type. This encrypts the SIP and RTP towards the Webex Global Media network from your premise-based SBC.
For purposes of this article, we will configure a Registration based Local Gateway capable of processing up to 250 concurrent calls into Webex Contact Center. Additional information on Local Gateway trunk types can be found here: https://help.webex.com/article/t9xctu/Get-started-with-Local-Gateway#local-gateway-trunking-models.
- On the Add Trunk Summary page, enter all settings including the Trunk Group, Outbound Proxy Address, Registration Domain, Line Port, and Authentication information including your user name and password. These values will be part of your Session Border Controller (SBC) configuration to establish connectivity to Webex Calling Local Gateway and ultimately Webex Contact Center.
- Navigate to Calling > Call Routing > Route Group and click Create Route Group.
- Enter a name for your Route Group and assign the Trunk you created in Step 4. Route Groups allow you to assign multiple Trunks (to scale your Local Gateway deployments and for High Availability) and assign Priority weights to call routing. Click Save and close the Create Route Group summary page.
- Navigate to Locations.
- Select a location you wish to configure for Webex Local Gateway interconnectivity by clicking on the appropriate record.
- Navigate to the Calling sub menu and click Set up calling.
- Under Connect Type, choose Premise-Based PSTN and click Next.
- On the Connection Type page, select either the Local Gateway Route Group you previously created or the Local Gateway Trunk in the Routing Choice drop-down list. Selecting a Local Gateway Route Group provides the highest flexibility, scalability, and fault tolerance, if properly configured for redundancy. Click Next.
- Click Add Numbers Now on the PSTN connection saved dialog window.
- On the Choose a Location to Add Numbers page, click Next. This page will default to the location and CCP Provider you have previously chosen.
- Enter the phone numbers provided by your CCP Provider. You can list multiple numbers by separating them with commas. Acceptable formats include country codes, plus signs, dashes, or parentheses—for example: 4507832223, (450) 783-2223, 450-783-2223, or +1-450-783-2223.
Ensure that you only configure the numbers specifically allocated to your Webex CCP Connection by your CCP provider. Entering invalid numbers may result in call routing failures during subsequent steps. To activate numbers at a later time, toggle on the Activate Numbers later option.
- Click Save after you have added the numbers.
- Click Close on the Summary page.
- Verify your numbers under Calling > Numbers. You should see the DIDs that you have added in Step 15. Note that these numbers will appear in Globalize +E.164 format.
- Your recently added DID can be configured as a Webex Contact Center Entry Point / Directory Number (EP/DN) to route inbound calls into the Contact Center IVR. For additional configuration steps, see Configuration of Inbound Entry Points to Webex Contact Center.
Outbound Premise-based Local Gateway Dial Plan
To enable call routing from Webex Contact Center to on-premise destinations, such as agents or an existing PSTN provider, you must configure an Outbound Dial Plan in Control Hub. This dial plan outlines the patterns you can dial to reach on-premises destinations. Your dial plan will be specific to the extensions or PSTN numbers already in use on your premises.
The following steps will guide you to route calls towards the on-premises environment to agents or premise connected PSTN destinations.
-
Sign in to Control Hub.
- Navigate to Calling > Call Routing > Dial Plans.
-
Click Create Dial Plan.
-
Configure a Name, Routing Choice, and Patterns for premise-based destinations and click Save.
Dial plan patterns can include +E.164 prefixes, SIP URIs, or location-specific prefixes. The examples below build on the Local Gateway Numbers configured in step 16. The dial plan patterns shown represent premises-based destinations ranging from 1-804-555-0000 to 1-804-555-9999, which also corresponds to +1-804-555-0000 to +1-804-555-9999. By setting up these patterns, agents can dial numbers according to their preferred methods, and calls made from globalized +E.164 address books will be correctly routed to on-premises locations.
- Verify the on-premises dial plan by clicking on the entry. You will now see the two previously configured entries displayed.
Managed Gateways
Connecting your iOS managed gateway devices to Cisco Webex Control Hub, allows you to manage and monitor them from anywhere, together with the rest of your Unified Communications infrastructure.
This enables you to initiate common tasks to manage your devices more effectively. To enroll a gateway, you must install a management connector application and make sure that there is a secure connection between this and the Cisco Webex cloud. After you establish this connection, you can enroll the gateway by logging in to the Control Hub.
Additional information on configuring Managed Gateways can be found here: https://help.webex.com/article/xftgfc/Enroll-Cisco-IOS-managed-gateways-to-Webex-Cloud
Assigning services to Managed Gateways:
https://help.webex.com/article/n0qkgho/Assign-services-to-managed-gateways
Validating Cisco Local Gateway configuration through Control Hub:
https://help.webex.com/article/2zx7fg/Validate-Cisco-Local-Gateway-configuration-through-Control-Hub
Session Border Controller Configuration for Local Gateway Connectivity
Webex Contact Center Administrators are tasked with configuring the Session Border Controller (SBC) using the parameters provided in control hub. While detailed configuration instructions for specific SBCs are not included in this article, resources are provided below to assist with the setup for both Cisco CUBE and compatible third-party SBCs.
Each environment requires a slightly different SBC configuration, depending on the existing on-premises dial plan and PSTN integration.
Getting started guide with Local Gateway can be found here: https://help.webex.com/article/t9xctu/Get-started-with-Local-Gateway
Configuration steps for Cisco IOS XE devices (Cisco CUBE) can be found here:
https://help.webex.com/article/jr1i3r/Configure-Local-Gateway-on-Cisco-IOS-XE-for-Webex-Calling
Webex Calling Local Gateway supports third-party SBC vendors. Additional vendor information including supported models, software, and example configurations can be found here:
https://www.webex.com/content/dam/wbx/us/aag/webex_calling_third_party_sbc_support_cm-5753.pdf
Microsoft Teams Direct SIP Trunk Integration for Local Gateway Connectivity
Webex Contact Center can deliver calls to your agents using Microsoft Teams Desktop Application, Mobile Device, or Web Application via Local Gateway Direct SIP Routing Integration. This integration provides a SIP Trunk between your Webex Calling Local Gateway and your Microsoft Teams tenant and clients.
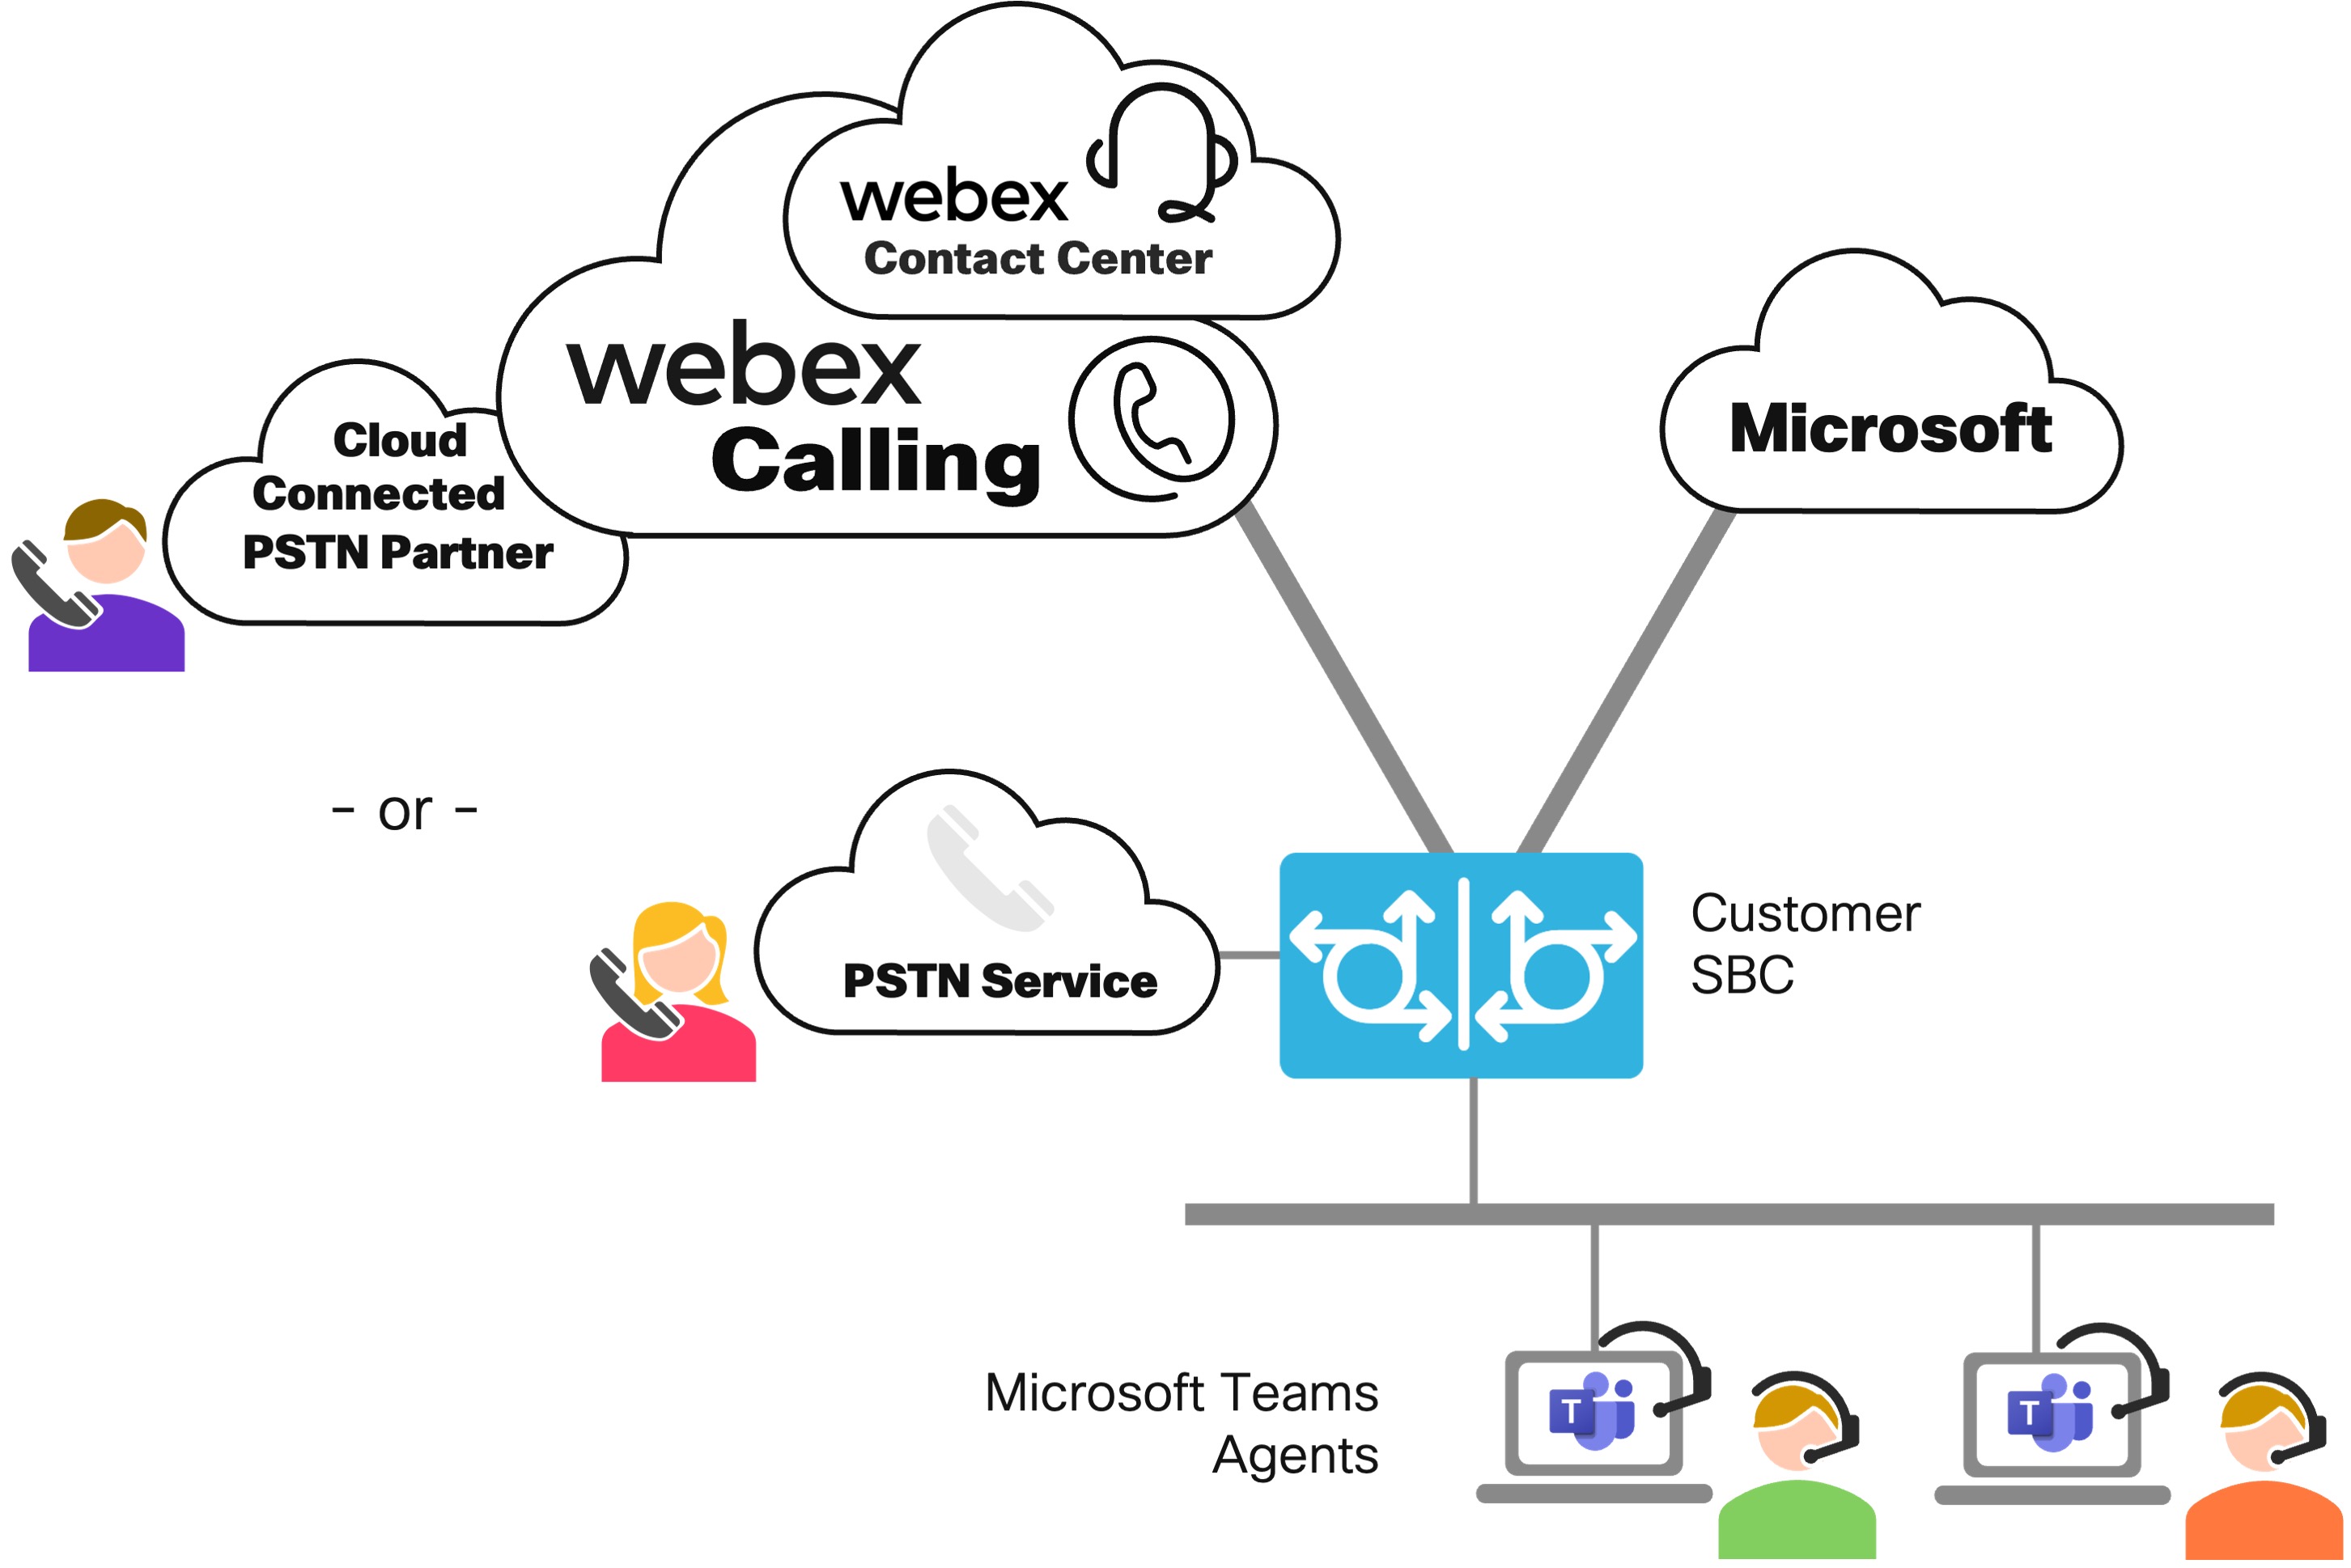
This integration requires either a Registration or Certificate based Local Gateway using a Cisco CUBE or third-party SBC. This integration includes Presence Status synchronization between your Webex Contact Center Agent Desktop and the Microsoft Teams client.
Microsoft Teams integration for Webex Contact Center will require the use of +E.164 dial plan configuration on the Local Gateway as well as full Control Hub Local Gateway configurations including Trunks, Route Group, and Location routing of unknown extensions towards a given sites Local Gateway or Route Group. Configuration details for Microsoft Teams Direct SIP Trunk Routing for Cisco CUBE can be found here: https://www.cisco.com/c/dam/en/us/solutions/collateral/enterprise/interoperability-portal/direct-routing-with-cube.pdf. If you are using a third-party SBC, check with your manufacturer for an interoperability and configuration guide for Microsoft Teams.
Cisco does not support directly connecting Webex Calling PSTN delivered calls directly to Microsoft Teams endpoints.
Verification of Webex Contact Center Service Details
During the setup of your tenant as described in Get Started with Webex Contact Center, a voice media platform is selected. Currently, next generation media platform is the default option for all new trials and subscriptions during the activation process.
Perform the following steps to verify whether you have selected the appropriate voice media platform and Telephony type:
-
Sign in to Control Hub.
- Navigate to Contact Center > Settings > Service Details.
-
Ensure your voice media platform is Real Time Media Service and Telephony is Webex Calling.
The options are grayed out after tenant provisioning and activation and cannot be changed without Cisco intervention. It is critical at this point that you validate your connectivity options before proceeding. If your tenant is provisioned incorrectly, please notify your Cisco account team, Customer Success Manager, or Cisco partner before proceeding further.
Configuration of Inbound Entry Points to Webex Contact Center
An Entry Point is the association of the inbound telephone number to an Interactive Voice Response (IVR) service flow in your Webex Contact Center. You will need to map external telephone numbers to IVR flows as part of the provisioning process for your inbound Webex Contact Center PSTN service.
-
Sign in to Control Hub.
- Navigate to Services > Contact Center > Customer Experience > Channels.
-
Click Create Channel.
- Configure the Entry Point Name, Description and set the Channel type to
Inbound Telephony. - Configure the Entry Point Settings fields—Service Level Threshold, Timezone, Routing Flow (IVR flow), Version label, and Music on Hold to your Contact Center values.
- Configure the Phone number to which a customer calls to reach your business. You can select from multiple numbers that are already configured in your Webex Calling service. For more information, go to numbers page.
- Select the following:
- Webex Calling Location from the drop-down list.
- PSTN number you have added in Webex Calling to represent the inbound call arrival number from the drop-down list.
- PSTN Region (if enabling this number for Regional Media).
You must select both a location and a region. However, you can populate the PSTN number, Extension number, or both.
- To add more numbers, click Add under Phone number.
- Click the check mark to save the values and click Save.
- Click Create to save the settings and click on the newly created channel.
For additional information regarding regional media optimization and the significance of the values selected, please see Regional PSTN Media Optimization Configuration.
Important considerations for extension numbers
Locations must be configured correctly for Webex Calling/PSTN services. For more information, see Configure Webex Calling for your organization.
When defining locations for Webex Contact Center, you must consider the following:
- Your location must be configured with a main number.
- Cisco recommends using prefixes when using multiple locations.
- You must avoid mixing prefixed and non-prefixed locations as this can lead to unexpected call routing.
- You must avoid using overlapping extensions across locations as this can also cause unexpected call routing.
- Cisco recommends using the Enterprise Significant Number (ESN) for all internal calls to and from Webex Contact Center.
When an entry point has been configured with both an E.164 number and an extension, the contact center always reports a call to the E.164 number, even if the extension was dialed. That is, the phone number takes priority over the extension.
If a caller dials an entry point from an endpoint that doesn't have an E.164 number assigned, the call is presented to the contact center entry point with the caller's location main number (E.164 number).
Regional PSTN Media Optimization Configuration
An Entry Point is the association of the telephone number to an Interactive Voice Response (IVR) service flow in your Webex Contact Center. You must map external telephone numbers to IVR flows as part of the provisioning process for your inbound Webex Contact Center PSTN service.
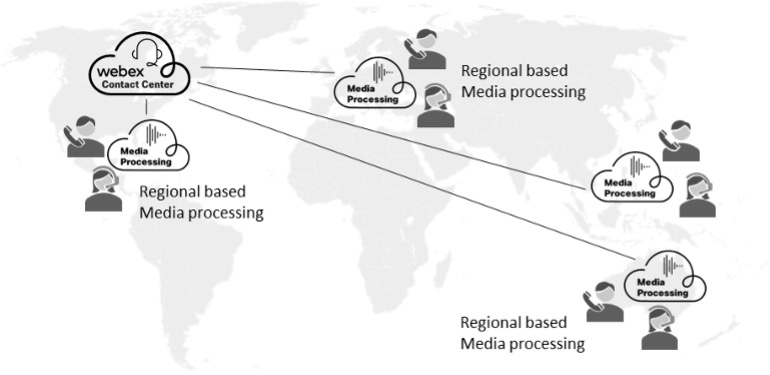
If you’re deploying a multinational based Webex Contact Center with geographically distributed customers and agents located in multiple regions, you can choose where you would like voice calls to be processed.
Webex has a global network of edge media processing resources worldwide. Processing voice media (audio) closest to the caller and agent lowers network latency delivering a better call quality experience for both customer and agent. As an administrator, you can choose a “PSTN Region” that decides where the Webex contact center processes media.
In Control Hub, you can associate a Webex Calling telephone number in a location with a Webex Contact Center entry point and select a PSTN region for media processing.
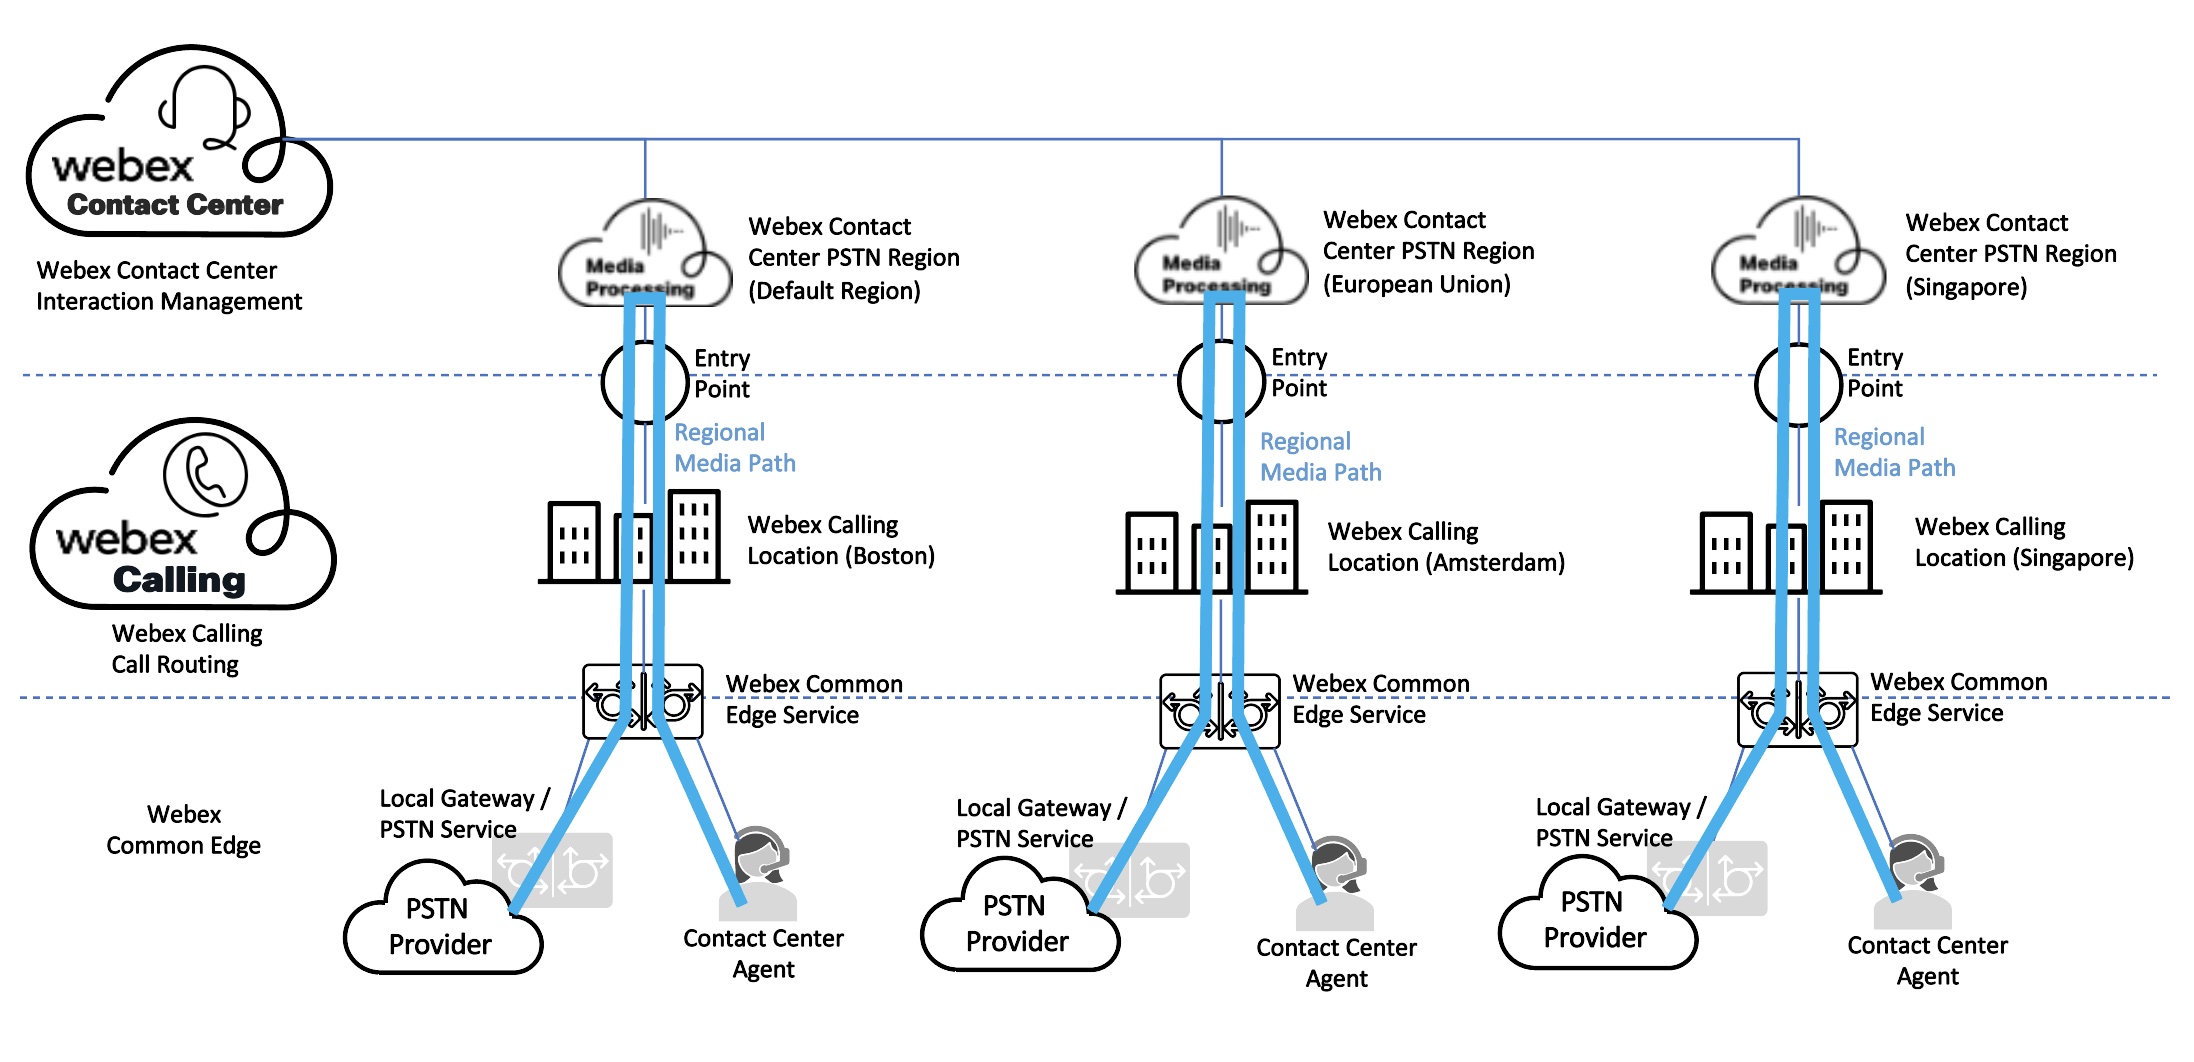
The following diagram illustrates an example of a global deployment. Webex Calling and Contact Center are deployed and hosted in the United States. The customer handles calls in multiple regions around the world. In each region, Webex Calling locations are created, and telephone numbers are provisioned. The customer maps entry points to these Webex Calling numbers. The entry point numbers are also linked to a PSTN region, which defines where Webex Contact Center processes calls. In this example, calls are routed and processed in the United States, the European Union, and Singapore based on the entry point configuration.
Configuration of Agents Connectivity to PSTN services
Webex Contact Center agents may be connected via Webex PSTN inter connectivity options or additional options such as Webex Calling devices, Webex App, or premise-based PBX devices. The following sections will cover various Agent Connectivity configurations and the Agent login experience for each.
Webex Calling Device Agent Configuration
Webex Contact Center agents can be configured as Webex Calling users with Calling based Devices such as MPP Phones or Webex App.
Incoming PSTN calls from either Webex Cloud Connected PSTN or Local Gateway can route to Webex Calling Device based agents.
Agents logging into Webex Contact Center with a Webex Calling device can choose to route calls to their Webex Calling device by selecting the Extension radio button under Select your Telephony Option.
Agents logging into Webex Contact Center with a Webex Calling device should follow these steps to route calls to their device:
-
Choose the Extension option in the Select your Telephony Option section.
- Enter the assigned Webex Calling extension number.
- Click Submit to confirm the selection.
To leverage this agent connectivity model, Webex Calling devices must be provisioned with an extension and associated to Calling users acting as Contact Center agents.
Webex Calling based agents can also use an +E.164 number using the “Dial Number” however doing this means phone control features such as preferred device and answering from the agent desktop will not be available.
Additional information regarding the provisioning of Webex Calling Devices can be found here: https://help.webex.com/article/n9r1aac/Configure-and-manage-Webex-Calling-devices
Supported Devices for Webex Calling:
https://help.webex.com/article/qkwt4j/Supported-devices-for-Webex-Calling
Migrating your Phone to Webex Calling:
https://help.webex.com/article/n19c71/Migrate-Your-Phone-to-Webex-Calling
Generating an Activation Code for a Device:
https://help.webex.com/article/ndb7w0db/Generate-an-activation-code-for-a-device
Troubleshooting Webex Calling MPP Phone Provisioning and Registration:
Webex Calling App (Softphone Phone) Configuration
Webex Contact Center agents can be configured to use Webex Calling based devices such as the Webex App (softphone).
Incoming PSTN calls from either Webex Cloud Connected PSTN or Local Gateway can be routed to Webex App based agents.
Agents logging into Webex Contact Center with a Webex Calling device should follow these steps to route calls to their device:
-
Select the Extension option in the Select your Telephony Option section.
- Enter the assigned Webex Calling extension number.
- Click Submit to confirm the selection.
To leverage this agent connectivity model, Webex App access must be provisioned with an extension and associated to Calling users acting as Contact Center agents.
Additional information regarding the provisioning of Webex App can be found here: https://help.webex.com/landing/ld-n0bl93g-WebexApp/Welcome-to-Webex-App
Additional information on Webex App Softphone settings can be found here:
WebRTC Configuration
Webex Contact Center agents can be configured with WebRTC capabilities.
Incoming PSTN calls from either Webex Cloud Connected PSTN or Local Gateway can route to WebRTC based agents.
Agents who prefer to use WebRTC for calls within the Webex Contact Center can route calls to their Agent Desktop device by following these steps:
-
Log in to Webex Contact Center.
- Click Desktop under Select your Telephony Option.
To leverage this agent connectivity model, Webex Contact Center agents must be provisioned to use WebRTC.
- Sign in to Control Hub.
- Navigate to Services > Contact Center > Tenant Settings > Voice.
- In the WebRTC section, enable the toggle button.
- Navigate to Desktop Experience > Desktop Profiles.
- Choose the Agent profile you wish to enable WebRTC for.
- Select the Voice Channel options tab. Select the Desktop checkbox and click Save.
WebRTC Network and Browser Requirements
WebRTC requires a minimum network bandwidth of 100kbps per call. To ensure your network can support WebRTC it is advised that customers use the Webex Cscan tool to test their network, agent computer, microphone, and latency requirements.
Webex Contact Center Administrators should run the Advanced CSCAN tool from networks where WebRTC will be deployed to agents including Call Centers and Remote / Work from Home or Internet based agents.
Additional information on using CScan can be found here: https://help.webex.com/article/y27bej/Use-CScan-to-Test-Webex-Calling-Network-Quality
WebRTC is supported on the Google Chrome, Microsoft Edge, and Mozilla Firefox browsers. Webex Contact Center Administrators are responsible for testing and deploying supported Chrome, Edge, and Firefox versions to their organizations. However, Virtual Desktop Infrastructure (VDI) does not support WebRTC.
WebRTC Notification Settings
To ensure that you receive notifications consistently, you must check your settings, specifically the Do not disturb option for notifications. The Do not disturb option suppresses notifications to minimize distractions. However, you can configure it to receive notifications.
To turn on the Do not disturb option on Windows:
- Click .
- Turn on the Do not disturb toggle.
Set notification on the Chrome browser
- Open the Chrome browser and click .
- Click Add next to Allowed to send notifications.
- Enter the URL of the site.
- Click Add.
Set notifications on the Microsoft Edge browser
- Open the Edge browser and click .
- Under Allow, enter the URL of the site.
- Click Add.
Set notifications on the Firefox browser
- Open the Firefox browser and click .
- Scroll to Permissions.
- Click Settings to the right of Notifications.
- Choose Allow or Block from the Status drop-down for any of the websites.
Set the duration of notification display on Windows
- Click .
- In the Dismiss notifications after this amount of time drop-down list, choose an option to define how long notifications are displayed.
Set the duration of notification display on Windows using Windows Registry Key
- Open Registry Editor.
- Navigate to Registry Key by locating the following key in the Registry Editor:
HKEY_CURRENT_USER\Control Panel\Accessibility - Right-click on MessageDuration and select Modify.
- In the Edit DWORD (32-bit) Value dialog box:
- Select Decimal under Base.
- Enter the desired time duration in the Value data field.
-
- For example, 300 sets the duration to 300 seconds (5 minutes).
- The default value is 5 (5 seconds).
- Click OK.
If you are customizing your desktop layout, first download the default desktop layout. Ensure that the time in browserNotificationTimer of the Desktop Layout is equal to the time you selected above.
Webex Calling PSTN and Premise based Agents Configuration
Webex Contact Center Agents can connect through PSTN or on-premise devices.
Incoming PSTN calls from either Webex Cloud Connected PSTN or Local Gateway can route to PSTN based agents (either to DIDs or Cellular devices) or to on-premise PBX devices.
Agents who intend to use PSTN or premise-based devices for calls within the Webex Contact Center must route calls to these devices by following these steps:
-
Log in to Webex Contact Center.
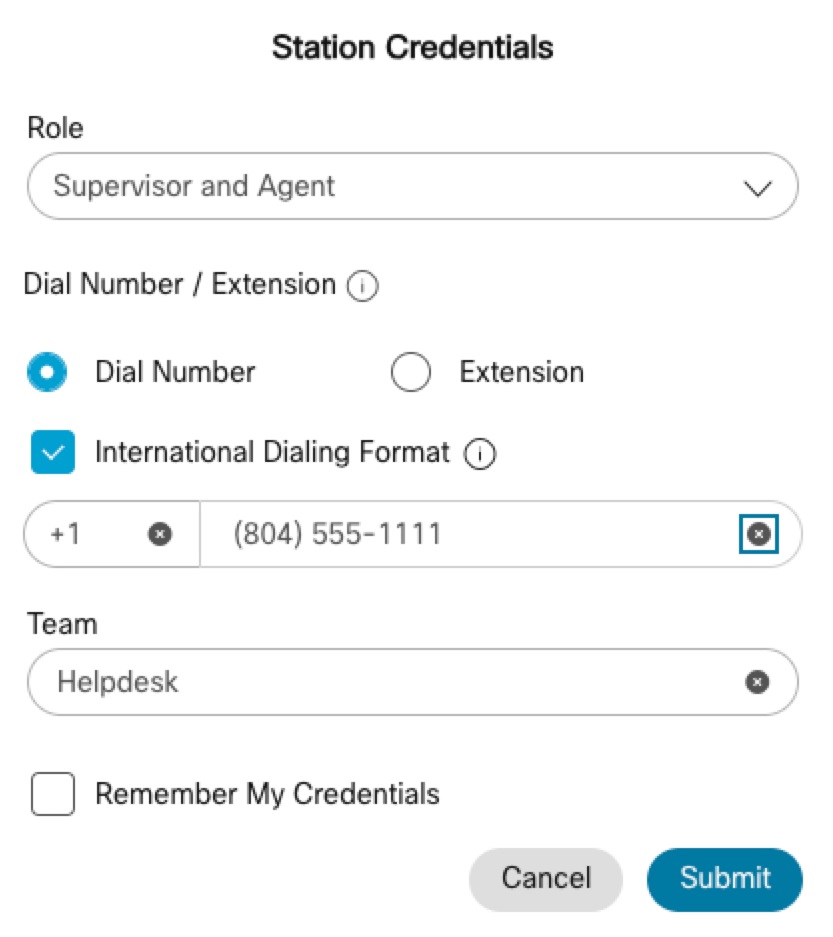
- Select Dial Number in the Select your Telephony Option section.
The International Dialing Format radio button can be of importance here. This option allows Webex Contact Center to route a call destined for a PSTN or Premise-based agent using +E.164 addressing, meaning that the call will leave Webex Contact Center destined for a globalized dialed number or DNIS.
For Webex Calling Local Gateway the dial plan you configure to route calls towards the on-premises PBX must contain a pattern match for the agents destination. If you have configured the dial plan for both E.164 and +E.164 patterns, then the agent can log in with either option into the agent desktop.
For Webex Cloud Connected PSTN, numbers and DIDs are always entered in +E.164 format.
PSTN Media and Signaling Requirements for Webex Contact Center
Webex Contact Center requires specific PSTN inter connectivity for both media and signaling. Calls arriving at Webex Contact Center must adhere to the following standards:
- Codec: G.711uLaw or G.711aLaw
- DTMF: RFC2833
SIP Interoperability Guidelines:
- SIP Early Offer: Not Supported (future roadmap item)
- SIP Delay Offer: Supported
- SIP Early Media: Not Supported (future roadmap item)
SIP Header Supported Fields:
- Packetization Timer in SIP SDP: 20ms
Webex Contact Center requires that any codec other than G.711 (such as G.729, iLBC, Opus, etc.) be transcoded before reaching Webex Contact Center media edge locations. Webex Contact Center does not provide transcoding, or media termination point services for calls using unsupported codecs. Ensure that all necessary transcoding is handled externally.
When using a Local Gateway for premise-based PSTN connections, ensure that all calls directed to Webex Contact Center from Webex Calling use the specified codec and DTMF types mentioned previously. You may need to utilize local Session Border Controller (SBC) resources to handle SIP interoperability and codec negotiation to meet these requirements.
PSTN Call Forwarding Scenarios and Best Practices
Webex Contact Center supports certain PSTN call forwarding configurations. To maintain minimal latency and ensure call quality, it is advisable to limit the number of PSTN carriers involved in call routing to no more than two before the call reaches Webex Contact Center. By doing so, you can reduce the variability in carrier-induced delays. Below, you will find examples that illustrate both supported and unsupported PSTN call forwarding scenarios.
Cloud Connected PSTN Call Forwarding scenario
Supported: PSTN Carrier 1 call forwarding to Cloud Connected PSTN Provider DIDs that come into Webex Contact Center.
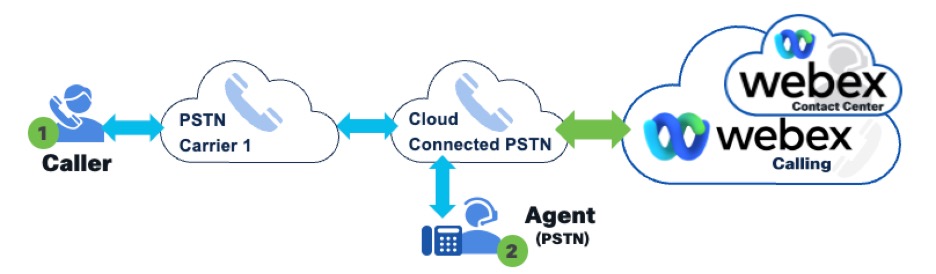
Unsupported:PSTN Carrier 1 call forwarding to PSTN Carrier 2 call forwarding to Cloud Connected PSTN Provider DIDs that come into Webex Contact Center.
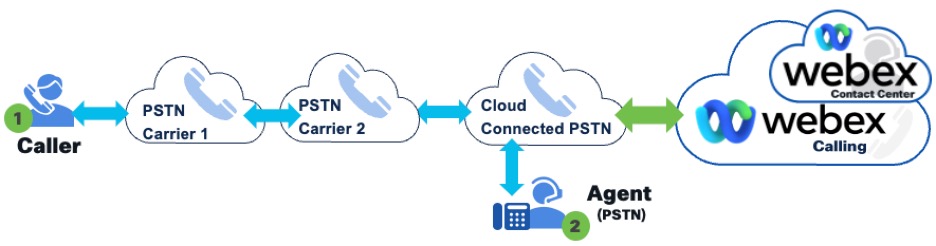
Adding a second northbound PSTN carrier to forward calls to an intermediary PSTN carrier introduces extra delay to inbound calls and is not supported by Webex Contact Center. To ensure optimal call quality, it is recommended to port your telephone numbers directly to a Cloud Connected PSTN provider. If call forwarding is necessary, ensure that there is only one upstream PSTN carrier forwarding calls to the Cloud Connected PSTN.
Webex Local Gateway Call Forwarding scenario
Supported: PSTN Carrier 1 call forwarding to Local Gateway DIDs that route via Webex Calling into Webex Contact Center.
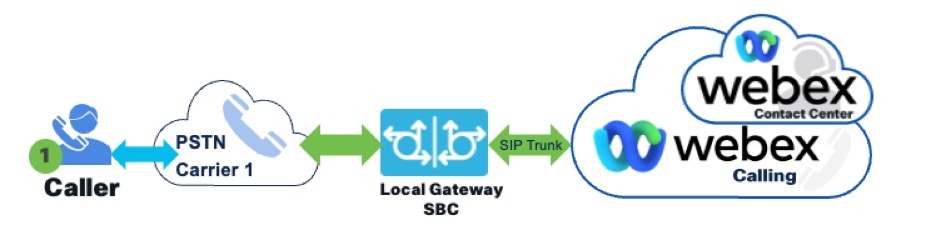
Unsupported:PSTN Carrier 1 call forwarding to PSTN Carrier 2 call forwarding Local Gateway DIDs that route into Webex Contact Center.
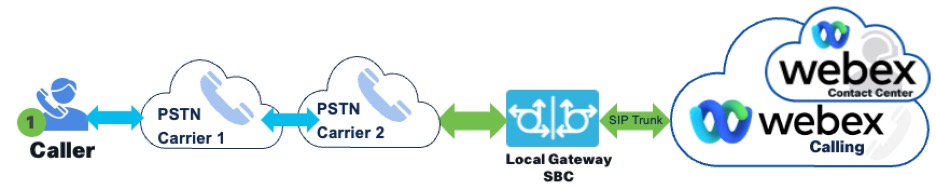
Introducing a second upstream or northbound PSTN carrier that forwards calls to an intermediary PSTN carrier increases the delay for inbound calls to Webex Contact Center and is not a supported configuration. For optimal performance, consider transferring your telephone numbers to the PSTN carrier that connects calls directly to the Local Gateway. If call forwarding is involved, ensure that only one upstream PSTN carrier is forwarding calls to the Local Gateway's PSTN carrier DIDs.
Webex Contact Center PSTN Call Forwarding scenario
Supported: PSTN Carrier 1 call forwarding to Webex Contact Center PSTN DID.
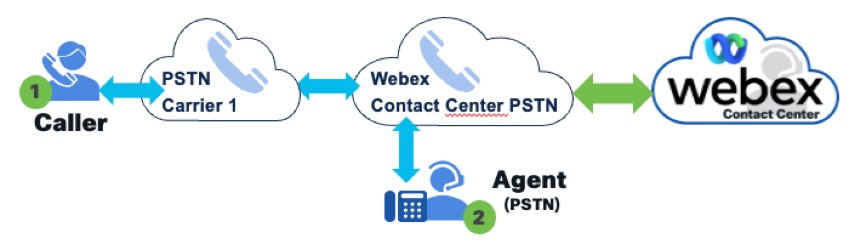
Unsupported: PSTN Carrier 1 call forwarding to PSTN Carrier 2 call forwarding to Webex Contact Center PSTN DID that come into Webex Contact Center.
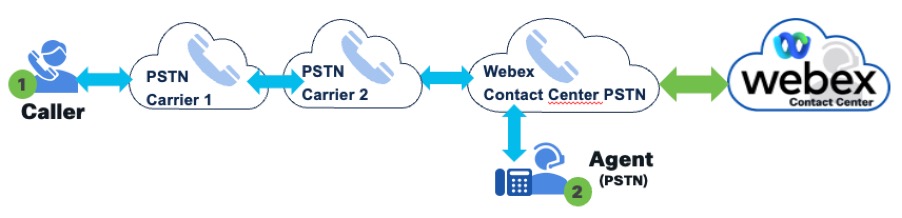
Introducing a second upstream or northbound PSTN carrier that forwards calls to an intermediary PSTN carrier can lead to increased latency for inbound calls to Webex Contact Center, and such a setup is not supported. To maintain call quality, it is recommended to port your telephone numbers directly to Webex Contact Center's PSTN service. If call forwarding is required, limit it to a single upstream PSTN carrier that forwards calls directly to the PSTN DIDs provided by Webex Contact Center.
Best Practices for handling unanswered calls
In a Webex Contact Center environment, the management of unanswered customer calls by agents is managed by the Redirect on No Answer (RONA) timer that can be configured by the administrator.
RONA timer
The RONA (Redirection on No Answer) timer specifies the time within which an agent answers a call or task. If the agent doesn’t respond, such as being away from their desk or handling another task, a configurable timeout triggers after a set period. This timeout returns the call or task to the queue for reassignment and changes the agent's status to RONA. Administrators configure this timeout for various communication channels, including voice, chat, email, and social messaging.
For more information, see https://help.webex.com/en-us/article/nbkcfp1/Manage-RONA-timeouts.
Voicemail
Cisco does not recommend enabling voicemail on an agent line. If it is incorrectly configured, a customer call could be forwarded to voicemail, leading the contact center to believe the call has been answered correctly. If voicemail is necessary on an agent line, the administrator should take this into account during their configuration.
The RONA timer configuration plays a critical role as it interacts with the agent's endpoint voicemail settings and determines whether unanswered calls redirect back to the queue or forward to the agent's voicemail. The business case or customer service strategy guides how these are configured:
- Requeue the call—When the RONA timer expires without an answer and its duration is shorter than the voicemail ring duration, the call requeues within the contact center and routes to the next available agent, ensuring continuous customer service.
- Forward to voicemail—If the voicemail ring duration is shorter than the RONA timer, the unanswered call forwards to the agent's voicemail box, allowing customers to leave messages when agents are unavailable.
Administrators can disable the voicemail forwarding option if voicemails aren’t required.
Proper configuration of these timers is essential for efficiently managing customer calls and aligning with business objectives. Effective setup ensures a balanced approach between providing immediate customer service and offering fallback options like voicemail, improving overall call handling efficiency.
Configuration of RONA and voicemail timeout settings
There are two scenarios where adjusting the RONA timer and voicemail settings ensures alignment with business needs:
-
Unanswered calls requeue to the contact center—
To requeue unanswered calls back into the contact center:
- Option 1—Disable the voicemail setting that forwards unanswered calls to the agent’s voicemail if business requirements specify that calls routed from the contact center to an agent's extension must always requeue upon RONA timeout.
- Option 2—Ensure the contact center's RONA timer (default of 18 seconds) is set to a duration shorter than the number of rings configured for the agent's voicemail. This configuration causes the RONA timer to expire before voicemail pickup, redirecting unanswered calls back into the contact center queue.
-
Forwarding unanswered calls to voicemail—
Confirm that the contact center's RONA timer (default of 18 seconds) is configured with a duration longer than the number of rings set for the agent's voicemail. This configuration allows the voicemail to activate before the RONA timer expires, forwarding the unanswered call to the agent's designated voicemail box.
Contact center administrators can also configure two lines on agent endpoints to differentiate between contact center calls and direct calls.
One line can be designated exclusively for managing customer interactions originating from the contact center's routing system. To ensure unanswered calls return to the contact center queue, voicemail functionality can be disabled on this line.
The secondary line can handle direct inward dial (DID) calls for internal or personal use and can have voicemail and call forwarding features enabled.
What to do next?
For additional information on how to configure your contact center, see the Cisco Webex Contact Center Setup and Administration Guide.


