Add a phone to a user

With Control Hub, you can assign a phone to a user for personal usage. The phones listed here support Webex Calling. While all these phones can be added using a MAC address, only the following subset can be registered using an activation code:

  • Cisco IP Phone 6800 シリーズ マルチプラットフォーム電話(音声電話- 6821、6841、6851、6861、6871)

  • Cisco IP Phone 7800 シリーズマルチプラットフォーム電話 (音声電話7811、-6821、7841、7861)

  • Cisco IP Phone 8800 シリーズ マルチプラットフォーム電話 (音声電話-8811、8841、8851、8861)

  • Cisco IP Phone 8800 シリーズ マルチ プラットフォーム電話 (ビデオ電話-8845、8865)

  • Cisco IP 電話会議 Phone 7832 および 8832

  • Cisco Video Phone 8875

  • Cisco Desk Phone 9800 シリーズ

Regarding DECT devices, only DECT base devices (not DECT handsets) are available for assignment in Control Hub. ベース ユニットをユーザーに割り当てた後、手動で DECT ハンドセットをそのベース ユニットにペアリングする必要があります。詳細については、「ハンドセットを基地局に接続する」を参照してください。

1

From the customer view in https://admin.webex.com, go to Management > Devices > Add device.

You can also add a device to the user from the Users section by navigating to Management > Users > select a user > Devices > Add device.
2

Choose Personal usage to assign a device to a user and then click Next.

3

Enter either the username or the actual name of the phone's owner, choose the user from the results, and then click Next.

4

Choose the kind of device you want to set up for the user:

  • Cisco Desk Phone—If you choose this option, select the Cisco Desk Phone model from the Select device drop-down menu.
  • Cisco phone, ATA, or 3rd party device—If you choose this option, choose Cisco Managed Devices from the Select device drop-down menu. Then select the Device type from the drop-down menu.
5

Choose whether you want to register the phone with an activation code (if the option appears) or a MAC address, and then click Save.

  • By Activation Code—Choose this option if you want to generate an activation code that you can share with the device owner. 16桁のアクティベーション コードはデバイスに手動で入力する必要があります。

    マルチプラットフォーム電話のアクティベーション コード画面を表示するには、11.2.3 MSR1 以降のファームウェア ロードが必要です。電話のファームウェアを更新する必要がある場合は、[ユーザー] を https://upgrade.cisco.com/MPP_upgrade.html に指定します。

  • By MAC Address—Choose this option if you know the MAC address of the device. 電話機の MAC アドレスは固有なエントリーでなければなりません。すでに登録されている電話機の MAC アドレスを入力した場合、または番号を入力する際に間違った場合には、エラー メッセージが表示されます。

サードパーティのデバイスを使用している場合、制限が適用される場合があります。

デバイスのアクティベーション コードの生成を選択しても、そのコードをまだ使用していない場合、そのデバイスのステータスでは、割り当てられているユーザーのデバイス セクションと Control Hub の [デバイス] リストで、[アクティブ化中] と示されます。Keep in mind that it may take up to 10 minutes for device status to be updated in Control Hub.

To modify or manage the devices assigned to the user, see Manage a device for a user section in this article.

電話を新しいワークスペースに追加する

When people are at work, they gather in places such as lunch rooms, lobbies, and conference rooms. You can set up shared Webex devices in these Workspaces, add services, and then watch the collaboration happen.

The key principle of a Workspaces device is that it isn’t assigned to a specific user, but rather a physical location, allowing for shared usage.

The devices listed support Webex Calling. これらのほとんどのデバイスは MAC アドレスを使用して登録できますが、アクティベーション コードを使用して登録できるのは次のサブセットだけです。

  • Cisco IP Phone 6800 シリーズマルチプラットフォーム電話 (音声電話-6821、6841、6851)

  • Cisco IP Phone 7800 シリーズマルチプラットフォーム電話 (音声電話7811、-6821、7841、7861)

  • Cisco IP Phone 8800 シリーズ マルチプラットフォーム電話 (音声電話-8811、8841、8851、8861)

  • Cisco IP Phone 8800 シリーズ マルチ プラットフォーム電話 (ビデオ電話-8845、8865)

  • Cisco IP 電話会議 Phone 7832 および 8832

  • Cisco Desk Phone 9800 シリーズ

スケジューリングを始める前に

  • You can add up to five Cisco Desk phones, Cisco MPP phones, ATAs, or third-party devices to a Workspace with professional Workspace license.
    You can only add multiple devices to a professional workspace from the new workspace page. Turn on Try new Workspaces from the upper right corner of the workspace page to use the new workspace page.
  • You can add only one device to a Workspace with common area Workspace license.
1

Sign in to Control Hub, then go to Management > Devices > Add device.

You can also add a device to a new Workspace by going to Management > Workspaces > Add workspace.
2

Choose Shared usage, then click Next.

3

Choose New workspace, then click Next.

4

Enter a name for the workspace (such as the name of the physical room), select the room type, add the room capacity, and choose the location of the workspace.[次へ] をクリックします。

A workspace name can't be longer than 30 characters, and can't have %, #, <, >, /, \, and " characters.

5

Choose the kind of device you want to set up for the workspace:

  • Cisco Desk Phone—If you choose this option, select the Cisco Desk Phone model from the Select device drop-down menu.
  • Cisco phone, ATA, or 3rd party device—If you choose this option, choose Cisco Managed Devices from the Select device drop-down menu. Then select the Device type from the drop-down menu.
6

Choose whether you want to register the phone with an activation code (if the option appears) or a MAC address, and then click Next.

  • By Activation Code—Choose this option if you want to generate an activation code that you can share with the device owner. 16桁のアクティベーション コードはデバイスに手動で入力する必要があります。

    マルチプラットフォーム電話のアクティベーション コード画面を表示するには、11.2.3 MSR1 以降のファームウェア ロードが必要です。If phone firmware needs to be updated, direct users to https://upgrade.cisco.com/MPP_upgrade.html.

  • By MAC Address—Choose this option if you know the MAC address of the device. 電話機の MAC アドレスは固有なエントリーでなければなりません。すでに登録されている電話機の MAC アドレスを入力した場合、または番号を入力する際に間違った場合には、エラー メッセージが表示されます。
Webex Calling の場合、1、 つの共有電話をワークスペースに追加することしかできません。

Cisco IP 会議電話 7832 の場合、一部のソフトキーが使用できない場合があります。フルセットのソフトキーが必要な場合は、ユーザーにこの電話を割り当てることをお勧めします。

7

Click the Calling service, and choose the subscription and license type that you want to assign to the workspace.

  • Professional workspace

  • Common area workspace

To find out more about the features that are available with the licenses, see Features available by license type for Webex Calling.

8

[ロケーション][電話番号](選択したロケーションによって決まるもの) を割り当てて、[保存] をクリックします。拡張機能を割り当てるオプションもあります。

If you want to add additional devices to a professional workspace, you can do it in any one of the following ways:
  • Go to Management > Devices > Add device > Shared usage > Existing workspace. From the drop-down, search and select the workspace.

    A notification appears if you've already added the maximum number of devices to the workspace and you can't proceed further.

  • Go to Management > Workspaces. Then, click under the Actions column of respective workspace and click Add Device.

    The Add Device option is disabled if you've already added the maximum number of devices to the workspace.

To modify or manage the devices assigned to the workspace, see Manage a device for a workspace section.

既存の MPP 電話を別のユーザーまたはデバイスに再割り当てする

あるユーザー/workspace に割り当てられた電話Webex Callingユーザー/workspace Webex Callingに割り当てられた電話を再利用するには、次の手順を実行します:

1

の顧客ビューから、 https://admin.webex.comデバイスが現在割り当てられているユーザー/Workspace に移動します。

次のシナリオでデバイスを再割り当てすることができます。

  1. If you wish to delete the user, select Delete User/Workspace to delete the user/workspace and the associated devices.

  2. デバイスを削除する場合、[デバイス] を選択 、削除するデバイスを選択します。

2

電話で、設定メニューに進み、電話を再割り当てするためにこれらのステップを完了します。

  1. [デバイス 管理] を選択し、次に [ファクトリー リセット] を選択します

  2. 電話が再起動します。再起動が完了すると、電話はシステム画面アクティベーション コードします。

  3. 電話の再割り当ての準備ができました。

3

[電話をユーザーに追加して 割り当てる] または [新しい Workspace に電話を追加] の手順に従って、ユーザー/Workspace に電話を割り当てるか、追加します。

4

Control Hub にデバイスを追加する場合、電話で次のアクションを完了します。

  1. アクティベーション コードの場合:

    アクティベーション コードを入力します。電話が再起動し、新規ユーザー/Workspace にボード上にいます。

  2. MAC アドレスの場合:

    Enter #000 on the Activation Code screen, the phone is reonboarded with Webex Calling and provisions to the new user/workspace.

Add a board, desk, or room device to a new workspace

ユーザーが職場にいる際、ランチ ルーム、ロビー、会議室など、多くのワークスペースに集まります。これらの場所にある共有 Cisco Webex デバイスをセットアップし、サービスを追加し、コラボレーションの様子を確認できます。

The key principle of a Workspaces device is that it’s not assigned to a specific user, but rather a physical location, allowing for shared usage.

ここに記載されているデバイスは Webex Calling をサポートしています。

1

From the customer view in https://admin.webex.com, go to Management > Devices > Add device.

You can also add a device to a new workspace from the Workspaces section by navigation to Management > Workspaces > Add workspace.
2

Choose Shared usage and click Next.

3

Choose New workspace and click Next.

4

Enter a name for the workspace (such as the name of the physical room), select the room type, add the room capacity, and choose the location for the workspace.[次へ] をクリックします。

5

Choose Cisco Room and Desk device.

6

Choose one of the following services and click Next.

  • Call on Webex (1:1 call, non-PSTN) —Users can only make Webex App or Webex Session Initiation Protocol (SIP) calls using a SIP address (for example, username@example.calls.webex.com).
  • Cisco Webex Calling —In addition to being able to make and receive Webex App and SIP calls, people in this Workspace can use the device to make and receive phone calls from within the Webex Calling numbering plan. For example, you can call your coworker by dialing the phone number 555-555-5555, extension 5555, or SIP address username@example.webex.com but you can also call your local pizzeria.
7

If you've chosen Cisco Webex Calling service, then choose the subscription and the license type that you want to assign to the workspace.

  • Professional workspace

  • Common area workspace

To find out more about the features that are available with the licenses, see Features available by license type for Webex Calling.

8

[ロケーション][電話番号](選択したロケーションによって決まるもの)、および [内線番号] を割り当てて、[保存] をクリックします。

9

与えられたコードを使用してデバイスを有効にします。アクティベーション コードはコピー、メール、または印刷により使用できます。

デバイスを一括で追加し、割り当てる

To assign several devices to users and workspaces, you can populate a CSV file with the required information and activate those devices in just a couple of easy steps.

  • You can add up to 5 Cisco Desk Phones, Cisco MPP phones, ATAs, or 3rd party devices to a workspace with Professional workspace license.
  • You can add only one device to a workspace with common area workspace license.

ここに記載されているデバイスは Webex Calling をサポートしています。You can register all devices using a MAC address; however, register the following subset of devices using an activation code:

  • Cisco IP Phone 6800 シリーズマルチプラットフォーム電話 (音声電話-6821、6841、6851)

  • Cisco IP Phone 7800 シリーズマルチプラットフォーム電話 (音声電話7811、-6821、7841、7861)

  • Cisco IP Phone 8800 シリーズ マルチプラットフォーム電話 (音声電話-8811、8841、8851、8861)

  • Cisco IP Phone 8800 シリーズ マルチ プラットフォーム電話 (ビデオ電話-8845、8865)

  • Cisco IP 電話会議 Phone 7832 および 8832

  • Cisco Video Phone 8875

  • Cisco Desk Phone 9800 シリーズ

1

From the customer view in https://admin.webex.com, go to Management > Devices > Add device > Multiple Cisco IP phones.

2

Choose one of the following options and click Download.

  • Users in my organization—You can get a list of all users in your organization and their associated attributes so you don't have to manually look up each user.
  • Workspaces in my organization—You can get a list of all workspaces in your organization and their associated attributes so you don't have to manually look up each workspace.
    If a workspace has multiple devices, only the first device appears in the downloaded CSV. However, you can assign multiple devices to a professional workspace through CSV by adding the details in separate rows.

    If you want to see which devices belong to a workspace, you can export the device CSV by navigating to Management > Devices. Then, select one or more devices and click Export to CSV.

  • Add device sample template—You can use the available template to enter information such as usernames, type (indicate whether it's a user or a workspace), MAC addresses, and device models.
You can use the following table to prepare your CSV file.
The following fields are mandatory when assigning a device to Webex Calling users and workspaces:
  • ユーザーの場合:Username, Type, Device Type, and Model if the device type is IP.
  • For Workspace: Username, Type, Phone number or Extension, Webex Calling Workspace [subscription name], Device Type, and Model if the device type is IP.

列名説明Supported Value

ユーザー名

To assign a device to a user, enter the user's email address.

Don't enter the user ID or their name.

To assign a device to a workspace, enter the workspace name.

まだ存在しない Workspace を入力すると、その Workspace は自動的に作成されます。

Example user email: test@example.com

Example workspace name: Break Room

タイプ

Enter the appropriate type as user or workspace.

USER

ワークスペース

電話番号

電話番号を入力します。

Example: +12815550100

Extension

Enter an extension.

例: 00-999999

デバイス タイプ

Enter the type of the device.

To use any Multiplatform Phones, ATA or DECT devices with Webex Calling, enter IP.

To create new workspaces to have RoomOS devices, enter WEBEX or WEBEX_CALLING, depending on the desired Calling option

モデル

Enter the device model if the device type is IP.

Example device model: Cisco 7841, Cisco 8851, and so on

MAC アドレス

Enter the MAC address of the device.

If you leave the MAC address field blank, an activation code is generated.

Use activation codes for the RoomOS devices.

Example MAC address: 001A2B3C4D5E

位置情報

Enter the name of the user or workspace location.

例: サンノゼ

Calling Plan

Enter TRUEs to enable Cisco Calling Plan for the newly added workspace.

This feature doesn’t work for users, existing workspaces, and workspaces with unsupported location.

○(はい)

FALSE

Webex Calling Workspace [subscription ID]

Specify the subscription to be utilized for creating common-area or professional calling workspaces.

Each subscription possessing workspace license has a corresponding column. You can assign either a common area workspace license or a professional workspace license. To assign a license, enter TRUE in any one of the license type columns of the respective subscription.

You must assign only one subscription for a workspace.

You can also transfer workspaces from one subscription to another. To transfer, enter FALSE in the source subscription column and TRUE in the target subscription column.

We recommend using a recently generated template to prepare the CSV import file, as it will contain accurate information regarding the active subscriptions for workspace licenses.

○(はい)

FALSE

Webex Calling Professional Workspace [subscription ID]

These Phone Number and Extension fields were previously titled Directory Number and Direct Line; these column names continue to support for a short time.
CSV ファイルあたりのデバイス数を 1000 に制限することをお勧めします。If you want to add more than 1000 devices, use a second CSV file.
3

スプレッドシートに入力します。

4

CSV ファイルをドラッグ アンド ドロップするか、[ファイルを選択] をクリックしてアップロードします。

5

If the MAC address is blank, you get the options to choose where the activation code gets sent.

  • Provide a link—The activation code gets added to a CSV file. After import, you’ll get a link to download the activation code file on the Import Status screen.
  • Email activation code—If the device is for a workspace, the activation code gets sent to you, as the administrator. デバイスがユーザー用の場合、アクティベーション コードはユーザーにメールで送信されます。

You or the user need to enter the activation code on the device for activating it.

6

[送信] をクリックします。

Displays the updated status when the devices become active.

マルチプラットフォーム デバイスは、ユーザーがデバイスでアクティベーション コードを入力するために、11.2.3MSR1 以降のファームウェア ロードを実行する必要があります。For information about upgrading phone firmware, see this article.

Export a device list

If you want to view the list of devices assigned to users and workspaces, you can export the CSV file.

https://admin.webex.com の顧客ビューから、[デバイス] に移動します。

Select multiple devices from the device list and select the Export option. You can choose the fields to include in the CSV file, and export the content to a local folder.

The fields displayed on the CSV file depend on the connection of the device to the platform. Therefore, some fields aren’t available in the output file.

ユーザーのデバイスを管理する

組織のユーザーに割り当てられたデバイスの、新しいアクティベーション コードを追加、削除、再起動、チェック、または作成することができます。これは、必要に応じてユーザーの画面でデバイスを表示し、管理する場合に役立ちます。

1

From the customer view in https://admin.webex.com, go to Management > Users.

2

Select a user and click Devices.

3

このユーザーにデバイスを追加するには、[デバイスの追加] をクリックします。

If the user is already assigned a device and you want to add another device, click Action > Add device.

For more information on adding the device to a user, see Add phones to a user section.

4

既存のデバイスを変更するには、デバイス名を選択します。

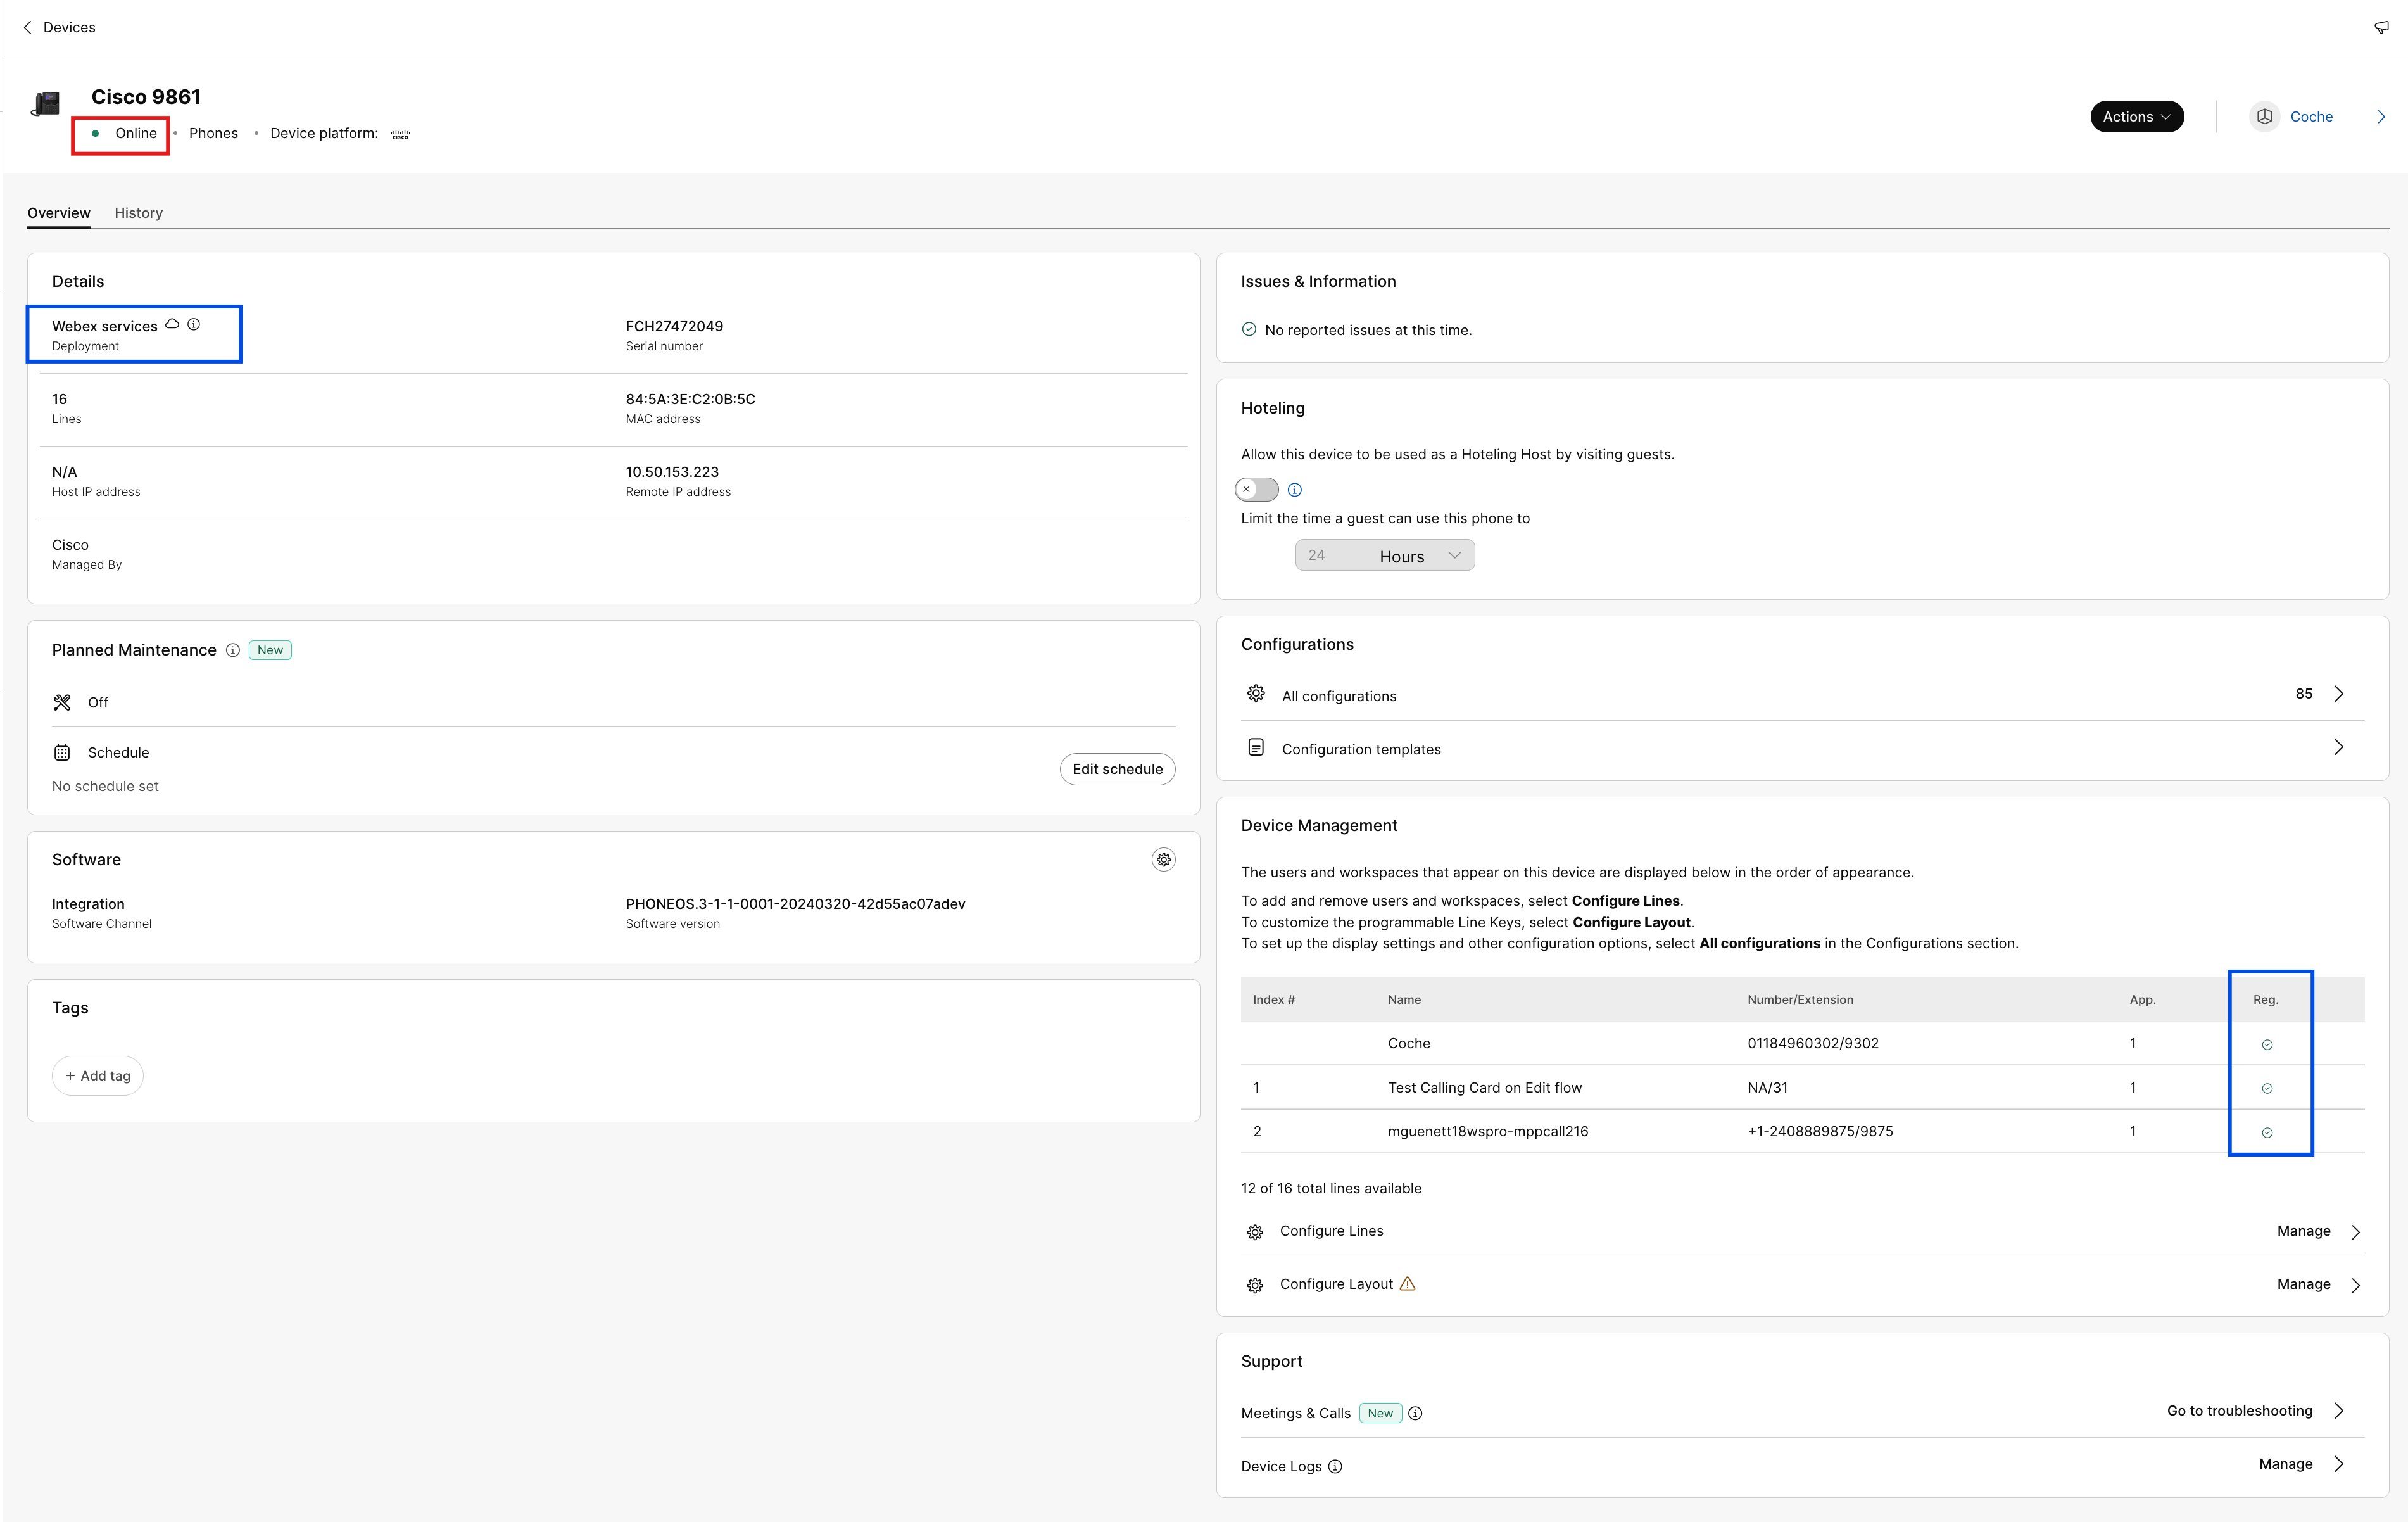
This takes you to the Devices page. ここでは、デバイス設定を表示および編集したり、デバイスを削除したり、デバイスを再起動したり、必要に応じてデバイスの新しいアクティベーションコードを作成したりできます。電話設定の構成についての詳細は、「電話設定の構成と更新」を参照してください。

5

ユーザーに追加されたデバイスが Webex Aware の場合、図に示すように、Webex Aware オプションがデバイスの下に表示されます。Webex Aware は、デバイスが Webex プラットフォームにオンボードされ、電話によってサポートされている Webex 機能にアクセス権を持つことを示します。

6

[アクション ] を クリックしてデバイスを管理します。アクションは構成変更を適用するか、MPP デバイスのファームウェアをアップデートするのに役立ちます。

[アクション] タブには Webex Aware 対応デバイスの次のオプションがあります。
  • Apply Changes—Issues request to the phone to download and apply changes to the configuration.
  • Reboot—Issues request to force reboot the device and download the current configuration.
  • Report Problem—Issues request to the device to generate and upload a PRT to the cloud.
  • Delete—Deletes a device that is listed for the user.

ワークスペースのデバイスを管理する

デバイスは、ワークスペースのプロファイルから直接追加および管理できます。ワークスペースのデバイスにはファックスのような ATA デバイスを含めることが可能です。また、ワークスペースのデバイスをホテリングホストとしてセットアップすることもできます。For more information about hoteling, see:Hoteling in Cisco Webex Control Hub.

1

From the customer view in https://admin.webex.com, go to Management > Workspaces.

2

Select the workspace to modify.

3

To add a device, click Add Device in the Devices tile.

For more information on adding devices to workspace, see Add a phone to a new workspace section.

4

既存のデバイスを変更するには、デバイス名を選択します。

This takes you to the Devices page. ここでは、デバイス設定を表示および編集したり、デバイスを削除したり、デバイスを再起動したり、デバイスをホテリングホストとして使用したりできます。電話設定の構成についての詳細は、「電話設定の構成と更新」を参照してください。

5

ワークスペースに追加されたデバイスが Webex Aware である場合、Webex Aware オプションがデバイスの下に図のように表示されます。Webex Aware は、デバイスが Webex プラットフォームにオンボードされ、電話によってサポートされている Webex 機能にアクセス可能なことを示します。

6

[アクション ] を クリックしてデバイスを管理します。アクションは構成変更を適用するか、MPP デバイスのファームウェアをアップデートするのに役立ちます。

[アクション] タブには Webex Aware 対応デバイスの次のオプションがあります。
  • Apply Changes—Issues request to the phone to download and apply changes to the configuration.
  • Reboot—Issues request to force reboot the device and download the current configuration.
  • Report Problem—Issues request to the device to generate and upload a PRT to the cloud.
  • Delete—Deletes a device that is listed for the user.

回線の設定 - MPP デバイスの回線の追加と並べ替え

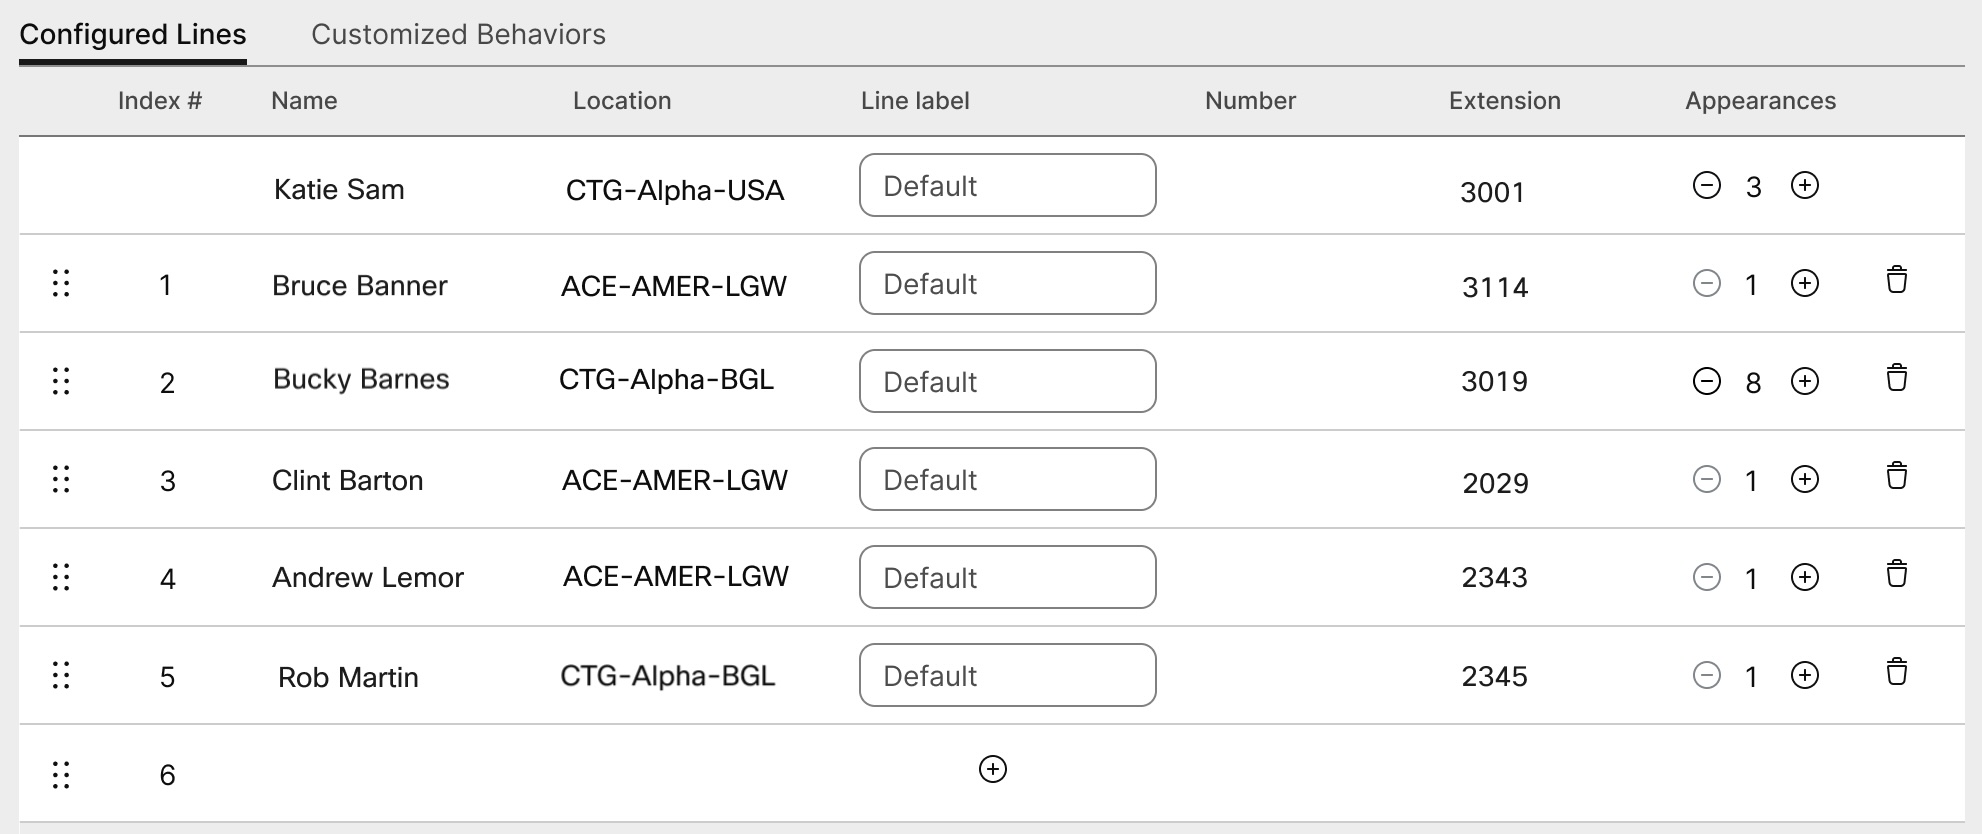
Shared line appearance allows you to add lines to a primary device of the user and reorder how the lines appear. This feature allows a user to receive and place calls to and from another user's extension, using their own phone. An example of shared line appearance is an executive assistant who wants to make and receive calls from the boss's line. 共有回線のアピアランスは、プライマリユーザーの回線の別のインスタンスにもなります。

The maximum configuration limit is 35 devices for each user phone number, including the desktop or mobile App of the user. You can add additional lines to the workspace phone. However, you can add only the workspace phone with professional license as a shared line.

When assigning a shared line, you can assign numbers from different Webex Calling locations to devices in a different location. For example, a number (user, workspace, virtual line) from the UK location can be assigned to a device that is assigned to a user in the U.S. location.

For more information on shared line across locations, see:Configuration of shared lines and virtual lines across locations.

When a user adds the Speed dials to their MPP phone, they aren’t visible in the Control Hub. Speed dials can be overwritten on configuring a shared line.

If a user has numbers from other users/groups configured on their devices, you can add a custom label for the shared line. This custom label helps to identify one shared line appearance from the other.

1

https://admin.webex.com のカスタマービューから、[ユーザー] または [ワークスペース] (変更するデバイスが割り当てられている場所によって異なる)に移動します。

2

変更するユーザーまたはワークスペースを選択し、[デバイス] にスクロールします。

3

Select the device to add or modify the shared lines, and scroll to Phone Users and Settings.

電話に表示されるユーザーおよび場所は、表示順にリストされます。

4

この電話からユーザーまたは場所を追加または削除するには、[回線を設定する] を選択します。

5

回線を削除するには、 アイコンをクリックします。

回線 1 のプライマリ ユーザーを削除することはできません。
6

共有回線のアピアランスを追加するには、 アイコンをクリックします。

表示したい順番になるように回線を追加します。共有回線のアピアランスを並べ替えるには、表示したい順番になるようにリストを削除し、追加します。
7

名前または電話番号を入力し、表示されるオプションから選択し、[保存] をクリックします。

ユーザーの ATA デバイスを設定する

Control Hub のユーザーに割り当てられたアナログ電話アダプター(ATA)デバイスのポートを構成できます。Currently, the two configurations for ATA devices available are for devices with two ports and devices with 24 ports.

1

https://admin.webex.com の顧客ビューから [ユーザー] に移動します。

2

変更するユーザーを選択し、[デバイス] までスクロールします。

3

追加または変更するデバイスを選択します。

4

[このデバイス上のユーザー] で、[ポートを設定する] をクリックします。

5

共有ポートの設定を追加するには、 アイコンをクリックします。

6

名前または電話番号を入力し、表示されるオプションから選択し、次に [保存] をクリックします。

ルックアップには、デバイスのないワークスペースだけが表示されます。
7

If the device requires T.38 fax compression, check the box in the T.38 column or override the user-level compression options, and then click Save.

ワークスペースには ATA を含めることができます。これはファックスに便利です。

自分のロケーションに番号を追加する

電話番号は、トライアル中であるか、有料のサブスクリプションに変更したかには関わりなく、顧客の卓上電話および室内デバイスにいつでも追加できます。

We've increased the number of telephone numbers that you can add in Control Hub 250 to 1000.

1

https://admin.webex.com のカスタマービューから、[サービス] > [通話] > [番号] の順に移動してから、[番号の追加] をクリックします。

2

[ロケーション][番号タイプ] を指定します。番号を移行する場合には、現在の新しい請求番号と新しい番号の両方を入力してください。

3

Specify the Location, State, Area Code, Prefix (optional), and then click Search.

Available numbers are displayed.

4

Select the numbers that you want to add to the location.

The numbers you choose move over to the Selected Numbers field.

5

[保存] をクリックします。

注文した PSTN 番号のステータスを確認する

組織が注文した PSTN 番号は、リストとして確認できます。With this information you can see the unused numbers that are available, and the numbers that have been ordered that will soon become available.

https://admin.webex.com の顧客ビューから [サービス] > [Calling] > [PSTN 注文] に移動します。

マルチプラットフォーム電話 (MPP) 接続アクセサリ— ヘッドセットおよびキー拡張モジュール (KEM)

When you connect accessories (Headsets/KEMs) to an MPP device, they appear as an inventory item under the Devices tab in the Control Hub. Control Hub のデバイス インベントリでは、アクセサリのモデル、ステータス、アクセサリの所有者を確認できます。アクセサリを選択すると、アクセサリのシリアル番号や現在のソフトウェア バージョンなどの追加情報を取得できます。アクセサリが MPP に接続されている限り、アクセサリ ステータスのフィールドは「オンライン」と報告されます。MPP 接続されたヘッドセットは、デバイス管理から最新バージョンのソフトウェアを取得して自動アップグレードされます。

Want to see how it's done? Watch this video demonstration on how to view your accessories in Control Hub.
表 1. 互換性のあるヘッドセット

機種

Cisco ヘッドセット 520 シリーズ

Cisco ヘッドセット 530 シリーズ

Cisco ヘッドセット 560 シリーズ

Cisco ヘッドセット 730 シリーズ

Cisco IP Phone 8811/8841/8845

RJ9 & RJ11

Cisco IP Phone 8851/8861/8865

USB

USB

USB

RJ9 & RJ11

Cisco IP Phone 7811/7821/7841/7861

Cisco IP Phone 6821/6841/6851/6861

Cisco IP Phone 6871

USB

USB

USB

Cisco IP Conference Phone 7832/8832

表 2. 互換性のあるキー拡張モジュール

機種

KEM

Cisco IP Phone 8811/8841/8845

Cisco IP Phone 8851/8861/8865

BEKEM

CP-8800-A-KEM

CP-8800-V-KEM

Cisco IP Phone 7811/7821/7841/7861

Cisco IP Phone 6821/6841/6861/6871

Cisco IP Phone 6851

CP-68KEM-3PCC

Cisco IP Conference Phone 7832/8832