
Thanks for your feedback.
 Feedback?
You can select varied connections for multisite applications. For example, you can select Cisco Calling Plans for one location, Cloud-Connected PSTN (CCP) for a second location, and Local Gateway for the third location. When choosing the Cisco Calling Plans, the following applies.
General guidelines for Number ordering
-
Cisco makes no guarantee regarding the availability of phone numbers, even if that number is listed by Cisco as available.
-
You won’t lease or sell any phone number provided by Cisco.
-
Caller ID Name may not always reflect your requested name.
-
Cisco treats all phone numbers as two-way numbers.
- For New number ordering
-
You can order numbers from Cisco individually or in a consecutive block, where the numbers are in sequential order (that is a "Block Order").
-
You can order a Block Order in increments of 10, 50 or 100.
-
You can’t delete individual numbers that were ordered as part of a Block Order. To remove a portion of the block, delete the entire block and then order new numbers.
-
You cannot order block of toll-free numbers. Currently, toll-free numbers are only available in the U.S. and Canada locations for Cisco Calling Plans.
-
Requirements
-
Partners must be an authorized Webex Calling partner and have accepted the new Webex Calling addendum through enrollment into the Webex Calling PSTN program.
-
A minimum of one committed Outbound Calling Plan license must be purchased to enable access to all services associated with Cisco Calling Plans.
Limitations
-
Cisco Calling Plans are currently available to specified countries.
-
You can order a maximum of 100 new standard phone numbers at a time. Additional numbers can be placed as a separate order.
-
You can't order a block of toll-free numbers.
-
Cisco Calling Plans only supports Webex Contact Center through use of Service Numbers. For more information about the Webex Contact Center,see Get started with Webex Contact Center.
-
Except for 911 calls, Cisco Calling Plans don't support calls to X11 services including directory service calls.
-
Some premium services and international destinations may not be available for operational purposes. If specific destinations which aren’t generally available are required, customers can open a support case to request availability.
-
Webex Online supports only one location that is set by default with Cisco Calling Plan.
Cisco Calling Plans are available for technical evaluation as part of the Webex Calling trial process. While Cisco Calling Plans trials are free to use, there are some neddotable limitations during the trial phase.
As you can convert the trial accounts to paid accounts, the required regulatory documentation, as mentioned in the 'Order New Phone Numbers' section under each country, is also mandatory for trial services. These documents are legally required by country regulators for our Telephone Number (TN) provisioning team to procure the numbers.
-
Each trial account can provision up to 10 standard telephone numbers from Cisco Calling Plans with Webex Calling. It isn’t permitted to provision more than 10 numbers per trial.
-
Only new, standard telephone numbers are supported in trials. Ported numbers, consecutive blocks, and inbound toll-free numbers aren’t supported on trial accounts. You also cannot port numbers out of a trial. You must convert to a paid account if you wish to use these features.
-
International calling, along with Premium Service Call types I & II are blocked from use during the trial period.
-
Business Texting isn’t available on Webex Calling trial accounts.
-
Trial accounts are intended for technical evaluation purposes only, and not for normal commercial operation. As such, emergency services are only meant for technical evaluation; actual emergency calls can’t be guaranteed. Users shouldn’t place actual emergency service calls on a trial account.
When placing an order to convert a Webex Calling trial with Cisco Calling Plans to a paid subscription, you must order at least one Cisco Calling Plan committed license to maintain the telephone numbers and configuration used in the trial.
-
Cisco Calling Plans (Cisco PSTN)
-
Cloud Connected PSTN
-
Premise-based PSTN (Local Gateway must be enabled separately. For more information, see Configure Premises-based PSTN in Control Hub.)
| 1 |
Sign in to Control Hub. |
| 2 |
Go to and select the location you want to update. |
| 3 |
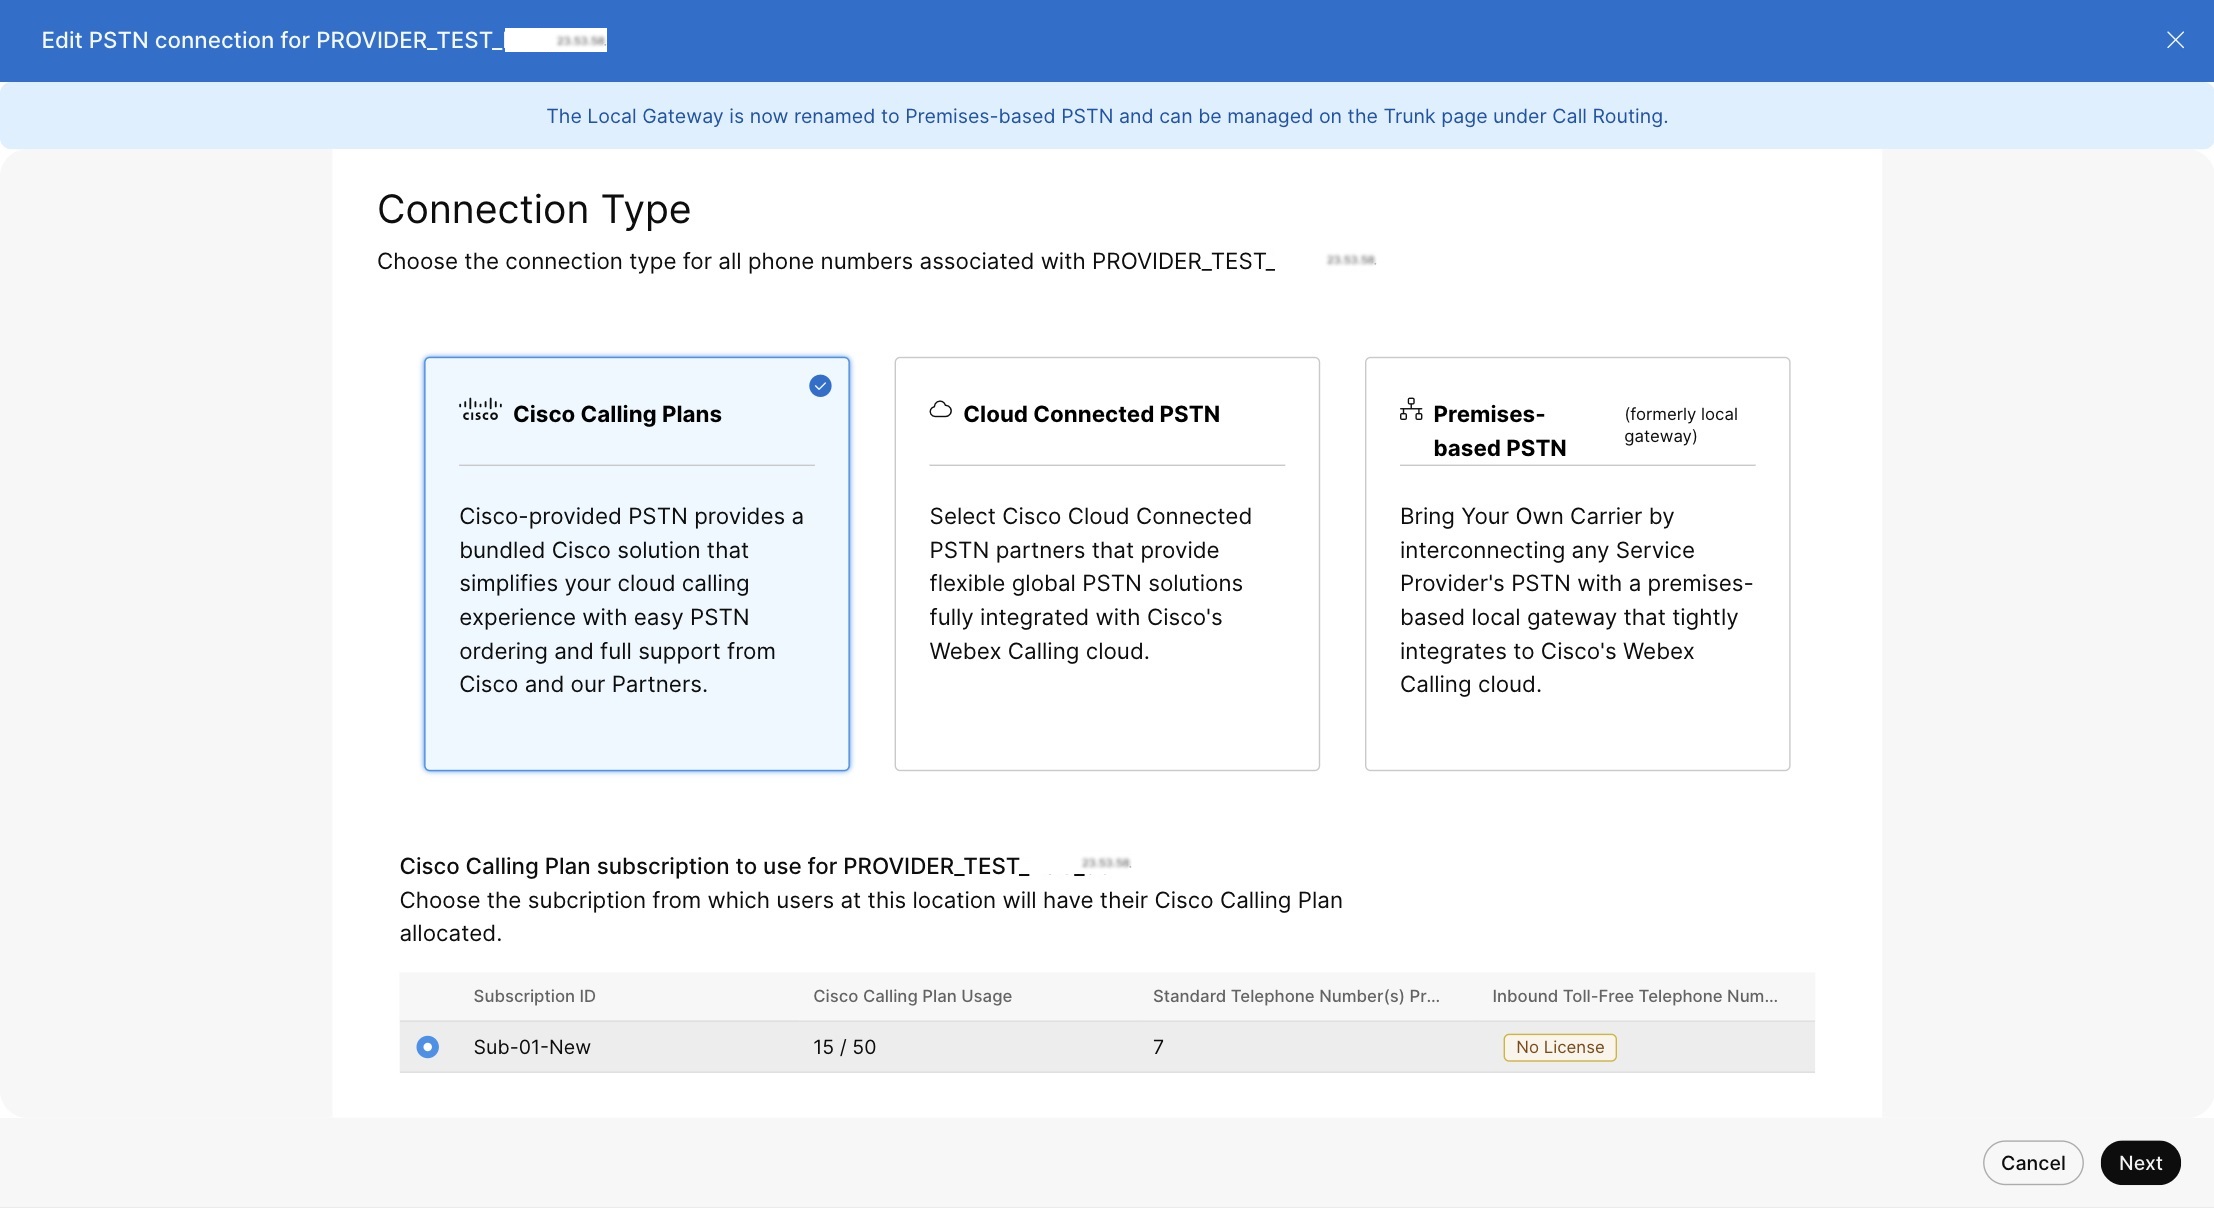
Select the Calling tab and Click Manage next to PTSN Connection. |
| 4 |
Select Cisco Calling Plans and click Next. |
| 5 |
Enter the contact information and click Next. This field is for the contact information of the person who will sign the legal contract with Cisco. |
| 6 |
Enter the Emergency Services Address (ESA), and click Save. By default, the ESA entered here is applied to all phone numbers for this location. You can change the ESA for an individual user if needed. For example, you may need to change the ESA if you have a remote employee who works from home. |
| 7 |
On the summary screen, do one of the following:
|
Before you begin
-
The Cisco Calling Plan must be enabled for your site before you can order new phone numbers, including toll-free numbers, through Control Hub.
-
When requesting new numbers, you can enter specific numbers or a block of consecutive numbers. You can also allow the system to assign numbers from the search inventory based on the country, state, area code, and prefix you select.
-
By default, the Emergency Service Address (ESA) entered for a location during your Cisco Calling Plan setup applies to all phone numbers for that location.
-
If the location subscription has the Service Number license, you can add the numbers as a Service Number.
-
You can modify the existing Standard Number to Service Number in a Cisco Calling Plan location with the Service Number license.
-
You can move Service Numbers between Cisco Calling Plan locations with the Service Number license.
| 1 |
Sign in to Control Hub. |
| 2 |
Go to . 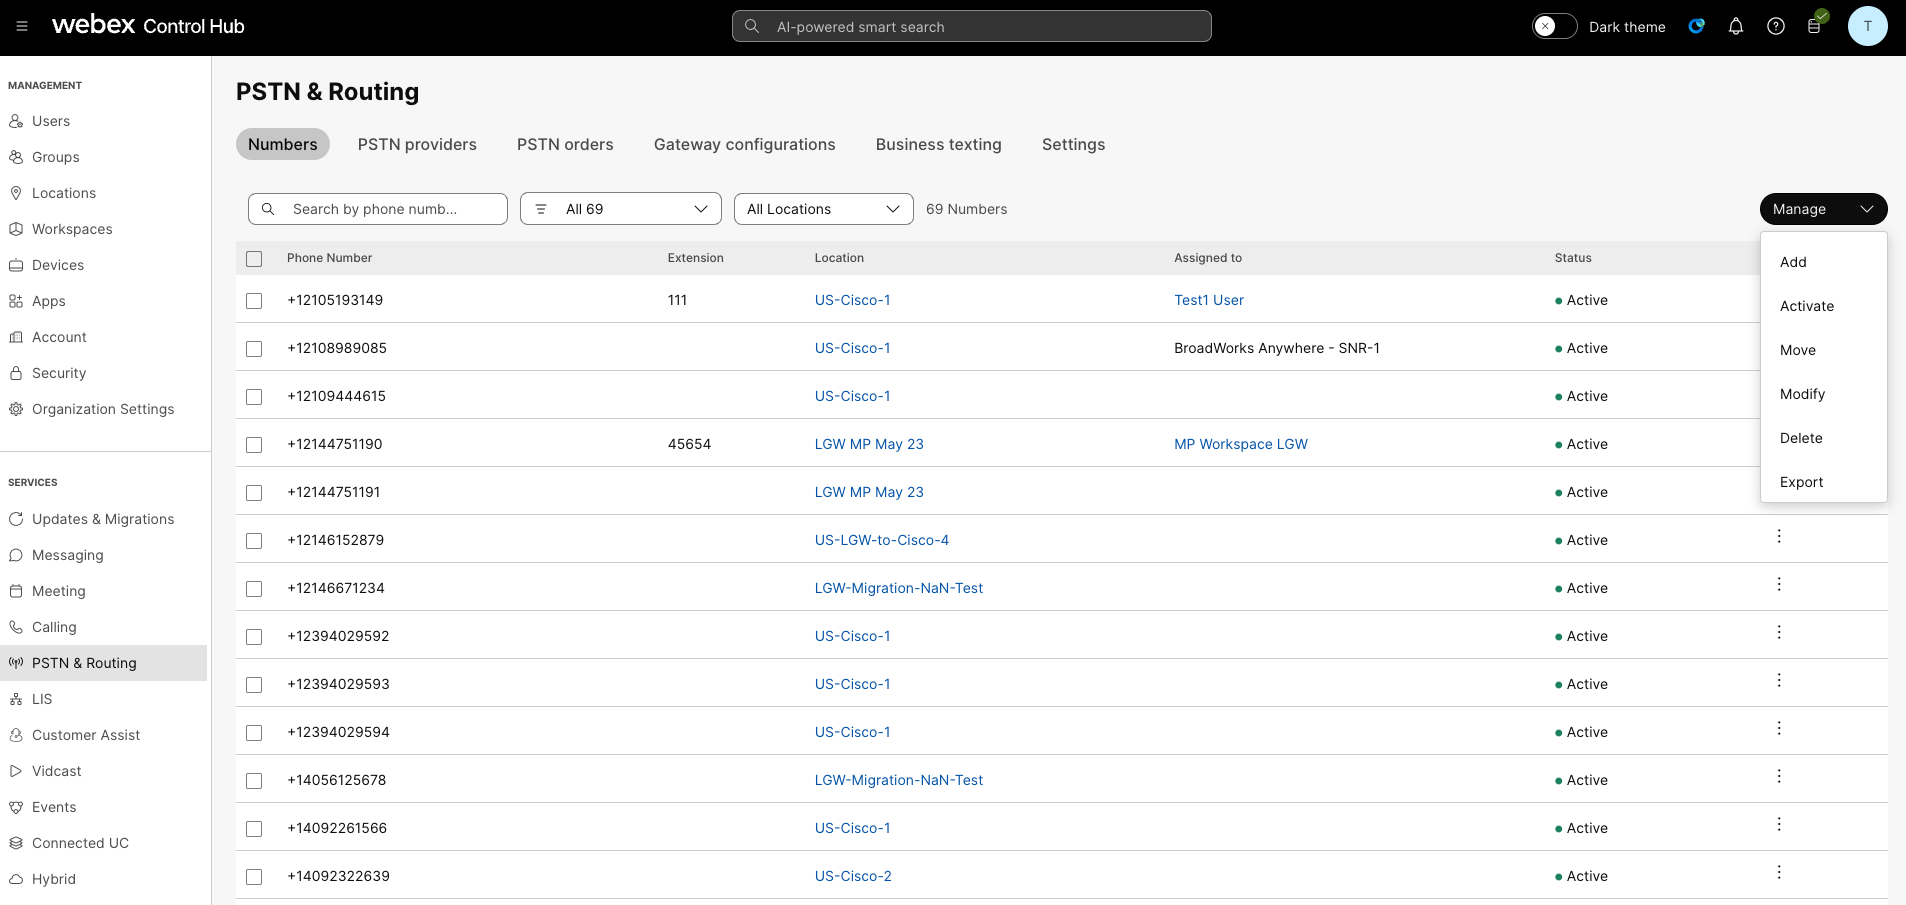
|
| 3 |
From the Manage drop-down select Add. |
| 4 |
Choose a Location and PSTN Number in Number Type drop-down on add numbers page. |
| 5 |
Select Order New Numbers and click Next. |
| 6 |
Choose one of the following options:
|
| 7 |
Specify the numbers that you want to order by selecting the Country, State, and the Area Code or City to search by. |
| 8 |
Enter how many numbers you want auto-selected for you and click Search. You’re provided a list of available numbers based on your selected criteria. |
| 9 |
Select the type of number to order from:
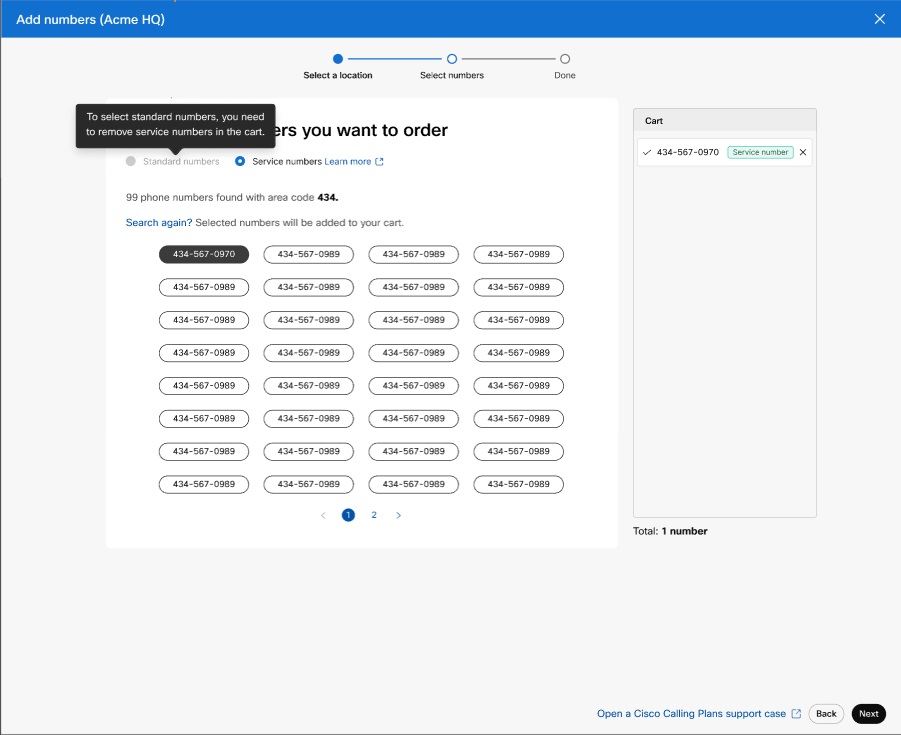
|
| 10 |
Click the numbers that you would like to order, then click Order. The numbers you selected appears in the cart.
|
| 11 |
On the order submission confirmation page, select PSTN Orders to check your order status. |
| 12 |
Accept the Terms of Service to activate the new numbers. The Terms of Service link is only available to customer administrators. Partners only see a message that the Terms of Service must be signed by the customer. |
With the Cisco Calling Plan, you can order blocks of telephone numbers directly from Cisco through Control Hub.
Before you begin
-
Ordering blocks of numbers is only available for customers with a paid subscription.
-
The maximum number of block numbers that can be ordered is 100.
-
Numbers ordered in a block can only be deleted if the entire block is deleted.
-
By default, the Emergency Service Address (ESA) entered for a location during your Cisco Calling Plan setup is applied to all phone numbers for that location.
| 1 |
Sign in to Control Hub. |
| 2 |
Go to .
|
| 3 |
From the Manage drop-down select Add. |
| 4 |
Choose a Location and PSTN Number in Number Type drop-down on add numbers page and then click Next. |
| 5 |
Select Order New Numbers, click Next. |
| 6 |
Select the toggle for Get a Set of Numbers that Follow Each Other in Order. |
| 7 |
From the drop-down, select the quantity of block numbers needed. |
| 8 |
Specify State and use either Area Code/Prefix or City as your search criteria, and click Search. |
| 9 |
Select from the list of available blocks of numbers provided, based on your search criteria, and click Order. |
| 10 |
On the order submission confirmation page, select the PSTN Orders to check your order status. This brings you to the PSTN Orders page. |
| 11 |
Accept the Terms of Service to activate the new numbers. |
Before you begin
We strongly recommend you to read and familiarize yourself with the Cisco Calling Plan Number Porting Guidelines and Policies before you start porting the numbers.
-
Enable Cisco Calling Plan for your site before you port in phone numbers through Control Hub.
-
A signed Letter of Agency (LOA) is needed, authorizing Cisco to place orders with the current PSTN carrier to move the service to Cisco. The current account owner or authorized signer must sign the LOA. You're prompted to sign the LOA while completing the porting steps.
-
Ensure you have a recent bill from the last 30 days in PNG or PDF format from your current PSTN provider. While porting, you’re prompted to upload a copy of your bill.
-
To ensure a successful port in, make sure you have the following information ready:
-
List of all phone numbers to port
-
Current PSTN provider account information
-
Customer Service Record (CSR) if available
-
Your account PIN, if one exists
When porting numbers and choosing the numbers to port in, we recommend that you consider any number that receives inbound calls. See Cisco Calling Plan Number Porting Guidelines and Policies for more information.
-
-
By default, the Emergency Service Address (ESA) entered for a location during your Cisco Calling Plan setup is applied to all phone numbers for that location.
When you request to port a number, only Calling services related to the number are ported in the United States and Canada. For porting numbers for Messaging services, see Enable business texting for more information.
| 1 |
Sign in to Control Hub. |
| 2 |
Go to .
|
| 3 |
Choose a Location in the Add New Numbers page. |
| 4 |
From the Manage drop-down select Add. |
| 5 |
Choose a Location and PSTN Number in Number Type on add numbers page, then click Next. |
| 6 |
Select Port Numbers Over and click Next. |
| 7 |
You can choose to add the numbers as:
You can only select Service Number if your Cisco Calling Plan for your location has a Service Number license. Contact your Partner to allow you to purchase Service Numbers for your subscription. |
| 8 |
Add the phone number that you want to port over, and then click Save & continue. A portability check is automatically run when you enter the numbers. Highlighted numbers are non-portable. PSTN Technical Support supports further review of these instances. You can add up to 1000 phone numbers. 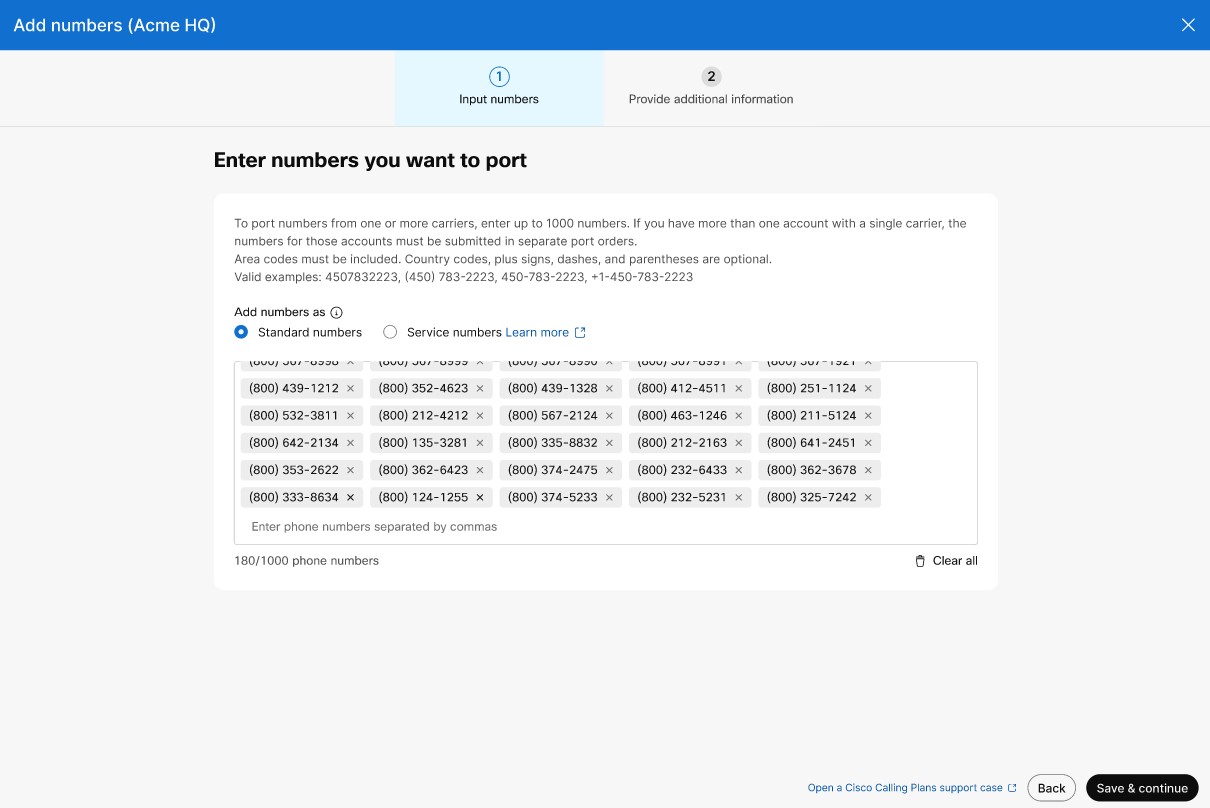
|
| 9 |
In the PSTN order details section, your default contact email address is displayed on which you will receive port order status. Add an email address in Additional contacts if you want to receive email notification on more email addresses. Click Next. |
| 10 |
Enter your account information with your current provider. Make sure that the information entered matches your current provider bill. Click Next. |
| 11 |
Upload a bill from your previous provider. Make sure that the bill is from the last 30 days and is in PNG or PDF format. Click Next. |
| 12 |
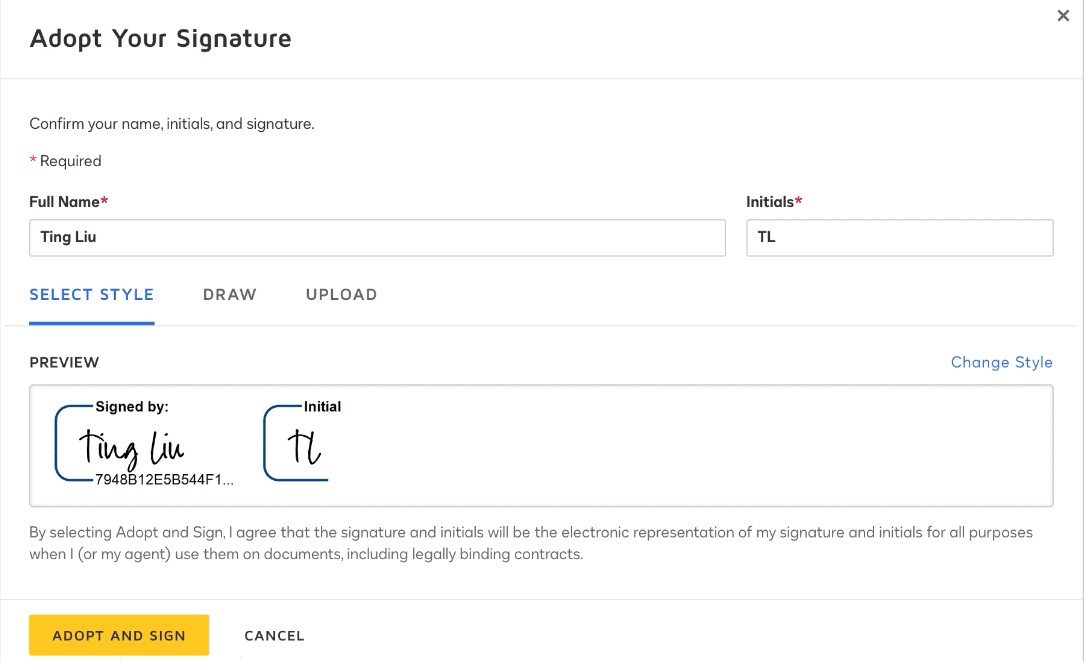
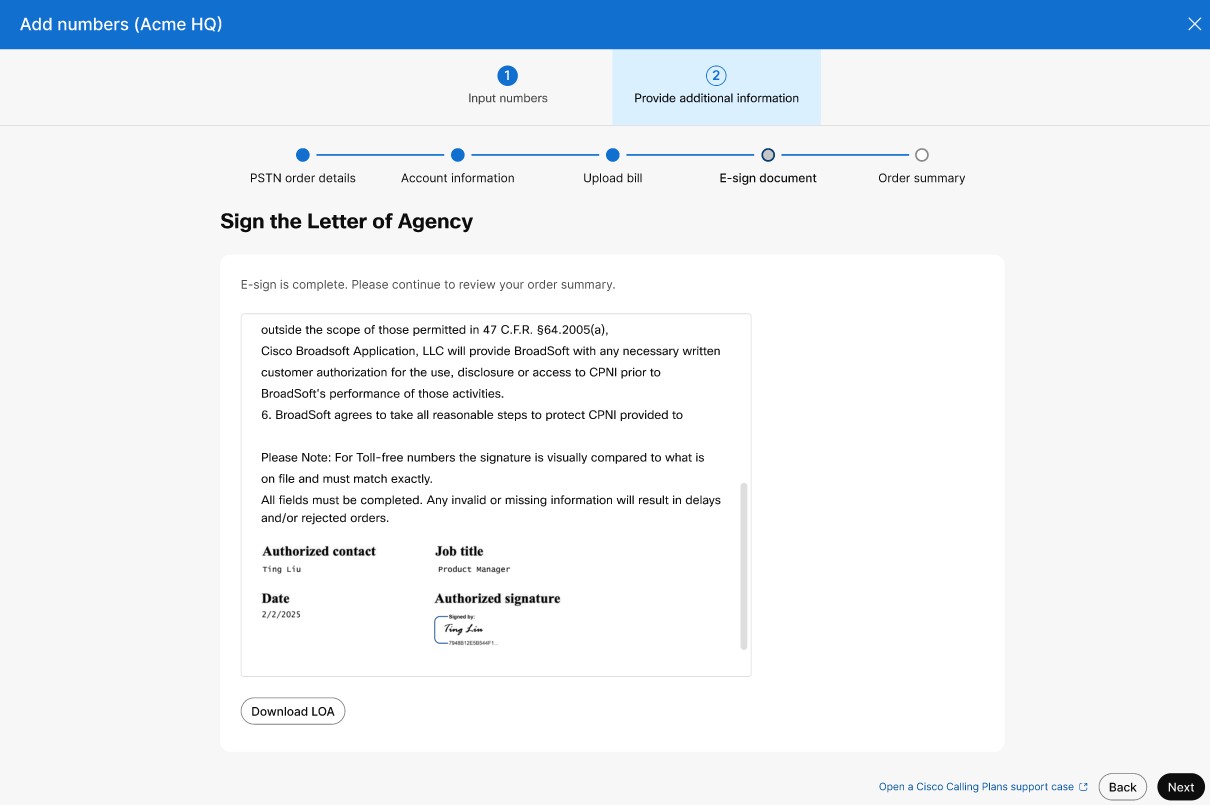
For phone numbers, enter your first and last name and job title to sign the Letter of Agency (LOA). Click Sign & Submit. |
| 13 |
(Optional) If you are porting in toll free numbers, then follow these steps to sign an LOA:
|
| 14 |
Review your order and click Next. |
| 15 |
The order submission screen shows a summary of your port in order. Click Done. Control Hub conducts a preliminary error check before you submit a port in order. If there are any issues found with a port order, administrators receive an email notification, and an error message appears on the PSTN Orders screen. 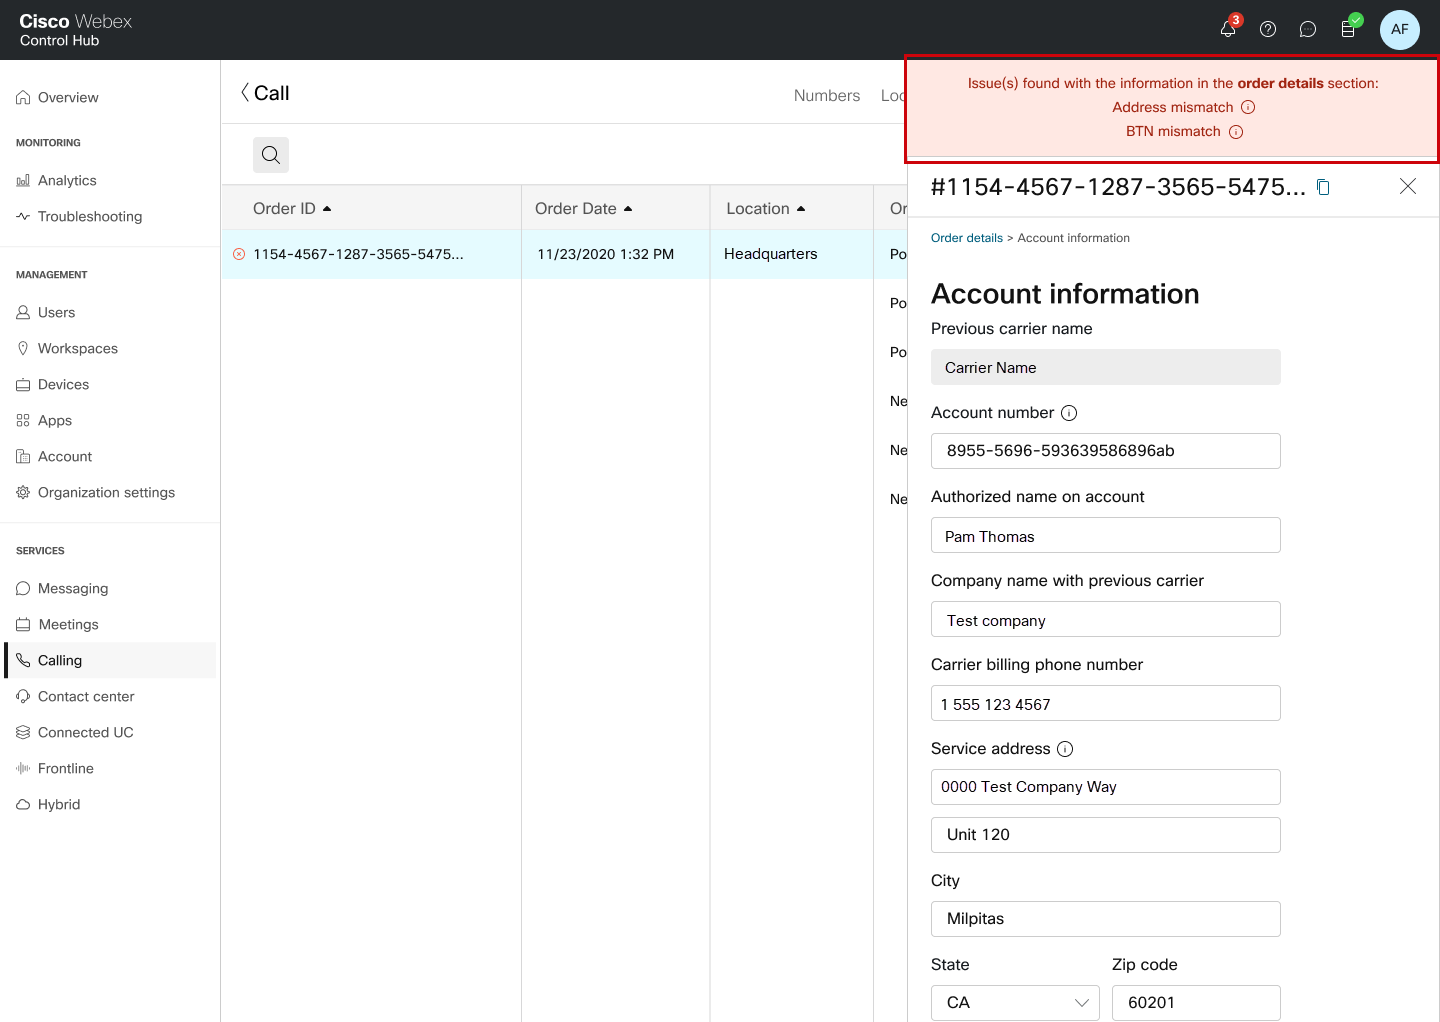
Business texting can be enabled after the phone numbers have been successfully ported. See Enable business texting for more information. |


Before you begin
We strongly recommend you to read and familiarize yourself with the Cisco Calling Plan Number Porting Guidelines and Policies before you start porting the numbers.
-
Enable the Cisco Calling Plan for your site before you move phone numbers through Control Hub.
-
To ensure a successful move, make sure you have the following information ready:
-
List of all phone numbers to move
-
Your account PIN if one exists.
-
-
By default, the Emergency Service Address (ESA) entered for a location during your Cisco Calling Plan setup is applied to all phone numbers for that location.
| 1 |
Sign in to Control Hub. |
| 2 |
Go to . |
| 3 |
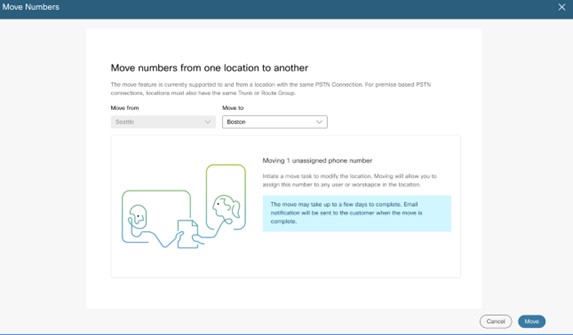
Select the location from which you want to move the number, then click Next. |
| 4 |
From the Move to drop-down box, select the location to move the number to, then click Move.
|
| 5 |
A move order is created and can be viewed on the PSTN Orders page.
You can also see the status of the move order on the Tasks page.
|
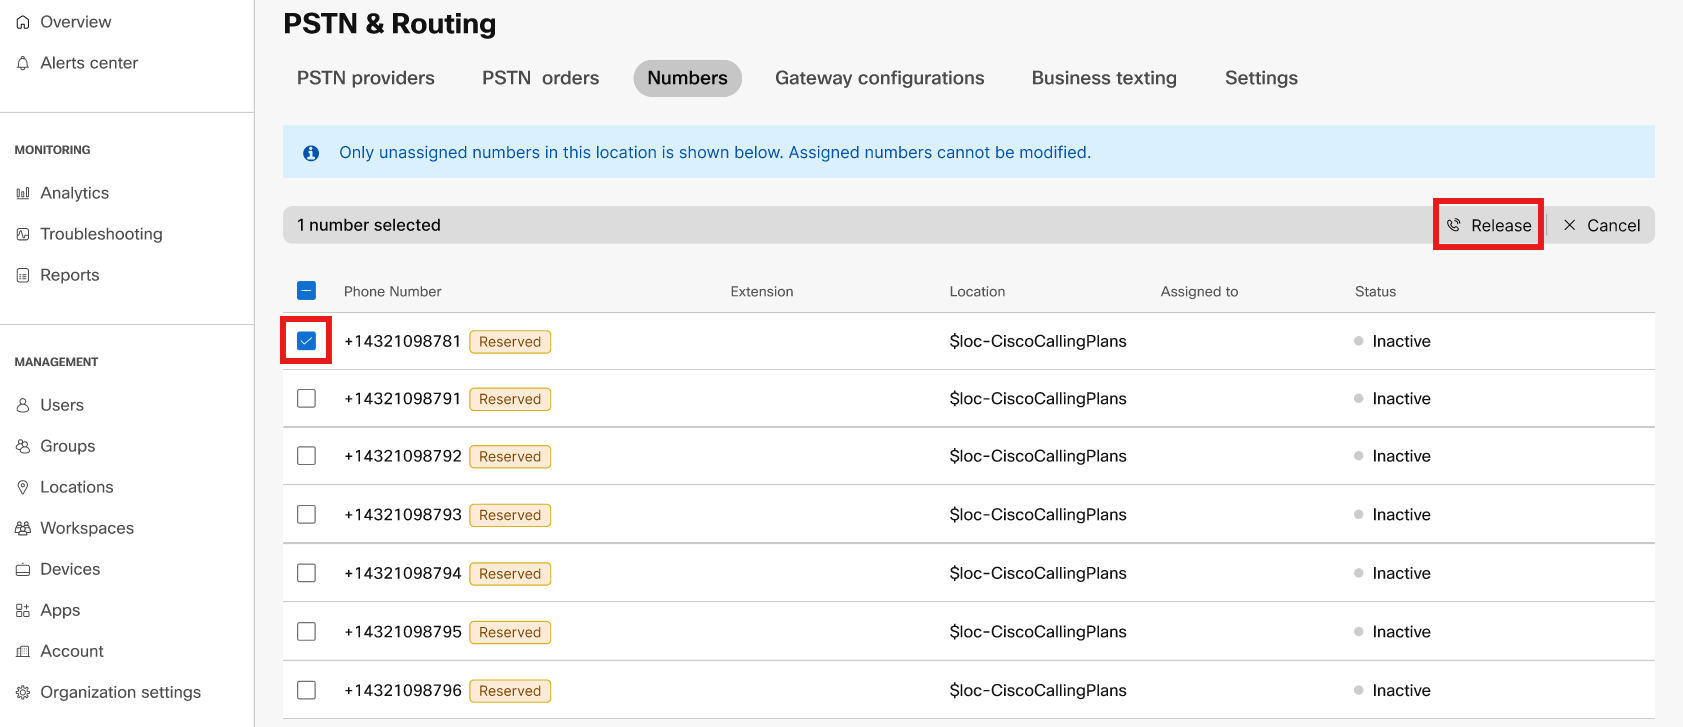
This feature allows you to secure unused telephone numbers without paying the full cost. By reserving these numbers, you retain full ownership even while they are inactive or unassigned to specific users or features, ensuring they remain available for your future needs.
For an organization, the reserved telephone numbers (TNs) are billed at a lower daily rate than the active numbers.
You can modify a number to release it from reserved status.
Existing Cisco Calling Plan customers can add the Reserve or Release functionality by modifying their subscriptions.
For new customers, this functionality is included automatically in their Cisco Calling Plan subscription.
Before you begin
- A number is unassigned to a user/workspace/service
- A number is Standard, Service or Toll Free number only
- The numbers are in same location
- The numbers have same reservation status
| 1 |
Sign in to Control Hub. |
| 2 |
In Services menu, go to . |
| 3 |
Click Manage and select Modify. 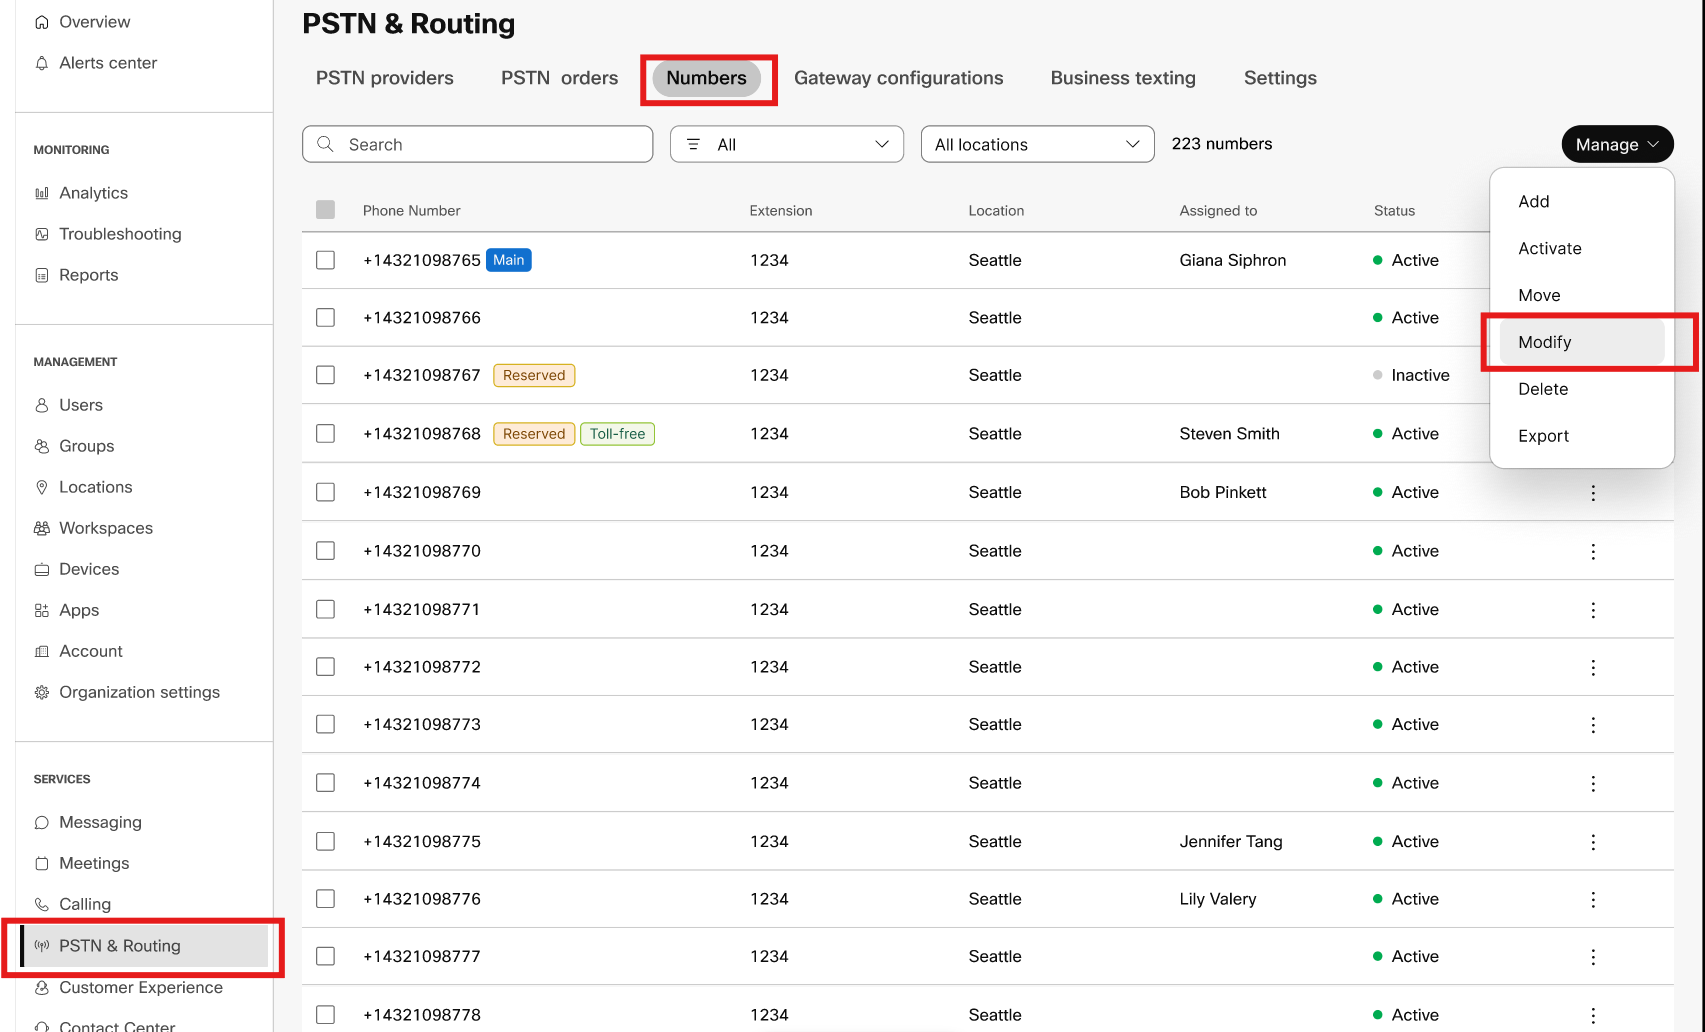
|
| 4 |
Select the source Location for the numbers you want to modify. The selected location must have reserve number license.
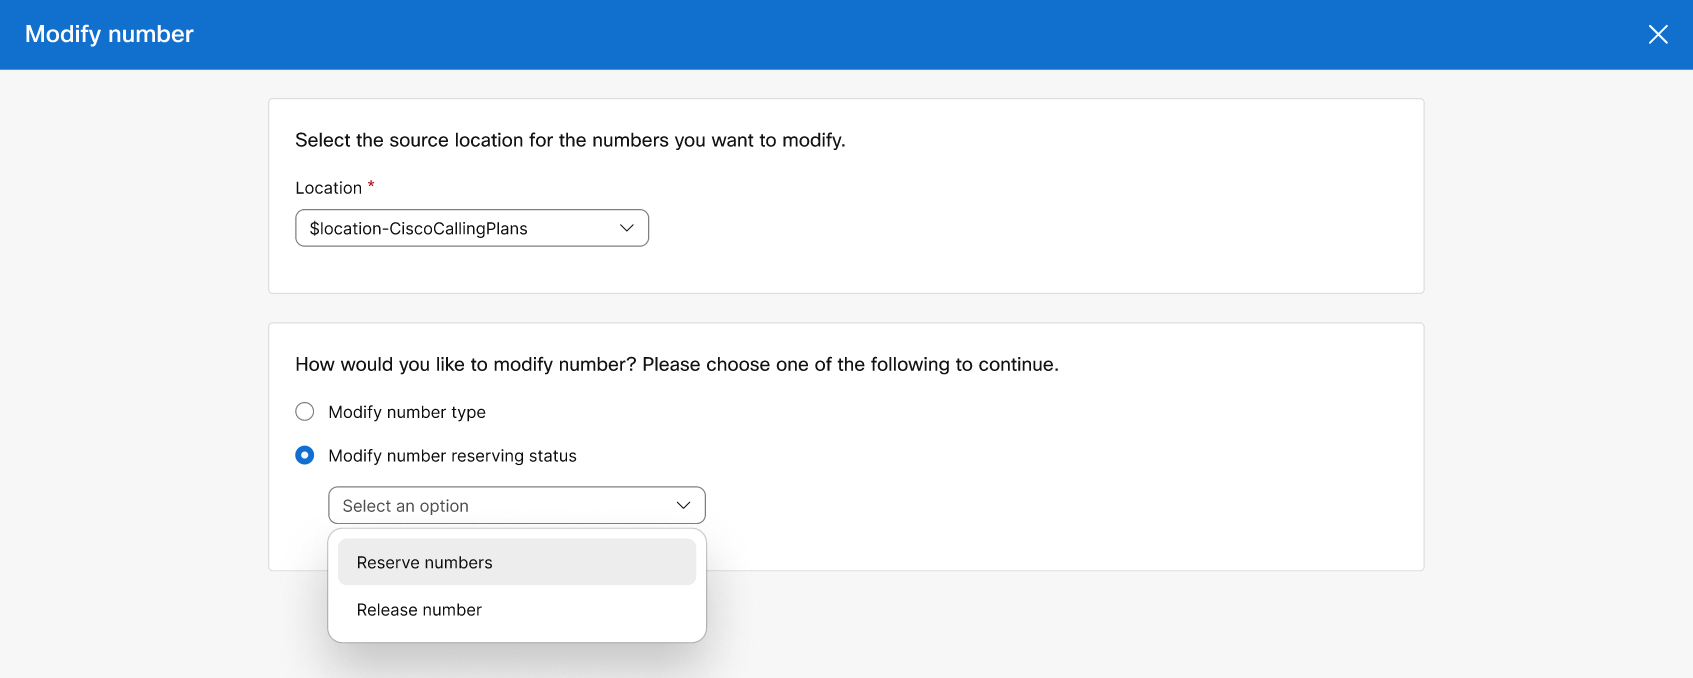
|
| 5 |
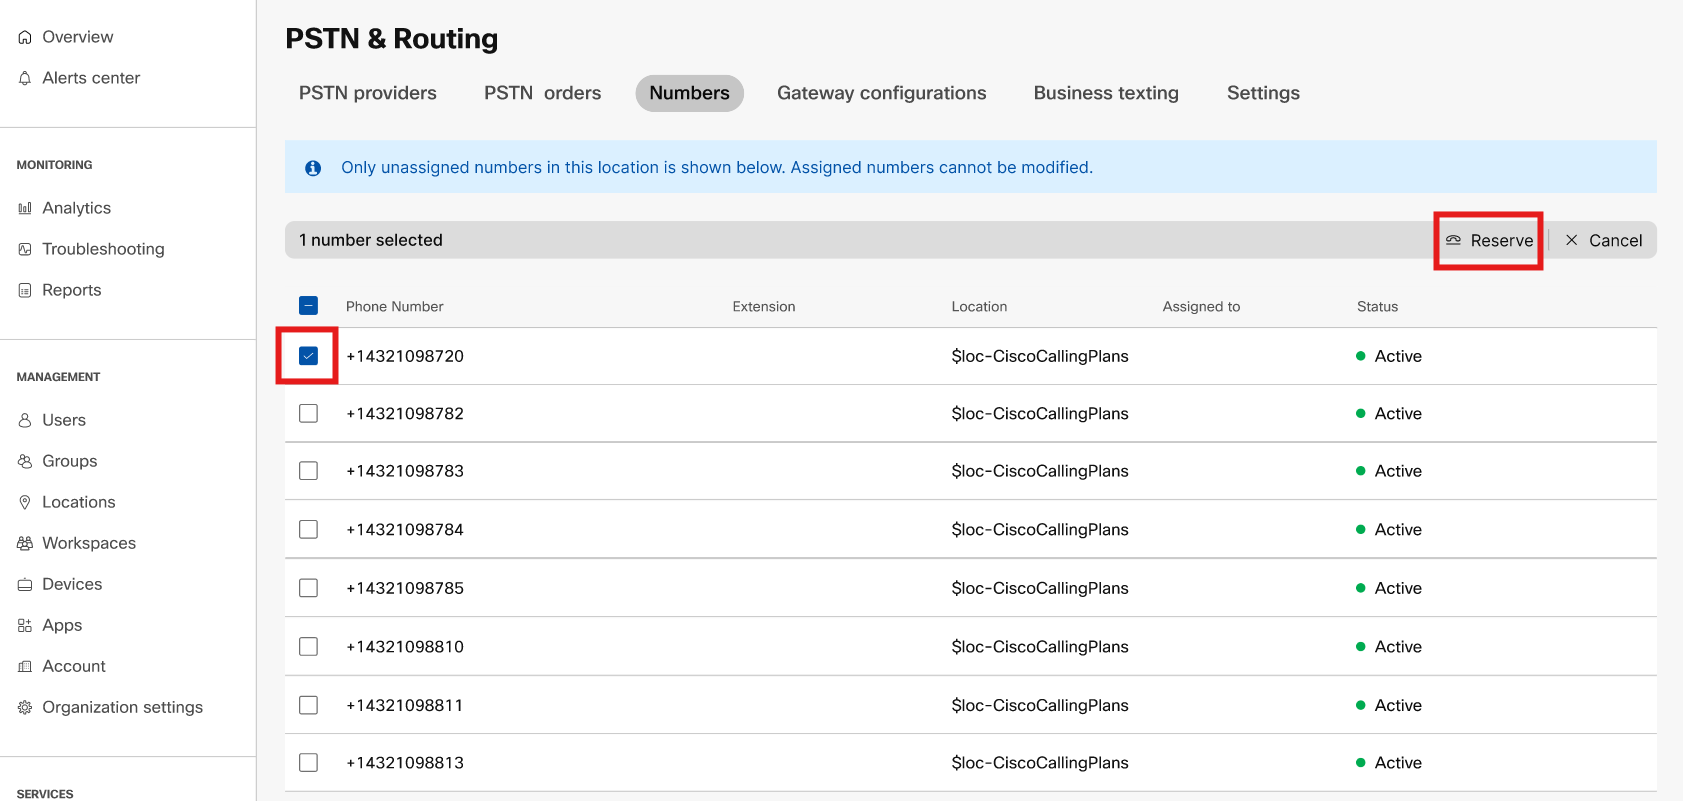
To reserve a number, perform the following steps:
A modify order is created. In the PSTN orders page, you can view the pending orders and orders with errors.
|
| 6 |
To release a number, perform the following steps: 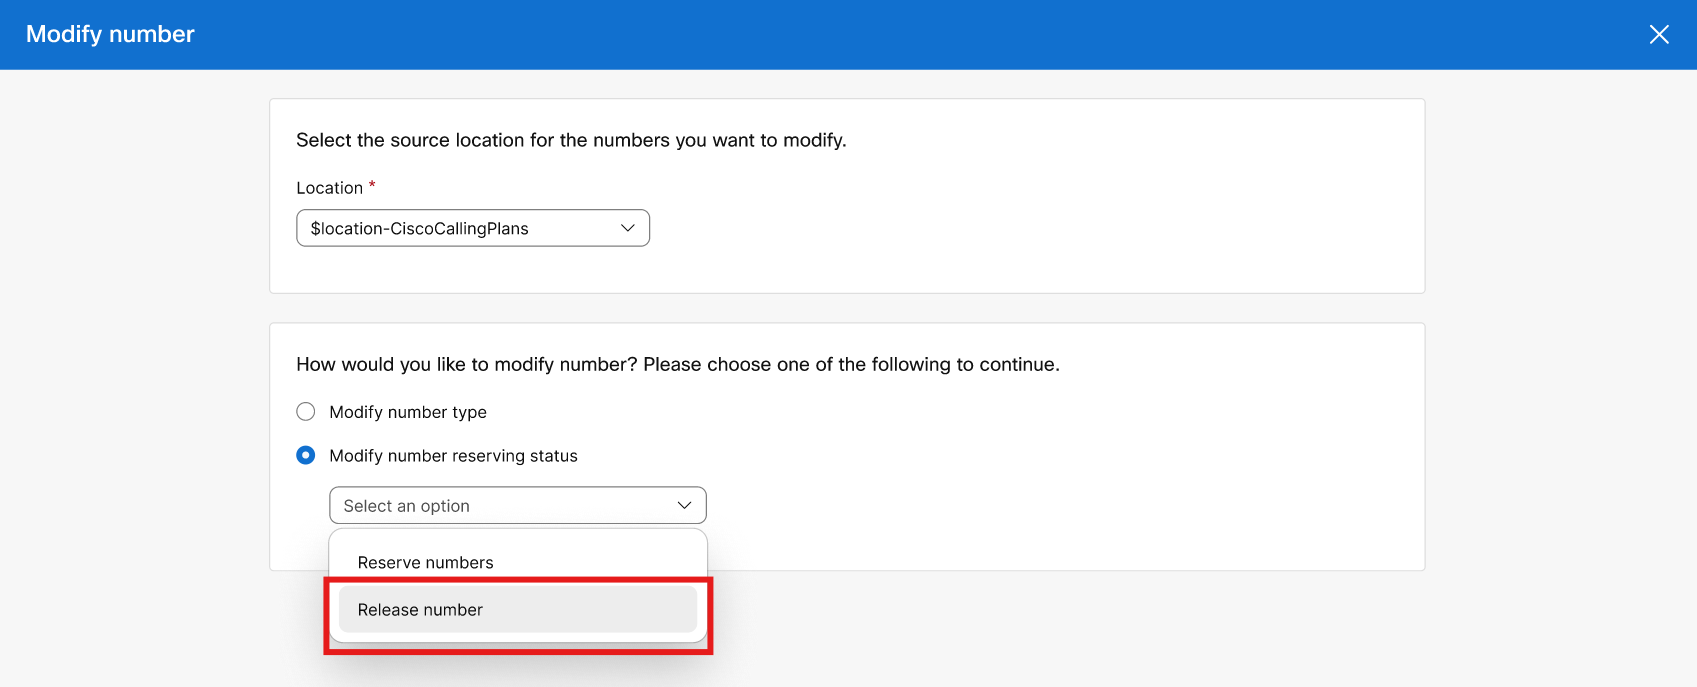
A modify order is created. In the PSTN orders page, you can view the pending orders and orders with errors.
|
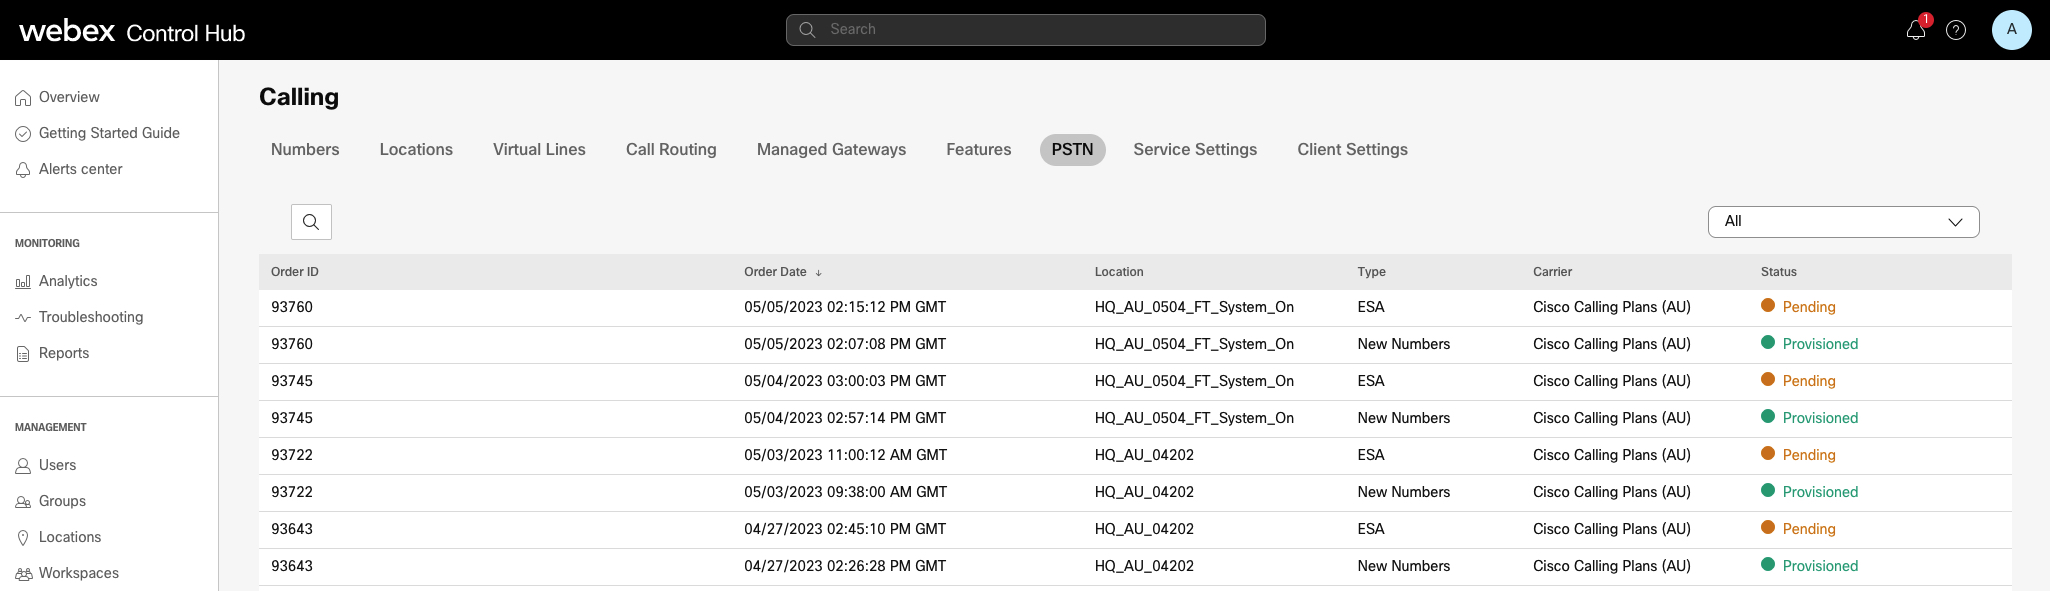
When placing orders for new numbers or porting in existing numbers, you can check the order status or port rejection notices in Control Hub.
A migration banner displays when there are locations to migrate from Non-Integrated CCP to Integrated CCP.
-
From the customer view in https://admin.webex.com, go to Calling and then click PSTN.
A status is assigned for every order.
-
Go to .
A status is assigned for every order.
Select an order to check its status.
-
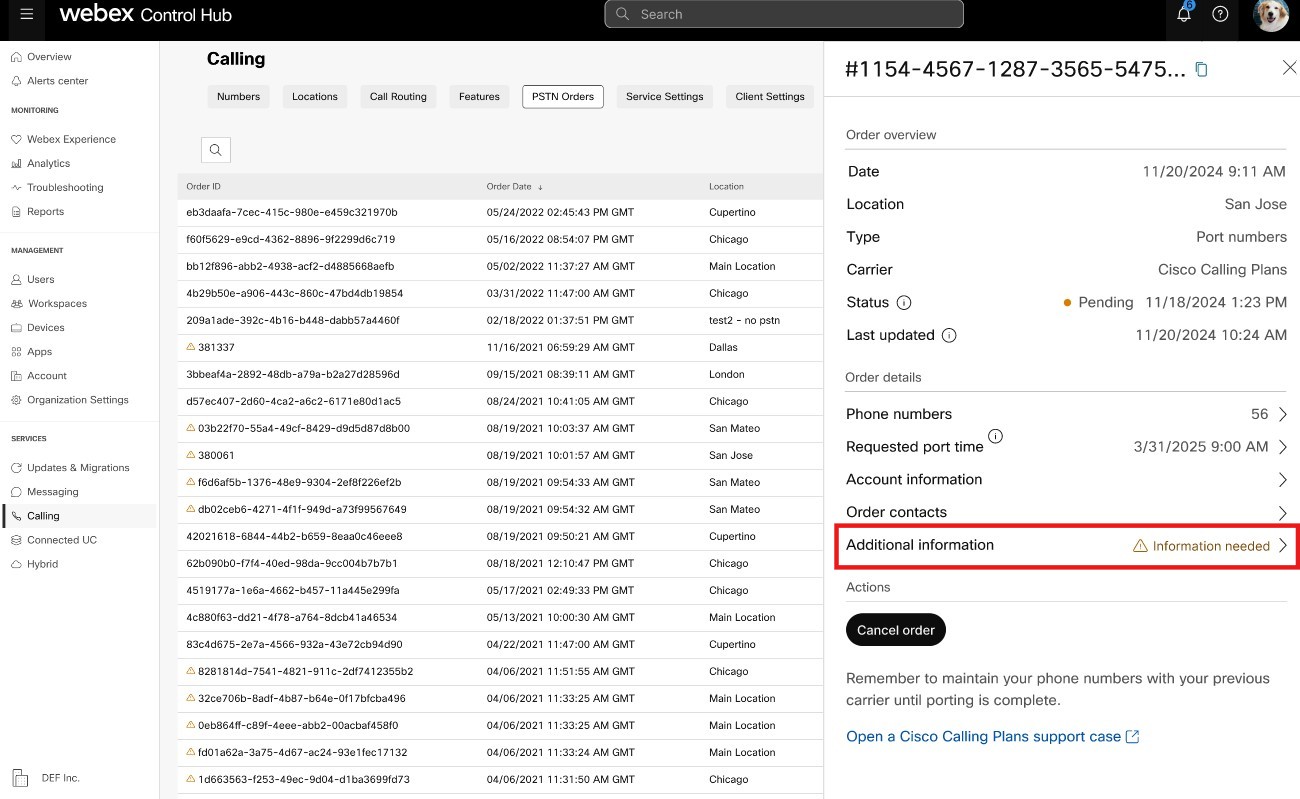
For Toll free porting order, click on a pending order to check if any information is required in this order.
- Click Additional Information. It shows if any
account information or bill upload is pending.
-
In Additional information section, you can click action required and add information as required.
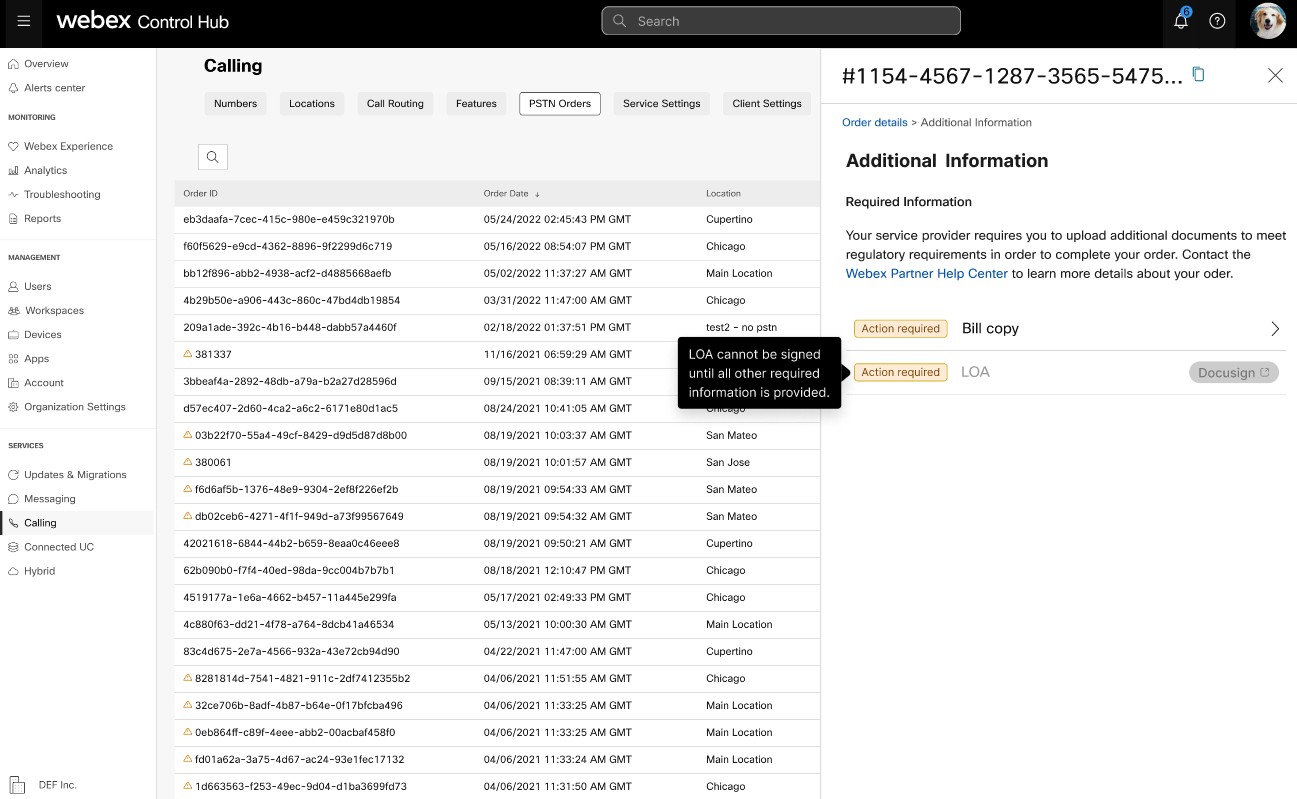
If you update any account information or due date of an order, you have to sign the Letter of Agency (LAO) agreement again. You can sign an LOA agreement only after all the required actions are completed.
- Click Additional Information. It shows if any
account information or bill upload is pending.
Status values for New Number Orders
|
Displayed Status |
Description |
|---|---|
|
Pending |
New numbers order is created by the user. |
|
Provisioned |
New numbers are provisioned. |
|
Error |
An issue is detected with the new numbers order. Create a TAC ticket to get help. |
Status Values for Ported Number Orders
|
Displayed Status |
Description |
|---|---|
|
Pending |
User is in the process of creating/filling in details of the Porting Order. Once submitted, the order will still show Pending until Cisco validates and accepts the porting order. |
|
Action Required |
This status is displayed when any information is pending, such as account information, due date, or required documentation. |
|
Rejected |
Porting issue is detected. See the Porting Errors table for additional details. Alternatively, go to Control Hub and click on the PSTN Help link for PSTN technical support. |
|
Submitted |
Porting Order is validated and accepted. |
|
FOC Received |
FOC date confirmation from the previous PSTN provider received. |
|
Completed |
Porting process is complete. |
|
Canceled |
Order is canceled. |
Porting Error Messages
|
Displayed Error |
Description |
How to fix |
|---|---|---|
|
| ||
|
Account number mismatch |
Account number does not match the number on the Customer Service Record (CSR) |
Update the Account Number field on the PSTN Order and resubmit. For some carriers, the account number may be the same as the BTN or the telephone number itself. |
|
Account number required |
The account number wasn't provided but is required. |
Update the Account Number field on the PSTN Order and resubmit. For some carriers, the account number may be the same as the BTN or the telephone number itself. |
|
Account name mismatch |
The person authorizing doesn't match the name on the (CSR). |
Update the Authorized name on account field on the PSTN order and resubmit. |
|
BTN mismatch |
BTN or ATN does not match that on the CSR. |
Update the Carrier billing phone number field on the PSTN Order and resubmit. |
|
Company name mismatch |
Entity name does not match that on the CSR. |
Update the Company name with previous carrier field on the PSTN order and resubmit. |
|
Multiple BTNs |
The OSP requires this Porting Order to be split and submitted as separate orders. |
Cancel the current PSTN order and create new, multiple PSTN Orders. Create one for each group of numbers that have the same BTN. |
|
FOC rejected by losing carrier |
The FOC date requested cannot be accommodated by the OSP. |
Update the Port Complete date field on the PSTN order and resubmit. |
|
Unknown |
Go to Control Hub and click on PSTN Help link for PSTN technical support. |
Go to Control Hub and click on PSTN Help link for PSTN technical support. |
|
Invalid PIN |
Passcode/PIN must be provided for wireless port. |
Update the PIN field on the PSTN order and resubmit. |
|
Pending order |
The OSP has a pending LSR on the account (for example, a port out or address change). |
Remove the telephone numbers in question from the PSTN order and resubmit. |
|
Pending main BTN |
BTN is one of the phone numbers being ported. User must indicate Porting Order Type, Remaining Numbers Action, and New Billing Phone Number accordingly. |
Remove the main BTN from the list of telephone numbers being ported and resubmit the order. Please include the Main BTN into the last iteration of numbers (if porting numbers in multiple iterations). |
|
Service address mismatch |
The location info doesn't match that on the CSR. |
Update the Service address, State, and City fields and resubmit the order. |
|
TN has special feature |
Some of the phone numbers can't be ported because they have a special feature (for example, remote call forward). |
Remove number(s) with special features from the PSTN order and resubmit. Or, unassign special feature from the numbers being ported. |
|
TN mismatch |
Some of the phone numbers don't belong to the end user. |
Remove the number(s) in question and resubmit the order. |
|
TN not portable |
Some of the phone numbers can't be ported because they're inactive or aren't part of the end user's account. |
Try to remove the number(s) in question and resubmit the PSTN order. |
|
Unsupported rate center |
The rate center isn't portable. |
Remove the number(s) in question and resubmit the order. |
|
Zip/postal code mismatch |
Postal code doesn't match the one on the CSR. |
Update the Zip code field and resubmit the order. |
|
Previous carrier's bill is invalid |
The invoice is invalid. |
Go to PSTN Order details, then open Previous Carrier’s Bill section. Upload the correct bill file and resubmit the order. |
|
LOA invalid |
The LOA is invalid. |
Sign the LOA and resubmit the PSTN order. Alternatively, go to Control Hub and click on the PSTN Help link for PSTN technical support. |
PSTN – Public Switched Telephone Network
CSR – Customer Service Record
FOC – Firm Order Commitment
OSP – Old Service Provider
BTN – Billing Telephone Number
ATN – Account Telephone Number
The card view displays the PSTN provider available for the Webex Calling customer before configuring the PSTN location. The PSTN view displays both Providers and Orders.
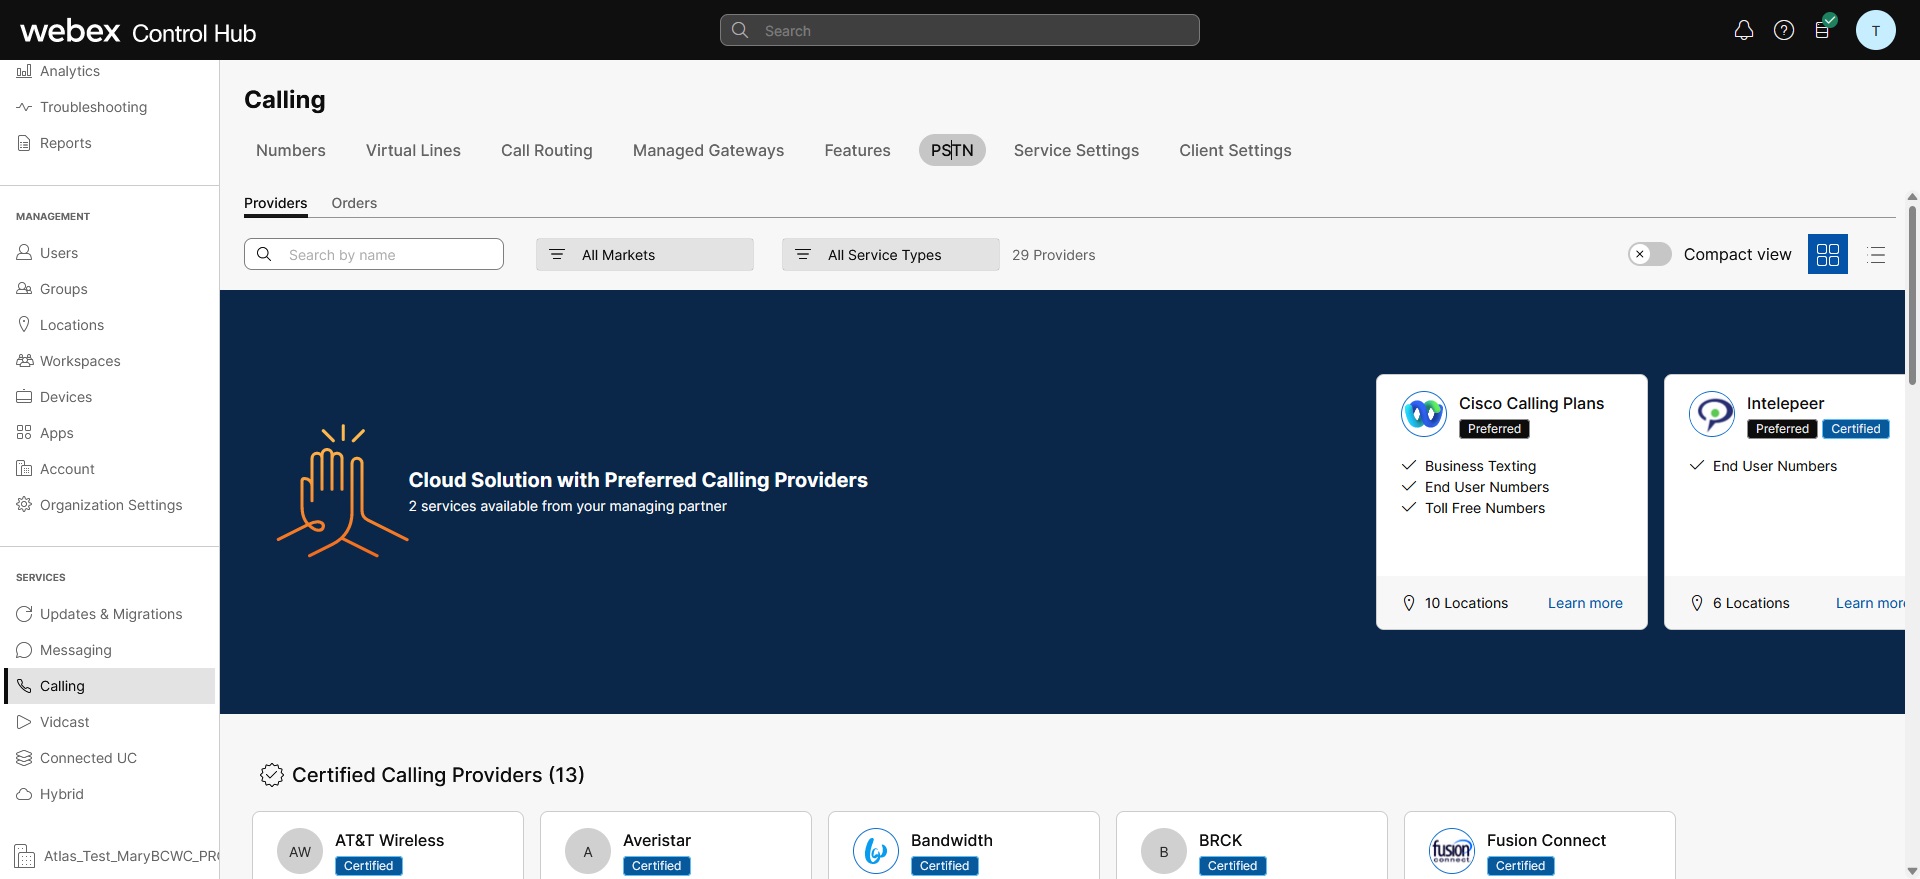
You can apply the search filter to filter content based on Service Type and Market. Use the toggle option to change the view from Compact to Table. The compact view helps to resize the card to display the provider details without the service information.
The provider screen displays the various provider cards with the list of supported service types. The Providers section is classified into the following:
-
Preferred Calling providers
-
Certified Calling providers
-
Calling providers
Click the Learn More option on the card to view details of the provider. It displays Use the search field to select the PSTN service provider based on Cisco business relationship preference such as certified provider and Calling provider.
The providers include the following:
-
Provider summary
-
List of locations configured with this provider
-
List of markets that the provider is available for the supported services.
If the customer has PSTN locations where Calling services aren’t set up, the Select this provider action bar displays. Use this option to configure the service for the PSTN location.
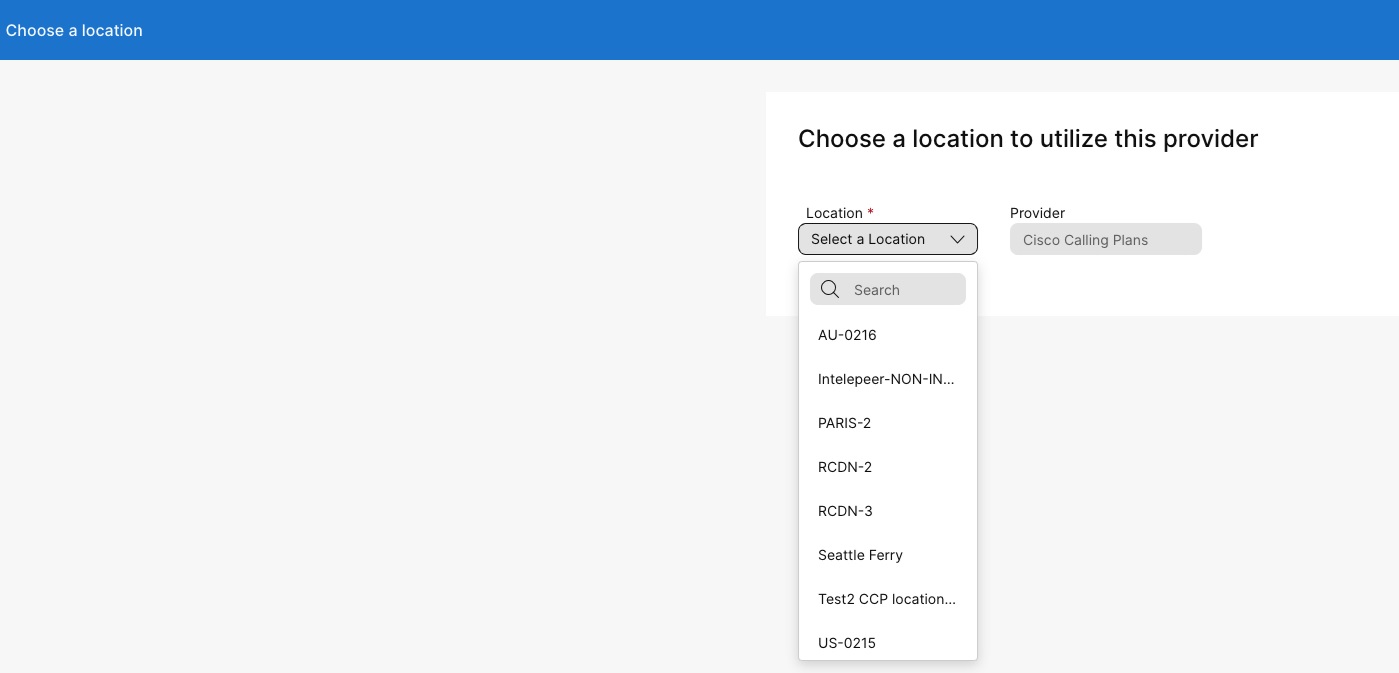
The preferred view in the Control Hub displays the calling providers that the managing partner prefers to work. However, you can view all available calling providers with Webex Calling. This section provides the following:
-
Select the location from the drop-down menu.
-
Choose the subscription type for the users to use the Cisco Calling plans. Click Next.
-
Complete the fields for Contract Information and Emergency Service Address configuration.
The PSTN service set up is now complete.
| 1 |
Sign in to Control Hub. |
| 2 |
Go to and select the location you want to update. |
| 3 |
Next to PSTN Connection, click Manage. |
| 4 |
Next to the Emergency Service Address, click Edit. |
| 5 |
Enter the new address and click Save. If ESA (Enterprise Service Address) address validation fails while configuring premise or CCPP connections, administrators can close the ESA screen and continue with the setup. The validation failure will not prevent setting up the connection. If the ESA is not validated, emergency call handling may be delayed, and additional charges may apply if calls are routed to an emergency relay center. |
To configure an ESA for an user, ensure the following conditions are met:
- The user has a non-mobile primary phone number assigned.
- The user’s location is within the U.S. or Canada.
These conditions are necessary because the ESA is tied to the user's phone number and location. This setup allows accurate routing of emergency calls and proper callback to the user through the Emergency Callback Number (ECBN) associated with their location or phone number.
| 1 |
Sign in to Control Hub. |
| 2 |
Go to . |
| 3 |
Select the user that you want to modify and click Calling. |
| 4 |
Select the right arrow to expand the primary phone number settings under Numbers. |
| 5 |
Under Emergency Service Address, select Custom Address. Enter the following details. In case of an emergency, the local emergency response crew will use this address to locate the caller.
|
| 6 |
Update the information for the workspace and click Validate. On entering a service address, the system validates the address. If the system cannot find the address, a Suggested Address displays in a side panel. Review the suggested address and click Apply to update the Emergency service address. Click Save , to save the changes. |
A custom emergency address overrides the location's default emergency address for the specific user.
To order a Service number, consider these pointers:
-
Service numbers on Cisco Calling Plans are currently only available in the U.S. and Canada.
-
You can change all unassigned numbers in a location that aren’t mobile or toll-free numbers from Standard to Service number.
-
You can only assign Service numbers to site services like Auto Attendant, Call Queue, Hunt groups and more.
-
Service numbers can be assigned as a number in a Route List.
-
You can use Service numbers as a main number for a Webex location and use it as a caller ID for a user or a workspace.
Service numbers are ordered and ported into Cisco Calling Plans using the same process as regular telephone numbers or consecutive blocks of numbers. When proceeding through the ordering and porting flow, users will be offered the chance to order or port in numbers as “Standard numbers” or “Service numbers”.
Order New Numbers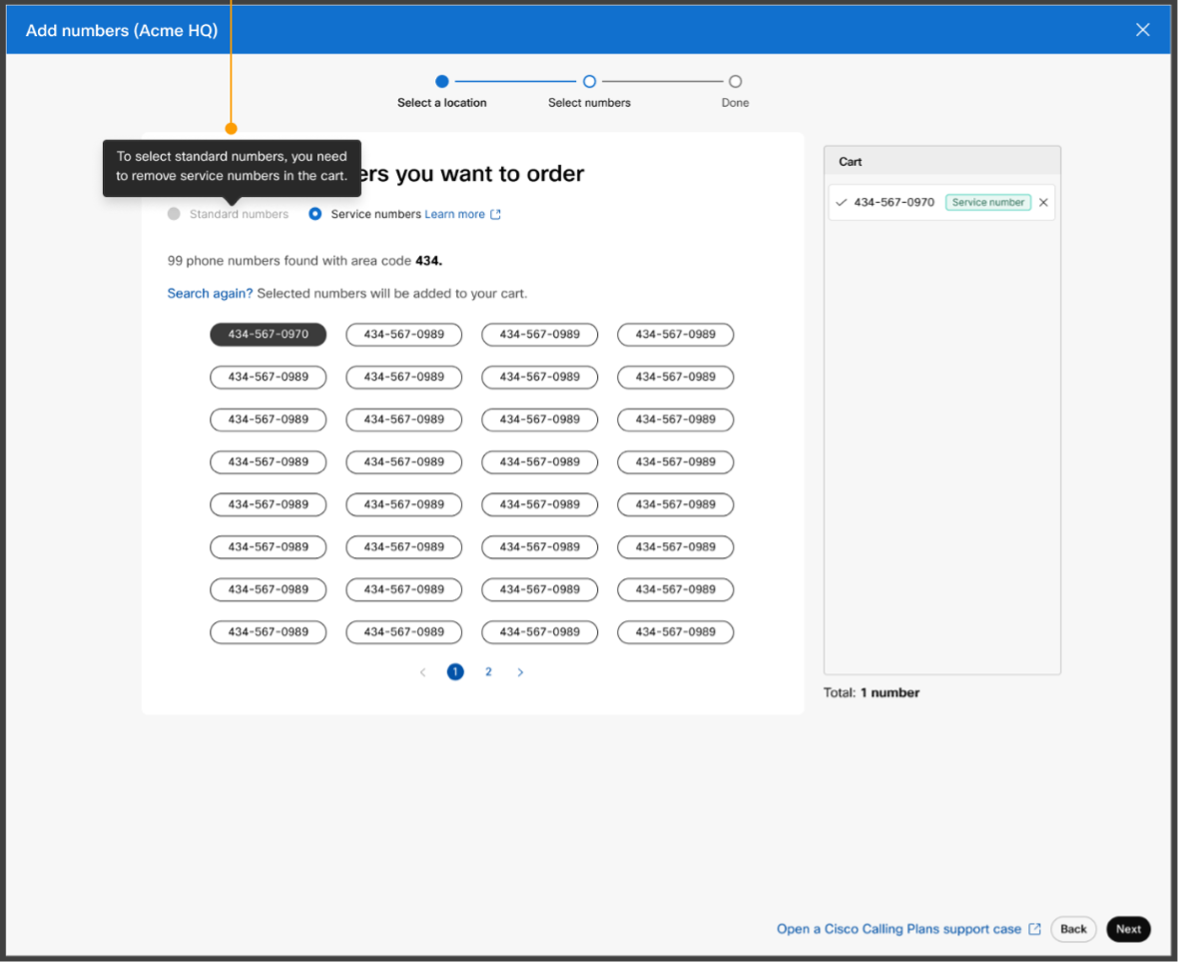
Port Numbers
-
Toll-free numbers are added as toll free irrespective of the selection.
-
If the Service numbers option is grayed, contact your partner to ensure the proper license is applied to your subscription.
-
Each new or port order can only contain Service numbers or standard numbers – but not both. Multiple orders can be used to order a mix of number types, or the number types can be modified after ordering and porting.
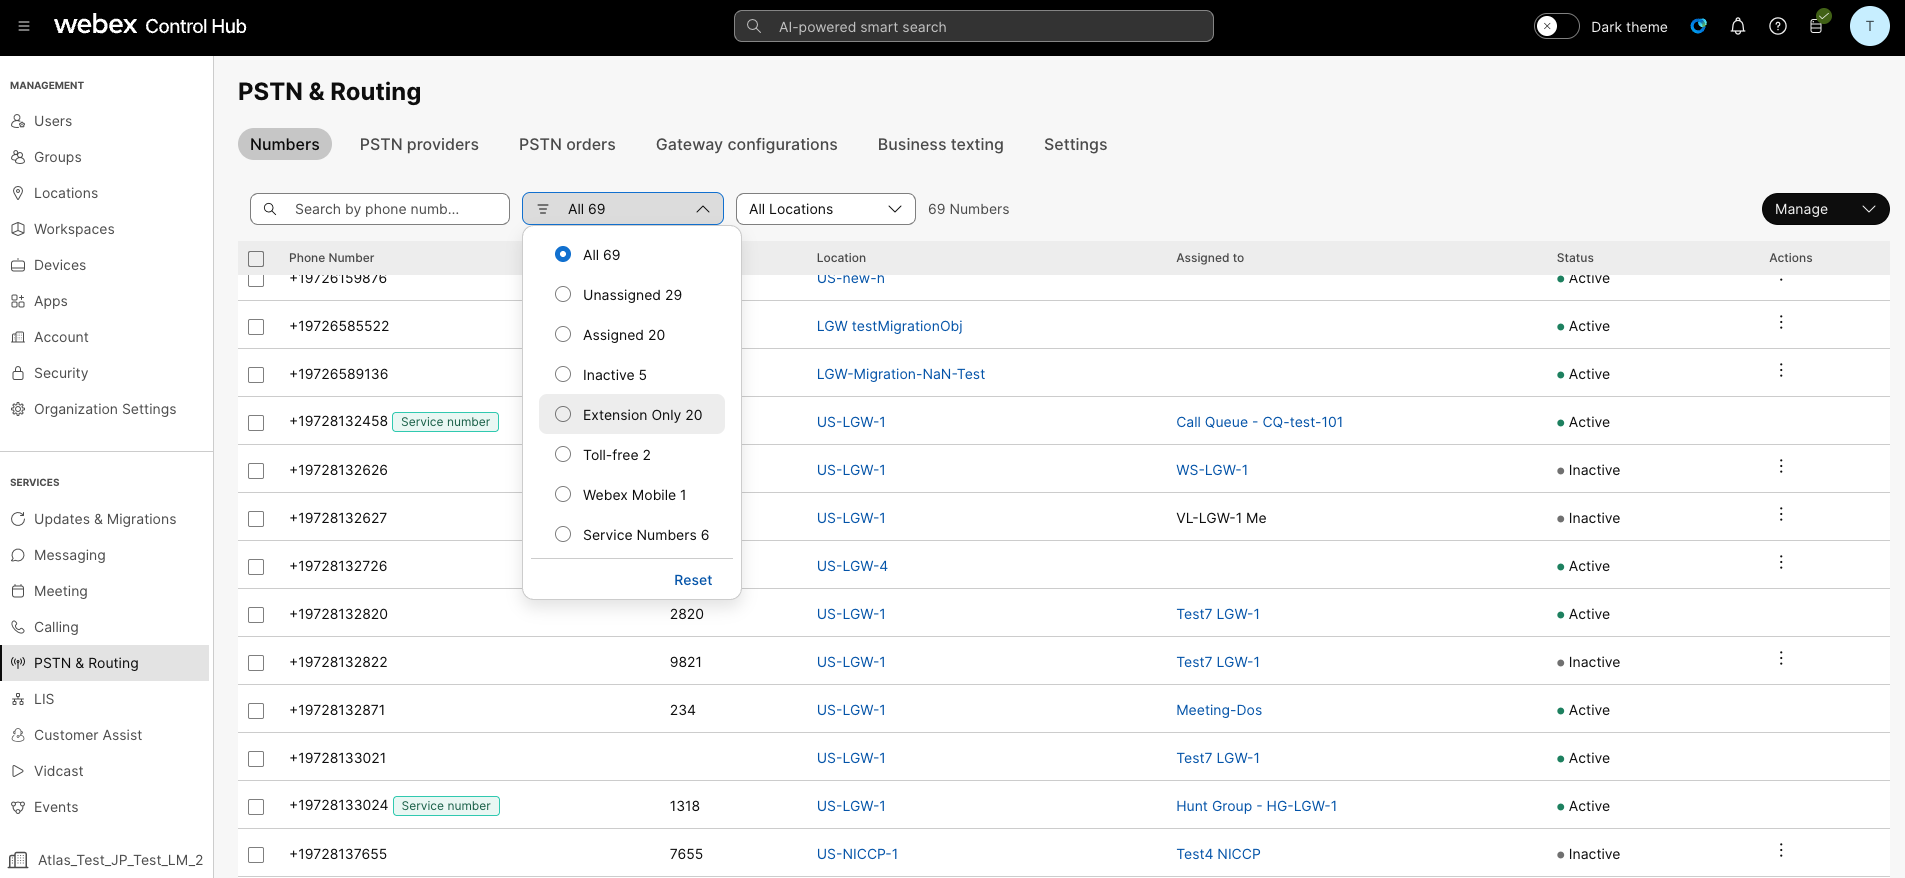
To modify an existing Standard number to a Service number, follow these steps:
- Sign in to Control Hub.
- Go to .
-
Select the number that you wish to change using the Actions drop down. Choose Modify from the drop-down. The Modify numbers window displays that you’re modifying the number type from Standard to Service number. Click Save.
- On the Numbers window, you now observe the Service number indication against the
number.
The Numbers page on Control Hub has a Service numbers filter. The Numbers page displays the count of Service numbers allocated and a Service number indication against the relevant number.
Webex Calling provides flexible Calling plans and the ability to choose the PSTN solution that fits the requirement. Over time you may have to migrate to a different PSTN solution due to changes in the business environment or other factors.
Use this matrix to know the potential PSTN migration paths for Webex Calling.
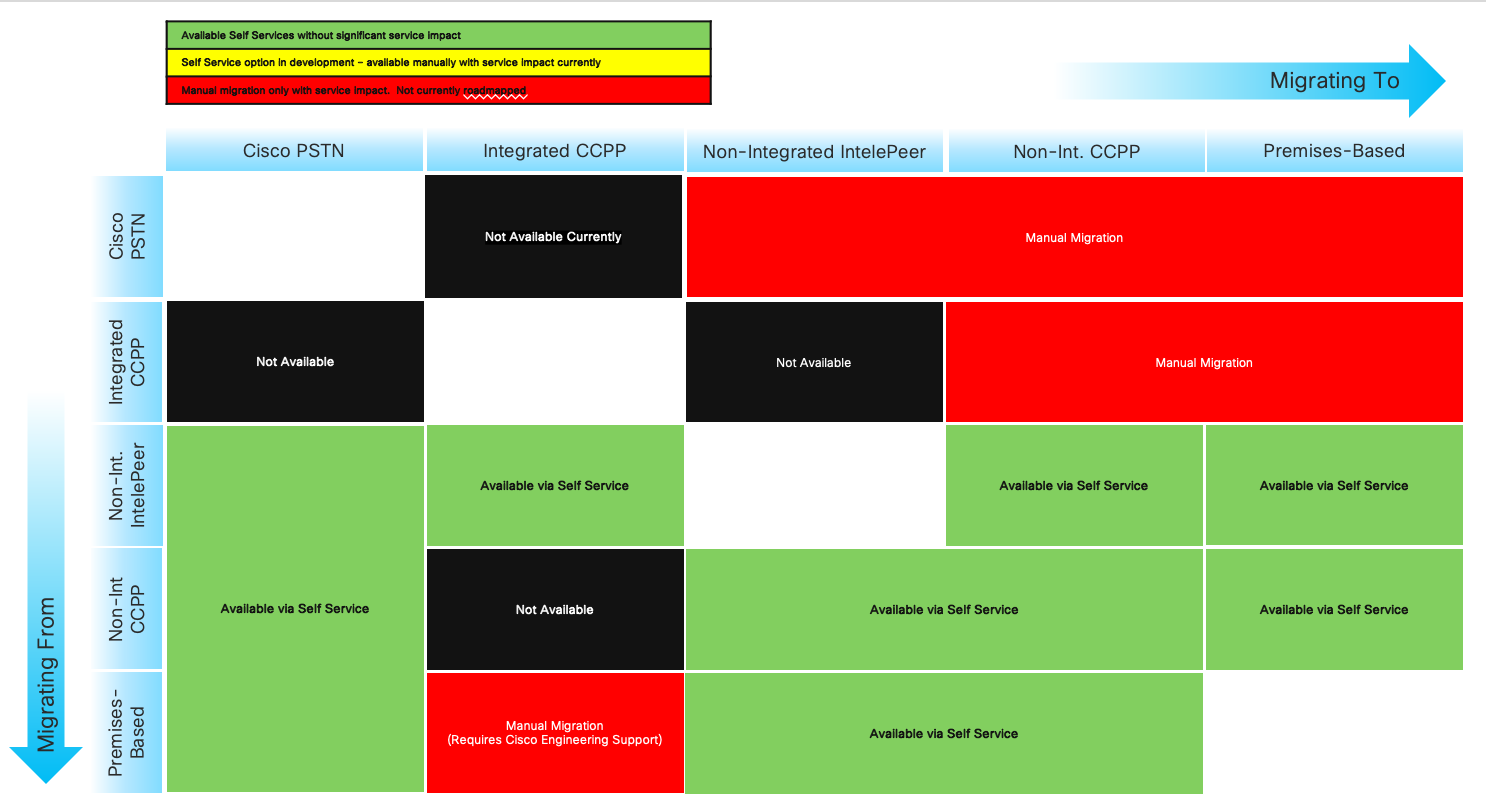
Webex Calling supports the following PSTN migration paths:
-
Using Self Service through Control Hub
-
Premises-based PSTN, non-integrated CCPP, and non-integrated IntelePeer to Cisco Calling Plans. See Migrate to Cisco Calling plans.
-
Non-integrated CCP Provider including non-integrated Intelepeer to a Premises-based Solution. See, Configure premises-based PSTN in Control Hub
-
Premises-based solution to non-integrated CCPP. You must update the connection type in Control Hub and select a CCPP partner. This type of migration does not require any further configuration.
-
-
Using Manual Migration
-
Premises-based solution to Integrated CCP Provider
-
Integrated CCP Provider to Non-integrated CCP Provider (Exception: Non-integrated Intelepeer isn’t supported as the target CCP Provider)
-
Integrated CCP Provider to Premises-based Solution
-
To use the manual migration process, you must create a new location, move TNs and users to the new location, and reconfigure site services/service assignments. During migration, you experience service interruption and there’s a risk of data loss.
Here’s a list of unsupported PSTN migration paths:
-
Cisco Calling Plans to integrated Intelepeer
-
Integrated Intelepeer to Cisco Calling Plans
The minimum required order is one Outbound Calling Plan (OCP). Billing includes charges for outbound calling plans, phone numbers, and international Calling usage. Your Cisco monthly billing invoice includes information on call activity, charges, and applicable fees and taxes. There’s no additional charge to port phone numbers.
When your billing begins:
-
Outbound Calling Plans ordered in CCW begin billing on the requested service date (RSD).
-
Outbound Calling Plans provisioned in Control Hub begin billing immediately.
-
Phone numbers provisioned in Control Hub begin billing immediately or, if ported from another provider, billing begins upon port completion.
Outbound calling plan rates:
-
Rates for the Outbound Calling Plans and phone numbers are prorated using the same proration method used to calculate the rates for the Webex Calling licenses.
-
International Calling rates vary by country and are billed the month following usage.
See Cisco Calling Plan bill for the details.
Cisco Calling Plans support is provided by various support divisions, depending on your need.
|
Support Division |
Purpose |
Contact Information |
|---|---|---|
|
Partner Help Desk (PHD) |
Partner how-to and/or documentation inquiries, Pre-quoting Regulatory Tax and other enquiries about the Cisco Calling Plans offering. |
North America: 1-844-613-6108 EMEA: +44 129 366 10 20 APAC: +61 3 7017 7272 Email: webexcalling-phd@cisco.com |
|
PSTN Technical Support (PTS) |
|
Go to Control Hub and click on PSTN Help link for PSTN technical support. |
|
TAC |
Issues with Control Hub functionality Issues with service, such as dropped calls, call quality issues, or service outages |
North America: 1-800-553-2447 EMEA: +32 2 704 5555 APAC: +61 2 8446 7411 Email: tac@cisco.com See also: |
|
Invoice & Collections |
VAT, Payment and other invoicing queries |
Contact the Collector on the Invoice via email or phone |
|
Cisco SaaS Support Team (CES) |
|
Refer Partner Support Playbook and Cisco Calling Plans FAQ Create a case through link below if the required information is not found in the playbook - https://customerservice.cloudapps.cisco.com/ |
You can select varied connections for multi-site applications. For example, you can select Cisco Calling Plans for one location, Cloud-Connected PSTN (CCP) for a second location, and Local Gateway for the third location. When choosing the Cisco Calling Plans, the following applies.
Requirements
-
Partners must be an authorized Webex Calling partner and have accepted the new Webex Calling addendum through enrollment into the Webex Calling PSTN program.
-
A minimum of one committed Outbound Calling Plan license must be purchased to enable access to all services associated with Cisco Calling Plans.
Limitations
-
Cisco Calling Plans are currently available to specified countries.
-
Existing Webex Calling locations or telephone numbers can only transition to Cisco Calling Plans in certain scenarios. For details on supported migration paths, refer Supported paths for PSTN migration section.
-
You can order a maximum of 100 new standard phone numbers at a time. Additional numbers can be placed as a separate order.
-
Toll-free numbers aren’t currently available. You can’t order new toll-free numbers or port existing toll-free numbers to the Cisco Calling Plans.
-
Cisco Calling Plans aren’t supported with Webex Contact Center or authorized for use in which high-concurrent calls or high-volume calls or uncommonly short or long calls are made. For more information about Webex Contact Center, see Get started with Webex Contact Center.
-
Some premium services and international destinations may not be available for operational purposes. If specific destinations which are not generally available are required, customers can open a support case to request availability.
The card view displays the PSTN provider available for the Webex Calling customer before configuring the PSTN location. The PSTN view displays both Providers and Orders.
You can apply the search filter to filter content based on Service Type and Market. Use the toggle option to change the view from Compact to Table. The compact view helps to resize the card to display the provider details without the service information.
The provider screen displays the various provider cards with the list of supported service types. The Providers section is classified into the following:
-
Preferred Calling providers
-
Certified Calling providers
-
Calling providers
Click the Learn More option on the card to view details of the provider. It displays Use the search field to select the PSTN service provider based on Cisco business relationship preference such as certified provider and Calling provider.
The providers include the following:
-
Provider summary
-
List of locations configured with this provider
-
List of markets that the provider is available for the supported services.
If the customer has PSTN locations where Calling services aren’t set up, the Select this provider action bar displays. Use this option to configure the service for the PSTN location.
The preferred view in the Control Hub displays the calling providers that the managing partner prefers to work. However, you can view all available calling providers with Webex Calling. This section provides the following:
-
Select the location from the drop-down menu.
-
Choose the subscription type for the users to use the Cisco Calling plans. Click Next.
-
Complete the fields for Contract Information and Emergency Service Address configuration.
The PSTN service set up is now complete.
Cisco Calling Plans are available for technical evaluation as part of the Webex Calling trial process. While Cisco Calling Plans trials are free to use, there are some neddotable limitations during the trial phase.
As you can convert the trial accounts to paid accounts, the required regulatory documentation, as mentioned in the 'Order New Phone Numbers' section under each country, is also mandatory for trial services. These documents are legally required by country regulators for our Telephone Number (TN) provisioning team to procure the numbers.
-
Each trial account can provision up to 10 standard telephone numbers from Cisco Calling Plans with Webex Calling. It isn’t permitted to provision more than 10 numbers per trial.
-
Only new, standard telephone numbers are supported in trials. Ported numbers, consecutive blocks, and inbound toll-free numbers aren’t supported on trial accounts. You also cannot port numbers out of a trial. You must convert to a paid account if you wish to use these features.
-
International calling, along with Premium Service Call types I & II are blocked from use during the trial period.
-
Business Texting isn’t available on Webex Calling trial accounts.
-
Trial accounts are intended for technical evaluation purposes only, and not for normal commercial operation. As such, emergency services are only meant for technical evaluation; actual emergency calls can’t be guaranteed. Users shouldn’t place actual emergency service calls on a trial account.
When placing an order to convert a Webex Calling trial with Cisco Calling Plans to a paid subscription, you must order at least one Cisco Calling Plan committed license to maintain the telephone numbers and configuration used in the trial.
-
Cisco Calling Plans (Cisco PSTN)
-
Cloud Connected PSTN
-
Premise-based PSTN (Local Gateway must be enabled separately. For more information, see Configure Premises-based PSTN in Control Hub.)
| 1 |
Sign in to Control Hub. |
| 2 |
Go to and select the location you want to update. |
| 3 |
Select the Calling tab and Click Manage next to PTSN Connection. |
| 4 |
Select Cisco Calling Plans and click Next. |
| 5 |
Enter the contact information and click Next. This field is for the contact information of the person who will sign the legal contract with Cisco. |
| 6 |
Enter the Emergency Services Address (ESA), and click Save. By default, the ESA entered here is applied to all phone numbers for this location. You can change the ESA for an individual user if needed. For example, you may need to change the ESA if you have a remote employee who works from home. |
| 7 |
On the summary screen, do one of the following:
|
Before you begin
-
The Cisco Calling Plan must be enabled for your site before you can order new phone numbers through Control Hub.
-
By default, the Emergency Service Address (ESA) entered for a location during your Cisco Calling Plan setup is applied to all phone numbers for that location.
- Provide the following information for business identity verification:
- First name and last name of the legal representative
- Contact phone number
- Copy of passport or any ID card
- Company name
- Local company registration certificate
- VAT number
- Provide the following information for address verification:
- Address matching the DID area code (street, building number, postal code, city, and country)
- Proof of address, not older than last 3 months
| 1 |
Sign in to Control Hub. |
| 2 |
Go to .
|
| 3 |
From the Manage drop-down select Add. |
| 4 |
Select a Location and PSTN Number in Number Type drop-down on add numbers page. You’re directed to Contact Support to order new numbers. |
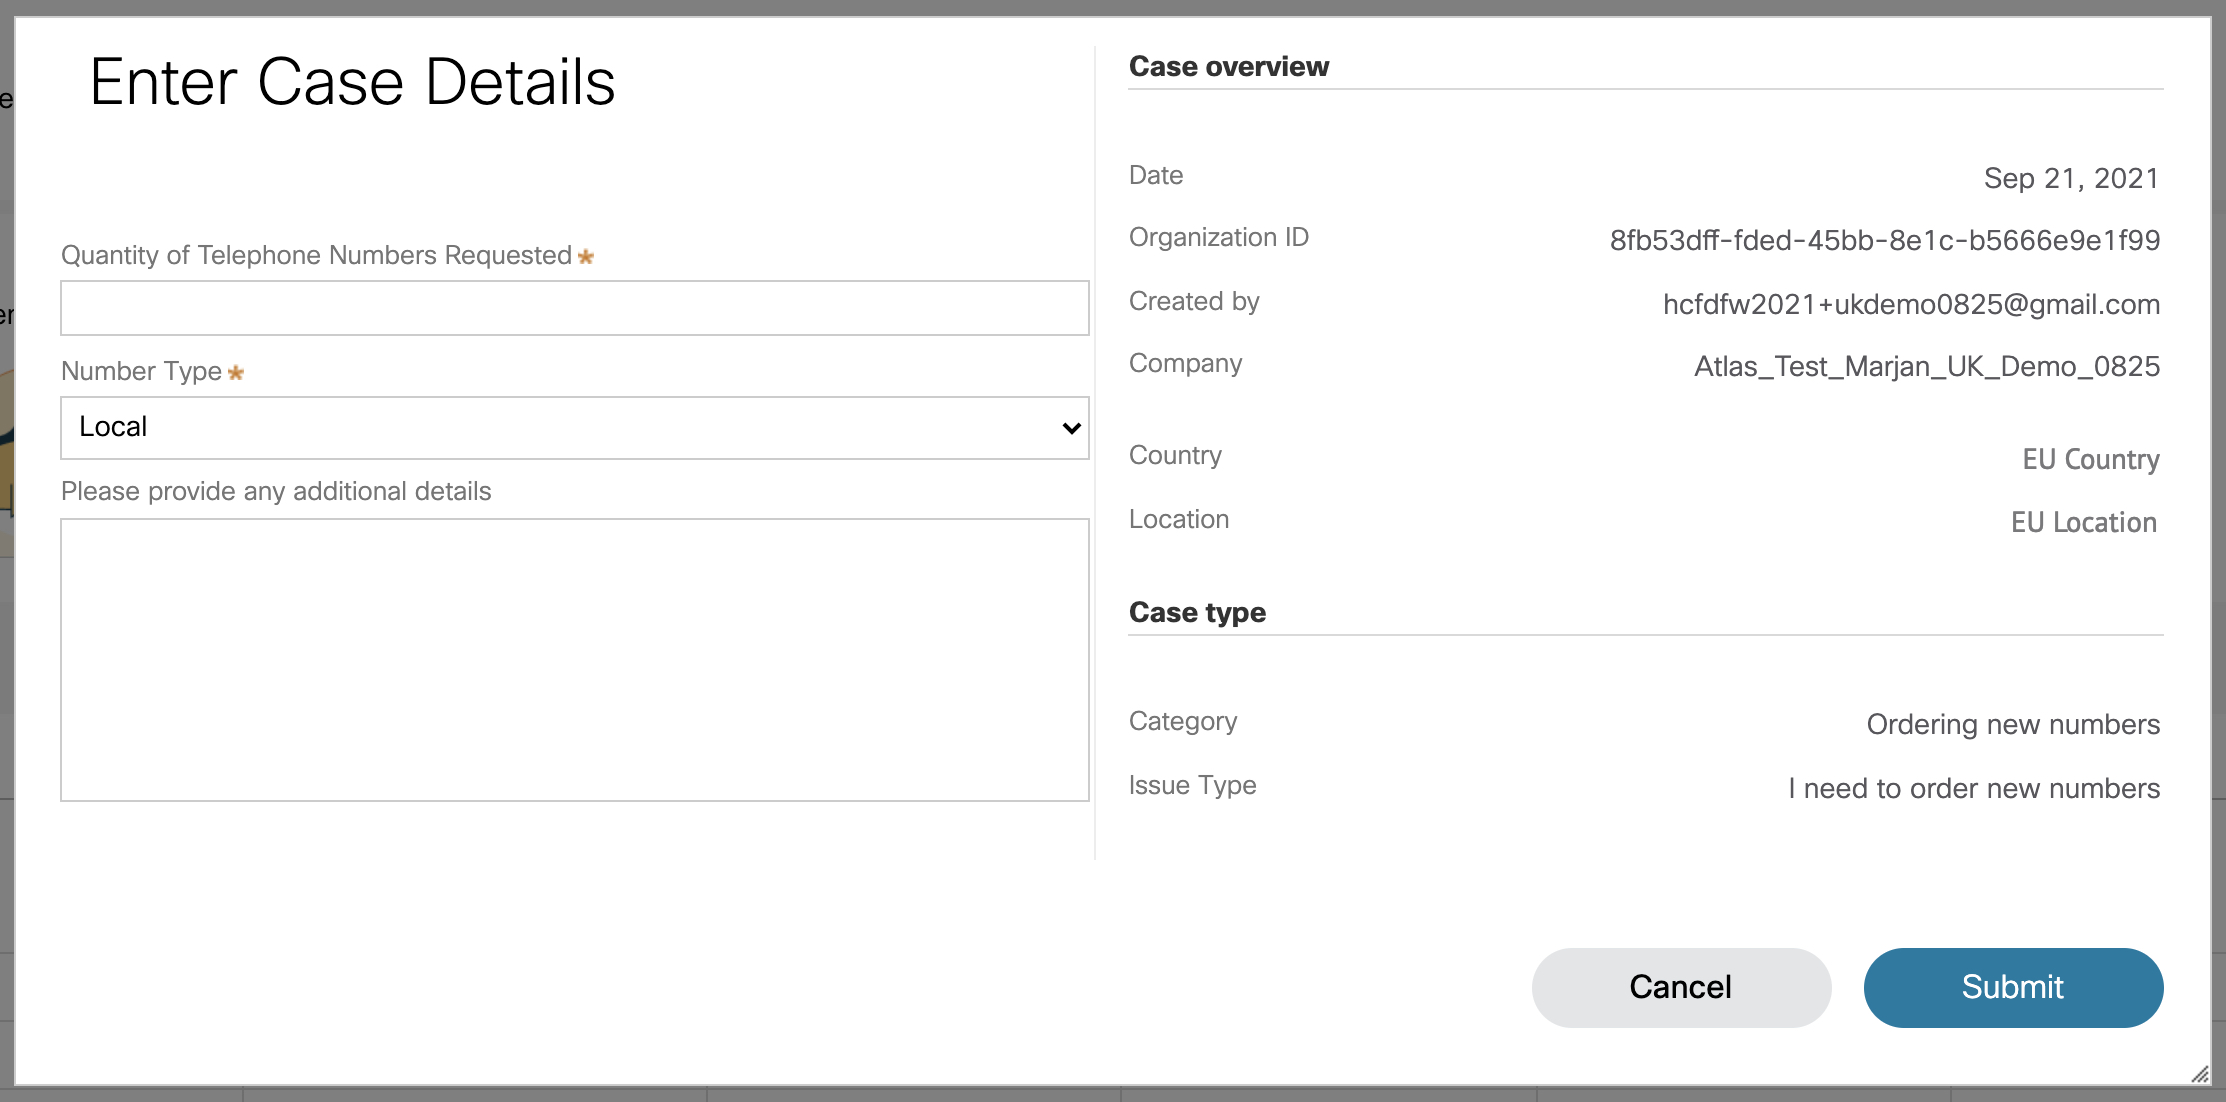
| 5 |
Click Contact Support. Your location information is automatically populated on the Case Details window.
|
| 6 |
Indicate how many new numbers you’re requesting in the Number of Telephone Numbers Requested field. |
| 7 |
From the Number Type drop-down list, choose Local or National as the case maybe. |
| 8 |
(Optional) Enter the additional details. |
| 9 |
Click Submit. You receive a PSTN Order Number which displays on the PSTN order page. It can take up to 5 - 7 business days for the ordering and document approval process. |
Before you begin
We strongly recommend you to read and familiarize yourself with the Cisco Calling Plan Number Porting Guidelines and Policies before you start porting the numbers.
-
Enable Cisco Calling Plan for your location before you port in phone numbers through Control Hub.
-
Require a signed Letter of Agency (LOA), authorizing Cisco to place orders with the current PSTN carrier to move the service to Cisco. The LOA must be signed by the current account owner or authorized signer. You're prompted to sign the LOA while completing the porting steps.
-
Make sure you have a recent bill in PNG or PDF format from your current PSTN provider. The bill must not be older than 30 days. While completing the porting steps, you’re prompted to upload a copy of your bill.
-
For successful porting, ensure that you have the following information ready:
-
List of all phone numbers to port (non-toll free)
-
Current PSTN provider account information
-
Customer Service Record (CSR) if available
-
Your account PIN if one exists
-
VAT number or Tax ID
Certain countries require these additional documents:
-
Belgium
Proof of Local Address (Utility Bill and so on), dated within the last three months
-
Netherlands
-
Proof of Local Address (Utility Bill, and so on) dated within the last three months
-
Company registration document
-
-
Poland
-
Company registration document
-
Valid Passport/ID Card of the authorizing person
-
-
-
When planning for which numbers to port in, we recommend that you consider any number that receives inbound calls. See Cisco Calling Plan Number Policy for more information.
-
By default, the Emergency Service Address (ESA) entered for a location during your Cisco Calling Plan setup applies to all phone numbers for that location.
As an administrator, you can move existing phone numbers from your current PSTN to the Cisco Calling Plan option. The following are the types of porting services:
- Standard port: When a phone number moves from one service provider to another, without any special circumstances. For example, porting a number from Carrier A to Carrier B within the same country and service area is a Standard port.
- Mixed operator port: A more complex porting situation that involves multiple operators or service providers. For example, porting a range of numbers in a block that belongs to two or more network operators is a Mixed operator port.
Porting of numbers is done in a fixed time slot in the following countries:
| Porting time slot | Countries |
|---|---|
| Monday to Friday between 8 a.m. to 3 p.m. | Switzerland, Belgium, Sweden |
| Monday to Friday between 9 a.m. to 4 p.m. | Netherlands, Lithuania, Luxembourg, Denmark |
| Monday to Friday between 8 a.m. to 5 p.m. | Finland |
Requests for porting out of hours are on a case-by-case basis and depend on the carriers involved. We can’t guarantee that out of hours porting is available.
| 1 |
Sign in to Control Hub. |
| 2 |
Go to . |
| 3 |
From the Manage drop-down select Add. |
| 4 |
Choose a Location and PSTN Number in Number Type drop-down on add numbers page and then click Next. |
| 5 |
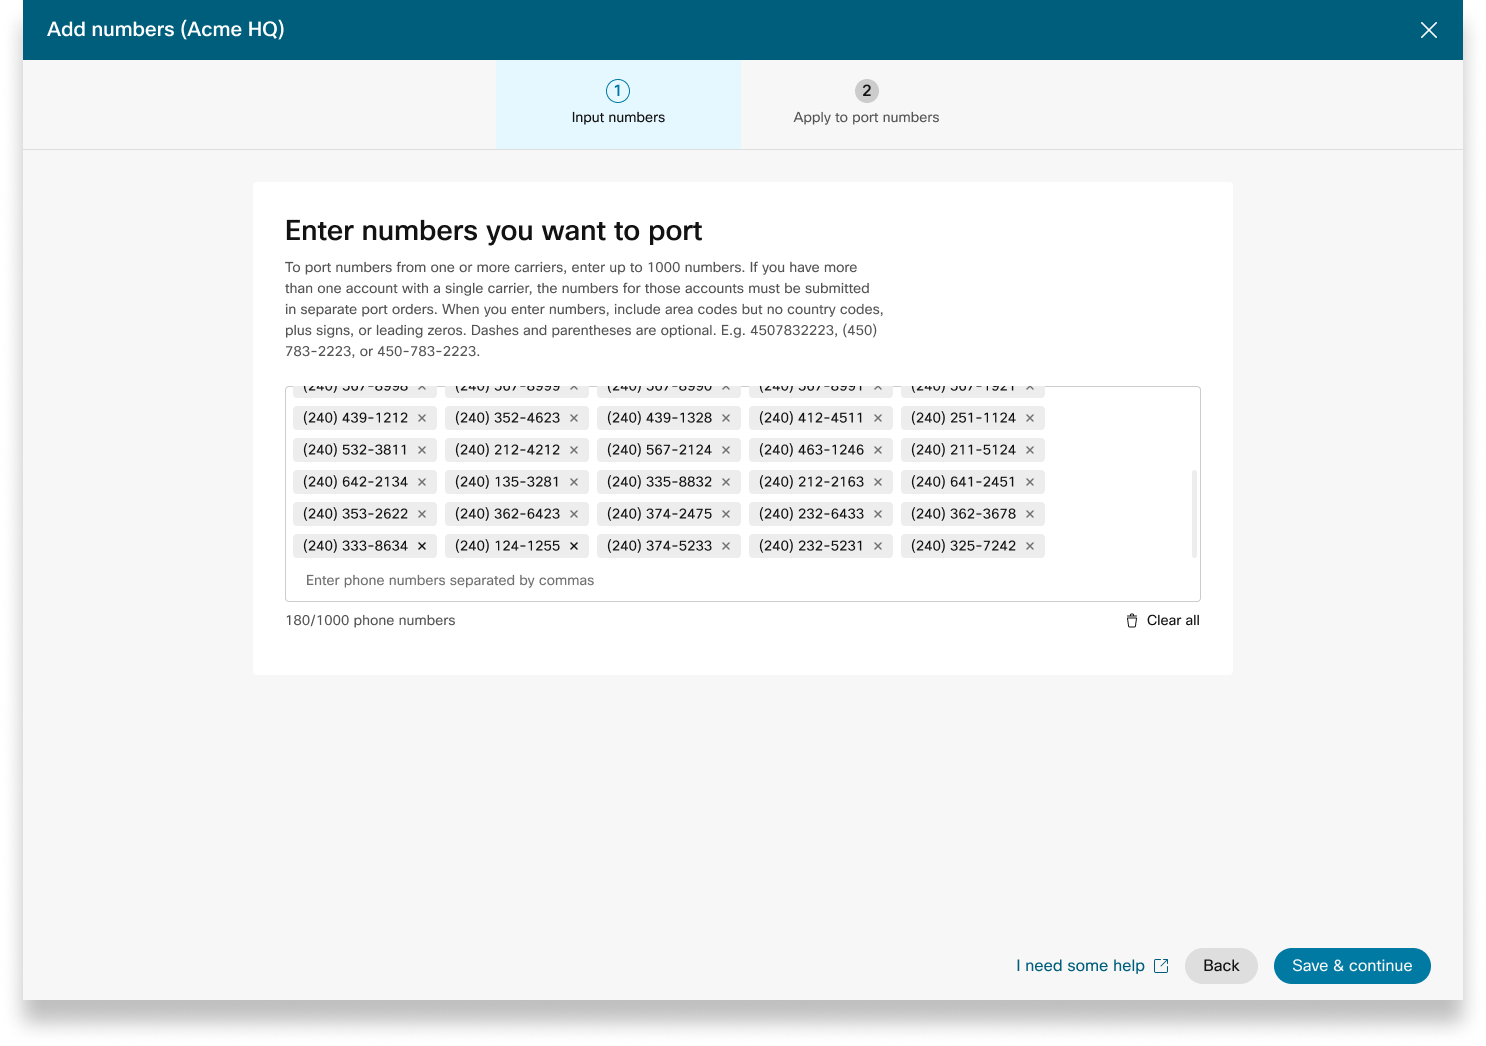
Select Port Numbers Over and click Next. |
| 6 |
Add the phone numbers that you want to port, and then click Save & continue. |
| 7 |
Enter the Date and Time by when you want the porting to finish. Set the schedule based on your preference. But it’s not guaranteed that the porting of your numbers is finished at the exact date and time selected. |
| 8 |
(Optional) Enter an additional email address, other than the default contact listed, to receive notifications regarding the port order status. |
| 9 |
Click Next. |
| 10 |
Enter your current carrier account information in the fields provided. Make sure this matches the information on your previous carrier’s bill. |
| 11 |
Click Next. |
| 12 |
Upload your previous carrier bill (not older than 30 days). |
| 13 |
Click Next. |
| 14 |
Upload the LOA. The authorized contact for your previous carrier’s account must upload the signed LOA. Open a ticket with Webex Partner Help Center to get the LOA required for your country and upload the signed copy here. If you're not the authorized contact, skip this step. That person can come back and upload the signed LOA later, we’ll send your order contacts a reminder. |
| 15 |
Click Save & continue. |
| 16 |
Your Port Order is submitted. You can check the order status in PSTN Orders. |
| 17 |
Click Done. Our support team contacts you for any additional documents requirements to complete your porting request. You can upload the requested documents in the right-hand panel of the order. The Firm Order Commitment (FOC) date can be two business days later from the submission date. An FOC is the date on which the losing carrier states that it releases a phone number to the winning carrier. After the losing carrier confirms the porting request, you can cancel or postpone the porting request as per the following rules: These time frames are estimates and aren’t bound by any SLA.
If porting takes place and you need to roll back the numbers to the previous carrier, raise such requests with the PTS team at the earliest. Rollbacks aren’t always possible and may require placing a port back request with the previous carrier. |
When placing orders for new numbers or porting existing numbers, you can check the order status or port rejection notices in Control Hub.
A migration banner is displayed when there are locations which need to be migrated from Non-Integrated CCP to Integrated CCP.
-
Sign in to Control Hub.
-
Go to .
Every order submitted has a status value.
Select an order to check its status.
Status Values for New Number Orders
|
Displayed Status |
Description |
|---|---|
|
Pending |
A New numbers order has been created by the user. |
|
Provisioned |
New numbers are provisioned. |
|
Error |
An issue is detected with the new numbers order. Create a TAC ticket to get help. |
|
Action Required |
Click to contact PTS for assistance. |
Status Values for Ported Number Orders
|
Displayed Status |
Description |
|---|---|
|
Pending |
User is in the process of creating/filling in details of the Porting Order. Once submitted, the order will still show Pending until Cisco validates and accepts the porting order. |
|
Rejected |
Porting issue is detected. See the Porting Errors table for additional details. If required, go to Control Hub and click on the PSTN Help link for PSTN technical support. |
|
Submitted |
Porting Order is validated and accepted. |
|
FOC Received |
FOC date confirmation from the previous PSTN provider received. |
|
Completed |
Porting process is complete. |
|
Canceled |
Order is canceled. |
Porting Error Messages
|
Displayed Error |
Description |
How to fix |
|---|---|---|
|
| ||
|
Account number mismatch |
Account number doesn’t match the number on the Customer Service Record (CSR) |
Update the Account Number field on the PSTN Order and resubmit. For some carriers, the account number may be the same as the BTN or the telephone number itself. |
|
Account number required |
The account number wasn't provided but is required. |
Update the Account Number field on the PSTN Order and resubmit. For some carriers, the account number may be the same as the BTN or the telephone number itself. |
|
Account name mismatch |
The person authorizing doesn't match the name on the (CSR). |
Update the Authorized name on account field on the PSTN order and resubmit. |
|
BTN mismatch |
BTN or ATN doesn’t match that on the CSR. |
Update the Carrier billing phone number field on the PSTN Order and resubmit. |
|
Company name mismatch |
Entity name does not match that on the CSR. |
Update the Company name with previous carrier field on the PSTN order and resubmit. |
|
Multiple BTNs |
The OSP requires this Porting Order to be split and submitted as separate orders. |
Cancel the current PSTN order and create a new, multiple PSTN Orders. Create one for each group of numbers that have the same BTN. |
|
FOC rejected by losing carrier |
The FOC date requested can’t be accommodated by the OSP. |
Update the Port Complete date field on the PSTN order and resubmit. |
|
Unknown |
Go to Control Hub and click on the PSTN Help link for PSTN technical support. |
Go to Control Hub and click on the PSTN Help link for PSTN technical support. |
|
Invalid PIN |
Passcode/PIN must be provided for wireless port. |
Update the PIN field on the PSTN order and resubmit. |
|
Pending order |
The OSP has a pending LSR on the account (for example, a port out or address change). |
Remove the telephone numbers in question from the PSTN order and resubmit. |
|
Pending main BTN |
BTN is one of the phone numbers being ported. User must indicate Porting Order Type, Remaining Numbers Action, and New Billing Phone Number accordingly. |
Remove the main BTN from the list of telephone numbers being ported and resubmit the order. Include the Main BTN into the last iteration of numbers (if porting numbers in multiple iterations). |
|
Service address mismatch |
The location info doesn't match that on the CSR. |
Update the Service address, State, and City fields and resubmit the order. |
|
TN has special feature |
Some of the phone numbers can't be ported because they have a special feature (for example, remote call forward). |
Remove numbers with special features from the PSTN order and resubmit. Or, unassign a special features from the numbers being ported. |
|
TN mismatch |
Some of the phone numbers don't belong to the end user. |
Remove one or more numbers in question and resubmit the order. |
|
TN not portable |
Some of the phone numbers can't be ported because they're inactive or aren't part of the end user's account. |
Try to remove one or more numbers in question and resubmit the PSTN order. |
|
Unsupported rate center |
The rate center isn't portable. |
Remove one or more numbers in question and resubmit the order. |
|
Zip/postal code mismatch |
Postal code doesn't match the one on the CSR. |
Update the Zip code field and resubmit the order. |
|
Previous carrier's bill is invalid |
The invoice is invalid. |
Go to PSTN Order details, then open Previous Carrier’s Bill section. Upload the correct bill file and resubmit the order. |
|
LOA invalid |
The LOA is invalid. |
Sign the LOA and resubmit the PSTN order. Alternatively, go to Control Hub and click on the PSTN Help link for PSTN technical support. |
PSTN – Public Switched Telephone Network
CSR – Customer Service Record
FOC – Firm Order Commitment
OSP – Old Service Provider
BTN – Billing Telephone Number
ATN – Account Telephone Number
To configure an ESA for an user, ensure the following conditions are met:
- The user has a non-mobile primary phone number assigned.
- The user’s location is within the U.S. or Canada.
These conditions are necessary because the ESA is tied to the user's phone number and location. This setup allows accurate routing of emergency calls and proper callback to the user through the Emergency Callback Number (ECBN) associated with their location or phone number.
| 1 |
Sign in to Control Hub. |
| 2 |
Go to . |
| 3 |
Select the user that you want to modify and click Calling. |
| 4 |
Select the right arrow to expand the primary phone number settings under Numbers. |
| 5 |
Under Emergency Service Address, select Custom Address. Enter the following details. In case of an emergency, the local emergency response crew will use this address to locate the caller.
|
| 6 |
Update the information for the workspace and click Validate. On entering a service address, the system validates the address. If the system cannot find the address, a Suggested Address displays in a side panel. Review the suggested address and click Apply to update the Emergency service address. Click Save , to save the changes. |
A custom emergency address overrides the location's default emergency address for the specific user.
| 1 |
Sign in to Control Hub. |
| 2 |
Go to and select the location you want to update. |
| 3 |
Next to PSTN Connection, click Manage. |
| 4 |
Next to the Emergency Service Address, click Edit. |
| 5 |
Enter the new address and click Save. If ESA (Enterprise Service Address) address validation fails while configuring premise or CCPP connections, administrators can close the ESA screen and continue with the setup. The validation failure will not prevent setting up the connection. If the ESA is not validated, emergency call handling may be delayed, and additional charges may apply if calls are routed to an emergency relay center. |
Webex Calling provides flexible Calling plans and the ability to choose the PSTN solution that fits the requirement. Over time you may have to migrate to a different PSTN solution due to changes in the business environment or other factors.
Use this matrix to know the potential PSTN migration paths for Webex Calling.
Webex Calling supports the following PSTN migration paths:
-
Using Self Service through Control Hub
-
Premises-based PSTN, non-integrated CCPP, and non-integrated IntelePeer to Cisco Calling Plans. See Migrate to Cisco Calling plans.
-
Non-integrated CCP Provider including non-integrated Intelepeer to a Premises-based Solution. See, Configure premises-based PSTN in Control Hub
-
Premises-based solution to non-integrated CCPP. You must update the connection type in Control Hub and select a CCPP partner. This type of migration does not require any further configuration.
-
-
Using Manual Migration
-
Premises-based solution to Integrated CCP Provider
-
Integrated CCP Provider to Non-integrated CCP Provider (Exception: Non-integrated Intelepeer isn’t supported as the target CCP Provider)
-
Integrated CCP Provider to Premises-based Solution
-
To use the manual migration process, you must create a new location, move TNs and users to the new location, and reconfigure site services/service assignments. During migration, you experience service interruption and there’s a risk of data loss.
Here’s a list of unsupported PSTN migration paths:
-
Cisco Calling Plans to integrated Intelepeer
-
Integrated Intelepeer to Cisco Calling Plans
The minimum required order is one Outbound Calling Plan (OCP). Billing includes charges for outbound calling plans, phone numbers, and international Calling usage. Your Cisco monthly billing invoice includes information on call activity, charges, and applicable fees and taxes. There’s no additional charge to port phone numbers.
When your billing begins:
-
Outbound Calling Plans ordered in CCW begin billing on the requested service date (RSD).
-
Outbound Calling Plans provisioned in Control Hub begin billing immediately.
-
Phone numbers provisioned in Control Hub begin billing immediately or, if ported from another provider, billing begins upon port completion.
Outbound calling plan rates:
-
Rates for the Outbound Calling Plans and phone numbers are prorated using the same proration method used to calculate the rates for the Webex Calling licenses.
-
International Calling rates vary by country and are billed the month following usage.
See Cisco Calling Plan bill for the details.
Cisco Calling Plans support is provided by various support divisions, depending on your need.
|
Support Division |
Purpose |
Contact Information |
|---|---|---|
|
Partner Help Desk (PHD) |
Partner how-to and/or documentation inquiries, Pre-quoting Regulatory Tax and other enquiries about the Cisco Calling Plans offering. |
North America: 1-844-613-6108 EMEA: +44 129 366 10 20 APAC: +61 3 7017 7272 Email: webexcalling-phd@cisco.com |
|
PSTN Technical Support (PTS) |
|
Go to Control Hub and click on PSTN Help link for PSTN technical support. |
|
TAC |
Issues with Control Hub functionality Issues with service, such as dropped calls, call quality issues, or service outages |
North America: 1-800-553-2447 EMEA: +32 2 704 5555 APAC: +61 2 8446 7411 Email: tac@cisco.com See also: |
|
Invoice & Collections |
VAT, Payment and other invoicing queries |
Contact the Collector on the Invoice via email or phone |
|
Cisco SaaS Support Team (CES) |
|
Refer Partner Support Playbook and Cisco Calling Plans FAQ Create a case through link below if the required information is not found in the playbook - https://customerservice.cloudapps.cisco.com/ |
You can select varied connections for multi-site applications. For example, you can select Cisco Calling Plans for one location, Cloud-Connected PSTN (CCP) for a second location, and Local Gateway for the third location. When choosing the Cisco Calling Plans, the following applies.
Requirements
-
Partners must be an authorized Webex Calling partner and have accepted the new Webex Calling addendum through enrollment into the Webex Calling PSTN program.
-
A minimum of one committed Outbound Calling Plan license must be purchased to enable access to all services associated with Cisco Calling Plans.
Limitations
-
Cisco Calling Plans are currently available to specified countries.
-
Existing Webex Calling locations or telephone numbers can only transition to Cisco Calling Plans in certain scenarios. For details on supported migration paths, refer Supported paths for PSTN migration section.
-
You can order a maximum of 100 new standard phone numbers at a time. Additional numbers can be placed as a separate order.
-
You can't order block of toll-free numbers.
-
Cisco Calling Plans aren’t supported with Webex Contact Center or authorized for use in which high-concurrent calls or high-volume calls or uncommonly short or long calls are made. For more information about Webex Contact Center, see Get started with Webex Contact Center.
-
With the exception of 911 calls, Cisco Calling Plans don't support calls to X11 services including directory service calls.
-
Some premium services and international destinations may not be available for operational purposes. If specific destinations which are not generally available are required, customers can open a support case to request availability.
The card view displays the PSTN provider available for the Webex Calling customer before configuring the PSTN location. The PSTN view displays both Providers and Orders.
You can apply the search filter to filter content based on Service Type and Market. Use the toggle option to change the view from Compact to Table. The compact view helps to resize the card to display the provider details without the service information.
The provider screen displays the various provider cards with the list of supported service types. The Providers section is classified into the following:
-
Preferred Calling providers
-
Certified Calling providers
-
Calling providers
Click the Learn More option on the card to view details of the provider. It displays Use the search field to select the PSTN service provider based on Cisco business relationship preference such as certified provider and Calling provider.
The providers include the following:
-
Provider summary
-
List of locations configured with this provider
-
List of markets that the provider is available for the supported services.
If the customer has PSTN locations where Calling services aren’t set up, the Select this provider action bar displays. Use this option to configure the service for the PSTN location.
The preferred view in the Control Hub displays the calling providers that the managing partner prefers to work. However, you can view all available calling providers with Webex Calling. This section provides the following:
-
Select the location from the drop-down menu.
-
Choose the subscription type for the users to use the Cisco Calling plans. Click Next.
-
Complete the fields for Contract Information and Emergency Service Address configuration.
The PSTN service set up is now complete.
Cisco Calling Plans are available for technical evaluation as part of the Webex Calling trial process. While Cisco Calling Plans trials are free to use, there are some neddotable limitations during the trial phase.
As you can convert the trial accounts to paid accounts, the required regulatory documentation, as mentioned in the 'Order New Phone Numbers' section under each country, is also mandatory for trial services. These documents are legally required by country regulators for our Telephone Number (TN) provisioning team to procure the numbers.
-
Each trial account can provision up to 10 standard telephone numbers from Cisco Calling Plans with Webex Calling. It isn’t permitted to provision more than 10 numbers per trial.
-
Only new, standard telephone numbers are supported in trials. Ported numbers, consecutive blocks, and inbound toll-free numbers aren’t supported on trial accounts. You also cannot port numbers out of a trial. You must convert to a paid account if you wish to use these features.
-
International calling, along with Premium Service Call types I & II are blocked from use during the trial period.
-
Business Texting isn’t available on Webex Calling trial accounts.
-
Trial accounts are intended for technical evaluation purposes only, and not for normal commercial operation. As such, emergency services are only meant for technical evaluation; actual emergency calls can’t be guaranteed. Users shouldn’t place actual emergency service calls on a trial account.
When placing an order to convert a Webex Calling trial with Cisco Calling Plans to a paid subscription, you must order at least one Cisco Calling Plan committed license to maintain the telephone numbers and configuration used in the trial.
-
Cisco Calling Plans (Cisco PSTN)
-
Cloud Connected PSTN
-
Premise-based PSTN (Local Gateway must be enabled separately. For more information, see Configure Premises-based PSTN in Control Hub.)
| 1 |
Sign in to Control Hub. |
| 2 |
Go to and select the location you want to update. |
| 3 |
Select the Calling tab and Click Manage next to PTSN Connection. |
| 4 |
Select Cisco Calling Plans and click Next. |
| 5 |
Enter the contact information and click Next. This field is for the contact information of the person who will sign the legal contract with Cisco. |
| 6 |
Enter the Emergency Services Address (ESA), and click Save. By default, the ESA entered here is applied to all phone numbers for this location. You can change the ESA for an individual user if needed. For example, you may need to change the ESA if you have a remote employee who works from home. |
| 7 |
On the summary screen, do one of the following:
|
Before you begin
-
The Cisco Calling Plan must be enabled for your site before you can order new phone numbers, including toll-free numbers, through Control Hub.
-
When requesting new numbers, you can enter specific numbers or a block of consecutive numbers. You can also allow the system to assign numbers from the search inventory based on the country, state, area code, and prefix you select.
-
By default, the Emergency Service Address (ESA) entered for a location during your Cisco Calling Plan setup applies to all phone numbers for that location.
-
If the location subscription has the Service Number license, you can add the numbers as a Service Number.
-
You can modify the existing Standard Number to Service Number in a Cisco Calling Plan location with the Service Number license.
-
You can move Service Numbers between Cisco Calling Plan locations with the Service Number license.
| 1 |
Sign in to Control Hub. |
| 2 |
Go to .
|
| 3 |
From the Manage drop-down select Add. |
| 4 |
Choose a Location and PSTN Number in Number Type drop-down on add numbers page. |
| 5 |
Select Order New Numbers and click Next. |
| 6 |
Choose one of the following options:
|
| 7 |
Specify the numbers that you want to order by selecting the Country, State, and the Area Code or City to search by. |
| 8 |
Enter how many numbers you want auto-selected for you and click Search. You’re provided a list of available numbers based on your selected criteria. |
| 9 |
Select the type of number to order from:
|
| 10 |
Click the numbers that you would like to order, then click Order. The numbers you selected appears in the cart.
|
| 11 |
On the order submission confirmation page, select PSTN Orders to check your order status. |
| 12 |
Accept the Terms of Service to activate the new numbers. The Terms of Service link is only available to customer administrators. Partners only see a message that the Terms of Service must be signed by the customer. |
With the Cisco Calling Plan, you can order blocks of telephone numbers directly from Cisco through Control Hub.
Before you begin
-
Ordering blocks of numbers is only available for customers with a paid subscription.
-
The maximum number of block numbers that can be ordered is 100.
-
Numbers ordered in a block can only be deleted if the entire block is deleted.
-
By default, the Emergency Service Address (ESA) entered for a location during your Cisco Calling Plan setup is applied to all phone numbers for that location.
| 1 |
Sign in to Control Hub. |
| 2 |
Go to .
|
| 3 |
From the Manage drop-down select Add. |
| 4 |
Choose a Location and PSTN Number in Number Type drop-down on add numbers page and then click Next. |
| 5 |
Select Order New Numbers, click Next. |
| 6 |
Select the toggle for Get a Set of Numbers that Follow Each Other in Order. |
| 7 |
From the drop-down, select the quantity of block numbers needed. |
| 8 |
Specify State and use either Area Code/Prefix or City as your search criteria, and click Search. |
| 9 |
Select from the list of available blocks of numbers provided, based on your search criteria, and click Order. |
| 10 |
On the order submission confirmation page, select the PSTN Orders to check your order status. This brings you to the PSTN Orders page. |
| 11 |
Accept the Terms of Service to activate the new numbers. |
Before you begin
We strongly recommend you to read and familiarize yourself with the Cisco Calling Plan Number Porting Guidelines and Policies before you start porting the numbers.
-
Enable Cisco Calling Plan for your site before you port in phone numbers through Control Hub.
-
A signed Letter of Agency (LOA) is needed, authorizing Cisco to place orders with the current PSTN carrier to move the service to Cisco. The current account owner or authorized signer must sign the LOA. You're prompted to sign the LOA while completing the porting steps.
-
Ensure you have a recent bill from the last 30 days in PNG or PDF format from your current PSTN provider. While porting, you’re prompted to upload a copy of your bill.
-
To ensure a successful port in, make sure you have the following information ready:
-
List of all phone numbers to port
-
Current PSTN provider account information
-
Customer Service Record (CSR) if available
-
Your account PIN, if one exists
When porting numbers and choosing the numbers to port in, we recommend that you consider any number that receives inbound calls. See Cisco Calling Plan Number Porting Guidelines and Policies for more information.
-
-
By default, the Emergency Service Address (ESA) entered for a location during your Cisco Calling Plan setup is applied to all phone numbers for that location.
When you request to port a number, only Calling services related to the number are ported in the United States and Canada. For porting numbers for Messaging services, see Enable business texting for more information.
| 1 |
Sign in to Control Hub. |
| 2 |
Go to .
|
| 3 |
Choose a Location in the Add New Numbers page. |
| 4 |
From the Manage drop-down select Add. |
| 5 |
Choose a Location and PSTN Number in Number Type on add numbers page, then click Next. |
| 6 |
Select Port Numbers Over and click Next. |
| 7 |
You can choose to add the numbers as:
You can only select Service Number if your Cisco Calling Plan for your location has a Service Number license. Contact your Partner to allow you to purchase Service Numbers for your subscription. |
| 8 |
Add the phone number that you want to port over, and then click Save & continue. A portability check is automatically run when you enter the numbers. Highlighted numbers are non-portable. PSTN Technical Support supports further review of these instances. You can add up to 1000 phone numbers.
|
| 9 |
In the PSTN order details section, your default contact email address is displayed on which you will receive port order status. Add an email address in Additional contacts if you want to receive email notification on more email addresses. Click Next. |
| 10 |
Enter your account information with your current provider. Make sure that the information entered matches your current provider bill. Click Next. |
| 11 |
Upload a bill from your previous provider. Make sure that the bill is from the last 30 days and is in PNG or PDF format. Click Next. |
| 12 |
For phone numbers, enter your first and last name and job title to sign the Letter of Agency (LOA). Click Sign & Submit. |
| 13 |
(Optional) If you are porting in toll free numbers, then follow these steps to sign an LOA:
|
| 14 |
Review your order and click Next. |
| 15 |
The order submission screen shows a summary of your port in order. Click Done. Control Hub conducts a preliminary error check before you submit a port in order. If there are any issues found with a port order, administrators receive an email notification, and an error message appears on the PSTN Orders screen.
Business texting can be enabled after the phone numbers have been successfully ported. See Enable business texting for more information. |
When placing orders for new numbers or porting in existing numbers, you can check the order status or port rejection notices in Control Hub.
A migration banner displays when there are locations to migrate from Non-Integrated CCP to Integrated CCP.
-
From the customer view in https://admin.webex.com, go to Calling and then click PSTN.
A status is assigned for every order.
-
Go to .
A status is assigned for every order.
Select an order to check its status.
-
For Toll free porting order, click on a pending order to check if any information is required in this order.
- Click Additional Information. It shows if any
account information or bill upload is pending.
-
In Additional information section, you can click action required and add information as required.
If you update any account information or due date of an order, you have to sign the Letter of Agency (LAO) agreement again. You can sign an LOA agreement only after all the required actions are completed.
- Click Additional Information. It shows if any
account information or bill upload is pending.
Status values for New Number Orders
|
Displayed Status |
Description |
|---|---|
|
Pending |
New numbers order is created by the user. |
|
Provisioned |
New numbers are provisioned. |
|
Error |
An issue is detected with the new numbers order. Create a TAC ticket to get help. |
Status Values for Ported Number Orders
|
Displayed Status |
Description |
|---|---|
|
Pending |
User is in the process of creating/filling in details of the Porting Order. Once submitted, the order will still show Pending until Cisco validates and accepts the porting order. |
|
Action Required |
This status is displayed when any information is pending, such as account information, due date, or required documentation. |
|
Rejected |
Porting issue is detected. See the Porting Errors table for additional details. Alternatively, go to Control Hub and click on the PSTN Help link for PSTN technical support. |
|
Submitted |
Porting Order is validated and accepted. |
|
FOC Received |
FOC date confirmation from the previous PSTN provider received. |
|
Completed |
Porting process is complete. |
|
Canceled |
Order is canceled. |
Porting Error Messages
|
Displayed Error |
Description |
How to fix |
|---|---|---|
|
| ||
|
Account number mismatch |
Account number does not match the number on the Customer Service Record (CSR) |
Update the Account Number field on the PSTN Order and resubmit. For some carriers, the account number may be the same as the BTN or the telephone number itself. |
|
Account number required |
The account number wasn't provided but is required. |
Update the Account Number field on the PSTN Order and resubmit. For some carriers, the account number may be the same as the BTN or the telephone number itself. |
|
Account name mismatch |
The person authorizing doesn't match the name on the (CSR). |
Update the Authorized name on account field on the PSTN order and resubmit. |
|
BTN mismatch |
BTN or ATN does not match that on the CSR. |
Update the Carrier billing phone number field on the PSTN Order and resubmit. |
|
Company name mismatch |
Entity name does not match that on the CSR. |
Update the Company name with previous carrier field on the PSTN order and resubmit. |
|
Multiple BTNs |
The OSP requires this Porting Order to be split and submitted as separate orders. |
Cancel the current PSTN order and create new, multiple PSTN Orders. Create one for each group of numbers that have the same BTN. |
|
FOC rejected by losing carrier |
The FOC date requested cannot be accommodated by the OSP. |
Update the Port Complete date field on the PSTN order and resubmit. |
|
Unknown |
Go to Control Hub and click on PSTN Help link for PSTN technical support. |
Go to Control Hub and click on PSTN Help link for PSTN technical support. |
|
Invalid PIN |
Passcode/PIN must be provided for wireless port. |
Update the PIN field on the PSTN order and resubmit. |
|
Pending order |
The OSP has a pending LSR on the account (for example, a port out or address change). |
Remove the telephone numbers in question from the PSTN order and resubmit. |
|
Pending main BTN |
BTN is one of the phone numbers being ported. User must indicate Porting Order Type, Remaining Numbers Action, and New Billing Phone Number accordingly. |
Remove the main BTN from the list of telephone numbers being ported and resubmit the order. Please include the Main BTN into the last iteration of numbers (if porting numbers in multiple iterations). |
|
Service address mismatch |
The location info doesn't match that on the CSR. |
Update the Service address, State, and City fields and resubmit the order. |
|
TN has special feature |
Some of the phone numbers can't be ported because they have a special feature (for example, remote call forward). |
Remove number(s) with special features from the PSTN order and resubmit. Or, unassign special feature from the numbers being ported. |
|
TN mismatch |
Some of the phone numbers don't belong to the end user. |
Remove the number(s) in question and resubmit the order. |
|
TN not portable |
Some of the phone numbers can't be ported because they're inactive or aren't part of the end user's account. |
Try to remove the number(s) in question and resubmit the PSTN order. |
|
Unsupported rate center |
The rate center isn't portable. |
Remove the number(s) in question and resubmit the order. |
|
Zip/postal code mismatch |
Postal code doesn't match the one on the CSR. |
Update the Zip code field and resubmit the order. |
|
Previous carrier's bill is invalid |
The invoice is invalid. |
Go to PSTN Order details, then open Previous Carrier’s Bill section. Upload the correct bill file and resubmit the order. |
|
LOA invalid |
The LOA is invalid. |
Sign the LOA and resubmit the PSTN order. Alternatively, go to Control Hub and click on the PSTN Help link for PSTN technical support. |
PSTN – Public Switched Telephone Network
CSR – Customer Service Record
FOC – Firm Order Commitment
OSP – Old Service Provider
BTN – Billing Telephone Number
ATN – Account Telephone Number
To configure an ESA for an user, ensure the following conditions are met:
- The user has a non-mobile primary phone number assigned.
- The user’s location is within the U.S. or Canada.
These conditions are necessary because the ESA is tied to the user's phone number and location. This setup allows accurate routing of emergency calls and proper callback to the user through the Emergency Callback Number (ECBN) associated with their location or phone number.
| 1 |
Sign in to Control Hub. |
| 2 |
Go to . |
| 3 |
Select the user that you want to modify and click Calling. |
| 4 |
Select the right arrow to expand the primary phone number settings under Numbers. |
| 5 |
Under Emergency Service Address, select Custom Address. Enter the following details. In case of an emergency, the local emergency response crew will use this address to locate the caller.
|
| 6 |
Update the information for the workspace and click Validate. On entering a service address, the system validates the address. If the system cannot find the address, a Suggested Address displays in a side panel. Review the suggested address and click Apply to update the Emergency service address. Click Save , to save the changes. |
A custom emergency address overrides the location's default emergency address for the specific user.
| 1 |
Sign in to Control Hub. |
| 2 |
Go to and select the location you want to update. |
| 3 |
Next to PSTN Connection, click Manage. |
| 4 |
Next to the Emergency Service Address, click Edit. |
| 5 |
Enter the new address and click Save. If ESA (Enterprise Service Address) address validation fails while configuring premise or CCPP connections, administrators can close the ESA screen and continue with the setup. The validation failure will not prevent setting up the connection. If the ESA is not validated, emergency call handling may be delayed, and additional charges may apply if calls are routed to an emergency relay center. |
Webex Calling provides flexible Calling plans and the ability to choose the PSTN solution that fits the requirement. Over time you may have to migrate to a different PSTN solution due to changes in the business environment or other factors.
Use this matrix to know the potential PSTN migration paths for Webex Calling.
Webex Calling supports the following PSTN migration paths:
-
Using Self Service through Control Hub
-
Premises-based PSTN, non-integrated CCPP, and non-integrated IntelePeer to Cisco Calling Plans. See Migrate to Cisco Calling plans.
-
Non-integrated CCP Provider including non-integrated Intelepeer to a Premises-based Solution. See, Configure premises-based PSTN in Control Hub
-
Premises-based solution to non-integrated CCPP. You must update the connection type in Control Hub and select a CCPP partner. This type of migration does not require any further configuration.
-
-
Using Manual Migration
-
Premises-based solution to Integrated CCP Provider
-
Integrated CCP Provider to Non-integrated CCP Provider (Exception: Non-integrated Intelepeer isn’t supported as the target CCP Provider)
-
Integrated CCP Provider to Premises-based Solution
-
To use the manual migration process, you must create a new location, move TNs and users to the new location, and reconfigure site services/service assignments. During migration, you experience service interruption and there’s a risk of data loss.
Here’s a list of unsupported PSTN migration paths:
-
Cisco Calling Plans to integrated Intelepeer
-
Integrated Intelepeer to Cisco Calling Plans
The minimum required order is one Outbound Calling Plan (OCP). Billing includes charges for outbound calling plans, phone numbers, and international Calling usage. Your Cisco monthly billing invoice includes information on call activity, charges, and applicable fees and taxes. There’s no additional charge to port phone numbers.
When your billing begins:
-
Outbound Calling Plans ordered in CCW begin billing on the requested service date (RSD).
-
Outbound Calling Plans provisioned in Control Hub begin billing immediately.
-
Phone numbers provisioned in Control Hub begin billing immediately or, if ported from another provider, billing begins upon port completion.
Outbound calling plan rates:
-
Rates for the Outbound Calling Plans and phone numbers are prorated using the same proration method used to calculate the rates for the Webex Calling licenses.
-
International Calling rates vary by country and are billed the month following usage.
See Cisco Calling Plan bill for the details.
Cisco Calling Plans support is provided by various support divisions, depending on your need.
|
Support Division |
Purpose |
Contact Information |
|---|---|---|
|
Partner Help Desk (PHD) |
Partner how-to and/or documentation inquiries, Pre-quoting Regulatory Tax and other enquiries about the Cisco Calling Plans offering. |
North America: 1-844-613-6108 EMEA: +44 129 366 10 20 APAC: +61 3 7017 7272 Email: webexcalling-phd@cisco.com |
|
PSTN Technical Support (PTS) |
|
Go to Control Hub and click on PSTN Help link for PSTN technical support. |
|
TAC |
Issues with Control Hub functionality Issues with service, such as dropped calls, call quality issues, or service outages |
North America: 1-800-553-2447 EMEA: +32 2 704 5555 APAC: +61 2 8446 7411 Email: tac@cisco.com See also: |
|
Invoice & Collections |
VAT, Payment and other invoicing queries |
Contact the Collector on the Invoice via email or phone |
|
Cisco SaaS Support Team (CES) |
|
Refer Partner Support Playbook and Cisco Calling Plans FAQ Create a case through link below if the required information is not found in the playbook - https://customerservice.cloudapps.cisco.com/ |
You can select varied connections for multi-site applications. For example, you can select Cisco Calling Plans for one location, Cloud-Connected PSTN (CCP) for a second location, and Local Gateway for the third location. When choosing the Cisco Calling Plans, the following applies.
Requirements
-
Partners must be an authorized Webex Calling partner and have accepted the new Webex Calling addendum through enrollment into the Webex Calling PSTN program.
-
A minimum of one committed Outbound Calling Plan license must be purchased to enable access to all services associated with Cisco Calling Plans.
Limitations
-
Cisco Calling Plans are currently available to specified countries.
-
Existing Webex Calling locations or telephone numbers can only transition to Cisco Calling Plans in certain scenarios. For details on supported migration paths, refer Supported paths for PSTN migration section.
-
You can order a maximum of 100 new standard phone numbers at a time. Additional numbers can be placed as a separate order.
-
Toll-free numbers aren’t currently available. You can’t order new toll-free numbers or port existing toll-free numbers to the Cisco Calling Plans.
-
Cisco Calling Plans aren’t supported with Webex Contact Center or authorized for use in which high-concurrent calls or high-volume calls or uncommonly short or long calls are made. For more information about Webex Contact Center, see Get started with Webex Contact Center.
-
Some premium services and international destinations may not be available for operational purposes. If specific destinations which are not generally available are required, customers can open a support case to request availability.
The card view displays the PSTN provider available for the Webex Calling customer before configuring the PSTN location. The PSTN view displays both Providers and Orders.
You can apply the search filter to filter content based on Service Type and Market. Use the toggle option to change the view from Compact to Table. The compact view helps to resize the card to display the provider details without the service information.
The provider screen displays the various provider cards with the list of supported service types. The Providers section is classified into the following:
-
Preferred Calling providers
-
Certified Calling providers
-
Calling providers
Click the Learn More option on the card to view details of the provider. It displays Use the search field to select the PSTN service provider based on Cisco business relationship preference such as certified provider and Calling provider.
The providers include the following:
-
Provider summary
-
List of locations configured with this provider
-
List of markets that the provider is available for the supported services.
If the customer has PSTN locations where Calling services aren’t set up, the Select this provider action bar displays. Use this option to configure the service for the PSTN location.
The preferred view in the Control Hub displays the calling providers that the managing partner prefers to work. However, you can view all available calling providers with Webex Calling. This section provides the following:
-
Select the location from the drop-down menu.
-
Choose the subscription type for the users to use the Cisco Calling plans. Click Next.
-
Complete the fields for Contract Information and Emergency Service Address configuration.
The PSTN service set up is now complete.
Cisco Calling Plans are available for technical evaluation as part of the Webex Calling trial process. While Cisco Calling Plans trials are free to use, there are some neddotable limitations during the trial phase.
As you can convert the trial accounts to paid accounts, the required regulatory documentation, as mentioned in the 'Order New Phone Numbers' section under each country, is also mandatory for trial services. These documents are legally required by country regulators for our Telephone Number (TN) provisioning team to procure the numbers.
-
Each trial account can provision up to 10 standard telephone numbers from Cisco Calling Plans with Webex Calling. It isn’t permitted to provision more than 10 numbers per trial.
-
Only new, standard telephone numbers are supported in trials. Ported numbers, consecutive blocks, and inbound toll-free numbers aren’t supported on trial accounts. You also cannot port numbers out of a trial. You must convert to a paid account if you wish to use these features.
-
International calling, along with Premium Service Call types I & II are blocked from use during the trial period.
-
Business Texting isn’t available on Webex Calling trial accounts.
-
Trial accounts are intended for technical evaluation purposes only, and not for normal commercial operation. As such, emergency services are only meant for technical evaluation; actual emergency calls can’t be guaranteed. Users shouldn’t place actual emergency service calls on a trial account.
When placing an order to convert a Webex Calling trial with Cisco Calling Plans to a paid subscription, you must order at least one Cisco Calling Plan committed license to maintain the telephone numbers and configuration used in the trial.
-
Cisco Calling Plans (Cisco PSTN)
-
Cloud Connected PSTN
-
Premise-based PSTN (Local Gateway must be enabled separately. For more information, see Configure Premises-based PSTN in Control Hub.)
| 1 |
Sign in to Control Hub. |
| 2 |
Go to and select the location you want to update. |
| 3 |
Select the Calling tab and Click Manage next to PTSN Connection. |
| 4 |
Select Cisco Calling Plans and click Next. |
| 5 |
Enter the contact information and click Next. This field is for the contact information of the person who will sign the legal contract with Cisco. |
| 6 |
Enter the Emergency Services Address (ESA), and click Save. By default, the ESA entered here is applied to all phone numbers for this location. You can change the ESA for an individual user if needed. For example, you may need to change the ESA if you have a remote employee who works from home. |
| 7 |
On the summary screen, do one of the following:
|
Before you begin
-
Enable the Cisco Calling Plan for your site before you order new phone numbers through Control Hub.
-
By default, the Emergency Service Address (ESA) entered for a location during your Cisco Calling Plan setup is applied to all phone numbers for that location.
- Provide the following information for business identity verification:
- First name and last name of the legal representative
- Contact phone number
- Company name
- Local company registration certificate
- Provide the following information for address verification:
- Address matching the DID area code (street, building number, postal code, city, and country)
- Proof of address, not older than last three months
Additionally, you must submit a copy of your passport or ID card in the Netherlands, Switzerland, Poland, Greece, and Lithuania. You must provide VAT ID in Sweden and Greece.
| 1 |
Click Contact Support. Your location information is automatically populated on the Case Details window. |
| 2 |
Indicate how many new numbers you’re requesting in the Number of Telephone Numbers Requested field. |
| 3 |
From the Number Type drop-down list, choose Local or National as the case maybe. |
| 4 |
(Optional) Enter the additional details. |
| 5 |
Click Submit. You receive a PSTN Order Number which displays on the PSTN order page. It can take up to five to seven business days for the ordering and document approval process. |
Before you begin
We strongly recommend you to read and familiarize yourself with the Cisco Calling Plan Number Porting Guidelines and Policies before you start porting the numbers.
-
Enable Cisco Calling Plan for your location before you port in phone numbers through Control Hub.
-
Require a signed Letter of Agency (LOA), authorizing Cisco to place orders with the current PSTN carrier to move the service to Cisco. The LOA must be signed by the current account owner or authorized signer. You're prompted to sign the LOA while completing the porting steps.
-
Make sure you have a recent bill in PNG or PDF format from your current PSTN provider. The bill must not be older than 30 days. While completing the porting steps, you’re prompted to upload a copy of your bill.
-
For successful porting, ensure that you have the following information ready:
-
List of all phone numbers to port (non-toll free)
-
Current PSTN provider account information
-
Customer Service Record (CSR) if available
-
Your account PIN if one exists
-
VAT number or Tax ID
Certain countries require these additional documents:
-
Belgium
Proof of Local Address (Utility Bill and so on), dated within the last three months
-
Netherlands
-
Proof of Local Address (Utility Bill, and so on) dated within the last three months
-
Company registration document
-
-
Poland
-
Company registration document
-
Valid Passport/ID Card of the authorizing person
-
-
-
When planning for which numbers to port in, we recommend that you consider any number that receives inbound calls. See Cisco Calling Plan Number Policy for more information.
-
By default, the Emergency Service Address (ESA) entered for a location during your Cisco Calling Plan setup applies to all phone numbers for that location.
As an administrator, you can move existing phone numbers from your current PSTN to the Cisco Calling Plan option. The following are the types of porting services:
- Standard port: When a phone number moves from one service provider to another, without any special circumstances. For example, porting a number from Carrier A to Carrier B within the same country and service area is a Standard port.
- Mixed operator port: A more complex porting situation that involves multiple operators or service providers. For example, porting a range of numbers in a block that belongs to two or more network operators is a Mixed operator port.
Porting of numbers is done in a fixed time slot in the following countries:
| Porting time slot | Countries |
|---|---|
| Monday to Friday between 8 a.m. to 3 p.m. | Switzerland, Belgium, Sweden |
| Monday to Friday between 9 a.m. to 4 p.m. | Netherlands, Lithuania, Luxembourg, Denmark |
| Monday to Friday between 8 a.m. to 5 p.m. | Finland |
Requests for porting out of hours are on a case-by-case basis and depend on the carriers involved. We can’t guarantee that out of hours porting is available.
| 1 |
Sign in to Control Hub. |
| 2 |
Go to . |
| 3 |
From the Manage drop-down select Add. |
| 4 |
Choose a Location and PSTN Number in Number Type drop-down on add numbers page and then click Next. |
| 5 |
Select Port Numbers Over and click Next. |
| 6 |
Add the phone numbers that you want to port, and then click Save & continue. |
| 7 |
Enter the Date and Time by when you want the porting to finish. Set the schedule based on your preference. But it’s not guaranteed that the porting of your numbers is finished at the exact date and time selected. |
| 8 |
(Optional) Enter an additional email address, other than the default contact listed, to receive notifications regarding the port order status. |
| 9 |
Click Next. |
| 10 |
Enter your current carrier account information in the fields provided. Make sure this matches the information on your previous carrier’s bill. |
| 11 |
Click Next. |
| 12 |
Upload your previous carrier bill (not older than 30 days). |
| 13 |
Click Next. |
| 14 |
Upload the LOA. The authorized contact for your previous carrier’s account must upload the signed LOA. Open a ticket with Webex Partner Help Center to get the LOA required for your country and upload the signed copy here. If you're not the authorized contact, skip this step. That person can come back and upload the signed LOA later, we’ll send your order contacts a reminder. |
| 15 |
Click Save & continue. |
| 16 |
Your Port Order is submitted. You can check the order status in PSTN Orders. |
| 17 |
Click Done. Our support team contacts you for any additional documents requirements to complete your porting request. You can upload the requested documents in the right-hand panel of the order. The Firm Order Commitment (FOC) date can be two business days later from the submission date. An FOC is the date on which the losing carrier states that it releases a phone number to the winning carrier. After the losing carrier confirms the porting request, you can cancel or postpone the porting request as per the following rules: These time frames are estimates and aren’t bound by any SLA.
If porting takes place and you need to roll back the numbers to the previous carrier, raise such requests with the PTS team at the earliest. Rollbacks aren’t always possible and may require placing a port back request with the previous carrier. |
When placing orders for new numbers or porting existing numbers, you can check the order status or port rejection notices in Control Hub.
A migration banner is displayed when there are locations which need to be migrated from Non-Integrated CCP to Integrated CCP.
-
Sign in to Control Hub.
-
Go to .
Every order submitted has a status value.
Select an order to check its status.
Status Values for New Number Orders
|
Displayed Status |
Description |
|---|---|
|
Pending |
A New numbers order has been created by the user. |
|
Provisioned |
New numbers are provisioned. |
|
Error |
An issue is detected with the new numbers order. Create a TAC ticket to get help. |
|
Action Required |
Click to contact PTS for assistance. |
Status Values for Ported Number Orders
|
Displayed Status |
Description |
|---|---|
|
Pending |
User is in the process of creating/filling in details of the Porting Order. Once submitted, the order will still show Pending until Cisco validates and accepts the porting order. |
|
Rejected |
Porting issue is detected. See the Porting Errors table for additional details. If required, go to Control Hub and click on the PSTN Help link for PSTN technical support. |
|
Submitted |
Porting Order is validated and accepted. |
|
FOC Received |
FOC date confirmation from the previous PSTN provider received. |
|
Completed |
Porting process is complete. |
|
Canceled |
Order is canceled. |
Porting Error Messages
|
Displayed Error |
Description |
How to fix |
|---|---|---|
|
| ||
|
Account number mismatch |
Account number doesn’t match the number on the Customer Service Record (CSR) |
Update the Account Number field on the PSTN Order and resubmit. For some carriers, the account number may be the same as the BTN or the telephone number itself. |
|
Account number required |
The account number wasn't provided but is required. |
Update the Account Number field on the PSTN Order and resubmit. For some carriers, the account number may be the same as the BTN or the telephone number itself. |
|
Account name mismatch |
The person authorizing doesn't match the name on the (CSR). |
Update the Authorized name on account field on the PSTN order and resubmit. |
|
BTN mismatch |
BTN or ATN doesn’t match that on the CSR. |
Update the Carrier billing phone number field on the PSTN Order and resubmit. |
|
Company name mismatch |
Entity name does not match that on the CSR. |
Update the Company name with previous carrier field on the PSTN order and resubmit. |
|
Multiple BTNs |
The OSP requires this Porting Order to be split and submitted as separate orders. |
Cancel the current PSTN order and create a new, multiple PSTN Orders. Create one for each group of numbers that have the same BTN. |
|
FOC rejected by losing carrier |
The FOC date requested can’t be accommodated by the OSP. |
Update the Port Complete date field on the PSTN order and resubmit. |
|
Unknown |
Go to Control Hub and click on the PSTN Help link for PSTN technical support. |
Go to Control Hub and click on the PSTN Help link for PSTN technical support. |
|
Invalid PIN |
Passcode/PIN must be provided for wireless port. |
Update the PIN field on the PSTN order and resubmit. |
|
Pending order |
The OSP has a pending LSR on the account (for example, a port out or address change). |
Remove the telephone numbers in question from the PSTN order and resubmit. |
|
Pending main BTN |
BTN is one of the phone numbers being ported. User must indicate Porting Order Type, Remaining Numbers Action, and New Billing Phone Number accordingly. |
Remove the main BTN from the list of telephone numbers being ported and resubmit the order. Include the Main BTN into the last iteration of numbers (if porting numbers in multiple iterations). |
|
Service address mismatch |
The location info doesn't match that on the CSR. |
Update the Service address, State, and City fields and resubmit the order. |
|
TN has special feature |
Some of the phone numbers can't be ported because they have a special feature (for example, remote call forward). |
Remove numbers with special features from the PSTN order and resubmit. Or, unassign a special features from the numbers being ported. |
|
TN mismatch |
Some of the phone numbers don't belong to the end user. |
Remove one or more numbers in question and resubmit the order. |
|
TN not portable |
Some of the phone numbers can't be ported because they're inactive or aren't part of the end user's account. |
Try to remove one or more numbers in question and resubmit the PSTN order. |
|
Unsupported rate center |
The rate center isn't portable. |
Remove one or more numbers in question and resubmit the order. |
|
Zip/postal code mismatch |
Postal code doesn't match the one on the CSR. |
Update the Zip code field and resubmit the order. |
|
Previous carrier's bill is invalid |
The invoice is invalid. |
Go to PSTN Order details, then open Previous Carrier’s Bill section. Upload the correct bill file and resubmit the order. |
|
LOA invalid |
The LOA is invalid. |
Sign the LOA and resubmit the PSTN order. Alternatively, go to Control Hub and click on the PSTN Help link for PSTN technical support. |
PSTN – Public Switched Telephone Network
CSR – Customer Service Record
FOC – Firm Order Commitment
OSP – Old Service Provider
BTN – Billing Telephone Number
ATN – Account Telephone Number
To configure an ESA for an user, ensure the following conditions are met:
- The user has a non-mobile primary phone number assigned.
- The user’s location is within the U.S. or Canada.
These conditions are necessary because the ESA is tied to the user's phone number and location. This setup allows accurate routing of emergency calls and proper callback to the user through the Emergency Callback Number (ECBN) associated with their location or phone number.
| 1 |
Sign in to Control Hub. |
| 2 |
Go to . |
| 3 |
Select the user that you want to modify and click Calling. |
| 4 |
Select the right arrow to expand the primary phone number settings under Numbers. |
| 5 |
Under Emergency Service Address, select Custom Address. Enter the following details. In case of an emergency, the local emergency response crew will use this address to locate the caller.
|
| 6 |
Update the information for the workspace and click Validate. On entering a service address, the system validates the address. If the system cannot find the address, a Suggested Address displays in a side panel. Review the suggested address and click Apply to update the Emergency service address. Click Save , to save the changes. |
A custom emergency address overrides the location's default emergency address for the specific user.
| 1 |
Sign in to Control Hub. |
| 2 |
Go to and select the location you want to update. |
| 3 |
Next to PSTN Connection, click Manage. |
| 4 |
Next to the Emergency Service Address, click Edit. |
| 5 |
Enter the new address and click Save. If ESA (Enterprise Service Address) address validation fails while configuring premise or CCPP connections, administrators can close the ESA screen and continue with the setup. The validation failure will not prevent setting up the connection. If the ESA is not validated, emergency call handling may be delayed, and additional charges may apply if calls are routed to an emergency relay center. |
Webex Calling provides flexible Calling plans and the ability to choose the PSTN solution that fits the requirement. Over time you may have to migrate to a different PSTN solution due to changes in the business environment or other factors.
Use this matrix to know the potential PSTN migration paths for Webex Calling.
Webex Calling supports the following PSTN migration paths:
-
Using Self Service through Control Hub
-
Premises-based PSTN, non-integrated CCPP, and non-integrated IntelePeer to Cisco Calling Plans. See Migrate to Cisco Calling plans.
-
Non-integrated CCP Provider including non-integrated Intelepeer to a Premises-based Solution. See, Configure premises-based PSTN in Control Hub
-
Premises-based solution to non-integrated CCPP. You must update the connection type in Control Hub and select a CCPP partner. This type of migration does not require any further configuration.
-
-
Using Manual Migration
-
Premises-based solution to Integrated CCP Provider
-
Integrated CCP Provider to Non-integrated CCP Provider (Exception: Non-integrated Intelepeer isn’t supported as the target CCP Provider)
-
Integrated CCP Provider to Premises-based Solution
-
To use the manual migration process, you must create a new location, move TNs and users to the new location, and reconfigure site services/service assignments. During migration, you experience service interruption and there’s a risk of data loss.
Here’s a list of unsupported PSTN migration paths:
-
Cisco Calling Plans to integrated Intelepeer
-
Integrated Intelepeer to Cisco Calling Plans
The minimum required order is one Outbound Calling Plan (OCP). Billing includes charges for outbound calling plans, phone numbers, and international Calling usage. Your Cisco monthly billing invoice includes information on call activity, charges, and applicable fees and taxes. There’s no additional charge to port phone numbers.
When your billing begins:
-
Outbound Calling Plans ordered in CCW begin billing on the requested service date (RSD).
-
Outbound Calling Plans provisioned in Control Hub begin billing immediately.
-
Phone numbers provisioned in Control Hub begin billing immediately or, if ported from another provider, billing begins upon port completion.
Outbound calling plan rates:
-
Rates for the Outbound Calling Plans and phone numbers are prorated using the same proration method used to calculate the rates for the Webex Calling licenses.
-
International Calling rates vary by country and are billed the month following usage.
See Cisco Calling Plan bill for the details.
Cisco Calling Plans support is provided by various support divisions, depending on your need.
|
Support Division |
Purpose |
Contact Information |
|---|---|---|
|
Partner Help Desk (PHD) |
Partner how-to and/or documentation inquiries, Pre-quoting Regulatory Tax and other enquiries about the Cisco Calling Plans offering. |
North America: 1-844-613-6108 EMEA: +44 129 366 10 20 APAC: +61 3 7017 7272 Email: webexcalling-phd@cisco.com |
|
PSTN Technical Support (PTS) |
|
Go to Control Hub and click on PSTN Help link for PSTN technical support. |
|
TAC |
Issues with Control Hub functionality Issues with service, such as dropped calls, call quality issues, or service outages |
North America: 1-800-553-2447 EMEA: +32 2 704 5555 APAC: +61 2 8446 7411 Email: tac@cisco.com See also: |
|
Invoice & Collections |
VAT, Payment and other invoicing queries |
Contact the Collector on the Invoice via email or phone |
|
Cisco SaaS Support Team (CES) |
|
Refer Partner Support Playbook and Cisco Calling Plans FAQ Create a case through link below if the required information is not found in the playbook - https://customerservice.cloudapps.cisco.com/ |
You can select varied connections for multi-site applications. For example, you can select Cisco Calling Plans for one location, Cloud-Connected PSTN (CCP) for a second location, and Local Gateway for the third location. When choosing the Cisco Calling Plans, the following applies.
Requirements
-
Partners must be an authorized Webex Calling partner and have accepted the new Webex Calling addendum through enrollment into the Webex Calling PSTN program.
-
A minimum of one committed Outbound Calling Plan license must be purchased to enable access to all services associated with Cisco Calling Plans.
Limitations
-
Cisco Calling Plans are currently available to specified countries.
-
Existing Webex Calling locations or telephone numbers can only transition to Cisco Calling Plans in certain scenarios. For details on supported migration paths, refer Supported paths for PSTN migration section.
-
You can order a maximum of 100 new standard phone numbers at a time. Additional numbers can be placed as a separate order.
-
Toll-free numbers aren’t currently available. You can’t order new toll-free numbers or port existing toll-free numbers to the Cisco Calling Plans.
-
Cisco Calling Plans aren’t supported with Webex Contact Center or authorized for use in which high-concurrent calls or high-volume calls or uncommonly short or long calls are made. For more information about Webex Contact Center, see Get started with Webex Contact Center.
-
Some premium services and international destinations may not be available for operational purposes. If specific destinations which are not generally available are required, customers can open a support case to request availability.
The card view displays the PSTN provider available for the Webex Calling customer before configuring the PSTN location. The PSTN view displays both Providers and Orders.
You can apply the search filter to filter content based on Service Type and Market. Use the toggle option to change the view from Compact to Table. The compact view helps to resize the card to display the provider details without the service information.
The provider screen displays the various provider cards with the list of supported service types. The Providers section is classified into the following:
-
Preferred Calling providers
-
Certified Calling providers
-
Calling providers
Click the Learn More option on the card to view details of the provider. It displays Use the search field to select the PSTN service provider based on Cisco business relationship preference such as certified provider and Calling provider.
The providers include the following:
-
Provider summary
-
List of locations configured with this provider
-
List of markets that the provider is available for the supported services.
If the customer has PSTN locations where Calling services aren’t set up, the Select this provider action bar displays. Use this option to configure the service for the PSTN location.
The preferred view in the Control Hub displays the calling providers that the managing partner prefers to work. However, you can view all available calling providers with Webex Calling. This section provides the following:
-
Select the location from the drop-down menu.
-
Choose the subscription type for the users to use the Cisco Calling plans. Click Next.
-
Complete the fields for Contract Information and Emergency Service Address configuration.
The PSTN service set up is now complete.
Cisco Calling Plans are available for technical evaluation as part of the Webex Calling trial process. While Cisco Calling Plans trials are free to use, there are some neddotable limitations during the trial phase.
As you can convert the trial accounts to paid accounts, the required regulatory documentation, as mentioned in the 'Order New Phone Numbers' section under each country, is also mandatory for trial services. These documents are legally required by country regulators for our Telephone Number (TN) provisioning team to procure the numbers.
-
Each trial account can provision up to 10 standard telephone numbers from Cisco Calling Plans with Webex Calling. It isn’t permitted to provision more than 10 numbers per trial.
-
Only new, standard telephone numbers are supported in trials. Ported numbers, consecutive blocks, and inbound toll-free numbers aren’t supported on trial accounts. You also cannot port numbers out of a trial. You must convert to a paid account if you wish to use these features.
-
International calling, along with Premium Service Call types I & II are blocked from use during the trial period.
-
Business Texting isn’t available on Webex Calling trial accounts.
-
Trial accounts are intended for technical evaluation purposes only, and not for normal commercial operation. As such, emergency services are only meant for technical evaluation; actual emergency calls can’t be guaranteed. Users shouldn’t place actual emergency service calls on a trial account.
When placing an order to convert a Webex Calling trial with Cisco Calling Plans to a paid subscription, you must order at least one Cisco Calling Plan committed license to maintain the telephone numbers and configuration used in the trial.
-
Cisco Calling Plans (Cisco PSTN)
-
Cloud Connected PSTN
-
Premise-based PSTN (Local Gateway must be enabled separately. For more information, see Configure Premises-based PSTN in Control Hub.)
| 1 |
Sign in to Control Hub. |
| 2 |
Go to and select the location you want to update. |
| 3 |
Select the Calling tab and Click Manage next to PTSN Connection. |
| 4 |
Select Cisco Calling Plans and click Next. |
| 5 |
Enter the contact information and click Next. This field is for the contact information of the person who will sign the legal contract with Cisco. |
| 6 |
Enter the Emergency Services Address (ESA), and click Save. By default, the ESA entered here is applied to all phone numbers for this location. You can change the ESA for an individual user if needed. For example, you may need to change the ESA if you have a remote employee who works from home. |
| 7 |
On the summary screen, do one of the following:
|
Before you begin
-
Enable the Cisco Calling Plan for your site before you order new phone numbers through Control Hub.
-
By default, the Emergency Service Address (ESA) entered for a location during your Cisco Calling Plan setup is applied to all phone numbers for that location.
- Provide the following information for business identity verification:
- First name and last name of the legal representative
- Contact phone number
- Company name
- Local company registration certificate
- Provide the following information for address verification:
- Address matching the DID area code (street, building number, postal code, city, and country)
- Proof of address, not older than last three months
Additionally, you must submit a copy of your passport or ID card in the Netherlands, Switzerland, Poland, Greece, and Lithuania. You must provide VAT ID in Sweden and Greece.
| 1 |
Click Contact Support. Your location information is automatically populated on the Case Details window. |
| 2 |
Indicate how many new numbers you’re requesting in the Number of Telephone Numbers Requested field. |
| 3 |
From the Number Type drop-down list, choose Local or National as the case maybe. |
| 4 |
(Optional) Enter the additional details. |
| 5 |
Click Submit. You receive a PSTN Order Number which displays on the PSTN order page. It can take up to five to seven business days for the ordering and document approval process. |
Before you begin
We strongly recommend you to read and familiarize yourself with the Cisco Calling Plan Number Porting Guidelines and Policies before you start porting the numbers.
-
Enable Cisco Calling Plan for your location before you port in phone numbers through Control Hub.
-
Require a signed Letter of Agency (LOA), authorizing Cisco to place orders with the current PSTN carrier to move the service to Cisco. The LOA must be signed by the current account owner or authorized signer. You're prompted to sign the LOA while completing the porting steps.
-
Make sure you have a recent bill in PNG or PDF format from your current PSTN provider. The bill must not be older than 30 days. While completing the porting steps, you’re prompted to upload a copy of your bill.
-
For successful porting, ensure that you have the following information ready:
-
List of all phone numbers to port (non-toll free)
-
Current PSTN provider account information
-
Customer Service Record (CSR) if available
-
Your account PIN if one exists
-
VAT number or Tax ID
Certain countries require these additional documents:
-
Belgium
Proof of Local Address (Utility Bill and so on), dated within the last three months
-
Netherlands
-
Proof of Local Address (Utility Bill, and so on) dated within the last three months
-
Company registration document
-
-
Poland
-
Company registration document
-
Valid Passport/ID Card of the authorizing person
-
-
-
When planning for which numbers to port in, we recommend that you consider any number that receives inbound calls. See Cisco Calling Plan Number Policy for more information.
-
By default, the Emergency Service Address (ESA) entered for a location during your Cisco Calling Plan setup applies to all phone numbers for that location.
As an administrator, you can move existing phone numbers from your current PSTN to the Cisco Calling Plan option. The following are the types of porting services:
- Standard port: When a phone number moves from one service provider to another, without any special circumstances. For example, porting a number from Carrier A to Carrier B within the same country and service area is a Standard port.
- Mixed operator port: A more complex porting situation that involves multiple operators or service providers. For example, porting a range of numbers in a block that belongs to two or more network operators is a Mixed operator port.
Porting of numbers is done in a fixed time slot in the following countries:
| Porting time slot | Countries |
|---|---|
| Monday to Friday between 8 a.m. to 3 p.m. | Switzerland, Belgium, Sweden |
| Monday to Friday between 9 a.m. to 4 p.m. | Netherlands, Lithuania, Luxembourg, Denmark |
| Monday to Friday between 8 a.m. to 5 p.m. | Finland |
Requests for porting out of hours are on a case-by-case basis and depend on the carriers involved. We can’t guarantee that out of hours porting is available.
| 1 |
Sign in to Control Hub. |
| 2 |
Go to . |
| 3 |
From the Manage drop-down select Add. |
| 4 |
Choose a Location and PSTN Number in Number Type drop-down on add numbers page and then click Next. |
| 5 |
Select Port Numbers Over and click Next. |
| 6 |
Add the phone numbers that you want to port, and then click Save & continue. |
| 7 |
Enter the Date and Time by when you want the porting to finish. Set the schedule based on your preference. But it’s not guaranteed that the porting of your numbers is finished at the exact date and time selected. |
| 8 |
(Optional) Enter an additional email address, other than the default contact listed, to receive notifications regarding the port order status. |
| 9 |
Click Next. |
| 10 |
Enter your current carrier account information in the fields provided. Make sure this matches the information on your previous carrier’s bill. |
| 11 |
Click Next. |
| 12 |
Upload your previous carrier bill (not older than 30 days). |
| 13 |
Click Next. |
| 14 |
Upload the LOA. The authorized contact for your previous carrier’s account must upload the signed LOA. Open a ticket with Webex Partner Help Center to get the LOA required for your country and upload the signed copy here. If you're not the authorized contact, skip this step. That person can come back and upload the signed LOA later, we’ll send your order contacts a reminder. |
| 15 |
Click Save & continue. |
| 16 |
Your Port Order is submitted. You can check the order status in PSTN Orders. |
| 17 |
Click Done. Our support team contacts you for any additional documents requirements to complete your porting request. You can upload the requested documents in the right-hand panel of the order. The Firm Order Commitment (FOC) date can be two business days later from the submission date. An FOC is the date on which the losing carrier states that it releases a phone number to the winning carrier. After the losing carrier confirms the porting request, you can cancel or postpone the porting request as per the following rules: These time frames are estimates and aren’t bound by any SLA.
If porting takes place and you need to roll back the numbers to the previous carrier, raise such requests with the PTS team at the earliest. Rollbacks aren’t always possible and may require placing a port back request with the previous carrier. |
When placing orders for new numbers or porting existing numbers, you can check the order status or port rejection notices in Control Hub.
A migration banner is displayed when there are locations which need to be migrated from Non-Integrated CCP to Integrated CCP.
-
Sign in to Control Hub.
-
Go to .
Every order submitted has a status value.
Select an order to check its status.
Status Values for New Number Orders
|
Displayed Status |
Description |
|---|---|
|
Pending |
A New numbers order has been created by the user. |
|
Provisioned |
New numbers are provisioned. |
|
Error |
An issue is detected with the new numbers order. Create a TAC ticket to get help. |
|
Action Required |
Click to contact PTS for assistance. |
Status Values for Ported Number Orders
|
Displayed Status |
Description |
|---|---|
|
Pending |
User is in the process of creating/filling in details of the Porting Order. Once submitted, the order will still show Pending until Cisco validates and accepts the porting order. |
|
Rejected |
Porting issue is detected. See the Porting Errors table for additional details. If required, go to Control Hub and click on the PSTN Help link for PSTN technical support. |
|
Submitted |
Porting Order is validated and accepted. |
|
FOC Received |
FOC date confirmation from the previous PSTN provider received. |
|
Completed |
Porting process is complete. |
|
Canceled |
Order is canceled. |
Porting Error Messages
|
Displayed Error |
Description |
How to fix |
|---|---|---|
|
| ||
|
Account number mismatch |
Account number doesn’t match the number on the Customer Service Record (CSR) |
Update the Account Number field on the PSTN Order and resubmit. For some carriers, the account number may be the same as the BTN or the telephone number itself. |
|
Account number required |
The account number wasn't provided but is required. |
Update the Account Number field on the PSTN Order and resubmit. For some carriers, the account number may be the same as the BTN or the telephone number itself. |
|
Account name mismatch |
The person authorizing doesn't match the name on the (CSR). |
Update the Authorized name on account field on the PSTN order and resubmit. |
|
BTN mismatch |
BTN or ATN doesn’t match that on the CSR. |
Update the Carrier billing phone number field on the PSTN Order and resubmit. |
|
Company name mismatch |
Entity name does not match that on the CSR. |
Update the Company name with previous carrier field on the PSTN order and resubmit. |
|
Multiple BTNs |
The OSP requires this Porting Order to be split and submitted as separate orders. |
Cancel the current PSTN order and create a new, multiple PSTN Orders. Create one for each group of numbers that have the same BTN. |
|
FOC rejected by losing carrier |
The FOC date requested can’t be accommodated by the OSP. |
Update the Port Complete date field on the PSTN order and resubmit. |
|
Unknown |
Go to Control Hub and click on the PSTN Help link for PSTN technical support. |
Go to Control Hub and click on the PSTN Help link for PSTN technical support. |
|
Invalid PIN |
Passcode/PIN must be provided for wireless port. |
Update the PIN field on the PSTN order and resubmit. |
|
Pending order |
The OSP has a pending LSR on the account (for example, a port out or address change). |
Remove the telephone numbers in question from the PSTN order and resubmit. |
|
Pending main BTN |
BTN is one of the phone numbers being ported. User must indicate Porting Order Type, Remaining Numbers Action, and New Billing Phone Number accordingly. |
Remove the main BTN from the list of telephone numbers being ported and resubmit the order. Include the Main BTN into the last iteration of numbers (if porting numbers in multiple iterations). |
|
Service address mismatch |
The location info doesn't match that on the CSR. |
Update the Service address, State, and City fields and resubmit the order. |
|
TN has special feature |
Some of the phone numbers can't be ported because they have a special feature (for example, remote call forward). |
Remove numbers with special features from the PSTN order and resubmit. Or, unassign a special features from the numbers being ported. |
|
TN mismatch |
Some of the phone numbers don't belong to the end user. |
Remove one or more numbers in question and resubmit the order. |
|
TN not portable |
Some of the phone numbers can't be ported because they're inactive or aren't part of the end user's account. |
Try to remove one or more numbers in question and resubmit the PSTN order. |
|
Unsupported rate center |
The rate center isn't portable. |
Remove one or more numbers in question and resubmit the order. |
|
Zip/postal code mismatch |
Postal code doesn't match the one on the CSR. |
Update the Zip code field and resubmit the order. |
|
Previous carrier's bill is invalid |
The invoice is invalid. |
Go to PSTN Order details, then open Previous Carrier’s Bill section. Upload the correct bill file and resubmit the order. |
|
LOA invalid |
The LOA is invalid. |
Sign the LOA and resubmit the PSTN order. Alternatively, go to Control Hub and click on the PSTN Help link for PSTN technical support. |
PSTN – Public Switched Telephone Network
CSR – Customer Service Record
FOC – Firm Order Commitment
OSP – Old Service Provider
BTN – Billing Telephone Number
ATN – Account Telephone Number
To configure an ESA for an user, ensure the following conditions are met:
- The user has a non-mobile primary phone number assigned.
- The user’s location is within the U.S. or Canada.
These conditions are necessary because the ESA is tied to the user's phone number and location. This setup allows accurate routing of emergency calls and proper callback to the user through the Emergency Callback Number (ECBN) associated with their location or phone number.
| 1 |
Sign in to Control Hub. |
| 2 |
Go to . |
| 3 |
Select the user that you want to modify and click Calling. |
| 4 |
Select the right arrow to expand the primary phone number settings under Numbers. |
| 5 |
Under Emergency Service Address, select Custom Address. Enter the following details. In case of an emergency, the local emergency response crew will use this address to locate the caller.
|
| 6 |
Update the information for the workspace and click Validate. On entering a service address, the system validates the address. If the system cannot find the address, a Suggested Address displays in a side panel. Review the suggested address and click Apply to update the Emergency service address. Click Save , to save the changes. |
A custom emergency address overrides the location's default emergency address for the specific user.
| 1 |
Sign in to Control Hub. |
| 2 |
Go to and select the location you want to update. |
| 3 |
Next to PSTN Connection, click Manage. |
| 4 |
Next to the Emergency Service Address, click Edit. |
| 5 |
Enter the new address and click Save. If ESA (Enterprise Service Address) address validation fails while configuring premise or CCPP connections, administrators can close the ESA screen and continue with the setup. The validation failure will not prevent setting up the connection. If the ESA is not validated, emergency call handling may be delayed, and additional charges may apply if calls are routed to an emergency relay center. |
The minimum required order is one Outbound Calling Plan (OCP). Billing includes charges for outbound calling plans, phone numbers, and international Calling usage. Your Cisco monthly billing invoice includes information on call activity, charges, and applicable fees and taxes. There’s no additional charge to port phone numbers.
When your billing begins:
-
Outbound Calling Plans ordered in CCW begin billing on the requested service date (RSD).
-
Outbound Calling Plans provisioned in Control Hub begin billing immediately.
-
Phone numbers provisioned in Control Hub begin billing immediately or, if ported from another provider, billing begins upon port completion.
Outbound calling plan rates:
-
Rates for the Outbound Calling Plans and phone numbers are prorated using the same proration method used to calculate the rates for the Webex Calling licenses.
-
International Calling rates vary by country and are billed the month following usage.
See Cisco Calling Plan bill for the details.
Webex Calling provides flexible Calling plans and the ability to choose the PSTN solution that fits the requirement. Over time you may have to migrate to a different PSTN solution due to changes in the business environment or other factors.
Use this matrix to know the potential PSTN migration paths for Webex Calling.
Webex Calling supports the following PSTN migration paths:
-
Using Self Service through Control Hub
-
Premises-based PSTN, non-integrated CCPP, and non-integrated IntelePeer to Cisco Calling Plans. See Migrate to Cisco Calling plans.
-
Non-integrated CCP Provider including non-integrated Intelepeer to a Premises-based Solution. See, Configure premises-based PSTN in Control Hub
-
Premises-based solution to non-integrated CCPP. You must update the connection type in Control Hub and select a CCPP partner. This type of migration does not require any further configuration.
-
-
Using Manual Migration
-
Premises-based solution to Integrated CCP Provider
-
Integrated CCP Provider to Non-integrated CCP Provider (Exception: Non-integrated Intelepeer isn’t supported as the target CCP Provider)
-
Integrated CCP Provider to Premises-based Solution
-
To use the manual migration process, you must create a new location, move TNs and users to the new location, and reconfigure site services/service assignments. During migration, you experience service interruption and there’s a risk of data loss.
Here’s a list of unsupported PSTN migration paths:
-
Cisco Calling Plans to integrated Intelepeer
-
Integrated Intelepeer to Cisco Calling Plans
Cisco Calling Plans support is provided by various support divisions, depending on your need.
|
Support Division |
Purpose |
Contact Information |
|---|---|---|
|
Partner Help Desk (PHD) |
Partner how-to and/or documentation inquiries, Pre-quoting Regulatory Tax and other enquiries about the Cisco Calling Plans offering. |
North America: 1-844-613-6108 EMEA: +44 129 366 10 20 APAC: +61 3 7017 7272 Email: webexcalling-phd@cisco.com |
|
PSTN Technical Support (PTS) |
|
Go to Control Hub and click on PSTN Help link for PSTN technical support. |
|
TAC |
Issues with Control Hub functionality Issues with service, such as dropped calls, call quality issues, or service outages |
North America: 1-800-553-2447 EMEA: +32 2 704 5555 APAC: +61 2 8446 7411 Email: tac@cisco.com See also: |
|
Invoice & Collections |
VAT, Payment and other invoicing queries |
Contact the Collector on the Invoice via email or phone |
|
Cisco SaaS Support Team (CES) |
|
Refer Partner Support Playbook and Cisco Calling Plans FAQ Create a case through link below if the required information is not found in the playbook - https://customerservice.cloudapps.cisco.com/ |
You can select varied connections for multi-site applications. For example, you can select Cisco Calling Plans for one location, Cloud-Connected PSTN (CCP) for a second location, and Local Gateway for the third location. When choosing the Cisco Calling Plans, the following applies.
Requirements
-
Partners must be an authorized Webex Calling partner and have accepted the new Webex Calling addendum through enrollment into the Webex Calling PSTN program.
-
A minimum of one committed Outbound Calling Plan license must be purchased to enable access to all services associated with Cisco Calling Plans.
Limitations
-
Cisco Calling Plans are currently available to specified countries.
-
Existing Webex Calling locations or telephone numbers can only transition to Cisco Calling Plans in certain scenarios. For details on supported migration paths, refer Supported paths for PSTN migration section.
-
You can order a maximum of 100 new standard phone numbers at a time. Additional numbers can be placed as a separate order.
-
Toll-free numbers aren’t currently available. You can’t order new toll-free numbers or port existing toll-free numbers to the Cisco Calling Plans.
-
Cisco Calling Plans aren’t supported with Webex Contact Center or authorized for use in which high-concurrent calls or high-volume calls or uncommonly short or long calls are made. For more information about Webex Contact Center, see Get started with Webex Contact Center.
-
Some premium services and international destinations may not be available for operational purposes. If specific destinations which are not generally available are required, customers can open a support case to request availability.
The card view displays the PSTN provider available for the Webex Calling customer before configuring the PSTN location. The PSTN view displays both Providers and Orders.
You can apply the search filter to filter content based on Service Type and Market. Use the toggle option to change the view from Compact to Table. The compact view helps to resize the card to display the provider details without the service information.
The provider screen displays the various provider cards with the list of supported service types. The Providers section is classified into the following:
-
Preferred Calling providers
-
Certified Calling providers
-
Calling providers
Click the Learn More option on the card to view details of the provider. It displays Use the search field to select the PSTN service provider based on Cisco business relationship preference such as certified provider and Calling provider.
The providers include the following:
-
Provider summary
-
List of locations configured with this provider
-
List of markets that the provider is available for the supported services.
If the customer has PSTN locations where Calling services aren’t set up, the Select this provider action bar displays. Use this option to configure the service for the PSTN location.
The preferred view in the Control Hub displays the calling providers that the managing partner prefers to work. However, you can view all available calling providers with Webex Calling. This section provides the following:
-
Select the location from the drop-down menu.
-
Choose the subscription type for the users to use the Cisco Calling plans. Click Next.
-
Complete the fields for Contract Information and Emergency Service Address configuration.
The PSTN service set up is now complete.
Cisco Calling Plans are available for technical evaluation as part of the Webex Calling trial process. While Cisco Calling Plans trials are free to use, there are some neddotable limitations during the trial phase.
As you can convert the trial accounts to paid accounts, the required regulatory documentation, as mentioned in the 'Order New Phone Numbers' section under each country, is also mandatory for trial services. These documents are legally required by country regulators for our Telephone Number (TN) provisioning team to procure the numbers.
-
Each trial account can provision up to 10 standard telephone numbers from Cisco Calling Plans with Webex Calling. It isn’t permitted to provision more than 10 numbers per trial.
-
Only new, standard telephone numbers are supported in trials. Ported numbers, consecutive blocks, and inbound toll-free numbers aren’t supported on trial accounts. You also cannot port numbers out of a trial. You must convert to a paid account if you wish to use these features.
-
International calling, along with Premium Service Call types I & II are blocked from use during the trial period.
-
Business Texting isn’t available on Webex Calling trial accounts.
-
Trial accounts are intended for technical evaluation purposes only, and not for normal commercial operation. As such, emergency services are only meant for technical evaluation; actual emergency calls can’t be guaranteed. Users shouldn’t place actual emergency service calls on a trial account.
When placing an order to convert a Webex Calling trial with Cisco Calling Plans to a paid subscription, you must order at least one Cisco Calling Plan committed license to maintain the telephone numbers and configuration used in the trial.
-
Cisco Calling Plans (Cisco PSTN)
-
Cloud Connected PSTN
-
Premise-based PSTN (Local Gateway must be enabled separately. For more information, see Configure Premises-based PSTN in Control Hub.)
| 1 |
Sign in to Control Hub. |
| 2 |
Go to and select the location you want to update. |
| 3 |
Select the Calling tab and Click Manage next to PTSN Connection. |
| 4 |
Select Cisco Calling Plans and click Next. |
| 5 |
Enter the contact information and click Next. This field is for the contact information of the person who will sign the legal contract with Cisco. |
| 6 |
Enter the Emergency Services Address (ESA), and click Save. By default, the ESA entered here is applied to all phone numbers for this location. You can change the ESA for an individual user if needed. For example, you may need to change the ESA if you have a remote employee who works from home. |
| 7 |
On the summary screen, do one of the following:
|
Before you begin
-
Enable the Cisco Calling Plan for your site before you order new phone numbers through Control Hub.
-
By default, the Emergency Service Address (ESA) entered for a location during your Cisco Calling Plan setup is applied to all phone numbers for that location.
- Provide the following information for business identity verification:
- First name and last name of the legal representative
- Contact phone number
- Company name
- Local company registration certificate
- Provide the following information for address verification:
- Address matching the DID area code (street, building number, postal code, city, and country)
- Proof of address, not older than last three months
Additionally, you must submit a copy of your passport or ID card in the Netherlands, Switzerland, Poland, Greece, and Lithuania. You must provide VAT ID in Sweden and Greece.
| 1 |
Click Contact Support. Your location information is automatically populated on the Case Details window. |
| 2 |
Indicate how many new numbers you’re requesting in the Number of Telephone Numbers Requested field. |
| 3 |
From the Number Type drop-down list, choose Local or National as the case maybe. |
| 4 |
(Optional) Enter the additional details. |
| 5 |
Click Submit. You receive a PSTN Order Number which displays on the PSTN order page. It can take up to five to seven business days for the ordering and document approval process. |
Before you begin
We strongly recommend you to read and familiarize yourself with the Cisco Calling Plan Number Porting Guidelines and Policies before you start porting the numbers.
-
Enable Cisco Calling Plan for your location before you port phone numbers through the Control Hub.
-
A signed Letter of Agency (LOA) is needed, authorizing Cisco to place orders with the current PSTN carrier to move the service to Cisco. The LOA must be signed by the current account owner or authorized signer. You're prompted to sign the LOA while completing the porting steps.
-
Make sure you have a recent bill in PNG or PDF format from your current PSTN provider. The bill must not be older than 30 days. While completing the porting steps, you’re prompted to upload a copy of your bill.
- Provide proof of address that isn’t older than three months. Any national address is accepted.
- Provide RIO code and SIRET code.
-
For successful porting, ensure that you have the following information ready:
-
List of all phone numbers to port in (non-toll free).
-
Current PSTN provider account information.
-
Customer Service Record (CSR) if available.
-
Your account PIN if one exists.
-
-
Additional information may be required depending on your country.
-
When planning for which numbers to port in, we recommend that you consider any number that receives inbound calls. See Cisco Calling Plan Number Porting Guidelines and Policies for more information.
-
By default, the Emergency Service Address (ESA) entered for a location during your Cisco Calling Plan setup is applied to all phone numbers for that location.
As an administrator, you can move existing phone numbers from your current PSTN to the Cisco Calling Plan option. The following are the types of porting services:
- Isolated - Choose this option if you’re porting only one number.
- Full portability - Choose this option if you’re migrating a main number along with all the associated numbers.
- Partial portability - Choose this option if you’re migrating some of the associated numbers to a billing telephone number, without porting the actual billing telephone number.
- Complex portability - Choose this option if you’re migrating a main phone number without the associated numbers to that number. In this case, you must inform which number becomes the new billing telephone number.
You can port in during morning trigger (10 a.m. to 1 p.m.) and afternoon trigger (2 p.m. to 5 p.m.).
Requests for porting out of hours are on a case-by-case basis and depend on the carriers involved. We can’t guarantee that out of hours porting is available.
| 1 |
Select Port Numbers Over and click Next. |
| 2 |
Add the phone numbers that you want to port in, and then click Save &
continue. |
| 3 |
Enter the Date and Time by when you want the porting to finish. The schedule is set based on your preference. But it’s not guaranteed that the porting of your numbers is finished at the exact date and time selected. |
| 4 |
(Optional) Enter an additional email address, other than the default contact listed, to receive notifications regarding the port order status. |
| 5 |
Click Next. |
| 6 |
Enter your current carrier account information in the fields provided. Make sure this matches the information on your previous carrier’s bill. |
| 7 |
Click Next. |
| 8 |
Upload your previous carrier bill (not older than 30 days). |
| 9 |
Click Next. |
| 10 |
Upload the LOA. The authorized contact for your previous carrier’s account needs to upload the signed LOA. Open a ticket with Webex Partner Help Center to get the LOA required for your country and upload the signed copy here. If you're not the authorized contact, skip this step for now. That person can come back and upload the signed LOA later, we’ll send your order contacts a reminder. |
| 11 |
Click Save & continue. |
| 12 |
Your Port Order is submitted. You can check the order status in PSTN Orders. |
| 13 |
Click Done. Additional documents may be required to complete your port in request. Should those documents be required, our support team lets you know what is needed. Those can be added in the right-hand panel of the order. The Firm Order Commitment (FOC) date could be eight business days or later from the submission date. An FOC is the date on which the losing carrier states that it releases a phone number to the winning carrier. Once the losing carrier provides go ahead for porting, you can cancel or postpone the porting request as per the following rules:
If porting takes place and you need to roll back the numbers to the previous carrier, raise such requests with the PTS team at the earliest. Rollbacks aren’t always possible and may require placing a port back request with the previous carrier. |
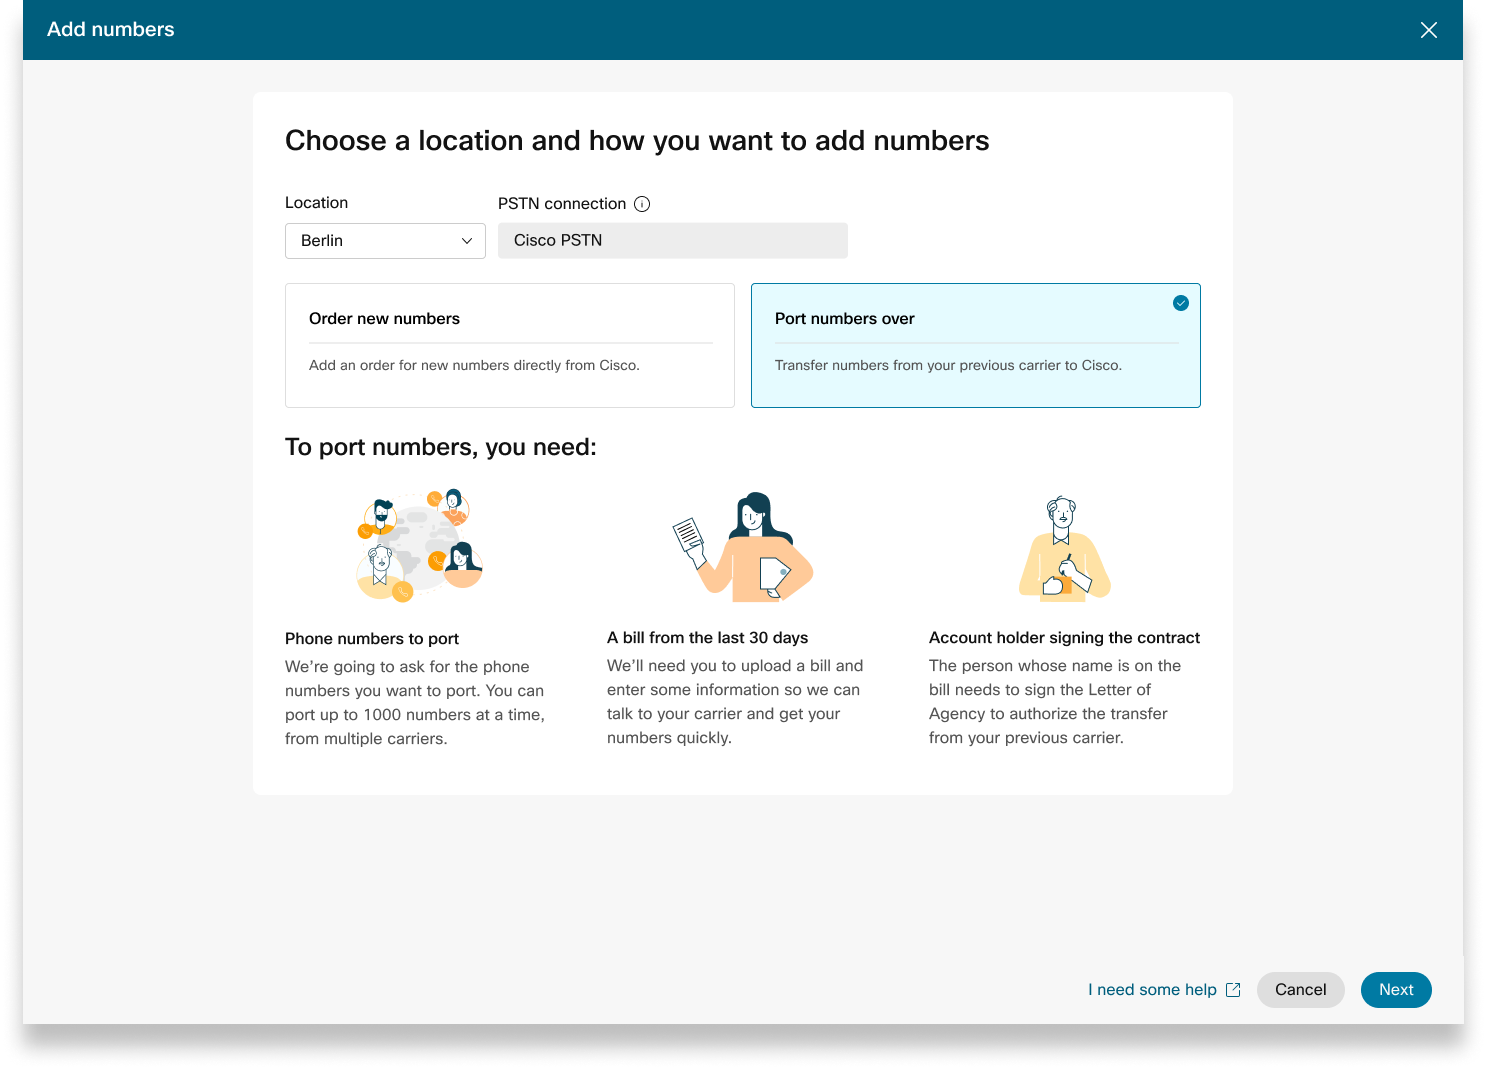
When placing orders for new numbers or porting existing numbers, you can check the order status or port rejection notices in Control Hub.
A migration banner is displayed when there are locations which need to be migrated from Non-Integrated CCP to Integrated CCP.
-
Sign in to Control Hub.
-
Go to .
Every order submitted has a status value.
Select an order to check its status.
Status Values for New Number Orders
|
Displayed Status |
Description |
|---|---|
|
Pending |
A New numbers order has been created by the user. |
|
Provisioned |
New numbers are provisioned. |
|
Error |
An issue is detected with the new numbers order. Create a TAC ticket to get help. |
|
Action Required |
Click to contact PTS for assistance. |
Status Values for Ported Number Orders
|
Displayed Status |
Description |
|---|---|
|
Pending |
User is in the process of creating/filling in details of the Porting Order. Once submitted, the order will still show Pending until Cisco validates and accepts the porting order. |
|
Rejected |
Porting issue is detected. See the Porting Errors table for additional details. If required, go to Control Hub and click on the PSTN Help link for PSTN technical support. |
|
Submitted |
Porting Order is validated and accepted. |
|
FOC Received |
FOC date confirmation from the previous PSTN provider received. |
|
Completed |
Porting process is complete. |
|
Canceled |
Order is canceled. |
Porting Error Messages
|
Displayed Error |
Description |
How to fix |
|---|---|---|
|
| ||
|
Account number mismatch |
Account number doesn’t match the number on the Customer Service Record (CSR) |
Update the Account Number field on the PSTN Order and resubmit. For some carriers, the account number may be the same as the BTN or the telephone number itself. |
|
Account number required |
The account number wasn't provided but is required. |
Update the Account Number field on the PSTN Order and resubmit. For some carriers, the account number may be the same as the BTN or the telephone number itself. |
|
Account name mismatch |
The person authorizing doesn't match the name on the (CSR). |
Update the Authorized name on account field on the PSTN order and resubmit. |
|
BTN mismatch |
BTN or ATN doesn’t match that on the CSR. |
Update the Carrier billing phone number field on the PSTN Order and resubmit. |
|
Company name mismatch |
Entity name does not match that on the CSR. |
Update the Company name with previous carrier field on the PSTN order and resubmit. |
|
Multiple BTNs |
The OSP requires this Porting Order to be split and submitted as separate orders. |
Cancel the current PSTN order and create a new, multiple PSTN Orders. Create one for each group of numbers that have the same BTN. |
|
FOC rejected by losing carrier |
The FOC date requested can’t be accommodated by the OSP. |
Update the Port Complete date field on the PSTN order and resubmit. |
|
Unknown |
Go to Control Hub and click on the PSTN Help link for PSTN technical support. |
Go to Control Hub and click on the PSTN Help link for PSTN technical support. |
|
Invalid PIN |
Passcode/PIN must be provided for wireless port. |
Update the PIN field on the PSTN order and resubmit. |
|
Pending order |
The OSP has a pending LSR on the account (for example, a port out or address change). |
Remove the telephone numbers in question from the PSTN order and resubmit. |
|
Pending main BTN |
BTN is one of the phone numbers being ported. User must indicate Porting Order Type, Remaining Numbers Action, and New Billing Phone Number accordingly. |
Remove the main BTN from the list of telephone numbers being ported and resubmit the order. Include the Main BTN into the last iteration of numbers (if porting numbers in multiple iterations). |
|
Service address mismatch |
The location info doesn't match that on the CSR. |
Update the Service address, State, and City fields and resubmit the order. |
|
TN has special feature |
Some of the phone numbers can't be ported because they have a special feature (for example, remote call forward). |
Remove numbers with special features from the PSTN order and resubmit. Or, unassign a special features from the numbers being ported. |
|
TN mismatch |
Some of the phone numbers don't belong to the end user. |
Remove one or more numbers in question and resubmit the order. |
|
TN not portable |
Some of the phone numbers can't be ported because they're inactive or aren't part of the end user's account. |
Try to remove one or more numbers in question and resubmit the PSTN order. |
|
Unsupported rate center |
The rate center isn't portable. |
Remove one or more numbers in question and resubmit the order. |
|
Zip/postal code mismatch |
Postal code doesn't match the one on the CSR. |
Update the Zip code field and resubmit the order. |
|
Previous carrier's bill is invalid |
The invoice is invalid. |
Go to PSTN Order details, then open Previous Carrier’s Bill section. Upload the correct bill file and resubmit the order. |
|
LOA invalid |
The LOA is invalid. |
Sign the LOA and resubmit the PSTN order. Alternatively, go to Control Hub and click on the PSTN Help link for PSTN technical support. |
PSTN – Public Switched Telephone Network
CSR – Customer Service Record
FOC – Firm Order Commitment
OSP – Old Service Provider
BTN – Billing Telephone Number
ATN – Account Telephone Number
To configure an ESA for an user, ensure the following conditions are met:
- The user has a non-mobile primary phone number assigned.
- The user’s location is within the U.S. or Canada.
These conditions are necessary because the ESA is tied to the user's phone number and location. This setup allows accurate routing of emergency calls and proper callback to the user through the Emergency Callback Number (ECBN) associated with their location or phone number.
| 1 |
Sign in to Control Hub. |
| 2 |
Go to . |
| 3 |
Select the user that you want to modify and click Calling. |
| 4 |
Select the right arrow to expand the primary phone number settings under Numbers. |
| 5 |
Under Emergency Service Address, select Custom Address. Enter the following details. In case of an emergency, the local emergency response crew will use this address to locate the caller.
|
| 6 |
Update the information for the workspace and click Validate. On entering a service address, the system validates the address. If the system cannot find the address, a Suggested Address displays in a side panel. Review the suggested address and click Apply to update the Emergency service address. Click Save , to save the changes. |
A custom emergency address overrides the location's default emergency address for the specific user.
| 1 |
Sign in to Control Hub. |
| 2 |
Go to and select the location you want to update. |
| 3 |
Next to PSTN Connection, click Manage. |
| 4 |
Next to the Emergency Service Address, click Edit. |
| 5 |
Enter the new address and click Save. If ESA (Enterprise Service Address) address validation fails while configuring premise or CCPP connections, administrators can close the ESA screen and continue with the setup. The validation failure will not prevent setting up the connection. If the ESA is not validated, emergency call handling may be delayed, and additional charges may apply if calls are routed to an emergency relay center. |
Webex Calling provides flexible Calling plans and the ability to choose the PSTN solution that fits the requirement. Over time you may have to migrate to a different PSTN solution due to changes in the business environment or other factors.
Use this matrix to know the potential PSTN migration paths for Webex Calling.
Webex Calling supports the following PSTN migration paths:
-
Using Self Service through Control Hub
-
Premises-based PSTN, non-integrated CCPP, and non-integrated IntelePeer to Cisco Calling Plans. See Migrate to Cisco Calling plans.
-
Non-integrated CCP Provider including non-integrated Intelepeer to a Premises-based Solution. See, Configure premises-based PSTN in Control Hub
-
Premises-based solution to non-integrated CCPP. You must update the connection type in Control Hub and select a CCPP partner. This type of migration does not require any further configuration.
-
-
Using Manual Migration
-
Premises-based solution to Integrated CCP Provider
-
Integrated CCP Provider to Non-integrated CCP Provider (Exception: Non-integrated Intelepeer isn’t supported as the target CCP Provider)
-
Integrated CCP Provider to Premises-based Solution
-
To use the manual migration process, you must create a new location, move TNs and users to the new location, and reconfigure site services/service assignments. During migration, you experience service interruption and there’s a risk of data loss.
Here’s a list of unsupported PSTN migration paths:
-
Cisco Calling Plans to integrated Intelepeer
-
Integrated Intelepeer to Cisco Calling Plans
The minimum required order is one Outbound Calling Plan (OCP). Billing includes charges for outbound calling plans, phone numbers, and international Calling usage. Your Cisco monthly billing invoice includes information on call activity, charges, and applicable fees and taxes. There’s no additional charge to port phone numbers.
When your billing begins:
-
Outbound Calling Plans ordered in CCW begin billing on the requested service date (RSD).
-
Outbound Calling Plans provisioned in Control Hub begin billing immediately.
-
Phone numbers provisioned in Control Hub begin billing immediately or, if ported from another provider, billing begins upon port completion.
Outbound calling plan rates:
-
Rates for the Outbound Calling Plans and phone numbers are prorated using the same proration method used to calculate the rates for the Webex Calling licenses.
-
International Calling rates vary by country and are billed the month following usage.
See Cisco Calling Plan bill for the details.
Cisco Calling Plans support is provided by various support divisions, depending on your need.
|
Support Division |
Purpose |
Contact Information |
|---|---|---|
|
Partner Help Desk (PHD) |
Partner how-to and/or documentation inquiries, Pre-quoting Regulatory Tax and other enquiries about the Cisco Calling Plans offering. |
North America: 1-844-613-6108 EMEA: +44 129 366 10 20 APAC: +61 3 7017 7272 Email: webexcalling-phd@cisco.com |
|
PSTN Technical Support (PTS) |
|
Go to Control Hub and click on PSTN Help link for PSTN technical support. |
|
TAC |
Issues with Control Hub functionality Issues with service, such as dropped calls, call quality issues, or service outages |
North America: 1-800-553-2447 EMEA: +32 2 704 5555 APAC: +61 2 8446 7411 Email: tac@cisco.com See also: |
|
Invoice & Collections |
VAT, Payment and other invoicing queries |
Contact the Collector on the Invoice via email or phone |
|
Cisco SaaS Support Team (CES) |
|
Refer Partner Support Playbook and Cisco Calling Plans FAQ Create a case through link below if the required information is not found in the playbook - https://customerservice.cloudapps.cisco.com/ |
You can select varied connections for multi-site applications. For example, you can select Cisco Calling Plans for one location, Cloud-Connected PSTN (CCP) for a second location, and Local Gateway for the third location. When choosing the Cisco Calling Plans, the following applies.
Requirements
-
Partners must be an authorized Webex Calling partner and have accepted the new Webex Calling addendum through enrollment into the Webex Calling PSTN program.
-
A minimum of one committed Outbound Calling Plan license must be purchased to enable access to all services associated with Cisco Calling Plans.
Limitations
-
Cisco Calling Plans are currently available to specified countries.
-
Existing Webex Calling locations or telephone numbers can only transition to Cisco Calling Plans in certain scenarios. For details on supported migration paths, refer Supported paths for PSTN migration section.
-
You can order a maximum of 100 new standard phone numbers at a time. Additional numbers can be placed as a separate order.
-
Toll-free numbers aren’t currently available. You can’t order new toll-free numbers or port existing toll-free numbers to the Cisco Calling Plans.
-
Cisco Calling Plans aren’t supported with Webex Contact Center or authorized for use in which high-concurrent calls or high-volume calls or uncommonly short or long calls are made. For more information about Webex Contact Center, see Get started with Webex Contact Center.
-
Some premium services and international destinations may not be available for operational purposes. If specific destinations which are not generally available are required, customers can open a support case to request availability.
The card view displays the PSTN provider available for the Webex Calling customer before configuring the PSTN location. The PSTN view displays both Providers and Orders.
You can apply the search filter to filter content based on Service Type and Market. Use the toggle option to change the view from Compact to Table. The compact view helps to resize the card to display the provider details without the service information.
The provider screen displays the various provider cards with the list of supported service types. The Providers section is classified into the following:
-
Preferred Calling providers
-
Certified Calling providers
-
Calling providers
Click the Learn More option on the card to view details of the provider. It displays Use the search field to select the PSTN service provider based on Cisco business relationship preference such as certified provider and Calling provider.
The providers include the following:
-
Provider summary
-
List of locations configured with this provider
-
List of markets that the provider is available for the supported services.
If the customer has PSTN locations where Calling services aren’t set up, the Select this provider action bar displays. Use this option to configure the service for the PSTN location.
The preferred view in the Control Hub displays the calling providers that the managing partner prefers to work. However, you can view all available calling providers with Webex Calling. This section provides the following:
-
Select the location from the drop-down menu.
-
Choose the subscription type for the users to use the Cisco Calling plans. Click Next.
-
Complete the fields for Contract Information and Emergency Service Address configuration.
The PSTN service set up is now complete.
Cisco Calling Plans are available for technical evaluation as part of the Webex Calling trial process. While Cisco Calling Plans trials are free to use, there are some neddotable limitations during the trial phase.
As you can convert the trial accounts to paid accounts, the required regulatory documentation, as mentioned in the 'Order New Phone Numbers' section under each country, is also mandatory for trial services. These documents are legally required by country regulators for our Telephone Number (TN) provisioning team to procure the numbers.
-
Each trial account can provision up to 10 standard telephone numbers from Cisco Calling Plans with Webex Calling. It isn’t permitted to provision more than 10 numbers per trial.
-
Only new, standard telephone numbers are supported in trials. Ported numbers, consecutive blocks, and inbound toll-free numbers aren’t supported on trial accounts. You also cannot port numbers out of a trial. You must convert to a paid account if you wish to use these features.
-
International calling, along with Premium Service Call types I & II are blocked from use during the trial period.
-
Business Texting isn’t available on Webex Calling trial accounts.
-
Trial accounts are intended for technical evaluation purposes only, and not for normal commercial operation. As such, emergency services are only meant for technical evaluation; actual emergency calls can’t be guaranteed. Users shouldn’t place actual emergency service calls on a trial account.
When placing an order to convert a Webex Calling trial with Cisco Calling Plans to a paid subscription, you must order at least one Cisco Calling Plan committed license to maintain the telephone numbers and configuration used in the trial.
-
Cisco Calling Plans (Cisco PSTN)
-
Cloud Connected PSTN
-
Premise-based PSTN (Local Gateway must be enabled separately. For more information, see Configure Premises-based PSTN in Control Hub.)
| 1 |
Sign in to Control Hub. |
| 2 |
Go to and select the location you want to update. |
| 3 |
Select the Calling tab and Click Manage next to PTSN Connection. |
| 4 |
Select Cisco Calling Plans and click Next. |
| 5 |
Enter the contact information and click Next. This field is for the contact information of the person who will sign the legal contract with Cisco. |
| 6 |
Enter the Emergency Services Address (ESA), and click Save. By default, the ESA entered here is applied to all phone numbers for this location. You can change the ESA for an individual user if needed. For example, you may need to change the ESA if you have a remote employee who works from home. |
| 7 |
On the summary screen, do one of the following:
|
Before you begin
-
The Cisco Calling Plan must be enabled for your site before you can order new phone numbers through Control Hub.
-
By default, the Emergency Service Address (ESA) entered for a location during your Cisco Calling Plan setup is applied to all phone numbers for that location.
- Provide the following information for business identity verification:
- First name and last name
- Contact phone number
- Company name
- German company incorporation certificate copy
- Germany registration form, which is available in the Pega Documents tab in the Control Hub.
- Provide the following information for address verification:
- Address matching the DID area code (street, building number, postal code, city, and country)
- A copy of a utility bill, which is less than three months old.
| 1 |
Choose a location and click Select under Order New Numbers. Click Next. You’re directed to Contact Support to order a new number. |
| 2 |
Click Contact Support. Your location information is automatically populated on the Case Details Screen. |
| 3 |
Indicate how many new numbers you’re requesting in the Number of Telephone
Numbers Requested field. |
| 4 |
Select your Number Type (Local or National) from the drop-down menu. |
| 5 |
(Optional) Input additional details. |
| 6 |
Click Submit. You receive a PSTN Order Number which displays on the PSTN order page. It can take up to 5 - 7 business days for the ordering and document approval process. |
Before you begin
We strongly recommend you to read and familiarize yourself with the Cisco Calling Plan Number Porting Guidelines and Policies before you start porting the numbers.
-
Enable Cisco Calling Plan for your location before you port in the phone numbers through the Control Hub.
-
A signed Letter of Agency (LOA) is needed, authorizing Cisco to place orders with the current PSTN carrier to move the service to Cisco. The LOA must be signed by the current account owner or authorized signer. You're prompted to sign the LOA while completing the porting steps.
-
Provide proof of a local address, which must be less than three months old. For local phone numbers, the address must be within the same area in which you need to port in the phone number.
-
Provide a company registration document.
-
Make sure you have a recent bill in PNG or PDF format from your current PSTN provider. The bill must not be older than 30 days. While completing the porting steps, you’re prompted to upload a copy of your bill.
-
For successful porting, ensure that you have the following information ready:
-
List of all phone numbers to port in (non-toll free)
-
Current PSTN provider account information
-
Customer Service Record (CSR) if available
-
Your account PIN if one exists
-
-
When planning for which numbers to port in, we recommend that you consider any number that receives inbound calls. See Cisco Calling Plan Number Policy for more information.
-
By default, the Emergency Service Address (ESA) entered for a location during your Cisco Calling Plan setup is applied to all phone numbers for that location.
As an administrator, you can move existing phone numbers from your current PSTN to the Cisco Calling Plan option. The following are the types of porting services:
- Standard port: When a phone number moves from one service provider to another, without any special circumstances. For example, porting a number from Carrier A to Carrier B within the same country and service area is a Standard port.
- Mixed operator port: A more complex porting situation that involves multiple operators or service providers. For example, porting a range of numbers in a block that belongs to two or more network operators is a Mixed operator port.
Porting in Germany takes place on Monday to Friday between 6 a.m. to 8 a.m.
Requests for porting out of hours are on a case-by-case basis and depend on the carriers involved. We can’t guarantee that out of hours porting is available.
| 1 |
Select Port Numbers Over and click Next. |
| 2 |
Add the phone numbers that you want to port in, and then click Save & continue. |
| 3 |
Enter the Date and Time by when you want the porting to finish. The schedule is set based on your preference. But it’s not guaranteed that the porting of your numbers is finished at the exact date and time selected. |
| 4 |
(Optional) Enter an additional email address, other than the default contact listed, to receive notifications regarding the port order status. |
| 5 |
Click Next. |
| 6 |
Enter your current carrier account information in the fields provided. Make sure this matches the information on your previous carrier’s bill. |
| 7 |
Click Next. |
| 8 |
Upload your previous carrier bill (not older than 30 days). |
| 9 |
Click Next. |
| 10 |
Upload the LOA. The authorized contact for your previous carrier’s account needs to upload the signed LOA. Open a ticket with Webex Partner Help Center to get the LOA required for your country and upload the signed copy here. If you're not the authorized contact, skip this step for now. That person can come back and upload the signed LOA later, we’ll send your order contacts a reminder. |
| 11 |
Click Save & continue. |
| 12 |
Your Port Order is submitted. You can check the order status in PSTN Orders. |
| 13 |
Click Done. Additional documents may be required to complete your port in request. Should those documents be required, our support team lets you know what is needed. Those can be added in the right-hand panel of the order. The Firm Order Commitment (FOC) date could be eight business days or later from the submission date. An FOC is the date on which the losing carrier states that it releases a phone number to the winning carrier. Once the losing carrier provides go ahead for porting, you can cancel or postpone the porting request as per the following rules:
If porting takes place and you need to roll back the numbers to the previous carrier, raise such requests with the PTS team at the earliest. Rollbacks aren’t always possible and may require placing a port back request with the previous carrier. |
When placing orders for new numbers or porting existing numbers, you can check the order status or port rejection notices in Control Hub.
A migration banner is displayed when there are locations which need to be migrated from Non-Integrated CCP to Integrated CCP.
-
Sign in to Control Hub.
-
Go to .
Every order submitted has a status value.
Select an order to check its status.
Status Values for New Number Orders
|
Displayed Status |
Description |
|---|---|
|
Pending |
A New numbers order has been created by the user. |
|
Provisioned |
New numbers are provisioned. |
|
Error |
An issue is detected with the new numbers order. Create a TAC ticket to get help. |
|
Action Required |
Click to contact PTS for assistance. |
Status Values for Ported Number Orders
|
Displayed Status |
Description |
|---|---|
|
Pending |
User is in the process of creating/filling in details of the Porting Order. Once submitted, the order will still show Pending until Cisco validates and accepts the porting order. |
|
Rejected |
Porting issue is detected. See the Porting Errors table for additional details. If required, go to Control Hub and click on the PSTN Help link for PSTN technical support. |
|
Submitted |
Porting Order is validated and accepted. |
|
FOC Received |
FOC date confirmation from the previous PSTN provider received. |
|
Completed |
Porting process is complete. |
|
Canceled |
Order is canceled. |
Porting Error Messages
|
Displayed Error |
Description |
How to fix |
|---|---|---|
|
| ||
|
Account number mismatch |
Account number doesn’t match the number on the Customer Service Record (CSR) |
Update the Account Number field on the PSTN Order and resubmit. For some carriers, the account number may be the same as the BTN or the telephone number itself. |
|
Account number required |
The account number wasn't provided but is required. |
Update the Account Number field on the PSTN Order and resubmit. For some carriers, the account number may be the same as the BTN or the telephone number itself. |
|
Account name mismatch |
The person authorizing doesn't match the name on the (CSR). |
Update the Authorized name on account field on the PSTN order and resubmit. |
|
BTN mismatch |
BTN or ATN doesn’t match that on the CSR. |
Update the Carrier billing phone number field on the PSTN Order and resubmit. |
|
Company name mismatch |
Entity name does not match that on the CSR. |
Update the Company name with previous carrier field on the PSTN order and resubmit. |
|
Multiple BTNs |
The OSP requires this Porting Order to be split and submitted as separate orders. |
Cancel the current PSTN order and create a new, multiple PSTN Orders. Create one for each group of numbers that have the same BTN. |
|
FOC rejected by losing carrier |
The FOC date requested can’t be accommodated by the OSP. |
Update the Port Complete date field on the PSTN order and resubmit. |
|
Unknown |
Go to Control Hub and click on the PSTN Help link for PSTN technical support. |
Go to Control Hub and click on the PSTN Help link for PSTN technical support. |
|
Invalid PIN |
Passcode/PIN must be provided for wireless port. |
Update the PIN field on the PSTN order and resubmit. |
|
Pending order |
The OSP has a pending LSR on the account (for example, a port out or address change). |
Remove the telephone numbers in question from the PSTN order and resubmit. |
|
Pending main BTN |
BTN is one of the phone numbers being ported. User must indicate Porting Order Type, Remaining Numbers Action, and New Billing Phone Number accordingly. |
Remove the main BTN from the list of telephone numbers being ported and resubmit the order. Include the Main BTN into the last iteration of numbers (if porting numbers in multiple iterations). |
|
Service address mismatch |
The location info doesn't match that on the CSR. |
Update the Service address, State, and City fields and resubmit the order. |
|
TN has special feature |
Some of the phone numbers can't be ported because they have a special feature (for example, remote call forward). |
Remove numbers with special features from the PSTN order and resubmit. Or, unassign a special features from the numbers being ported. |
|
TN mismatch |
Some of the phone numbers don't belong to the end user. |
Remove one or more numbers in question and resubmit the order. |
|
TN not portable |
Some of the phone numbers can't be ported because they're inactive or aren't part of the end user's account. |
Try to remove one or more numbers in question and resubmit the PSTN order. |
|
Unsupported rate center |
The rate center isn't portable. |
Remove one or more numbers in question and resubmit the order. |
|
Zip/postal code mismatch |
Postal code doesn't match the one on the CSR. |
Update the Zip code field and resubmit the order. |
|
Previous carrier's bill is invalid |
The invoice is invalid. |
Go to PSTN Order details, then open Previous Carrier’s Bill section. Upload the correct bill file and resubmit the order. |
|
LOA invalid |
The LOA is invalid. |
Sign the LOA and resubmit the PSTN order. Alternatively, go to Control Hub and click on the PSTN Help link for PSTN technical support. |
PSTN – Public Switched Telephone Network
CSR – Customer Service Record
FOC – Firm Order Commitment
OSP – Old Service Provider
BTN – Billing Telephone Number
ATN – Account Telephone Number
To configure an ESA for an user, ensure the following conditions are met:
- The user has a non-mobile primary phone number assigned.
- The user’s location is within the U.S. or Canada.
These conditions are necessary because the ESA is tied to the user's phone number and location. This setup allows accurate routing of emergency calls and proper callback to the user through the Emergency Callback Number (ECBN) associated with their location or phone number.
| 1 |
Sign in to Control Hub. |
| 2 |
Go to . |
| 3 |
Select the user that you want to modify and click Calling. |
| 4 |
Select the right arrow to expand the primary phone number settings under Numbers. |
| 5 |
Under Emergency Service Address, select Custom Address. Enter the following details. In case of an emergency, the local emergency response crew will use this address to locate the caller.
|
| 6 |
Update the information for the workspace and click Validate. On entering a service address, the system validates the address. If the system cannot find the address, a Suggested Address displays in a side panel. Review the suggested address and click Apply to update the Emergency service address. Click Save , to save the changes. |
A custom emergency address overrides the location's default emergency address for the specific user.
| 1 |
Sign in to Control Hub. |
| 2 |
Go to and select the location you want to update. |
| 3 |
Next to PSTN Connection, click Manage. |
| 4 |
Next to the Emergency Service Address, click Edit. |
| 5 |
Enter the new address and click Save. If ESA (Enterprise Service Address) address validation fails while configuring premise or CCPP connections, administrators can close the ESA screen and continue with the setup. The validation failure will not prevent setting up the connection. If the ESA is not validated, emergency call handling may be delayed, and additional charges may apply if calls are routed to an emergency relay center. |
Webex Calling provides flexible Calling plans and the ability to choose the PSTN solution that fits the requirement. Over time you may have to migrate to a different PSTN solution due to changes in the business environment or other factors.
Use this matrix to know the potential PSTN migration paths for Webex Calling.
Webex Calling supports the following PSTN migration paths:
-
Using Self Service through Control Hub
-
Premises-based PSTN, non-integrated CCPP, and non-integrated IntelePeer to Cisco Calling Plans. See Migrate to Cisco Calling plans.
-
Non-integrated CCP Provider including non-integrated Intelepeer to a Premises-based Solution. See, Configure premises-based PSTN in Control Hub
-
Premises-based solution to non-integrated CCPP. You must update the connection type in Control Hub and select a CCPP partner. This type of migration does not require any further configuration.
-
-
Using Manual Migration
-
Premises-based solution to Integrated CCP Provider
-
Integrated CCP Provider to Non-integrated CCP Provider (Exception: Non-integrated Intelepeer isn’t supported as the target CCP Provider)
-
Integrated CCP Provider to Premises-based Solution
-
To use the manual migration process, you must create a new location, move TNs and users to the new location, and reconfigure site services/service assignments. During migration, you experience service interruption and there’s a risk of data loss.
Here’s a list of unsupported PSTN migration paths:
-
Cisco Calling Plans to integrated Intelepeer
-
Integrated Intelepeer to Cisco Calling Plans
The minimum required order is one Outbound Calling Plan (OCP). Billing includes charges for outbound calling plans, phone numbers, and international Calling usage. Your Cisco monthly billing invoice includes information on call activity, charges, and applicable fees and taxes. There’s no additional charge to port phone numbers.
When your billing begins:
-
Outbound Calling Plans ordered in CCW begin billing on the requested service date (RSD).
-
Outbound Calling Plans provisioned in Control Hub begin billing immediately.
-
Phone numbers provisioned in Control Hub begin billing immediately or, if ported from another provider, billing begins upon port completion.
Outbound calling plan rates:
-
Rates for the Outbound Calling Plans and phone numbers are prorated using the same proration method used to calculate the rates for the Webex Calling licenses.
-
International Calling rates vary by country and are billed the month following usage.
See Cisco Calling Plan bill for the details.
Cisco Calling Plans support is provided by various support divisions, depending on your need.
|
Support Division |
Purpose |
Contact Information |
|---|---|---|
|
Partner Help Desk (PHD) |
Partner how-to and/or documentation inquiries, Pre-quoting Regulatory Tax and other enquiries about the Cisco Calling Plans offering. |
North America: 1-844-613-6108 EMEA: +44 129 366 10 20 APAC: +61 3 7017 7272 Email: webexcalling-phd@cisco.com |
|
PSTN Technical Support (PTS) |
|
Go to Control Hub and click on PSTN Help link for PSTN technical support. |
|
TAC |
Issues with Control Hub functionality Issues with service, such as dropped calls, call quality issues, or service outages |
North America: 1-800-553-2447 EMEA: +32 2 704 5555 APAC: +61 2 8446 7411 Email: tac@cisco.com See also: |
|
Invoice & Collections |
VAT, Payment and other invoicing queries |
Contact the Collector on the Invoice via email or phone |
|
Cisco SaaS Support Team (CES) |
|
Refer Partner Support Playbook and Cisco Calling Plans FAQ Create a case through link below if the required information is not found in the playbook - https://customerservice.cloudapps.cisco.com/ |
You can select varied connections for multi-site applications. For example, you can select Cisco Calling Plans for one location, Cloud-Connected PSTN (CCP) for a second location, and Local Gateway for the third location. When choosing the Cisco Calling Plans, the following applies.
Requirements
-
Partners must be an authorized Webex Calling partner and have accepted the new Webex Calling addendum through enrollment into the Webex Calling PSTN program.
-
A minimum of one committed Outbound Calling Plan license must be purchased to enable access to all services associated with Cisco Calling Plans.
Limitations
-
Cisco Calling Plans are currently available to specified countries.
-
Existing Webex Calling locations or telephone numbers can only transition to Cisco Calling Plans in certain scenarios. For details on supported migration paths, refer Supported paths for PSTN migration section.
-
You can order a maximum of 100 new standard phone numbers at a time. Additional numbers can be placed as a separate order.
-
Toll-free numbers aren’t currently available. You can’t order new toll-free numbers or port existing toll-free numbers to the Cisco Calling Plans.
-
Cisco Calling Plans aren’t supported with Webex Contact Center or authorized for use in which high-concurrent calls or high-volume calls or uncommonly short or long calls are made. For more information about Webex Contact Center, see Get started with Webex Contact Center.
-
Some premium services and international destinations may not be available for operational purposes. If specific destinations which are not generally available are required, customers can open a support case to request availability.
The card view displays the PSTN provider available for the Webex Calling customer before configuring the PSTN location. The PSTN view displays both Providers and Orders.
You can apply the search filter to filter content based on Service Type and Market. Use the toggle option to change the view from Compact to Table. The compact view helps to resize the card to display the provider details without the service information.
The provider screen displays the various provider cards with the list of supported service types. The Providers section is classified into the following:
-
Preferred Calling providers
-
Certified Calling providers
-
Calling providers
Click the Learn More option on the card to view details of the provider. It displays Use the search field to select the PSTN service provider based on Cisco business relationship preference such as certified provider and Calling provider.
The providers include the following:
-
Provider summary
-
List of locations configured with this provider
-
List of markets that the provider is available for the supported services.
If the customer has PSTN locations where Calling services aren’t set up, the Select this provider action bar displays. Use this option to configure the service for the PSTN location.
The preferred view in the Control Hub displays the calling providers that the managing partner prefers to work. However, you can view all available calling providers with Webex Calling. This section provides the following:
-
Select the location from the drop-down menu.
-
Choose the subscription type for the users to use the Cisco Calling plans. Click Next.
-
Complete the fields for Contract Information and Emergency Service Address configuration.
The PSTN service set up is now complete.
Cisco Calling Plans are available for technical evaluation as part of the Webex Calling trial process. While Cisco Calling Plans trials are free to use, there are some neddotable limitations during the trial phase.
As you can convert the trial accounts to paid accounts, the required regulatory documentation, as mentioned in the 'Order New Phone Numbers' section under each country, is also mandatory for trial services. These documents are legally required by country regulators for our Telephone Number (TN) provisioning team to procure the numbers.
-
Each trial account can provision up to 10 standard telephone numbers from Cisco Calling Plans with Webex Calling. It isn’t permitted to provision more than 10 numbers per trial.
-
Only new, standard telephone numbers are supported in trials. Ported numbers, consecutive blocks, and inbound toll-free numbers aren’t supported on trial accounts. You also cannot port numbers out of a trial. You must convert to a paid account if you wish to use these features.
-
International calling, along with Premium Service Call types I & II are blocked from use during the trial period.
-
Business Texting isn’t available on Webex Calling trial accounts.
-
Trial accounts are intended for technical evaluation purposes only, and not for normal commercial operation. As such, emergency services are only meant for technical evaluation; actual emergency calls can’t be guaranteed. Users shouldn’t place actual emergency service calls on a trial account.
When placing an order to convert a Webex Calling trial with Cisco Calling Plans to a paid subscription, you must order at least one Cisco Calling Plan committed license to maintain the telephone numbers and configuration used in the trial.
-
Cisco Calling Plans (Cisco PSTN)
-
Cloud Connected PSTN
-
Premise-based PSTN (Local Gateway must be enabled separately. For more information, see Configure Premises-based PSTN in Control Hub.)
| 1 |
Sign in to Control Hub. |
| 2 |
Go to and select the location you want to update. |
| 3 |
Select the Calling tab and Click Manage next to PTSN Connection. |
| 4 |
Select Cisco Calling Plans and click Next. |
| 5 |
Enter the contact information and click Next. This field is for the contact information of the person who will sign the legal contract with Cisco. |
| 6 |
Enter the Emergency Services Address (ESA), and click Save. By default, the ESA entered here is applied to all phone numbers for this location. You can change the ESA for an individual user if needed. For example, you may need to change the ESA if you have a remote employee who works from home. |
| 7 |
On the summary screen, do one of the following:
|
Before you begin
-
Enable the Cisco Calling Plan for your site before you order new phone numbers through Control Hub.
-
By default, the Emergency Service Address (ESA) entered for a location during your Cisco Calling Plan setup is applied to all phone numbers for that location.
- Provide the following information for business identity verification:
- First name and last name of the legal representative
- Contact phone number
- Company name
- Local company registration certificate
- Provide the following information for address verification:
- Address matching the DID area code (street, building number, postal code, city, and country)
- Proof of address, not older than last three months
Additionally, you must submit a copy of your passport or ID card in the Netherlands, Switzerland, Poland, Greece, and Lithuania. You must provide VAT ID in Sweden and Greece.
| 1 |
Click Contact Support. Your location information is automatically populated on the Case Details window. |
| 2 |
Indicate how many new numbers you’re requesting in the Number of Telephone Numbers Requested field. |
| 3 |
From the Number Type drop-down list, choose Local or National as the case maybe. |
| 4 |
(Optional) Enter the additional details. |
| 5 |
Click Submit. You receive a PSTN Order Number which displays on the PSTN order page. It can take up to five to seven business days for the ordering and document approval process. |
Before you begin
We strongly recommend you to read and familiarize yourself with the Cisco Calling Plan Number Porting Guidelines and Policies before you start porting the numbers.
-
Enable Cisco Calling Plan for your location before you port in phone numbers through the Control Hub.
-
A signed Letter of Agency (LOA) is needed, authorizing Cisco to place orders with the current PSTN carrier to move the service to Cisco. The LOA must be signed by the current account owner or authorized signer. You're prompted to sign the LOA while completing the porting steps.
-
Make sure you have a recent bill in PNG or PDF format from your current PSTN provider. The bill must not be older than 30 days. While completing the porting steps, you’re prompted to upload a copy of your bill.
-
For successful porting, ensure that you have the following information ready:
- List of all phone numbers to port in (non-toll free)
- Current PSTN provider account information
- Customer Service Record (CSR) if available
- Your account PIN if one exists
- VAT number or Tax ID
- Provide copy of your Passport or a valid ID proof.
- Provide your company registration certification.
-
When planning for which numbers to port in, we recommend that you consider any number that receives inbound calls. See Cisco Calling Plan Number Policy for more information.
-
By default, the Emergency Service Address (ESA) entered for a location during your Cisco Calling Plan setup is applied to all phone numbers for that location.
As an administrator, you can move existing phone numbers from your current PSTN to the Cisco Calling Plan option. The following are the types of porting services:
- Standard port: When a phone number moves from one service provider to another, without any special circumstances. For example, porting a number from Carrier A to Carrier B within the same country and service area is a Standard port.
- Mixed operator port: A more complex porting situation that involves multiple operators or service providers. For example, porting a range of numbers in a block that belongs to two or more network operators is a Mixed operator port.
Porting takes place on Monday to Friday between 9 a.m. to 6 p.m.
Requests for porting out of hours are on a case-by-case basis and depend on the carriers involved. We can’t guarantee that out of hours porting is available.
| 1 |
Select Port Numbers Over and click Next. |
| 2 |
Add the phone numbers that you want to port in, and then click Save & continue. |
| 3 |
Enter the Date and Time by when you want the porting to finish. The schedule is set based on your preference. But it’s not guaranteed that the porting of your numbers is finished at the exact date and time selected. |
| 4 |
(Optional) Enter an additional email address, other than the default contact listed, to receive notifications regarding the port order status. |
| 5 |
Click Next. |
| 6 |
Enter your current carrier account information in the fields provided. Make sure this matches the information on your previous carrier’s bill. |
| 7 |
Click Next. |
| 8 |
Upload your previous carrier bill (not older than 30 days). |
| 9 |
Click Next. |
| 10 |
Upload the LOA. The authorized contact for your previous carrier’s account needs to upload the signed LOA. Open a ticket with Webex Partner Help Center to get the LOA required for your country and upload the signed copy here. If you're not the authorized contact, skip this step for now. That person can come back and upload the signed LOA later, we’ll send your order contacts a reminder. |
| 11 |
Click Save & continue. |
| 12 |
Your Port Order is submitted. You can check the order status in PSTN Orders. |
| 13 |
Click Done. Our support team contacts you for any additional documents requirements to complete your porting request. You can upload such documents in the right-hand panel of the order. The Firm Order Commitment (FOC) date can be seven business days or more from the submission date. An FOC is the date on which the losing carrier states that it releases a phone number to the winning carrier. Once the losing carrier provides the go ahead for porting, you can cancel or postpone the porting request as per the following rules: These timeframes are estimates and aren’t bound by any SLA.
If porting takes place and you need to roll back the numbers to the previous carrier, raise such requests with the PTS team at the earliest. Rollbacks aren’t always possible and may require placing a port back request with the previous carrier. |
When placing orders for new numbers or porting existing numbers, you can check the order status or port rejection notices in Control Hub.
A migration banner is displayed when there are locations which need to be migrated from Non-Integrated CCP to Integrated CCP.
-
Sign in to Control Hub.
-
Go to .
Every order submitted has a status value.
Select an order to check its status.
Status Values for New Number Orders
|
Displayed Status |
Description |
|---|---|
|
Pending |
A New numbers order has been created by the user. |
|
Provisioned |
New numbers are provisioned. |
|
Error |
An issue is detected with the new numbers order. Create a TAC ticket to get help. |
|
Action Required |
Click to contact PTS for assistance. |
Status Values for Ported Number Orders
|
Displayed Status |
Description |
|---|---|
|
Pending |
User is in the process of creating/filling in details of the Porting Order. Once submitted, the order will still show Pending until Cisco validates and accepts the porting order. |
|
Rejected |
Porting issue is detected. See the Porting Errors table for additional details. If required, go to Control Hub and click on the PSTN Help link for PSTN technical support. |
|
Submitted |
Porting Order is validated and accepted. |
|
FOC Received |
FOC date confirmation from the previous PSTN provider received. |
|
Completed |
Porting process is complete. |
|
Canceled |
Order is canceled. |
Porting Error Messages
|
Displayed Error |
Description |
How to fix |
|---|---|---|
|
| ||
|
Account number mismatch |
Account number doesn’t match the number on the Customer Service Record (CSR) |
Update the Account Number field on the PSTN Order and resubmit. For some carriers, the account number may be the same as the BTN or the telephone number itself. |
|
Account number required |
The account number wasn't provided but is required. |
Update the Account Number field on the PSTN Order and resubmit. For some carriers, the account number may be the same as the BTN or the telephone number itself. |
|
Account name mismatch |
The person authorizing doesn't match the name on the (CSR). |
Update the Authorized name on account field on the PSTN order and resubmit. |
|
BTN mismatch |
BTN or ATN doesn’t match that on the CSR. |
Update the Carrier billing phone number field on the PSTN Order and resubmit. |
|
Company name mismatch |
Entity name does not match that on the CSR. |
Update the Company name with previous carrier field on the PSTN order and resubmit. |
|
Multiple BTNs |
The OSP requires this Porting Order to be split and submitted as separate orders. |
Cancel the current PSTN order and create a new, multiple PSTN Orders. Create one for each group of numbers that have the same BTN. |
|
FOC rejected by losing carrier |
The FOC date requested can’t be accommodated by the OSP. |
Update the Port Complete date field on the PSTN order and resubmit. |
|
Unknown |
Go to Control Hub and click on the PSTN Help link for PSTN technical support. |
Go to Control Hub and click on the PSTN Help link for PSTN technical support. |
|
Invalid PIN |
Passcode/PIN must be provided for wireless port. |
Update the PIN field on the PSTN order and resubmit. |
|
Pending order |
The OSP has a pending LSR on the account (for example, a port out or address change). |
Remove the telephone numbers in question from the PSTN order and resubmit. |
|
Pending main BTN |
BTN is one of the phone numbers being ported. User must indicate Porting Order Type, Remaining Numbers Action, and New Billing Phone Number accordingly. |
Remove the main BTN from the list of telephone numbers being ported and resubmit the order. Include the Main BTN into the last iteration of numbers (if porting numbers in multiple iterations). |
|
Service address mismatch |
The location info doesn't match that on the CSR. |
Update the Service address, State, and City fields and resubmit the order. |
|
TN has special feature |
Some of the phone numbers can't be ported because they have a special feature (for example, remote call forward). |
Remove numbers with special features from the PSTN order and resubmit. Or, unassign a special features from the numbers being ported. |
|
TN mismatch |
Some of the phone numbers don't belong to the end user. |
Remove one or more numbers in question and resubmit the order. |
|
TN not portable |
Some of the phone numbers can't be ported because they're inactive or aren't part of the end user's account. |
Try to remove one or more numbers in question and resubmit the PSTN order. |
|
Unsupported rate center |
The rate center isn't portable. |
Remove one or more numbers in question and resubmit the order. |
|
Zip/postal code mismatch |
Postal code doesn't match the one on the CSR. |
Update the Zip code field and resubmit the order. |
|
Previous carrier's bill is invalid |
The invoice is invalid. |
Go to PSTN Order details, then open Previous Carrier’s Bill section. Upload the correct bill file and resubmit the order. |
|
LOA invalid |
The LOA is invalid. |
Sign the LOA and resubmit the PSTN order. Alternatively, go to Control Hub and click on the PSTN Help link for PSTN technical support. |
PSTN – Public Switched Telephone Network
CSR – Customer Service Record
FOC – Firm Order Commitment
OSP – Old Service Provider
BTN – Billing Telephone Number
ATN – Account Telephone Number
To configure an ESA for an user, ensure the following conditions are met:
- The user has a non-mobile primary phone number assigned.
- The user’s location is within the U.S. or Canada.
These conditions are necessary because the ESA is tied to the user's phone number and location. This setup allows accurate routing of emergency calls and proper callback to the user through the Emergency Callback Number (ECBN) associated with their location or phone number.
| 1 |
Sign in to Control Hub. |
| 2 |
Go to . |
| 3 |
Select the user that you want to modify and click Calling. |
| 4 |
Select the right arrow to expand the primary phone number settings under Numbers. |
| 5 |
Under Emergency Service Address, select Custom Address. Enter the following details. In case of an emergency, the local emergency response crew will use this address to locate the caller.
|
| 6 |
Update the information for the workspace and click Validate. On entering a service address, the system validates the address. If the system cannot find the address, a Suggested Address displays in a side panel. Review the suggested address and click Apply to update the Emergency service address. Click Save , to save the changes. |
A custom emergency address overrides the location's default emergency address for the specific user.
| 1 |
Sign in to Control Hub. |
| 2 |
Go to and select the location you want to update. |
| 3 |
Next to PSTN Connection, click Manage. |
| 4 |
Next to the Emergency Service Address, click Edit. |
| 5 |
Enter the new address and click Save. If ESA (Enterprise Service Address) address validation fails while configuring premise or CCPP connections, administrators can close the ESA screen and continue with the setup. The validation failure will not prevent setting up the connection. If the ESA is not validated, emergency call handling may be delayed, and additional charges may apply if calls are routed to an emergency relay center. |
Webex Calling provides flexible Calling plans and the ability to choose the PSTN solution that fits the requirement. Over time you may have to migrate to a different PSTN solution due to changes in the business environment or other factors.
Use this matrix to know the potential PSTN migration paths for Webex Calling.
Webex Calling supports the following PSTN migration paths:
-
Using Self Service through Control Hub
-
Premises-based PSTN, non-integrated CCPP, and non-integrated IntelePeer to Cisco Calling Plans. See Migrate to Cisco Calling plans.
-
Non-integrated CCP Provider including non-integrated Intelepeer to a Premises-based Solution. See, Configure premises-based PSTN in Control Hub
-
Premises-based solution to non-integrated CCPP. You must update the connection type in Control Hub and select a CCPP partner. This type of migration does not require any further configuration.
-
-
Using Manual Migration
-
Premises-based solution to Integrated CCP Provider
-
Integrated CCP Provider to Non-integrated CCP Provider (Exception: Non-integrated Intelepeer isn’t supported as the target CCP Provider)
-
Integrated CCP Provider to Premises-based Solution
-
To use the manual migration process, you must create a new location, move TNs and users to the new location, and reconfigure site services/service assignments. During migration, you experience service interruption and there’s a risk of data loss.
Here’s a list of unsupported PSTN migration paths:
-
Cisco Calling Plans to integrated Intelepeer
-
Integrated Intelepeer to Cisco Calling Plans
The minimum required order is one Outbound Calling Plan (OCP). Billing includes charges for outbound calling plans, phone numbers, and international Calling usage. Your Cisco monthly billing invoice includes information on call activity, charges, and applicable fees and taxes. There’s no additional charge to port phone numbers.
When your billing begins:
-
Outbound Calling Plans ordered in CCW begin billing on the requested service date (RSD).
-
Outbound Calling Plans provisioned in Control Hub begin billing immediately.
-
Phone numbers provisioned in Control Hub begin billing immediately or, if ported from another provider, billing begins upon port completion.
Outbound calling plan rates:
-
Rates for the Outbound Calling Plans and phone numbers are prorated using the same proration method used to calculate the rates for the Webex Calling licenses.
-
International Calling rates vary by country and are billed the month following usage.
See Cisco Calling Plan bill for the details.
Cisco Calling Plans support is provided by various support divisions, depending on your need.
|
Support Division |
Purpose |
Contact Information |
|---|---|---|
|
Partner Help Desk (PHD) |
Partner how-to and/or documentation inquiries, Pre-quoting Regulatory Tax and other enquiries about the Cisco Calling Plans offering. |
North America: 1-844-613-6108 EMEA: +44 129 366 10 20 APAC: +61 3 7017 7272 Email: webexcalling-phd@cisco.com |
|
PSTN Technical Support (PTS) |
|
Go to Control Hub and click on PSTN Help link for PSTN technical support. |
|
TAC |
Issues with Control Hub functionality Issues with service, such as dropped calls, call quality issues, or service outages |
North America: 1-800-553-2447 EMEA: +32 2 704 5555 APAC: +61 2 8446 7411 Email: tac@cisco.com See also: |
|
Invoice & Collections |
VAT, Payment and other invoicing queries |
Contact the Collector on the Invoice via email or phone |
|
Cisco SaaS Support Team (CES) |
|
Refer Partner Support Playbook and Cisco Calling Plans FAQ Create a case through link below if the required information is not found in the playbook - https://customerservice.cloudapps.cisco.com/ |
You can select varied connections for multi-site applications. For example, you can select Cisco Calling Plans for one location, Cloud-Connected PSTN (CCP) for a second location, and Local Gateway for the third location. When choosing the Cisco Calling Plans, the following applies.
Requirements
-
Partners must be an authorized Webex Calling partner and have accepted the new Webex Calling addendum through enrollment into the Webex Calling PSTN program.
-
A minimum of one committed Outbound Calling Plan license must be purchased to enable access to all services associated with Cisco Calling Plans.
Limitations
-
Cisco Calling Plans are currently available to specified countries.
-
Existing Webex Calling locations or telephone numbers can only transition to Cisco Calling Plans in certain scenarios. For details on supported migration paths, refer Supported paths for PSTN migration section.
-
You can order a maximum of 100 new standard phone numbers at a time. Additional numbers can be placed as a separate order.
-
Toll-free numbers aren’t currently available. You can’t order new toll-free numbers or port existing toll-free numbers to the Cisco Calling Plans.
-
Cisco Calling Plans aren’t supported with Webex Contact Center or authorized for use in which high-concurrent calls or high-volume calls or uncommonly short or long calls are made. For more information about Webex Contact Center, see Get started with Webex Contact Center.
-
Some premium services and international destinations may not be available for operational purposes. If specific destinations which are not generally available are required, customers can open a support case to request availability.
The card view displays the PSTN provider available for the Webex Calling customer before configuring the PSTN location. The PSTN view displays both Providers and Orders.
You can apply the search filter to filter content based on Service Type and Market. Use the toggle option to change the view from Compact to Table. The compact view helps to resize the card to display the provider details without the service information.
The provider screen displays the various provider cards with the list of supported service types. The Providers section is classified into the following:
-
Preferred Calling providers
-
Certified Calling providers
-
Calling providers
Click the Learn More option on the card to view details of the provider. It displays Use the search field to select the PSTN service provider based on Cisco business relationship preference such as certified provider and Calling provider.
The providers include the following:
-
Provider summary
-
List of locations configured with this provider
-
List of markets that the provider is available for the supported services.
If the customer has PSTN locations where Calling services aren’t set up, the Select this provider action bar displays. Use this option to configure the service for the PSTN location.
The preferred view in the Control Hub displays the calling providers that the managing partner prefers to work. However, you can view all available calling providers with Webex Calling. This section provides the following:
-
Select the location from the drop-down menu.
-
Choose the subscription type for the users to use the Cisco Calling plans. Click Next.
-
Complete the fields for Contract Information and Emergency Service Address configuration.
The PSTN service set up is now complete.
Cisco Calling Plans are available for technical evaluation as part of the Webex Calling trial process. While Cisco Calling Plans trials are free to use, there are some neddotable limitations during the trial phase.
As you can convert the trial accounts to paid accounts, the required regulatory documentation, as mentioned in the 'Order New Phone Numbers' section under each country, is also mandatory for trial services. These documents are legally required by country regulators for our Telephone Number (TN) provisioning team to procure the numbers.
-
Each trial account can provision up to 10 standard telephone numbers from Cisco Calling Plans with Webex Calling. It isn’t permitted to provision more than 10 numbers per trial.
-
Only new, standard telephone numbers are supported in trials. Ported numbers, consecutive blocks, and inbound toll-free numbers aren’t supported on trial accounts. You also cannot port numbers out of a trial. You must convert to a paid account if you wish to use these features.
-
International calling, along with Premium Service Call types I & II are blocked from use during the trial period.
-
Business Texting isn’t available on Webex Calling trial accounts.
-
Trial accounts are intended for technical evaluation purposes only, and not for normal commercial operation. As such, emergency services are only meant for technical evaluation; actual emergency calls can’t be guaranteed. Users shouldn’t place actual emergency service calls on a trial account.
When placing an order to convert a Webex Calling trial with Cisco Calling Plans to a paid subscription, you must order at least one Cisco Calling Plan committed license to maintain the telephone numbers and configuration used in the trial.
-
Cisco Calling Plans (Cisco PSTN)
-
Cloud Connected PSTN
-
Premise-based PSTN (Local Gateway must be enabled separately. For more information, see Configure Premises-based PSTN in Control Hub.)
| 1 |
Sign in to Control Hub. |
| 2 |
Go to and select the location you want to update. |
| 3 |
Select the Calling tab and Click Manage next to PTSN Connection. |
| 4 |
Select Cisco Calling Plans and click Next. |
| 5 |
Enter the contact information and click Next. This field is for the contact information of the person who will sign the legal contract with Cisco. |
| 6 |
Enter the Emergency Services Address (ESA), and click Save. By default, the ESA entered here is applied to all phone numbers for this location. You can change the ESA for an individual user if needed. For example, you may need to change the ESA if you have a remote employee who works from home. |
| 7 |
On the summary screen, do one of the following:
|
Before you begin
-
Enable the Cisco Calling Plan for your site before you order new phone numbers through Control Hub.
-
By default, the Emergency Service Address (ESA) entered for a location during your Cisco Calling Plan setup is applied to all phone numbers for that location.
- Provide the following information for business identity verification:
- First name and last name of the legal representative
- Contact phone number
- Company name
- Local company registration certificate
- Provide the following information for address verification:
- Address matching the DID area code (street, building number, postal code, city, and country)
- Proof of address, not older than last three months
Additionally, you must submit a copy of your passport or ID card in the Netherlands, Switzerland, Poland, Greece, and Lithuania. You must provide VAT ID in Sweden and Greece.
| 1 |
Click Contact Support. Your location information is automatically populated on the Case Details window. |
| 2 |
Indicate how many new numbers you’re requesting in the Number of Telephone Numbers Requested field. |
| 3 |
From the Number Type drop-down list, choose Local or National as the case maybe. |
| 4 |
(Optional) Enter the additional details. |
| 5 |
Click Submit. You receive a PSTN Order Number which displays on the PSTN order page. It can take up to five to seven business days for the ordering and document approval process. |
Before you begin
We strongly recommend you to read and familiarize yourself with the Cisco Calling Plan Number Porting Guidelines and Policies before you start porting the numbers.
-
Enable Cisco Calling Plan for your location before you port phone numbers through Control Hub.
-
A signed Letter of Agency (LOA) is needed, authorizing Cisco to place orders with the current PSTN carrier to move the service to Cisco. The LOA must be signed by the current account owner or authorized signer. You're prompted to sign the LOA while completing the porting steps.
-
Make sure you have a recent bill in PNG or PDF format from your current PSTN provider. The bill must not be older than 30 days. While completing the porting steps, you’re prompted to upload a copy of your bill.
-
For successful porting, ensure that you have the following information ready:
-
List of all phone numbers to port (non-toll free)
-
Current PSTN provider account information
-
Customer Service Record (CSR) if available
-
Your account PIN if one exists
-
UAN ID
-
-
When planning for which numbers to port, we recommend that you consider any number that receives inbound calls. See Cisco Calling Plan Number Policy for more information.
-
By default, the Emergency Service Address (ESA) entered for a location during your Cisco Calling Plan setup is applied to all phone numbers for that location.
As an administrator, you can move existing phone numbers from your current PSTN to the Cisco Calling Plan option. The following are the types of porting services:
- Standard port: When a phone number moves from one service provider to another, without any special circumstances. For example, porting a number from Carrier A to Carrier B within the same country and service area is a Standard port.
- Mixed operator port: A more complex porting situation that involves multiple operators or service providers. For example, porting a range of numbers in a block that belongs to two or more network operators is a Mixed operator port.
Porting in Ireland can take place on Monday to Friday between 10 a.m. to 3:30 p.m.
Requests for porting out of hours are on a case-by-case basis and depend on the carriers involved. We can’t guarantee that out of hours porting is available.
| 1 |
Sign in to Control Hub. |
| 2 |
Go to . |
| 3 |
From the Manage drop-down select Add. |
| 4 |
Choose a Location and PSTN Number in Number Type drop-down on add numbers page and then click Next. |
| 5 |
Select Port Numbers Over and click Next. |
| 6 |
Add the phone numbers that you want to port, and then click Save & continue. |
| 7 |
Enter the Date and Time by when you want the porting to finish. Set the schedule based on your preference. But it’s not guaranteed that the porting of your numbers is finished at the exact date and time selected. |
| 8 |
(Optional) Enter an additional email address, other than the default contact listed, to receive notifications regarding the port order status. |
| 9 |
Click Next. |
| 10 |
Enter your current carrier account information in the fields provided. Make sure this matches the information on your previous carrier’s bill. |
| 11 |
Click Next. |
| 12 |
Upload your previous carrier bill (not older than 30 days). |
| 13 |
Click Next. |
| 14 |
Upload the LOA. The authorized contact for your previous carrier’s account must upload the signed LOA. Open a ticket with Webex Partner Help Center to get the LOA required for your country and upload the signed copy here. If you're not the authorized contact, skip this step. That person can come back and upload the signed LOA later, we’ll send your order contacts a reminder. |
| 15 |
Click Save & continue. |
| 16 |
Your Port Order is submitted. You can check the order status in PSTN Orders. |
| 17 |
Click Done. Our support team contacts you for any additional documents requirements to complete your porting request. You can upload the requested documents in the right-hand panel of the order. The Firm Order Commitment (FOC) date can be two business days later from the submission date. An FOC is the date on which the losing carrier states that it releases a phone number to the winning carrier. After the losing carrier confirms the porting request, you can cancel or postpone the porting request as per the following rules: These time frames are estimates and aren’t bound by any SLA.
If porting takes place and you need to roll back the numbers to the previous carrier, raise such requests with the PTS team at the earliest. Rollbacks aren’t always possible and may require placing a port back request with the previous carrier. |
When placing orders for new numbers or porting existing numbers, you can check the order status or port rejection notices in Control Hub.
A migration banner is displayed when there are locations which need to be migrated from Non-Integrated CCP to Integrated CCP.
-
Sign in to Control Hub.
-
Go to .
Every order submitted has a status value.
Select an order to check its status.
Status Values for New Number Orders
|
Displayed Status |
Description |
|---|---|
|
Pending |
A New numbers order has been created by the user. |
|
Provisioned |
New numbers are provisioned. |
|
Error |
An issue is detected with the new numbers order. Create a TAC ticket to get help. |
|
Action Required |
Click to contact PTS for assistance. |
Status Values for Ported Number Orders
|
Displayed Status |
Description |
|---|---|
|
Pending |
User is in the process of creating/filling in details of the Porting Order. Once submitted, the order will still show Pending until Cisco validates and accepts the porting order. |
|
Rejected |
Porting issue is detected. See the Porting Errors table for additional details. If required, go to Control Hub and click on the PSTN Help link for PSTN technical support. |
|
Submitted |
Porting Order is validated and accepted. |
|
FOC Received |
FOC date confirmation from the previous PSTN provider received. |
|
Completed |
Porting process is complete. |
|
Canceled |
Order is canceled. |
Porting Error Messages
|
Displayed Error |
Description |
How to fix |
|---|---|---|
|
| ||
|
Account number mismatch |
Account number doesn’t match the number on the Customer Service Record (CSR) |
Update the Account Number field on the PSTN Order and resubmit. For some carriers, the account number may be the same as the BTN or the telephone number itself. |
|
Account number required |
The account number wasn't provided but is required. |
Update the Account Number field on the PSTN Order and resubmit. For some carriers, the account number may be the same as the BTN or the telephone number itself. |
|
Account name mismatch |
The person authorizing doesn't match the name on the (CSR). |
Update the Authorized name on account field on the PSTN order and resubmit. |
|
BTN mismatch |
BTN or ATN doesn’t match that on the CSR. |
Update the Carrier billing phone number field on the PSTN Order and resubmit. |
|
Company name mismatch |
Entity name does not match that on the CSR. |
Update the Company name with previous carrier field on the PSTN order and resubmit. |
|
Multiple BTNs |
The OSP requires this Porting Order to be split and submitted as separate orders. |
Cancel the current PSTN order and create a new, multiple PSTN Orders. Create one for each group of numbers that have the same BTN. |
|
FOC rejected by losing carrier |
The FOC date requested can’t be accommodated by the OSP. |
Update the Port Complete date field on the PSTN order and resubmit. |
|
Unknown |
Go to Control Hub and click on the PSTN Help link for PSTN technical support. |
Go to Control Hub and click on the PSTN Help link for PSTN technical support. |
|
Invalid PIN |
Passcode/PIN must be provided for wireless port. |
Update the PIN field on the PSTN order and resubmit. |
|
Pending order |
The OSP has a pending LSR on the account (for example, a port out or address change). |
Remove the telephone numbers in question from the PSTN order and resubmit. |
|
Pending main BTN |
BTN is one of the phone numbers being ported. User must indicate Porting Order Type, Remaining Numbers Action, and New Billing Phone Number accordingly. |
Remove the main BTN from the list of telephone numbers being ported and resubmit the order. Include the Main BTN into the last iteration of numbers (if porting numbers in multiple iterations). |
|
Service address mismatch |
The location info doesn't match that on the CSR. |
Update the Service address, State, and City fields and resubmit the order. |
|
TN has special feature |
Some of the phone numbers can't be ported because they have a special feature (for example, remote call forward). |
Remove numbers with special features from the PSTN order and resubmit. Or, unassign a special features from the numbers being ported. |
|
TN mismatch |
Some of the phone numbers don't belong to the end user. |
Remove one or more numbers in question and resubmit the order. |
|
TN not portable |
Some of the phone numbers can't be ported because they're inactive or aren't part of the end user's account. |
Try to remove one or more numbers in question and resubmit the PSTN order. |
|
Unsupported rate center |
The rate center isn't portable. |
Remove one or more numbers in question and resubmit the order. |
|
Zip/postal code mismatch |
Postal code doesn't match the one on the CSR. |
Update the Zip code field and resubmit the order. |
|
Previous carrier's bill is invalid |
The invoice is invalid. |
Go to PSTN Order details, then open Previous Carrier’s Bill section. Upload the correct bill file and resubmit the order. |
|
LOA invalid |
The LOA is invalid. |
Sign the LOA and resubmit the PSTN order. Alternatively, go to Control Hub and click on the PSTN Help link for PSTN technical support. |
PSTN – Public Switched Telephone Network
CSR – Customer Service Record
FOC – Firm Order Commitment
OSP – Old Service Provider
BTN – Billing Telephone Number
ATN – Account Telephone Number
To configure an ESA for an user, ensure the following conditions are met:
- The user has a non-mobile primary phone number assigned.
- The user’s location is within the U.S. or Canada.
These conditions are necessary because the ESA is tied to the user's phone number and location. This setup allows accurate routing of emergency calls and proper callback to the user through the Emergency Callback Number (ECBN) associated with their location or phone number.
| 1 |
Sign in to Control Hub. |
| 2 |
Go to . |
| 3 |
Select the user that you want to modify and click Calling. |
| 4 |
Select the right arrow to expand the primary phone number settings under Numbers. |
| 5 |
Under Emergency Service Address, select Custom Address. Enter the following details. In case of an emergency, the local emergency response crew will use this address to locate the caller.
|
| 6 |
Update the information for the workspace and click Validate. On entering a service address, the system validates the address. If the system cannot find the address, a Suggested Address displays in a side panel. Review the suggested address and click Apply to update the Emergency service address. Click Save , to save the changes. |
A custom emergency address overrides the location's default emergency address for the specific user.
| 1 |
Sign in to Control Hub. |
| 2 |
Go to and select the location you want to update. |
| 3 |
Next to PSTN Connection, click Manage. |
| 4 |
Next to the Emergency Service Address, click Edit. |
| 5 |
Enter the new address and click Save. If ESA (Enterprise Service Address) address validation fails while configuring premise or CCPP connections, administrators can close the ESA screen and continue with the setup. The validation failure will not prevent setting up the connection. If the ESA is not validated, emergency call handling may be delayed, and additional charges may apply if calls are routed to an emergency relay center. |
Webex Calling provides flexible Calling plans and the ability to choose the PSTN solution that fits the requirement. Over time you may have to migrate to a different PSTN solution due to changes in the business environment or other factors.
Use this matrix to know the potential PSTN migration paths for Webex Calling.
Webex Calling supports the following PSTN migration paths:
-
Using Self Service through Control Hub
-
Premises-based PSTN, non-integrated CCPP, and non-integrated IntelePeer to Cisco Calling Plans. See Migrate to Cisco Calling plans.
-
Non-integrated CCP Provider including non-integrated Intelepeer to a Premises-based Solution. See, Configure premises-based PSTN in Control Hub
-
Premises-based solution to non-integrated CCPP. You must update the connection type in Control Hub and select a CCPP partner. This type of migration does not require any further configuration.
-
-
Using Manual Migration
-
Premises-based solution to Integrated CCP Provider
-
Integrated CCP Provider to Non-integrated CCP Provider (Exception: Non-integrated Intelepeer isn’t supported as the target CCP Provider)
-
Integrated CCP Provider to Premises-based Solution
-
To use the manual migration process, you must create a new location, move TNs and users to the new location, and reconfigure site services/service assignments. During migration, you experience service interruption and there’s a risk of data loss.
Here’s a list of unsupported PSTN migration paths:
-
Cisco Calling Plans to integrated Intelepeer
-
Integrated Intelepeer to Cisco Calling Plans
The minimum required order is one Outbound Calling Plan (OCP). Billing includes charges for outbound calling plans, phone numbers, and international Calling usage. Your Cisco monthly billing invoice includes information on call activity, charges, and applicable fees and taxes. There’s no additional charge to port phone numbers.
When your billing begins:
-
Outbound Calling Plans ordered in CCW begin billing on the requested service date (RSD).
-
Outbound Calling Plans provisioned in Control Hub begin billing immediately.
-
Phone numbers provisioned in Control Hub begin billing immediately or, if ported from another provider, billing begins upon port completion.
Outbound calling plan rates:
-
Rates for the Outbound Calling Plans and phone numbers are prorated using the same proration method used to calculate the rates for the Webex Calling licenses.
-
International Calling rates vary by country and are billed the month following usage.
See Cisco Calling Plan bill for the details.
Cisco Calling Plans support is provided by various support divisions, depending on your need.
|
Support Division |
Purpose |
Contact Information |
|---|---|---|
|
Partner Help Desk (PHD) |
Partner how-to and/or documentation inquiries, Pre-quoting Regulatory Tax and other enquiries about the Cisco Calling Plans offering. |
North America: 1-844-613-6108 EMEA: +44 129 366 10 20 APAC: +61 3 7017 7272 Email: webexcalling-phd@cisco.com |
|
PSTN Technical Support (PTS) |
|
Go to Control Hub and click on PSTN Help link for PSTN technical support. |
|
TAC |
Issues with Control Hub functionality Issues with service, such as dropped calls, call quality issues, or service outages |
North America: 1-800-553-2447 EMEA: +32 2 704 5555 APAC: +61 2 8446 7411 Email: tac@cisco.com See also: |
|
Invoice & Collections |
VAT, Payment and other invoicing queries |
Contact the Collector on the Invoice via email or phone |
|
Cisco SaaS Support Team (CES) |
|
Refer Partner Support Playbook and Cisco Calling Plans FAQ Create a case through link below if the required information is not found in the playbook - https://customerservice.cloudapps.cisco.com/ |
You can select varied connections for multi-site applications. For example, you can select Cisco Calling Plans for one location, Cloud-Connected PSTN (CCP) for a second location, and Local Gateway for the third location. When choosing the Cisco Calling Plans, the following applies.
Requirements
-
Partners must be an authorized Webex Calling partner and have accepted the new Webex Calling addendum through enrollment into the Webex Calling PSTN program.
-
A minimum of one committed Outbound Calling Plan license must be purchased to enable access to all services associated with Cisco Calling Plans.
Limitations
-
Cisco Calling Plans are currently available to specified countries.
-
Existing Webex Calling locations or telephone numbers can only transition to Cisco Calling Plans in certain scenarios. For details on supported migration paths, refer Supported paths for PSTN migration section.
-
You can order a maximum of 100 new standard phone numbers at a time. Additional numbers can be placed as a separate order.
-
Toll-free numbers aren’t currently available. You can’t order new toll-free numbers or port existing toll-free numbers to the Cisco Calling Plans.
-
Cisco Calling Plans aren’t supported with Webex Contact Center or authorized for use in which high-concurrent calls or high-volume calls or uncommonly short or long calls are made. For more information about Webex Contact Center, see Get started with Webex Contact Center.
-
Some premium services and international destinations may not be available for operational purposes. If specific destinations which are not generally available are required, customers can open a support case to request availability.
The card view displays the PSTN provider available for the Webex Calling customer before configuring the PSTN location. The PSTN view displays both Providers and Orders.
You can apply the search filter to filter content based on Service Type and Market. Use the toggle option to change the view from Compact to Table. The compact view helps to resize the card to display the provider details without the service information.
The provider screen displays the various provider cards with the list of supported service types. The Providers section is classified into the following:
-
Preferred Calling providers
-
Certified Calling providers
-
Calling providers
Click the Learn More option on the card to view details of the provider. It displays Use the search field to select the PSTN service provider based on Cisco business relationship preference such as certified provider and Calling provider.
The providers include the following:
-
Provider summary
-
List of locations configured with this provider
-
List of markets that the provider is available for the supported services.
If the customer has PSTN locations where Calling services aren’t set up, the Select this provider action bar displays. Use this option to configure the service for the PSTN location.
The preferred view in the Control Hub displays the calling providers that the managing partner prefers to work. However, you can view all available calling providers with Webex Calling. This section provides the following:
-
Select the location from the drop-down menu.
-
Choose the subscription type for the users to use the Cisco Calling plans. Click Next.
-
Complete the fields for Contract Information and Emergency Service Address configuration.
The PSTN service set up is now complete.
Cisco Calling Plans are available for technical evaluation as part of the Webex Calling trial process. While Cisco Calling Plans trials are free to use, there are some neddotable limitations during the trial phase.
As you can convert the trial accounts to paid accounts, the required regulatory documentation, as mentioned in the 'Order New Phone Numbers' section under each country, is also mandatory for trial services. These documents are legally required by country regulators for our Telephone Number (TN) provisioning team to procure the numbers.
-
Each trial account can provision up to 10 standard telephone numbers from Cisco Calling Plans with Webex Calling. It isn’t permitted to provision more than 10 numbers per trial.
-
Only new, standard telephone numbers are supported in trials. Ported numbers, consecutive blocks, and inbound toll-free numbers aren’t supported on trial accounts. You also cannot port numbers out of a trial. You must convert to a paid account if you wish to use these features.
-
International calling, along with Premium Service Call types I & II are blocked from use during the trial period.
-
Business Texting isn’t available on Webex Calling trial accounts.
-
Trial accounts are intended for technical evaluation purposes only, and not for normal commercial operation. As such, emergency services are only meant for technical evaluation; actual emergency calls can’t be guaranteed. Users shouldn’t place actual emergency service calls on a trial account.
When placing an order to convert a Webex Calling trial with Cisco Calling Plans to a paid subscription, you must order at least one Cisco Calling Plan committed license to maintain the telephone numbers and configuration used in the trial.
-
Cisco Calling Plans (Cisco PSTN)
-
Cloud Connected PSTN
-
Premise-based PSTN (Local Gateway must be enabled separately. For more information, see Configure Premises-based PSTN in Control Hub.)
| 1 |
Sign in to Control Hub. |
| 2 |
Go to and select the location you want to update. |
| 3 |
Select the Calling tab and Click Manage next to PTSN Connection. |
| 4 |
Select Cisco Calling Plans and click Next. |
| 5 |
Enter the contact information and click Next. This field is for the contact information of the person who will sign the legal contract with Cisco. |
| 6 |
Enter the Emergency Services Address (ESA), and click Save. By default, the ESA entered here is applied to all phone numbers for this location. You can change the ESA for an individual user if needed. For example, you may need to change the ESA if you have a remote employee who works from home. |
| 7 |
On the summary screen, do one of the following:
|
A local telephony provider processes the new number request. Here is a list of legally required documents by the PSTN provider to provision the services:
For business identity verification:
-
Name of the authorizing person
-
Fiscal Code of the authorizing person
-
Date of Birth of the authorizing person
-
Place of Birth of the authorizing person
-
Gender of the authorizing person
-
Nationality of the authorizing person
-
Contact the phone number of the authorizing person.
-
Contact Email of the authorizing person
-
Passport or ID copy of the authorizing person
-
Company name
-
VAT number
-
Company incorporation certificate copy
-
Service description
For address verification:
-
Address matching the DID area code (street, building number, postal code, city, and country
-
A copy of a utility bill which is less than three months old.
It takes at least 5–7 business days for ordering and document approval.
Before you begin
-
Enable the Cisco Calling Plan for your site before you can order new phone numbers through Control Hub.
-
By default, the Emergency Service Address (ESA) entered for a location during your Cisco Calling Plan setup applies to all phone numbers for that location.
| 1 |
Select Order New Numbers and click Next. You’re directed to Contact Support for ordering new numbers. |
| 2 |
Click Contact Support. Your location information populates on the Case Details Screen. |
| 3 |
Indicate how many new numbers you’re requesting in the Number of Telephone Numbers Requested field. |
| 4 |
Select your Number Type (Local or National) from the drop-down menu. |
| 5 |
(Optional) Input additional details. |
| 6 |
Click Submit. You receive a PSTN Order Number which displays on the PSTN order page. |
Before you begin
As an administrator, you can move existing phone numbers from your current PSTN to the Cisco Calling Plan.
We strongly recommend you to read and familiarize yourself with the Cisco Calling Plan Number Porting Guidelines and Policies before you start porting the numbers.
-
Enable Cisco Calling Plan for your location before you port in phone numbers through the Control Hub.
-
Submit a signed Letter of Agency (LOA), to authorize Cisco to place orders with the current PSTN carrier to move the service to Cisco. The current owner or an authorized signer must sign the LOA. You're prompted to sign the LOA while completing the porting steps.
Ensure that the LOA address is within the same area code as the porting phone numbers.
-
To ensure a successful port, make sure you have the following information ready:
-
List of all phone numbers to port in (non toll free)
-
Current PSTN provider account information
-
Local TAX/VAT Number or Company Registration Number
-
Migration Code
-
Latest Invoice
-
Valid Passport/ID Card of the authorizing person
-
Fiscal Code of the authorizing person
-
Proof of Local Address (Utility Bill, and so on), dated from within the last three months
-
-
Porting Window– Ports in Italy can take place from Monday to Friday from 8 a.m. to 6 p.m..
Out of hours ports are requested on a case-by-case basis and depending on the carriers. Cisco can’t guarantee the availability of the out of hours porting.
-
Port Types
-
Standard Ports: A porting process where a number is moved from one provider to another without any special circumstances or complexities.
For example, porting a number from Carrier A to Carrier B within the same country and service area is a standard port.
-
Mixed Operator Ports: A more complex porting situation that involves multiple operators or service providers.
For instance, porting a range of numbers in a block that belong to two or more different range holders or Current Network Operators.
-
-
When planning for which numbers to port, we recommend that you consider any number that receives inbound calls. See Cisco Calling Plan Number Policy for more information.
-
By default, the Emergency Service Address (ESA) entered for a location during your Cisco Calling Plan setup is applied to all phone numbers for that location.
Port Cancellations and Rollbacks
If you choose to cancel or postpone a porting request even after receiving a go-ahead from your current carrier, bear in mind the following rules:
-
You can cancel or reschedule standard port requests up to five working days before the porting date.
-
You can cancel or reschedule Mixed Operator/Complex port requests up to seven working days before the porting date.
Once the port in period ends, the number porting starts without the option to cancel or reschedule.
-
If a porting doesn’t happen then to roll back the numbers to the previous carrier, raise a case with the Cisco PTS team. Rollbacks aren’t always possible and may require to place the port back with the previous carrier.
To port in numbers using the Control Hub, complete these steps:
| 1 |
Sign in to Control Hub. |
| 2 |
Go to . |
| 3 |
From the Manage drop-down select Add. |
| 4 |
Choose a Location and PSTN Number in Number Type drop-down on add numbers page and then click Next. |
| 5 |
Select Port Numbers Over and click Next. |
| 6 |
Add the phone numbers that you want to port, and then click Save & continue. |
| 7 |
Enter the Date and Time by when you want the porting to finish. Set the schedule based on your preference. But it’s not guaranteed that the porting of your numbers is finished at the exact date and time selected. |
| 8 |
(Optional) Enter an additional email address, other than the default contact listed, to receive notifications regarding the port order status. |
| 9 |
Click Next. |
| 10 |
Enter your current carrier account information in the fields provided. Make sure this matches the information on your previous carrier’s bill. |
| 11 |
Click Next. |
| 12 |
Upload your previous carrier bill (not older than 30 days). |
| 13 |
Click Next. |
| 14 |
Upload the LOA. The authorized contact for your previous carrier’s account must upload the signed LOA. Open a ticket with Webex Partner Help Center to get the LOA required for your country and upload the signed copy here. If you're not the authorized contact, skip this step. That person can come back and upload the signed LOA later, we’ll send your order contacts a reminder. |
| 15 |
Click Save & continue. |
| 16 |
Your Port Order is submitted. You can check the order status in PSTN Orders. |
| 17 |
Click Done. Our support team contacts you for any additional documents requirements to complete your porting request. You can upload the requested documents in the right-hand panel of the order. The Firm Order Commitment (FOC) date can be two business days later from the submission date. An FOC is the date on which the losing carrier states that it releases a phone number to the winning carrier. After the losing carrier confirms the porting request, you can cancel or postpone the porting request as per the following rules: These time frames are estimates and aren’t bound by any SLA.
If porting takes place and you need to roll back the numbers to the previous carrier, raise such requests with the PTS team at the earliest. Rollbacks aren’t always possible and may require placing a port back request with the previous carrier. |
When placing orders for new numbers or porting existing numbers, you can check the order status or port rejection notices in Control Hub.
A migration banner is displayed when there are locations which need to be migrated from Non-Integrated CCP to Integrated CCP.
-
Sign in to Control Hub.
-
Go to .
Every order submitted has a status value.
Select an order to check its status.
Status Values for New Number Orders
|
Displayed Status |
Description |
|---|---|
|
Pending |
A New numbers order has been created by the user. |
|
Provisioned |
New numbers are provisioned. |
|
Error |
An issue is detected with the new numbers order. Create a TAC ticket to get help. |
|
Action Required |
Click to contact PTS for assistance. |
Status Values for Ported Number Orders
|
Displayed Status |
Description |
|---|---|
|
Pending |
User is in the process of creating/filling in details of the Porting Order. Once submitted, the order will still show Pending until Cisco validates and accepts the porting order. |
|
Rejected |
Porting issue is detected. See the Porting Errors table for additional details. If required, go to Control Hub and click on the PSTN Help link for PSTN technical support. |
|
Submitted |
Porting Order is validated and accepted. |
|
FOC Received |
FOC date confirmation from the previous PSTN provider received. |
|
Completed |
Porting process is complete. |
|
Canceled |
Order is canceled. |
Porting Error Messages
|
Displayed Error |
Description |
How to fix |
|---|---|---|
|
| ||
|
Account number mismatch |
Account number doesn’t match the number on the Customer Service Record (CSR) |
Update the Account Number field on the PSTN Order and resubmit. For some carriers, the account number may be the same as the BTN or the telephone number itself. |
|
Account number required |
The account number wasn't provided but is required. |
Update the Account Number field on the PSTN Order and resubmit. For some carriers, the account number may be the same as the BTN or the telephone number itself. |
|
Account name mismatch |
The person authorizing doesn't match the name on the (CSR). |
Update the Authorized name on account field on the PSTN order and resubmit. |
|
BTN mismatch |
BTN or ATN doesn’t match that on the CSR. |
Update the Carrier billing phone number field on the PSTN Order and resubmit. |
|
Company name mismatch |
Entity name does not match that on the CSR. |
Update the Company name with previous carrier field on the PSTN order and resubmit. |
|
Multiple BTNs |
The OSP requires this Porting Order to be split and submitted as separate orders. |
Cancel the current PSTN order and create a new, multiple PSTN Orders. Create one for each group of numbers that have the same BTN. |
|
FOC rejected by losing carrier |
The FOC date requested can’t be accommodated by the OSP. |
Update the Port Complete date field on the PSTN order and resubmit. |
|
Unknown |
Go to Control Hub and click on the PSTN Help link for PSTN technical support. |
Go to Control Hub and click on the PSTN Help link for PSTN technical support. |
|
Invalid PIN |
Passcode/PIN must be provided for wireless port. |
Update the PIN field on the PSTN order and resubmit. |
|
Pending order |
The OSP has a pending LSR on the account (for example, a port out or address change). |
Remove the telephone numbers in question from the PSTN order and resubmit. |
|
Pending main BTN |
BTN is one of the phone numbers being ported. User must indicate Porting Order Type, Remaining Numbers Action, and New Billing Phone Number accordingly. |
Remove the main BTN from the list of telephone numbers being ported and resubmit the order. Include the Main BTN into the last iteration of numbers (if porting numbers in multiple iterations). |
|
Service address mismatch |
The location info doesn't match that on the CSR. |
Update the Service address, State, and City fields and resubmit the order. |
|
TN has special feature |
Some of the phone numbers can't be ported because they have a special feature (for example, remote call forward). |
Remove numbers with special features from the PSTN order and resubmit. Or, unassign a special features from the numbers being ported. |
|
TN mismatch |
Some of the phone numbers don't belong to the end user. |
Remove one or more numbers in question and resubmit the order. |
|
TN not portable |
Some of the phone numbers can't be ported because they're inactive or aren't part of the end user's account. |
Try to remove one or more numbers in question and resubmit the PSTN order. |
|
Unsupported rate center |
The rate center isn't portable. |
Remove one or more numbers in question and resubmit the order. |
|
Zip/postal code mismatch |
Postal code doesn't match the one on the CSR. |
Update the Zip code field and resubmit the order. |
|
Previous carrier's bill is invalid |
The invoice is invalid. |
Go to PSTN Order details, then open Previous Carrier’s Bill section. Upload the correct bill file and resubmit the order. |
|
LOA invalid |
The LOA is invalid. |
Sign the LOA and resubmit the PSTN order. Alternatively, go to Control Hub and click on the PSTN Help link for PSTN technical support. |
PSTN – Public Switched Telephone Network
CSR – Customer Service Record
FOC – Firm Order Commitment
OSP – Old Service Provider
BTN – Billing Telephone Number
ATN – Account Telephone Number
To configure an ESA for an user, ensure the following conditions are met:
- The user has a non-mobile primary phone number assigned.
- The user’s location is within the U.S. or Canada.
These conditions are necessary because the ESA is tied to the user's phone number and location. This setup allows accurate routing of emergency calls and proper callback to the user through the Emergency Callback Number (ECBN) associated with their location or phone number.
| 1 |
Sign in to Control Hub. |
| 2 |
Go to . |
| 3 |
Select the user that you want to modify and click Calling. |
| 4 |
Select the right arrow to expand the primary phone number settings under Numbers. |
| 5 |
Under Emergency Service Address, select Custom Address. Enter the following details. In case of an emergency, the local emergency response crew will use this address to locate the caller.
|
| 6 |
Update the information for the workspace and click Validate. On entering a service address, the system validates the address. If the system cannot find the address, a Suggested Address displays in a side panel. Review the suggested address and click Apply to update the Emergency service address. Click Save , to save the changes. |
A custom emergency address overrides the location's default emergency address for the specific user.
| 1 |
Sign in to Control Hub. |
| 2 |
Go to and select the location you want to update. |
| 3 |
Next to PSTN Connection, click Manage. |
| 4 |
Next to the Emergency Service Address, click Edit. |
| 5 |
Enter the new address and click Save. If ESA (Enterprise Service Address) address validation fails while configuring premise or CCPP connections, administrators can close the ESA screen and continue with the setup. The validation failure will not prevent setting up the connection. If the ESA is not validated, emergency call handling may be delayed, and additional charges may apply if calls are routed to an emergency relay center. |
Webex Calling provides flexible Calling plans and the ability to choose the PSTN solution that fits the requirement. Over time you may have to migrate to a different PSTN solution due to changes in the business environment or other factors.
Use this matrix to know the potential PSTN migration paths for Webex Calling.
Webex Calling supports the following PSTN migration paths:
-
Using Self Service through Control Hub
-
Premises-based PSTN, non-integrated CCPP, and non-integrated IntelePeer to Cisco Calling Plans. See Migrate to Cisco Calling plans.
-
Non-integrated CCP Provider including non-integrated Intelepeer to a Premises-based Solution. See, Configure premises-based PSTN in Control Hub
-
Premises-based solution to non-integrated CCPP. You must update the connection type in Control Hub and select a CCPP partner. This type of migration does not require any further configuration.
-
-
Using Manual Migration
-
Premises-based solution to Integrated CCP Provider
-
Integrated CCP Provider to Non-integrated CCP Provider (Exception: Non-integrated Intelepeer isn’t supported as the target CCP Provider)
-
Integrated CCP Provider to Premises-based Solution
-
To use the manual migration process, you must create a new location, move TNs and users to the new location, and reconfigure site services/service assignments. During migration, you experience service interruption and there’s a risk of data loss.
Here’s a list of unsupported PSTN migration paths:
-
Cisco Calling Plans to integrated Intelepeer
-
Integrated Intelepeer to Cisco Calling Plans
The minimum required order is one Outbound Calling Plan (OCP). Billing includes charges for outbound calling plans, phone numbers, and international Calling usage. Your Cisco monthly billing invoice includes information on call activity, charges, and applicable fees and taxes. There’s no additional charge to port phone numbers.
When your billing begins:
-
Outbound Calling Plans ordered in CCW begin billing on the requested service date (RSD).
-
Outbound Calling Plans provisioned in Control Hub begin billing immediately.
-
Phone numbers provisioned in Control Hub begin billing immediately or, if ported from another provider, billing begins upon port completion.
Outbound calling plan rates:
-
Rates for the Outbound Calling Plans and phone numbers are prorated using the same proration method used to calculate the rates for the Webex Calling licenses.
-
International Calling rates vary by country and are billed the month following usage.
See Cisco Calling Plan bill for the details.
Cisco Calling Plans support is provided by various support divisions, depending on your need.
|
Support Division |
Purpose |
Contact Information |
|---|---|---|
|
Partner Help Desk (PHD) |
Partner how-to and/or documentation inquiries, Pre-quoting Regulatory Tax and other enquiries about the Cisco Calling Plans offering. |
North America: 1-844-613-6108 EMEA: +44 129 366 10 20 APAC: +61 3 7017 7272 Email: webexcalling-phd@cisco.com |
|
PSTN Technical Support (PTS) |
|
Go to Control Hub and click on PSTN Help link for PSTN technical support. |
|
TAC |
Issues with Control Hub functionality Issues with service, such as dropped calls, call quality issues, or service outages |
North America: 1-800-553-2447 EMEA: +32 2 704 5555 APAC: +61 2 8446 7411 Email: tac@cisco.com See also: |
|
Invoice & Collections |
VAT, Payment and other invoicing queries |
Contact the Collector on the Invoice via email or phone |
|
Cisco SaaS Support Team (CES) |
|
Refer Partner Support Playbook and Cisco Calling Plans FAQ Create a case through link below if the required information is not found in the playbook - https://customerservice.cloudapps.cisco.com/ |
You can select varied connections for multi-site applications. For example, you can select Cisco Calling Plans for one location, Cloud-Connected PSTN (CCP) for a second location, and Local Gateway for the third location. When choosing the Cisco Calling Plans, the following applies.
Requirements
-
Partners must be an authorized Webex Calling partner and have accepted the new Webex Calling addendum through enrollment into the Webex Calling PSTN program.
-
A minimum of one committed Outbound Calling Plan license must be purchased to enable access to all services associated with Cisco Calling Plans.
Limitations
-
Cisco Calling Plans are currently available to specified countries.
-
Existing Webex Calling locations or telephone numbers can only transition to Cisco Calling Plans in certain scenarios. For details on supported migration paths, refer Supported paths for PSTN migration section.
-
You can order a maximum of 100 new standard phone numbers at a time. Additional numbers can be placed as a separate order.
-
Toll-free numbers aren’t currently available. You can’t order new toll-free numbers or port existing toll-free numbers to the Cisco Calling Plans.
-
Cisco Calling Plans aren’t supported with Webex Contact Center or authorized for use in which high-concurrent calls or high-volume calls or uncommonly short or long calls are made. For more information about Webex Contact Center, see Get started with Webex Contact Center.
-
Some premium services and international destinations may not be available for operational purposes. If specific destinations which are not generally available are required, customers can open a support case to request availability.
The card view displays the PSTN provider available for the Webex Calling customer before configuring the PSTN location. The PSTN view displays both Providers and Orders.
You can apply the search filter to filter content based on Service Type and Market. Use the toggle option to change the view from Compact to Table. The compact view helps to resize the card to display the provider details without the service information.
The provider screen displays the various provider cards with the list of supported service types. The Providers section is classified into the following:
-
Preferred Calling providers
-
Certified Calling providers
-
Calling providers
Click the Learn More option on the card to view details of the provider. It displays Use the search field to select the PSTN service provider based on Cisco business relationship preference such as certified provider and Calling provider.
The providers include the following:
-
Provider summary
-
List of locations configured with this provider
-
List of markets that the provider is available for the supported services.
If the customer has PSTN locations where Calling services aren’t set up, the Select this provider action bar displays. Use this option to configure the service for the PSTN location.
The preferred view in the Control Hub displays the calling providers that the managing partner prefers to work. However, you can view all available calling providers with Webex Calling. This section provides the following:
-
Select the location from the drop-down menu.
-
Choose the subscription type for the users to use the Cisco Calling plans. Click Next.
-
Complete the fields for Contract Information and Emergency Service Address configuration.
The PSTN service set up is now complete.
Cisco Calling Plans are available for technical evaluation as part of the Webex Calling trial process. While Cisco Calling Plans trials are free to use, there are some neddotable limitations during the trial phase.
As you can convert the trial accounts to paid accounts, the required regulatory documentation, as mentioned in the 'Order New Phone Numbers' section under each country, is also mandatory for trial services. These documents are legally required by country regulators for our Telephone Number (TN) provisioning team to procure the numbers.
-
Each trial account can provision up to 10 standard telephone numbers from Cisco Calling Plans with Webex Calling. It isn’t permitted to provision more than 10 numbers per trial.
-
Only new, standard telephone numbers are supported in trials. Ported numbers, consecutive blocks, and inbound toll-free numbers aren’t supported on trial accounts. You also cannot port numbers out of a trial. You must convert to a paid account if you wish to use these features.
-
International calling, along with Premium Service Call types I & II are blocked from use during the trial period.
-
Business Texting isn’t available on Webex Calling trial accounts.
-
Trial accounts are intended for technical evaluation purposes only, and not for normal commercial operation. As such, emergency services are only meant for technical evaluation; actual emergency calls can’t be guaranteed. Users shouldn’t place actual emergency service calls on a trial account.
When placing an order to convert a Webex Calling trial with Cisco Calling Plans to a paid subscription, you must order at least one Cisco Calling Plan committed license to maintain the telephone numbers and configuration used in the trial.
-
Cisco Calling Plans (Cisco PSTN)
-
Cloud Connected PSTN
-
Premise-based PSTN (Local Gateway must be enabled separately. For more information, see Configure Premises-based PSTN in Control Hub.)
| 1 |
Sign in to Control Hub. |
| 2 |
Go to and select the location you want to update. |
| 3 |
Select the Calling tab and Click Manage next to PTSN Connection. |
| 4 |
Select Cisco Calling Plans and click Next. |
| 5 |
Enter the contact information and click Next. This field is for the contact information of the person who will sign the legal contract with Cisco. |
| 6 |
Enter the Emergency Services Address (ESA), and click Save. By default, the ESA entered here is applied to all phone numbers for this location. You can change the ESA for an individual user if needed. For example, you may need to change the ESA if you have a remote employee who works from home. |
| 7 |
On the summary screen, do one of the following:
|
Before you begin
-
Enable the Cisco Calling Plan for your site before you order new phone numbers through Control Hub.
-
By default, the Emergency Service Address (ESA) entered for a location during your Cisco Calling Plan setup is applied to all phone numbers for that location.
- Provide the following information for business identity verification:
- First name and last name of the legal representative
- Contact phone number
- Company name
- Local company registration certificate
- Provide the following information for address verification:
- Address matching the DID area code (street, building number, postal code, city, and country)
- Proof of address, not older than last three months
Additionally, you must submit a copy of your passport or ID card in the Netherlands, Switzerland, Poland, Greece, and Lithuania. You must provide VAT ID in Sweden and Greece.
| 1 |
Click Contact Support. Your location information is automatically populated on the Case Details window. |
| 2 |
Indicate how many new numbers you’re requesting in the Number of Telephone Numbers Requested field. |
| 3 |
From the Number Type drop-down list, choose Local or National as the case maybe. |
| 4 |
(Optional) Enter the additional details. |
| 5 |
Click Submit. You receive a PSTN Order Number which displays on the PSTN order page. It can take up to five to seven business days for the ordering and document approval process. |
Before you begin
We strongly recommend you to read and familiarize yourself with the Cisco Calling Plan Number Porting Guidelines and Policies before you start porting the numbers.
-
Enable Cisco Calling Plan for your location before you port in phone numbers through Control Hub.
-
Require a signed Letter of Agency (LOA), authorizing Cisco to place orders with the current PSTN carrier to move the service to Cisco. The LOA must be signed by the current account owner or authorized signer. You're prompted to sign the LOA while completing the porting steps.
-
Make sure you have a recent bill in PNG or PDF format from your current PSTN provider. The bill must not be older than 30 days. While completing the porting steps, you’re prompted to upload a copy of your bill.
-
For successful porting, ensure that you have the following information ready:
-
List of all phone numbers to port (non-toll free)
-
Current PSTN provider account information
-
Customer Service Record (CSR) if available
-
Your account PIN if one exists
-
VAT number or Tax ID
Certain countries require these additional documents:
-
Belgium
Proof of Local Address (Utility Bill and so on), dated within the last three months
-
Netherlands
-
Proof of Local Address (Utility Bill, and so on) dated within the last three months
-
Company registration document
-
-
Poland
-
Company registration document
-
Valid Passport/ID Card of the authorizing person
-
-
-
When planning for which numbers to port in, we recommend that you consider any number that receives inbound calls. See Cisco Calling Plan Number Policy for more information.
-
By default, the Emergency Service Address (ESA) entered for a location during your Cisco Calling Plan setup applies to all phone numbers for that location.
As an administrator, you can move existing phone numbers from your current PSTN to the Cisco Calling Plan option. The following are the types of porting services:
- Standard port: When a phone number moves from one service provider to another, without any special circumstances. For example, porting a number from Carrier A to Carrier B within the same country and service area is a Standard port.
- Mixed operator port: A more complex porting situation that involves multiple operators or service providers. For example, porting a range of numbers in a block that belongs to two or more network operators is a Mixed operator port.
Porting of numbers is done in a fixed time slot in the following countries:
| Porting time slot | Countries |
|---|---|
| Monday to Friday between 8 a.m. to 3 p.m. | Switzerland, Belgium, Sweden |
| Monday to Friday between 9 a.m. to 4 p.m. | Netherlands, Lithuania, Luxembourg, Denmark |
| Monday to Friday between 8 a.m. to 5 p.m. | Finland |
Requests for porting out of hours are on a case-by-case basis and depend on the carriers involved. We can’t guarantee that out of hours porting is available.
| 1 |
Sign in to Control Hub. |
| 2 |
Go to . |
| 3 |
From the Manage drop-down select Add. |
| 4 |
Choose a Location and PSTN Number in Number Type drop-down on add numbers page and then click Next. |
| 5 |
Select Port Numbers Over and click Next. |
| 6 |
Add the phone numbers that you want to port, and then click Save & continue. |
| 7 |
Enter the Date and Time by when you want the porting to finish. Set the schedule based on your preference. But it’s not guaranteed that the porting of your numbers is finished at the exact date and time selected. |
| 8 |
(Optional) Enter an additional email address, other than the default contact listed, to receive notifications regarding the port order status. |
| 9 |
Click Next. |
| 10 |
Enter your current carrier account information in the fields provided. Make sure this matches the information on your previous carrier’s bill. |
| 11 |
Click Next. |
| 12 |
Upload your previous carrier bill (not older than 30 days). |
| 13 |
Click Next. |
| 14 |
Upload the LOA. The authorized contact for your previous carrier’s account must upload the signed LOA. Open a ticket with Webex Partner Help Center to get the LOA required for your country and upload the signed copy here. If you're not the authorized contact, skip this step. That person can come back and upload the signed LOA later, we’ll send your order contacts a reminder. |
| 15 |
Click Save & continue. |
| 16 |
Your Port Order is submitted. You can check the order status in PSTN Orders. |
| 17 |
Click Done. Our support team contacts you for any additional documents requirements to complete your porting request. You can upload the requested documents in the right-hand panel of the order. The Firm Order Commitment (FOC) date can be two business days later from the submission date. An FOC is the date on which the losing carrier states that it releases a phone number to the winning carrier. After the losing carrier confirms the porting request, you can cancel or postpone the porting request as per the following rules: These time frames are estimates and aren’t bound by any SLA.
If porting takes place and you need to roll back the numbers to the previous carrier, raise such requests with the PTS team at the earliest. Rollbacks aren’t always possible and may require placing a port back request with the previous carrier. |
When placing orders for new numbers or porting existing numbers, you can check the order status or port rejection notices in Control Hub.
A migration banner is displayed when there are locations which need to be migrated from Non-Integrated CCP to Integrated CCP.
-
Sign in to Control Hub.
-
Go to .
Every order submitted has a status value.
Select an order to check its status.
Status Values for New Number Orders
|
Displayed Status |
Description |
|---|---|
|
Pending |
A New numbers order has been created by the user. |
|
Provisioned |
New numbers are provisioned. |
|
Error |
An issue is detected with the new numbers order. Create a TAC ticket to get help. |
|
Action Required |
Click to contact PTS for assistance. |
Status Values for Ported Number Orders
|
Displayed Status |
Description |
|---|---|
|
Pending |
User is in the process of creating/filling in details of the Porting Order. Once submitted, the order will still show Pending until Cisco validates and accepts the porting order. |
|
Rejected |
Porting issue is detected. See the Porting Errors table for additional details. If required, go to Control Hub and click on the PSTN Help link for PSTN technical support. |
|
Submitted |
Porting Order is validated and accepted. |
|
FOC Received |
FOC date confirmation from the previous PSTN provider received. |
|
Completed |
Porting process is complete. |
|
Canceled |
Order is canceled. |
Porting Error Messages
|
Displayed Error |
Description |
How to fix |
|---|---|---|
|
| ||
|
Account number mismatch |
Account number doesn’t match the number on the Customer Service Record (CSR) |
Update the Account Number field on the PSTN Order and resubmit. For some carriers, the account number may be the same as the BTN or the telephone number itself. |
|
Account number required |
The account number wasn't provided but is required. |
Update the Account Number field on the PSTN Order and resubmit. For some carriers, the account number may be the same as the BTN or the telephone number itself. |
|
Account name mismatch |
The person authorizing doesn't match the name on the (CSR). |
Update the Authorized name on account field on the PSTN order and resubmit. |
|
BTN mismatch |
BTN or ATN doesn’t match that on the CSR. |
Update the Carrier billing phone number field on the PSTN Order and resubmit. |
|
Company name mismatch |
Entity name does not match that on the CSR. |
Update the Company name with previous carrier field on the PSTN order and resubmit. |
|
Multiple BTNs |
The OSP requires this Porting Order to be split and submitted as separate orders. |
Cancel the current PSTN order and create a new, multiple PSTN Orders. Create one for each group of numbers that have the same BTN. |
|
FOC rejected by losing carrier |
The FOC date requested can’t be accommodated by the OSP. |
Update the Port Complete date field on the PSTN order and resubmit. |
|
Unknown |
Go to Control Hub and click on the PSTN Help link for PSTN technical support. |
Go to Control Hub and click on the PSTN Help link for PSTN technical support. |
|
Invalid PIN |
Passcode/PIN must be provided for wireless port. |
Update the PIN field on the PSTN order and resubmit. |
|
Pending order |
The OSP has a pending LSR on the account (for example, a port out or address change). |
Remove the telephone numbers in question from the PSTN order and resubmit. |
|
Pending main BTN |
BTN is one of the phone numbers being ported. User must indicate Porting Order Type, Remaining Numbers Action, and New Billing Phone Number accordingly. |
Remove the main BTN from the list of telephone numbers being ported and resubmit the order. Include the Main BTN into the last iteration of numbers (if porting numbers in multiple iterations). |
|
Service address mismatch |
The location info doesn't match that on the CSR. |
Update the Service address, State, and City fields and resubmit the order. |
|
TN has special feature |
Some of the phone numbers can't be ported because they have a special feature (for example, remote call forward). |
Remove numbers with special features from the PSTN order and resubmit. Or, unassign a special features from the numbers being ported. |
|
TN mismatch |
Some of the phone numbers don't belong to the end user. |
Remove one or more numbers in question and resubmit the order. |
|
TN not portable |
Some of the phone numbers can't be ported because they're inactive or aren't part of the end user's account. |
Try to remove one or more numbers in question and resubmit the PSTN order. |
|
Unsupported rate center |
The rate center isn't portable. |
Remove one or more numbers in question and resubmit the order. |
|
Zip/postal code mismatch |
Postal code doesn't match the one on the CSR. |
Update the Zip code field and resubmit the order. |
|
Previous carrier's bill is invalid |
The invoice is invalid. |
Go to PSTN Order details, then open Previous Carrier’s Bill section. Upload the correct bill file and resubmit the order. |
|
LOA invalid |
The LOA is invalid. |
Sign the LOA and resubmit the PSTN order. Alternatively, go to Control Hub and click on the PSTN Help link for PSTN technical support. |
PSTN – Public Switched Telephone Network
CSR – Customer Service Record
FOC – Firm Order Commitment
OSP – Old Service Provider
BTN – Billing Telephone Number
ATN – Account Telephone Number
To configure an ESA for an user, ensure the following conditions are met:
- The user has a non-mobile primary phone number assigned.
- The user’s location is within the U.S. or Canada.
These conditions are necessary because the ESA is tied to the user's phone number and location. This setup allows accurate routing of emergency calls and proper callback to the user through the Emergency Callback Number (ECBN) associated with their location or phone number.
| 1 |
Sign in to Control Hub. |
| 2 |
Go to . |
| 3 |
Select the user that you want to modify and click Calling. |
| 4 |
Select the right arrow to expand the primary phone number settings under Numbers. |
| 5 |
Under Emergency Service Address, select Custom Address. Enter the following details. In case of an emergency, the local emergency response crew will use this address to locate the caller.
|
| 6 |
Update the information for the workspace and click Validate. On entering a service address, the system validates the address. If the system cannot find the address, a Suggested Address displays in a side panel. Review the suggested address and click Apply to update the Emergency service address. Click Save , to save the changes. |
A custom emergency address overrides the location's default emergency address for the specific user.
| 1 |
Sign in to Control Hub. |
| 2 |
Go to and select the location you want to update. |
| 3 |
Next to PSTN Connection, click Manage. |
| 4 |
Next to the Emergency Service Address, click Edit. |
| 5 |
Enter the new address and click Save. If ESA (Enterprise Service Address) address validation fails while configuring premise or CCPP connections, administrators can close the ESA screen and continue with the setup. The validation failure will not prevent setting up the connection. If the ESA is not validated, emergency call handling may be delayed, and additional charges may apply if calls are routed to an emergency relay center. |
Webex Calling provides flexible Calling plans and the ability to choose the PSTN solution that fits the requirement. Over time you may have to migrate to a different PSTN solution due to changes in the business environment or other factors.
Use this matrix to know the potential PSTN migration paths for Webex Calling.
Webex Calling supports the following PSTN migration paths:
-
Using Self Service through Control Hub
-
Premises-based PSTN, non-integrated CCPP, and non-integrated IntelePeer to Cisco Calling Plans. See Migrate to Cisco Calling plans.
-
Non-integrated CCP Provider including non-integrated Intelepeer to a Premises-based Solution. See, Configure premises-based PSTN in Control Hub
-
Premises-based solution to non-integrated CCPP. You must update the connection type in Control Hub and select a CCPP partner. This type of migration does not require any further configuration.
-
-
Using Manual Migration
-
Premises-based solution to Integrated CCP Provider
-
Integrated CCP Provider to Non-integrated CCP Provider (Exception: Non-integrated Intelepeer isn’t supported as the target CCP Provider)
-
Integrated CCP Provider to Premises-based Solution
-
To use the manual migration process, you must create a new location, move TNs and users to the new location, and reconfigure site services/service assignments. During migration, you experience service interruption and there’s a risk of data loss.
Here’s a list of unsupported PSTN migration paths:
-
Cisco Calling Plans to integrated Intelepeer
-
Integrated Intelepeer to Cisco Calling Plans
The minimum required order is one Outbound Calling Plan (OCP). Billing includes charges for outbound calling plans, phone numbers, and international Calling usage. Your Cisco monthly billing invoice includes information on call activity, charges, and applicable fees and taxes. There’s no additional charge to port phone numbers.
When your billing begins:
-
Outbound Calling Plans ordered in CCW begin billing on the requested service date (RSD).
-
Outbound Calling Plans provisioned in Control Hub begin billing immediately.
-
Phone numbers provisioned in Control Hub begin billing immediately or, if ported from another provider, billing begins upon port completion.
Outbound calling plan rates:
-
Rates for the Outbound Calling Plans and phone numbers are prorated using the same proration method used to calculate the rates for the Webex Calling licenses.
-
International Calling rates vary by country and are billed the month following usage.
See Cisco Calling Plan bill for the details.
Cisco Calling Plans support is provided by various support divisions, depending on your need.
|
Support Division |
Purpose |
Contact Information |
|---|---|---|
|
Partner Help Desk (PHD) |
Partner how-to and/or documentation inquiries, Pre-quoting Regulatory Tax and other enquiries about the Cisco Calling Plans offering. |
North America: 1-844-613-6108 EMEA: +44 129 366 10 20 APAC: +61 3 7017 7272 Email: webexcalling-phd@cisco.com |
|
PSTN Technical Support (PTS) |
|
Go to Control Hub and click on PSTN Help link for PSTN technical support. |
|
TAC |
Issues with Control Hub functionality Issues with service, such as dropped calls, call quality issues, or service outages |
North America: 1-800-553-2447 EMEA: +32 2 704 5555 APAC: +61 2 8446 7411 Email: tac@cisco.com See also: |
|
Invoice & Collections |
VAT, Payment and other invoicing queries |
Contact the Collector on the Invoice via email or phone |
|
Cisco SaaS Support Team (CES) |
|
Refer Partner Support Playbook and Cisco Calling Plans FAQ Create a case through link below if the required information is not found in the playbook - https://customerservice.cloudapps.cisco.com/ |
You can select varied connections for multi-site applications. For example, you can select Cisco Calling Plans for one location, Cloud-Connected PSTN (CCP) for a second location, and Local Gateway for the third location. When choosing the Cisco Calling Plans, the following applies.
Requirements
-
Partners must be an authorized Webex Calling partner and have accepted the new Webex Calling addendum through enrollment into the Webex Calling PSTN program.
-
A minimum of one committed Outbound Calling Plan license must be purchased to enable access to all services associated with Cisco Calling Plans.
Limitations
-
Cisco Calling Plans are currently available to specified countries.
-
Existing Webex Calling locations or telephone numbers can only transition to Cisco Calling Plans in certain scenarios. For details on supported migration paths, refer Supported paths for PSTN migration section.
-
You can order a maximum of 100 new standard phone numbers at a time. Additional numbers can be placed as a separate order.
-
Toll-free numbers aren’t currently available. You can’t order new toll-free numbers or port existing toll-free numbers to the Cisco Calling Plans.
-
Cisco Calling Plans aren’t supported with Webex Contact Center or authorized for use in which high-concurrent calls or high-volume calls or uncommonly short or long calls are made. For more information about Webex Contact Center, see Get started with Webex Contact Center.
-
Some premium services and international destinations may not be available for operational purposes. If specific destinations which are not generally available are required, customers can open a support case to request availability.
The card view displays the PSTN provider available for the Webex Calling customer before configuring the PSTN location. The PSTN view displays both Providers and Orders.
You can apply the search filter to filter content based on Service Type and Market. Use the toggle option to change the view from Compact to Table. The compact view helps to resize the card to display the provider details without the service information.
The provider screen displays the various provider cards with the list of supported service types. The Providers section is classified into the following:
-
Preferred Calling providers
-
Certified Calling providers
-
Calling providers
Click the Learn More option on the card to view details of the provider. It displays Use the search field to select the PSTN service provider based on Cisco business relationship preference such as certified provider and Calling provider.
The providers include the following:
-
Provider summary
-
List of locations configured with this provider
-
List of markets that the provider is available for the supported services.
If the customer has PSTN locations where Calling services aren’t set up, the Select this provider action bar displays. Use this option to configure the service for the PSTN location.
The preferred view in the Control Hub displays the calling providers that the managing partner prefers to work. However, you can view all available calling providers with Webex Calling. This section provides the following:
-
Select the location from the drop-down menu.
-
Choose the subscription type for the users to use the Cisco Calling plans. Click Next.
-
Complete the fields for Contract Information and Emergency Service Address configuration.
The PSTN service set up is now complete.
Cisco Calling Plans are available for technical evaluation as part of the Webex Calling trial process. While Cisco Calling Plans trials are free to use, there are some neddotable limitations during the trial phase.
As you can convert the trial accounts to paid accounts, the required regulatory documentation, as mentioned in the 'Order New Phone Numbers' section under each country, is also mandatory for trial services. These documents are legally required by country regulators for our Telephone Number (TN) provisioning team to procure the numbers.
-
Each trial account can provision up to 10 standard telephone numbers from Cisco Calling Plans with Webex Calling. It isn’t permitted to provision more than 10 numbers per trial.
-
Only new, standard telephone numbers are supported in trials. Ported numbers, consecutive blocks, and inbound toll-free numbers aren’t supported on trial accounts. You also cannot port numbers out of a trial. You must convert to a paid account if you wish to use these features.
-
International calling, along with Premium Service Call types I & II are blocked from use during the trial period.
-
Business Texting isn’t available on Webex Calling trial accounts.
-
Trial accounts are intended for technical evaluation purposes only, and not for normal commercial operation. As such, emergency services are only meant for technical evaluation; actual emergency calls can’t be guaranteed. Users shouldn’t place actual emergency service calls on a trial account.
When placing an order to convert a Webex Calling trial with Cisco Calling Plans to a paid subscription, you must order at least one Cisco Calling Plan committed license to maintain the telephone numbers and configuration used in the trial.
-
Cisco Calling Plans (Cisco PSTN)
-
Cloud Connected PSTN
-
Premise-based PSTN (Local Gateway must be enabled separately. For more information, see Configure Premises-based PSTN in Control Hub.)
| 1 |
Sign in to Control Hub. |
| 2 |
Go to and select the location you want to update. |
| 3 |
Select the Calling tab and Click Manage next to PTSN Connection. |
| 4 |
Select Cisco Calling Plans and click Next. |
| 5 |
Enter the contact information and click Next. This field is for the contact information of the person who will sign the legal contract with Cisco. |
| 6 |
Enter the Emergency Services Address (ESA), and click Save. By default, the ESA entered here is applied to all phone numbers for this location. You can change the ESA for an individual user if needed. For example, you may need to change the ESA if you have a remote employee who works from home. |
| 7 |
On the summary screen, do one of the following:
|
Before you begin
-
Enable the Cisco Calling Plan for your site before you order new phone numbers through Control Hub.
-
By default, the Emergency Service Address (ESA) entered for a location during your Cisco Calling Plan setup is applied to all phone numbers for that location.
- Provide the following information for business identity verification:
- First name and last name of the legal representative
- Contact phone number
- Company name
- Local company registration certificate
- Provide the following information for address verification:
- Address matching the DID area code (street, building number, postal code, city, and country)
- Proof of address, not older than last three months
Additionally, you must submit a copy of your passport or ID card in the Netherlands, Switzerland, Poland, Greece, and Lithuania. You must provide VAT ID in Sweden and Greece.
| 1 |
Click Contact Support. Your location information is automatically populated on the Case Details window. |
| 2 |
Indicate how many new numbers you’re requesting in the Number of Telephone Numbers Requested field. |
| 3 |
From the Number Type drop-down list, choose Local or National as the case maybe. |
| 4 |
(Optional) Enter the additional details. |
| 5 |
Click Submit. You receive a PSTN Order Number which displays on the PSTN order page. It can take up to five to seven business days for the ordering and document approval process. |
Before you begin
We strongly recommend you to read and familiarize yourself with the Cisco Calling Plan Number Porting Guidelines and Policies before you start porting the numbers.
-
Enable Cisco Calling Plan for your location before you port in phone numbers through the Control Hub.
-
A signed Letter of Agency (LOA) is needed, authorizing Cisco to place orders with the current PSTN carrier to move the service to Cisco. The LOA must be signed by the current account owner or authorized signer. You're prompted to sign the LOA while completing the porting steps.
-
Make sure you have a recent bill in PNG or PDF format from your current PSTN provider. The bill must not be older than 30 days. While completing the porting steps, you’re prompted to upload a copy of your bill.
-
For successful porting, ensure that you have the following information ready:
-
List of all phone numbers to port in (non-toll free)
-
Current PSTN provider account information
-
Customer Service Record (CSR) if available
-
Your account PIN if one exists
-
VAT ID or any Tax ID
-
Proof of Local Address such as Utility Bill and so on, dated within the last three months
-
-
When planning for which numbers to port, we recommend that you consider any number that receives inbound calls. See Cisco Calling Plan Number Policy for more information.
-
By default, the Emergency Service Address (ESA) entered for a location during your Cisco Calling Plan setup is applied to all phone numbers for that location.
As an administrator, you can move existing phone numbers from your current PSTN to the Cisco Calling Plan option. The following are the types of porting services:
- Standard port: When a phone number moves from one service provider to another, without any special circumstances. For example, porting a number from Carrier A to Carrier B within the same country and service area is a Standard port.
- Mixed operator port: A more complex porting situation that involves multiple operators or service providers. For example, porting a range of numbers in a block that belongs to two or more network operators is a Mixed operator port.
Porting of numbers is done on Monday to Friday between 8 a.m. to 3 p.m.
Requests for porting out of hours are on a case-by-case basis and depend on the carriers involved. We can’t guarantee that out of hours porting is available.
You cannot port a single number belonging to a Direct Dial Inward (DDI) range. For porting a DDI range, it must include at least 10 successive numbers or a multiple of it. The first number in the range to end with 0 and the last number in the range to end with 9. These details are available with the current PSTN provider.
| 1 |
Sign in to Control Hub. |
| 2 |
Go to . |
| 3 |
From the Manage drop-down select Add. |
| 4 |
Choose a Location and PSTN Number in Number Type drop-down on add numbers page and then click Next. |
| 5 |
Select Port Numbers Over and click Next. |
| 6 |
Add the phone numbers that you want to port, and then click Save & continue. |
| 7 |
Enter the Date and Time by when you want the porting to finish. Set the schedule based on your preference. But it’s not guaranteed that the porting of your numbers is finished at the exact date and time selected. |
| 8 |
(Optional) Enter an additional email address, other than the default contact listed, to receive notifications regarding the port order status. |
| 9 |
Click Next. |
| 10 |
Enter your current carrier account information in the fields provided. Make sure this matches the information on your previous carrier’s bill. |
| 11 |
Click Next. |
| 12 |
Upload your previous carrier bill (not older than 30 days). |
| 13 |
Click Next. |
| 14 |
Upload the LOA. The authorized contact for your previous carrier’s account must upload the signed LOA. Open a ticket with Webex Partner Help Center to get the LOA required for your country and upload the signed copy here. If you're not the authorized contact, skip this step. That person can come back and upload the signed LOA later, we’ll send your order contacts a reminder. |
| 15 |
Click Save & continue. |
| 16 |
Your Port Order is submitted. You can check the order status in PSTN Orders. |
| 17 |
Click Done. Our support team contacts you for any additional documents requirements to complete your porting request. You can upload the requested documents in the right-hand panel of the order. The Firm Order Commitment (FOC) date can be two business days later from the submission date. An FOC is the date on which the losing carrier states that it releases a phone number to the winning carrier. After the losing carrier confirms the porting request, you can cancel or postpone the porting request as per the following rules: These time frames are estimates and aren’t bound by any SLA.
If porting takes place and you need to roll back the numbers to the previous carrier, raise such requests with the PTS team at the earliest. Rollbacks aren’t always possible and may require placing a port back request with the previous carrier. |
When placing orders for new numbers or porting existing numbers, you can check the order status or port rejection notices in Control Hub.
A migration banner is displayed when there are locations which need to be migrated from Non-Integrated CCP to Integrated CCP.
-
Sign in to Control Hub.
-
Go to .
Every order submitted has a status value.
Select an order to check its status.
Status Values for New Number Orders
|
Displayed Status |
Description |
|---|---|
|
Pending |
A New numbers order has been created by the user. |
|
Provisioned |
New numbers are provisioned. |
|
Error |
An issue is detected with the new numbers order. Create a TAC ticket to get help. |
|
Action Required |
Click to contact PTS for assistance. |
Status Values for Ported Number Orders
|
Displayed Status |
Description |
|---|---|
|
Pending |
User is in the process of creating/filling in details of the Porting Order. Once submitted, the order will still show Pending until Cisco validates and accepts the porting order. |
|
Rejected |
Porting issue is detected. See the Porting Errors table for additional details. If required, go to Control Hub and click on the PSTN Help link for PSTN technical support. |
|
Submitted |
Porting Order is validated and accepted. |
|
FOC Received |
FOC date confirmation from the previous PSTN provider received. |
|
Completed |
Porting process is complete. |
|
Canceled |
Order is canceled. |
Porting Error Messages
|
Displayed Error |
Description |
How to fix |
|---|---|---|
|
| ||
|
Account number mismatch |
Account number doesn’t match the number on the Customer Service Record (CSR) |
Update the Account Number field on the PSTN Order and resubmit. For some carriers, the account number may be the same as the BTN or the telephone number itself. |
|
Account number required |
The account number wasn't provided but is required. |
Update the Account Number field on the PSTN Order and resubmit. For some carriers, the account number may be the same as the BTN or the telephone number itself. |
|
Account name mismatch |
The person authorizing doesn't match the name on the (CSR). |
Update the Authorized name on account field on the PSTN order and resubmit. |
|
BTN mismatch |
BTN or ATN doesn’t match that on the CSR. |
Update the Carrier billing phone number field on the PSTN Order and resubmit. |
|
Company name mismatch |
Entity name does not match that on the CSR. |
Update the Company name with previous carrier field on the PSTN order and resubmit. |
|
Multiple BTNs |
The OSP requires this Porting Order to be split and submitted as separate orders. |
Cancel the current PSTN order and create a new, multiple PSTN Orders. Create one for each group of numbers that have the same BTN. |
|
FOC rejected by losing carrier |
The FOC date requested can’t be accommodated by the OSP. |
Update the Port Complete date field on the PSTN order and resubmit. |
|
Unknown |
Go to Control Hub and click on the PSTN Help link for PSTN technical support. |
Go to Control Hub and click on the PSTN Help link for PSTN technical support. |
|
Invalid PIN |
Passcode/PIN must be provided for wireless port. |
Update the PIN field on the PSTN order and resubmit. |
|
Pending order |
The OSP has a pending LSR on the account (for example, a port out or address change). |
Remove the telephone numbers in question from the PSTN order and resubmit. |
|
Pending main BTN |
BTN is one of the phone numbers being ported. User must indicate Porting Order Type, Remaining Numbers Action, and New Billing Phone Number accordingly. |
Remove the main BTN from the list of telephone numbers being ported and resubmit the order. Include the Main BTN into the last iteration of numbers (if porting numbers in multiple iterations). |
|
Service address mismatch |
The location info doesn't match that on the CSR. |
Update the Service address, State, and City fields and resubmit the order. |
|
TN has special feature |
Some of the phone numbers can't be ported because they have a special feature (for example, remote call forward). |
Remove numbers with special features from the PSTN order and resubmit. Or, unassign a special features from the numbers being ported. |
|
TN mismatch |
Some of the phone numbers don't belong to the end user. |
Remove one or more numbers in question and resubmit the order. |
|
TN not portable |
Some of the phone numbers can't be ported because they're inactive or aren't part of the end user's account. |
Try to remove one or more numbers in question and resubmit the PSTN order. |
|
Unsupported rate center |
The rate center isn't portable. |
Remove one or more numbers in question and resubmit the order. |
|
Zip/postal code mismatch |
Postal code doesn't match the one on the CSR. |
Update the Zip code field and resubmit the order. |
|
Previous carrier's bill is invalid |
The invoice is invalid. |
Go to PSTN Order details, then open Previous Carrier’s Bill section. Upload the correct bill file and resubmit the order. |
|
LOA invalid |
The LOA is invalid. |
Sign the LOA and resubmit the PSTN order. Alternatively, go to Control Hub and click on the PSTN Help link for PSTN technical support. |
PSTN – Public Switched Telephone Network
CSR – Customer Service Record
FOC – Firm Order Commitment
OSP – Old Service Provider
BTN – Billing Telephone Number
ATN – Account Telephone Number
To configure an ESA for an user, ensure the following conditions are met:
- The user has a non-mobile primary phone number assigned.
- The user’s location is within the U.S. or Canada.
These conditions are necessary because the ESA is tied to the user's phone number and location. This setup allows accurate routing of emergency calls and proper callback to the user through the Emergency Callback Number (ECBN) associated with their location or phone number.
| 1 |
Sign in to Control Hub. |
| 2 |
Go to . |
| 3 |
Select the user that you want to modify and click Calling. |
| 4 |
Select the right arrow to expand the primary phone number settings under Numbers. |
| 5 |
Under Emergency Service Address, select Custom Address. Enter the following details. In case of an emergency, the local emergency response crew will use this address to locate the caller.
|
| 6 |
Update the information for the workspace and click Validate. On entering a service address, the system validates the address. If the system cannot find the address, a Suggested Address displays in a side panel. Review the suggested address and click Apply to update the Emergency service address. Click Save , to save the changes. |
A custom emergency address overrides the location's default emergency address for the specific user.
| 1 |
Sign in to Control Hub. |
| 2 |
Go to and select the location you want to update. |
| 3 |
Next to PSTN Connection, click Manage. |
| 4 |
Next to the Emergency Service Address, click Edit. |
| 5 |
Enter the new address and click Save. If ESA (Enterprise Service Address) address validation fails while configuring premise or CCPP connections, administrators can close the ESA screen and continue with the setup. The validation failure will not prevent setting up the connection. If the ESA is not validated, emergency call handling may be delayed, and additional charges may apply if calls are routed to an emergency relay center. |
Webex Calling provides flexible Calling plans and the ability to choose the PSTN solution that fits the requirement. Over time you may have to migrate to a different PSTN solution due to changes in the business environment or other factors.
Use this matrix to know the potential PSTN migration paths for Webex Calling.
Webex Calling supports the following PSTN migration paths:
-
Using Self Service through Control Hub
-
Premises-based PSTN, non-integrated CCPP, and non-integrated IntelePeer to Cisco Calling Plans. See Migrate to Cisco Calling plans.
-
Non-integrated CCP Provider including non-integrated Intelepeer to a Premises-based Solution. See, Configure premises-based PSTN in Control Hub
-
Premises-based solution to non-integrated CCPP. You must update the connection type in Control Hub and select a CCPP partner. This type of migration does not require any further configuration.
-
-
Using Manual Migration
-
Premises-based solution to Integrated CCP Provider
-
Integrated CCP Provider to Non-integrated CCP Provider (Exception: Non-integrated Intelepeer isn’t supported as the target CCP Provider)
-
Integrated CCP Provider to Premises-based Solution
-
To use the manual migration process, you must create a new location, move TNs and users to the new location, and reconfigure site services/service assignments. During migration, you experience service interruption and there’s a risk of data loss.
Here’s a list of unsupported PSTN migration paths:
-
Cisco Calling Plans to integrated Intelepeer
-
Integrated Intelepeer to Cisco Calling Plans
The minimum required order is one Outbound Calling Plan (OCP). Billing includes charges for outbound calling plans, phone numbers, and international Calling usage. Your Cisco monthly billing invoice includes information on call activity, charges, and applicable fees and taxes. There’s no additional charge to port phone numbers.
When your billing begins:
-
Outbound Calling Plans ordered in CCW begin billing on the requested service date (RSD).
-
Outbound Calling Plans provisioned in Control Hub begin billing immediately.
-
Phone numbers provisioned in Control Hub begin billing immediately or, if ported from another provider, billing begins upon port completion.
Outbound calling plan rates:
-
Rates for the Outbound Calling Plans and phone numbers are prorated using the same proration method used to calculate the rates for the Webex Calling licenses.
-
International Calling rates vary by country and are billed the month following usage.
See Cisco Calling Plan bill for the details.
Cisco Calling Plans support is provided by various support divisions, depending on your need.
|
Support Division |
Purpose |
Contact Information |
|---|---|---|
|
Partner Help Desk (PHD) |
Partner how-to and/or documentation inquiries, Pre-quoting Regulatory Tax and other enquiries about the Cisco Calling Plans offering. |
North America: 1-844-613-6108 EMEA: +44 129 366 10 20 APAC: +61 3 7017 7272 Email: webexcalling-phd@cisco.com |
|
PSTN Technical Support (PTS) |
|
Go to Control Hub and click on PSTN Help link for PSTN technical support. |
|
TAC |
Issues with Control Hub functionality Issues with service, such as dropped calls, call quality issues, or service outages |
North America: 1-800-553-2447 EMEA: +32 2 704 5555 APAC: +61 2 8446 7411 Email: tac@cisco.com See also: |
|
Invoice & Collections |
VAT, Payment and other invoicing queries |
Contact the Collector on the Invoice via email or phone |
|
Cisco SaaS Support Team (CES) |
|
Refer Partner Support Playbook and Cisco Calling Plans FAQ Create a case through link below if the required information is not found in the playbook - https://customerservice.cloudapps.cisco.com/ |
You can select varied connections for multi-site applications. For example, you can select Cisco Calling Plans for one location, Cloud-Connected PSTN (CCP) for a second location, and Local Gateway for the third location. When choosing the Cisco Calling Plans, the following applies.
Requirements
-
Partners must be an authorized Webex Calling partner and have accepted the new Webex Calling addendum through enrollment into the Webex Calling PSTN program.
-
A minimum of one committed Outbound Calling Plan license must be purchased to enable access to all services associated with Cisco Calling Plans.
Limitations
-
Cisco Calling Plans are currently available to specified countries.
-
Existing Webex Calling locations or telephone numbers can only transition to Cisco Calling Plans in certain scenarios. For details on supported migration paths, refer Supported paths for PSTN migration section.
-
You can order a maximum of 100 new standard phone numbers at a time. Additional numbers can be placed as a separate order.
-
Toll-free numbers aren’t currently available. You can’t order new toll-free numbers or port existing toll-free numbers to the Cisco Calling Plans.
-
Cisco Calling Plans aren’t supported with Webex Contact Center or authorized for use in which high-concurrent calls or high-volume calls or uncommonly short or long calls are made. For more information about Webex Contact Center, see Get started with Webex Contact Center.
-
Some premium services and international destinations may not be available for operational purposes. If specific destinations which are not generally available are required, customers can open a support case to request availability.
The card view displays the PSTN provider available for the Webex Calling customer before configuring the PSTN location. The PSTN view displays both Providers and Orders.
You can apply the search filter to filter content based on Service Type and Market. Use the toggle option to change the view from Compact to Table. The compact view helps to resize the card to display the provider details without the service information.
The provider screen displays the various provider cards with the list of supported service types. The Providers section is classified into the following:
-
Preferred Calling providers
-
Certified Calling providers
-
Calling providers
Click the Learn More option on the card to view details of the provider. It displays Use the search field to select the PSTN service provider based on Cisco business relationship preference such as certified provider and Calling provider.
The providers include the following:
-
Provider summary
-
List of locations configured with this provider
-
List of markets that the provider is available for the supported services.
If the customer has PSTN locations where Calling services aren’t set up, the Select this provider action bar displays. Use this option to configure the service for the PSTN location.
The preferred view in the Control Hub displays the calling providers that the managing partner prefers to work. However, you can view all available calling providers with Webex Calling. This section provides the following:
-
Select the location from the drop-down menu.
-
Choose the subscription type for the users to use the Cisco Calling plans. Click Next.
-
Complete the fields for Contract Information and Emergency Service Address configuration.
The PSTN service set up is now complete.
Cisco Calling Plans are available for technical evaluation as part of the Webex Calling trial process. While Cisco Calling Plans trials are free to use, there are some neddotable limitations during the trial phase.
As you can convert the trial accounts to paid accounts, the required regulatory documentation, as mentioned in the 'Order New Phone Numbers' section under each country, is also mandatory for trial services. These documents are legally required by country regulators for our Telephone Number (TN) provisioning team to procure the numbers.
-
Each trial account can provision up to 10 standard telephone numbers from Cisco Calling Plans with Webex Calling. It isn’t permitted to provision more than 10 numbers per trial.
-
Only new, standard telephone numbers are supported in trials. Ported numbers, consecutive blocks, and inbound toll-free numbers aren’t supported on trial accounts. You also cannot port numbers out of a trial. You must convert to a paid account if you wish to use these features.
-
International calling, along with Premium Service Call types I & II are blocked from use during the trial period.
-
Business Texting isn’t available on Webex Calling trial accounts.
-
Trial accounts are intended for technical evaluation purposes only, and not for normal commercial operation. As such, emergency services are only meant for technical evaluation; actual emergency calls can’t be guaranteed. Users shouldn’t place actual emergency service calls on a trial account.
When placing an order to convert a Webex Calling trial with Cisco Calling Plans to a paid subscription, you must order at least one Cisco Calling Plan committed license to maintain the telephone numbers and configuration used in the trial.
-
Cisco Calling Plans (Cisco PSTN)
-
Cloud Connected PSTN
-
Premise-based PSTN (Local Gateway must be enabled separately. For more information, see Configure Premises-based PSTN in Control Hub.)
| 1 |
Sign in to Control Hub. |
| 2 |
Go to and select the location you want to update. |
| 3 |
Select the Calling tab and Click Manage next to PTSN Connection. |
| 4 |
Select Cisco Calling Plans and click Next. |
| 5 |
Enter the contact information and click Next. This field is for the contact information of the person who will sign the legal contract with Cisco. |
| 6 |
Enter the Emergency Services Address (ESA), and click Save. By default, the ESA entered here is applied to all phone numbers for this location. You can change the ESA for an individual user if needed. For example, you may need to change the ESA if you have a remote employee who works from home. |
| 7 |
On the summary screen, do one of the following:
|
Before you begin
-
The Cisco Calling Plan must be enabled for your location before you can order new phone numbers through Control Hub.
-
When requesting new numbers, you can enter specific numbers or a block of consecutive numbers. You can also allow the system to assign numbers from the search inventory based on the country, state, area code, and prefix you select.
-
By default, the Emergency Service Address (ESA) entered for a location during your Cisco Calling Plan setup is applied to all phone numbers for that location.
| 1 |
Select Order New Numbers, click Next. |
| 2 |
Specify the numbers you want to order by selecting the Country, Area Code, and City from the drop-down. New numbers can be requested as local or non-geographic (not linked to a specific locality). 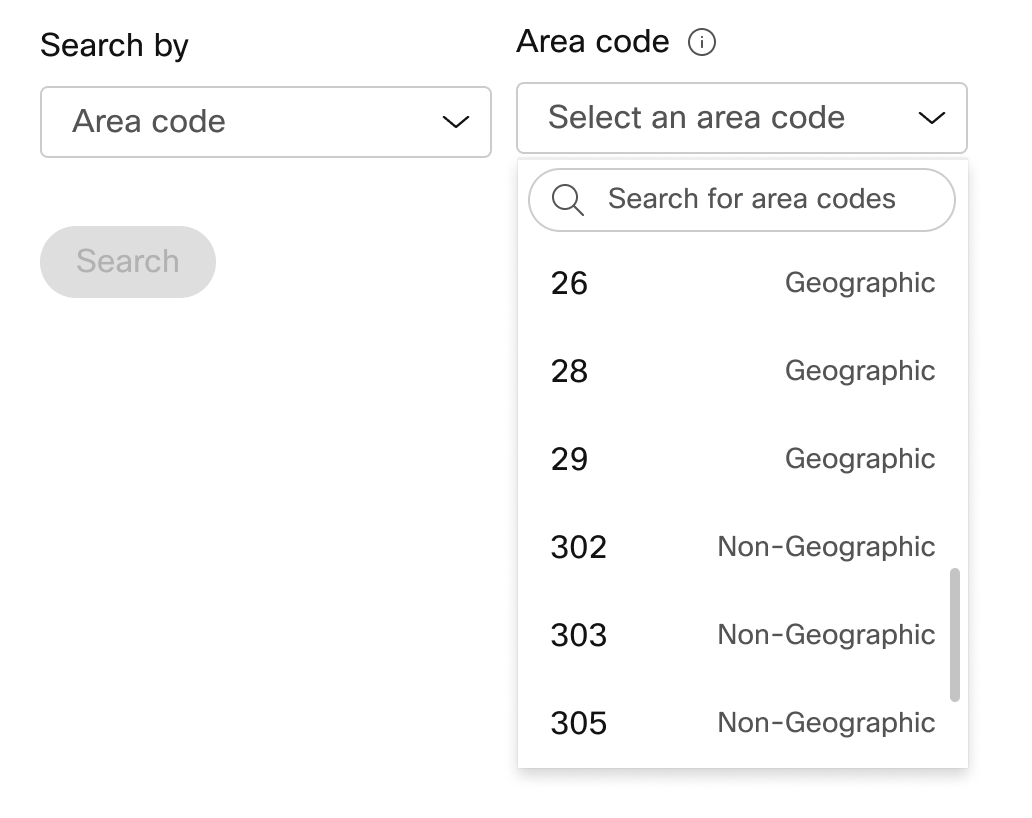
|
| 3 |
Enter how many numbers you want auto-selected for you and click Search. You are provided a list of available numbers based on your selected criteria. |
| 4 |
Click the numbers you would like to order, then click Order. |
| 5 |
On the order submission confirmation page, select PSTN Orders to check your order status. This brings you to the PSTN Orders page. |
| 6 |
Accept the Terms of Service to activate the new numbers. The Terms of Service link is only available to customer administrators. Partners only see a message that the Terms of Service needs to be signed by the customer. |
With the Cisco Calling Plan, you can order blocks of telephone numbers directly from Cisco through Control Hub.
Before you begin
-
Ordering blocks of numbers is only available for customers with a paid subscription.
-
The maximum number of block numbers that can be ordered is 100.
-
Numbers ordered in a block can only be deleted if the entire block is deleted.
-
By default, the Emergency Service Address (ESA) entered for a location during your Cisco Calling Plan setup is applied to all phone numbers for that location.
| 1 |
Sign in to Control Hub. |
| 2 |
Go to .
|
| 3 |
From the Manage drop-down select Add. |
| 4 |
Choose a Location and PSTN Number in Number Type drop-down on add numbers page and then click Next. |
| 5 |
Select Order New Numbers, click Next. |
| 6 |
Select the toggle for Get a Set of Numbers that Follow Each Other in Order. |
| 7 |
From the drop-down, select the quantity of block numbers needed. |
| 8 |
Specify State and use either Area Code/Prefix or City as your search criteria, and click Search. |
| 9 |
Select from the list of available blocks of numbers provided, based on your search criteria, and click Order. |
| 10 |
On the order submission confirmation page, select the PSTN Orders to check your order status. This brings you to the PSTN Orders page. |
| 11 |
Accept the Terms of Service to activate the new numbers. |
Before you begin
We strongly recommend you to read and familiarize yourself with the Cisco Calling Plan Number Porting Guidelines and Policies before you start porting the numbers.
-
Enable Cisco Calling Plan for your location before you port in phone numbers through Control Hub.
-
A signed Letter of Agency (LOA) is needed, authorizing Cisco to place orders with the current PSTN carrier to move the service to Cisco. The LOA must be signed by the current account owner or authorized signer. You're prompted to sign the LOA while completing the porting steps.
-
Make sure you have a recent bill in PNG or PDF formate from your current PSTN provider. The bill must be from the last 30 days. While completing the porting steps, you’re prompted to upload a copy of your bill.
-
To ensure a successful port, make sure you have the following information ready:
-
List of all phone numbers to port in (non-toll free)
-
Current PSTN provider account information
-
Customer Service Record (CSR) if available
-
Your account PIN if one exists
When planning for which numbers to port, we recommend that you consider any number that receives inbound calls. See Cisco Calling Plan Number Policy for more information.
-
-
By default, the Emergency Service Address (ESA) entered for a location during your Cisco Calling Plan setup is applied to all phone numbers for that location.
| 1 |
Sign in to Control Hub. |
| 2 |
Select the Line type from the drop-down as Single line or Multi-line, to display the number in single or multiple lines. |
| 3 |
Add the phone numbers you would like to keep, and then click Save & continue. A portability check is automatically run when numbers are entered. Highlighted numbers are considered non-portable. Further review of these instances is supported by PSTN Technical Support. 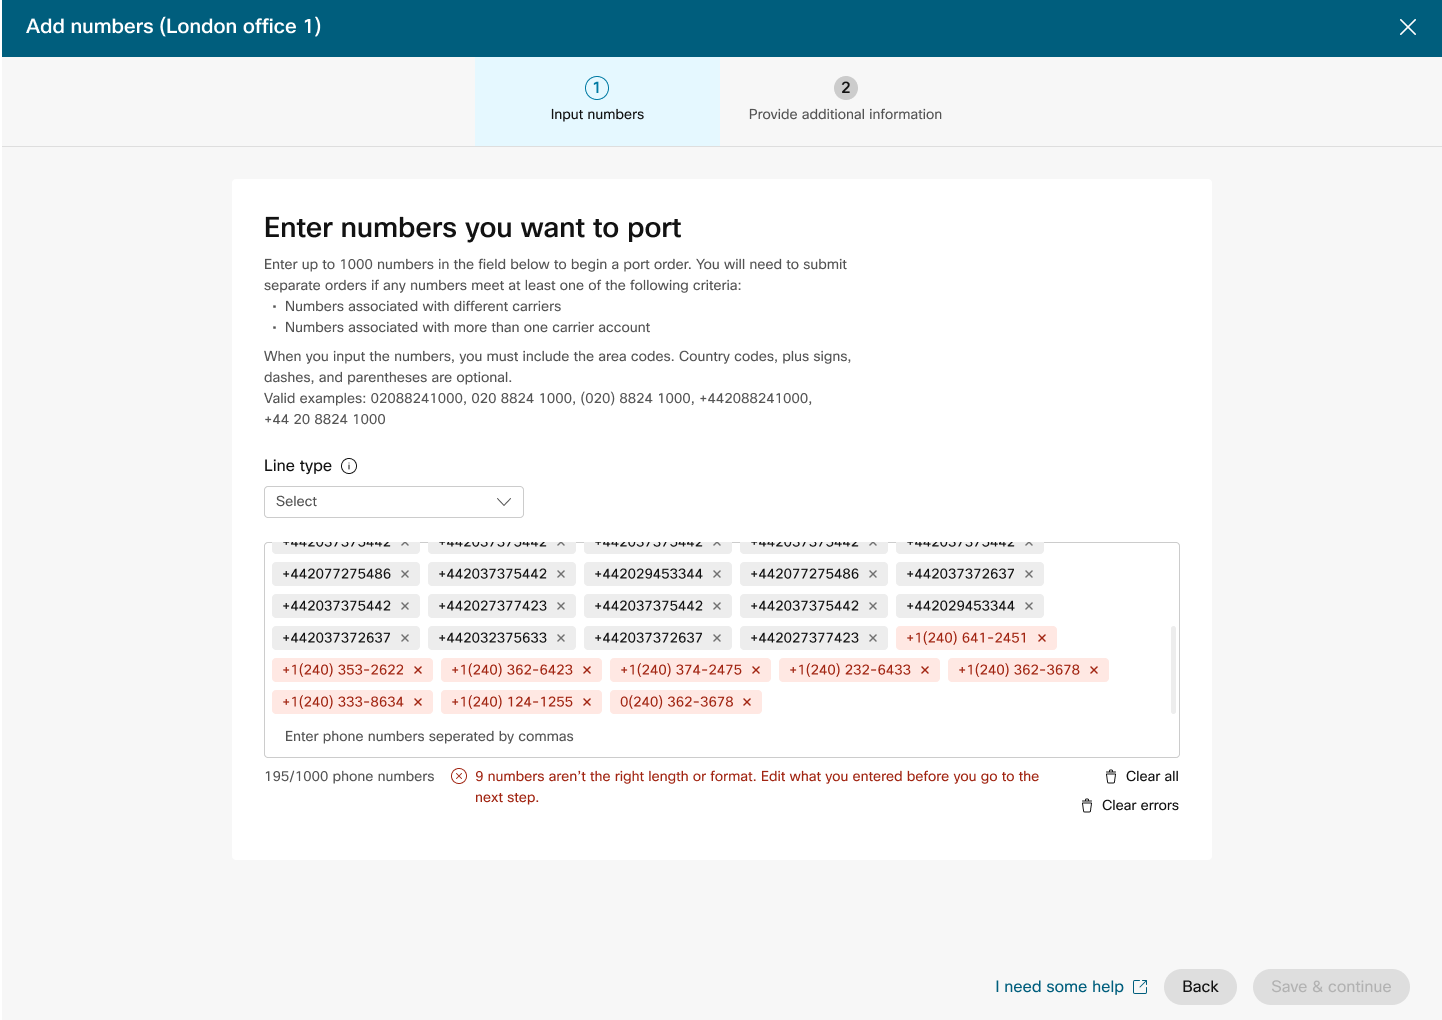
|
| 4 |
Enter your account information with your current provider. Make sure that the information entered matches your current provider bill. Click Next. |
| 5 |
Upload a bill from your previous provider. Make sure the bill is from the last 30 days and is in PNG or PDF format. Click Next. |
| 6 |
Enter your first and last name and job title to sign the Letter of Agency (LOA). Click Sign & Submit. |
| 7 |
Review your order and click Next. |
| 8 |
The order submission screen shows a summary of your port in order. Click Done. Control Hub conducts a preliminary error check before a port order is submitted. If there are any issues found with a port order, administrators receive an email notification and an error message appears on the PSTN Orders screen. |
When placing orders for new numbers or porting numbers, administrators can check order status or port rejection notices in Control Hub.
A migration banner is displayed when there are locations which need to be migrated from Non-Integrated CCP to Integrated CCP.
-
Select an order to check its status.
Status Values for New Number Orders
|
Displayed Status |
Description |
|---|---|
|
Pending |
New numbers order is created by the user. |
|
Provisioned |
New numbers are provisioned. |
|
Error |
Issue is detected with the new numbers order. Create a TAC ticket to receive help. |
Status Values for Ported Number Orders
|
Displayed Status |
Description |
|---|---|
|
Pending |
User is in the process of creating/filling in details of the Porting Order. Once submitted, the order will still show Pending until Cisco validates and accepts the porting order. |
|
Rejected |
Porting issue is detected. See the Porting Errors table for additional details or/and contact PSTN Technical Support, if required, for additional help. |
|
Submitted |
Porting Order is validated and accepted. |
|
FOC Received |
FOC date confirmation from the previous PSTN provider received. |
|
Completed |
Porting process is complete. |
|
Canceled |
Order is canceled. |
Porting Error Messages
|
Displayed Error |
Description |
How to fix |
|---|---|---|
|
| ||
|
Account number mismatch |
Account number does not match that on the (CSR). |
Update the Account Number field on the PSTN Order and resubmit. For some carriers, the account number may be the same as the BTN or the telephone number itself. |
|
Account number required |
The account number was not provided but is required. |
Update the Account Number field on the PSTN Order and re-submit. For some carriers, the account number may be the same as the BTN or the telephone number itself. |
|
Account name mismatch |
Person authorizing does not match that on the (CSR). |
Update the Authorized name on account field on the PSTN Order and resubmit. |
|
BTN mismatch |
BTN or ATN does not match that on the CSR. |
Update the Carrier billing phone number field on PSTN Order and resubmit. |
|
Company name mismatch |
Entity name does not match that on the CSR. |
Update the Company name with previous carrier field on PSTN order and resubmit. |
|
Multiple BTNs |
The OSP requires this Porting Order to be split and submitted as separate orders. |
Cancel current PSTN Order and create new, multiple PSTN Orders. Create one for each group of numbers that have the same BTN. |
|
FOC rejected by losing carrier |
The FOC date requested cannot be accommodated by the OSP. |
Update the Port Complete date field on PSTN Order and resubmit. |
|
Unknown |
Contact PSTN Technical Support team (PTS) for details. |
Contact PSTN Technical Support team (PTS) for details. |
|
Invalid PIN |
Passcode/PIN must be provided for wireless port. |
Update the PIN field on PSTN Order and resubmit. |
|
Pending order |
The OSP has a pending LSR on the account (for exmaple, a port out or address change). |
Remove the telephone numbers in question from the PSTN Order and resubmit. |
|
Pending main BTN |
BTN is one of the phone numbers being ported. User must indicate Porting Order Type, Remaining Numbers Action, and New Billing Phone Number accordingly. |
Remove the main BTN from the list of telephone numbers being ported and resubmit the order. Please include the Main BTN into the last iteration of numbers (if porting numbers in multiple iterations). |
|
Service address mismatch |
The location info does not match that on the CSR. |
Update the Service address, State, and City fields and resubmit the order. |
|
TN has special feature |
Some of the phone numbers cannot be ported because they have a special feature (for example, remote call forward). |
Remove number(s) with special features from the PSTN Order and resubmit. Or, unassign special feature from the numbers being ported. |
|
TN mismatch |
Some of the phone numbers do not belong to the end user. |
Remove the number(s) in question and resubmit the order. |
|
TN not portable |
Some of the phone numbers can't be ported because they are inactive or are not part of the end user's account. |
Try to remove the number(s) in question and resubmit the PSTN Order. |
|
Unsupported rate center |
The rate center is not portable. |
Remove the number(s) in question and resubmit the order. |
|
Zip/postal code mismatch |
Postal code does not match that on the CSR. |
Update the Zip code field and resubmit the order. |
|
Previous carrier's bill is invalid |
The invoice is invalid. |
Go to PSTN Order details, open Previous Carrier’s Bill section. Upload the correct bill file and resubmit the order. |
|
LOA invalid |
The LOA is invalid. |
Sign LOA and re-submit PSTN Order or contact PSTN Technical Support team (PTS). |
PSTN – Public Switched Telephone Network
CSR – Customer Service Record
FOC – Firm Order Commitment
OSP – Old Service Provider
BTN – Billing Telephone Number
ATN – Account Telephone Number
To configure an ESA for an user, ensure the following conditions are met:
- The user has a non-mobile primary phone number assigned.
- The user’s location is within the U.S. or Canada.
These conditions are necessary because the ESA is tied to the user's phone number and location. This setup allows accurate routing of emergency calls and proper callback to the user through the Emergency Callback Number (ECBN) associated with their location or phone number.
| 1 |
Sign in to Control Hub. |
| 2 |
Go to . |
| 3 |
Select the user that you want to modify and click Calling. |
| 4 |
Select the right arrow to expand the primary phone number settings under Numbers. |
| 5 |
Under Emergency Service Address, select Custom Address. Enter the following details. In case of an emergency, the local emergency response crew will use this address to locate the caller.
|
| 6 |
Update the information for the workspace and click Validate. On entering a service address, the system validates the address. If the system cannot find the address, a Suggested Address displays in a side panel. Review the suggested address and click Apply to update the Emergency service address. Click Save , to save the changes. |
A custom emergency address overrides the location's default emergency address for the specific user.
| 1 |
Sign in to Control Hub. |
| 2 |
Go to and select the location you want to update. |
| 3 |
Next to PSTN Connection, click Manage. |
| 4 |
Next to the Emergency Service Address, click Edit. |
| 5 |
Enter the new address and click Save. If ESA (Enterprise Service Address) address validation fails while configuring premise or CCPP connections, administrators can close the ESA screen and continue with the setup. The validation failure will not prevent setting up the connection. If the ESA is not validated, emergency call handling may be delayed, and additional charges may apply if calls are routed to an emergency relay center. |
Webex Calling provides flexible Calling plans and the ability to choose the PSTN solution that fits the requirement. Over time you may have to migrate to a different PSTN solution due to changes in the business environment or other factors.
Use this matrix to know the potential PSTN migration paths for Webex Calling.
Webex Calling supports the following PSTN migration paths:
-
Using Self Service through Control Hub
-
Premises-based PSTN, non-integrated CCPP, and non-integrated IntelePeer to Cisco Calling Plans. See Migrate to Cisco Calling plans.
-
Non-integrated CCP Provider including non-integrated Intelepeer to a Premises-based Solution. See, Configure premises-based PSTN in Control Hub
-
Premises-based solution to non-integrated CCPP. You must update the connection type in Control Hub and select a CCPP partner. This type of migration does not require any further configuration.
-
-
Using Manual Migration
-
Premises-based solution to Integrated CCP Provider
-
Integrated CCP Provider to Non-integrated CCP Provider (Exception: Non-integrated Intelepeer isn’t supported as the target CCP Provider)
-
Integrated CCP Provider to Premises-based Solution
-
To use the manual migration process, you must create a new location, move TNs and users to the new location, and reconfigure site services/service assignments. During migration, you experience service interruption and there’s a risk of data loss.
Here’s a list of unsupported PSTN migration paths:
-
Cisco Calling Plans to integrated Intelepeer
-
Integrated Intelepeer to Cisco Calling Plans
The minimum required order is one Outbound Calling Plan (OCP). Billing includes charges for outbound calling plans, phone numbers, and international Calling usage. Your Cisco monthly billing invoice includes information on call activity, charges, and applicable fees and taxes. There’s no additional charge to port phone numbers.
When your billing begins:
-
Outbound Calling Plans ordered in CCW begin billing on the requested service date (RSD).
-
Outbound Calling Plans provisioned in Control Hub begin billing immediately.
-
Phone numbers provisioned in Control Hub begin billing immediately or, if ported from another provider, billing begins upon port completion.
Outbound calling plan rates:
-
Rates for the Outbound Calling Plans and phone numbers are prorated using the same proration method used to calculate the rates for the Webex Calling licenses.
-
International Calling rates vary by country and are billed the month following usage.
See Cisco Calling Plan bill for the details.
Cisco Calling Plans support is provided by various support divisions, depending on your need.
|
Support Division |
Purpose |
Contact Information |
|---|---|---|
|
Partner Help Desk (PHD) |
Partner how-to and/or documentation inquiries, Pre-quoting Regulatory Tax and other enquiries about the Cisco Calling Plans offering. |
North America: 1-844-613-6108 EMEA: +44 129 366 10 20 APAC: +61 3 7017 7272 Email: webexcalling-phd@cisco.com |
|
PSTN Technical Support (PTS) |
|
Go to Control Hub and click on PSTN Help link for PSTN technical support. |
|
TAC |
Issues with Control Hub functionality Issues with service, such as dropped calls, call quality issues, or service outages |
North America: 1-800-553-2447 EMEA: +32 2 704 5555 APAC: +61 2 8446 7411 Email: tac@cisco.com See also: |
|
Invoice & Collections |
VAT, Payment and other invoicing queries |
Contact the Collector on the Invoice via email or phone |
|
Cisco SaaS Support Team (CES) |
|
Refer Partner Support Playbook and Cisco Calling Plans FAQ Create a case through link below if the required information is not found in the playbook - https://customerservice.cloudapps.cisco.com/ |
You can select varied connections for multi-site applications. For example, you can select Cisco Calling Plans for one location, Cloud-Connected PSTN (CCP) for a second location, and Local Gateway for the third location. When choosing the Cisco Calling Plans, the following applies.
Requirements
-
Partners must be an authorized Webex Calling partner and have accepted the new Webex Calling addendum through enrollment into the Webex Calling PSTN program.
-
A minimum of one committed Outbound Calling Plan license must be purchased to enable access to all services associated with Cisco Calling Plans.
Limitations
-
Cisco Calling Plans are currently available to specified countries.
-
Existing Webex Calling locations or telephone numbers can only transition to Cisco Calling Plans in certain scenarios. For details on supported migration paths, refer Supported paths for PSTN migration section.
-
You can order a maximum of 100 new standard phone numbers at a time. Additional numbers can be placed as a separate order.
-
Toll-free numbers aren’t currently available. You can’t order new toll-free numbers or port existing toll-free numbers to the Cisco Calling Plans.
-
Cisco Calling Plans aren’t supported with Webex Contact Center or authorized for use in which high-concurrent calls or high-volume calls or uncommonly short or long calls are made. For more information about Webex Contact Center, see Get started with Webex Contact Center.
-
Some premium services and international destinations may not be available for operational purposes. If specific destinations which are not generally available are required, customers can open a support case to request availability.
The card view displays the PSTN provider available for the Webex Calling customer before configuring the PSTN location. The PSTN view displays both Providers and Orders.
You can apply the search filter to filter content based on Service Type and Market. Use the toggle option to change the view from Compact to Table. The compact view helps to resize the card to display the provider details without the service information.
The provider screen displays the various provider cards with the list of supported service types. The Providers section is classified into the following:
-
Preferred Calling providers
-
Certified Calling providers
-
Calling providers
Click the Learn More option on the card to view details of the provider. It displays Use the search field to select the PSTN service provider based on Cisco business relationship preference such as certified provider and Calling provider.
The providers include the following:
-
Provider summary
-
List of locations configured with this provider
-
List of markets that the provider is available for the supported services.
If the customer has PSTN locations where Calling services aren’t set up, the Select this provider action bar displays. Use this option to configure the service for the PSTN location.
The preferred view in the Control Hub displays the calling providers that the managing partner prefers to work. However, you can view all available calling providers with Webex Calling. This section provides the following:
-
Select the location from the drop-down menu.
-
Choose the subscription type for the users to use the Cisco Calling plans. Click Next.
-
Complete the fields for Contract Information and Emergency Service Address configuration.
The PSTN service set up is now complete.
Cisco Calling Plans are available for technical evaluation as part of the Webex Calling trial process. While Cisco Calling Plans trials are free to use, there are some neddotable limitations during the trial phase.
As you can convert the trial accounts to paid accounts, the required regulatory documentation, as mentioned in the 'Order New Phone Numbers' section under each country, is also mandatory for trial services. These documents are legally required by country regulators for our Telephone Number (TN) provisioning team to procure the numbers.
-
Each trial account can provision up to 10 standard telephone numbers from Cisco Calling Plans with Webex Calling. It isn’t permitted to provision more than 10 numbers per trial.
-
Only new, standard telephone numbers are supported in trials. Ported numbers, consecutive blocks, and inbound toll-free numbers aren’t supported on trial accounts. You also cannot port numbers out of a trial. You must convert to a paid account if you wish to use these features.
-
International calling, along with Premium Service Call types I & II are blocked from use during the trial period.
-
Business Texting isn’t available on Webex Calling trial accounts.
-
Trial accounts are intended for technical evaluation purposes only, and not for normal commercial operation. As such, emergency services are only meant for technical evaluation; actual emergency calls can’t be guaranteed. Users shouldn’t place actual emergency service calls on a trial account.
When placing an order to convert a Webex Calling trial with Cisco Calling Plans to a paid subscription, you must order at least one Cisco Calling Plan committed license to maintain the telephone numbers and configuration used in the trial.
-
Cisco Calling Plans (Cisco PSTN)
-
Cloud Connected PSTN
-
Premise-based PSTN (Local Gateway must be enabled separately. For more information, see Configure Premises-based PSTN in Control Hub.)
| 1 |
Sign in to Control Hub. |
| 2 |
Go to and select the location you want to update. |
| 3 |
Select the Calling tab and Click Manage next to PTSN Connection. |
| 4 |
Select Cisco Calling Plans and click Next. |
| 5 |
Enter the contact information and click Next. This field is for the contact information of the person who will sign the legal contract with Cisco. |
| 6 |
Enter the Emergency Services Address (ESA), and click Save. By default, the ESA entered here is applied to all phone numbers for this location. You can change the ESA for an individual user if needed. For example, you may need to change the ESA if you have a remote employee who works from home. |
| 7 |
On the summary screen, do one of the following:
|
Before you begin
-
The Cisco Calling Plan must be enabled for your site before you can order new phone numbers through Control Hub.
-
When requesting new numbers, you can enter specific numbers. You can also allow the system to assign numbers from the search inventory based on the country, and city you select.
-
By default, the Emergency Service Address (ESA) entered for a location during your Cisco Calling Plan setup is applied to all phone numbers for that location.
| 1 |
Sign in to Control Hub. |
| 2 |
Specify the Country, State, and the Area Code or City to search by. |
| 3 |
Enter how many numbers you want auto-selected for you and click Search. You are provided a list of available numbers based on your selected criteria. |
| 4 |
Select from the list of available numbers provided, based on your search criteria, and click Order. The selected numbers are displayed as pending to reserve. |
| 5 |
Click Save Cart to reserve the selected numbers. |
| 6 |
(Optional) Click X to remove the numbers from the cart |
| 7 |
(Optional) Click Save Cart to update the reserved numbers. |
| 8 |
Click Order to order the numbers selected. |
| 9 |
Click View Order. On the order submission confirmation page, select the PSTN Orders to check your order status. This brings you to the PSTN Orders page. |
| 10 |
Click on the PSTN Order to view order overview and order details. |
| 11 |
Click Additional Information on the order overview side panel to upload Address Proof and Business Registration Document. The address proof and business registration document can be uploaded either from a pending number order or an ESA order. A provisioned number order does not allow you to upload additional documents. |
| 12 |
Click Address Proof and Business Registration Document fields to upload the documents. |
| 13 |
Click Choose a file to upload the documents. Browse the files from your system and click Open to upload documents. |
| 14 |
Click X to close the side panel once you upload the documents. |
With the Cisco Calling Plan, you can order in advance new phone numbers directly from the Control Hub when there are no numbers available for a specific city or area. Advance ordering is only available for paid organizations.
| 1 |
Select City from the Search by drop-down. |
| 2 |
Select a city from the City drop-down without any numbers assigned. |
| 3 |
Click Search to search for any numbers assigned to the city. |
| 4 |
Click Request, an Advance Order window to order numbers for the selected city displays. |
| 5 |
Enter how many numbers that you want to order and click Add Advance Order to Cart. The cart displays based on your criteria and reserves the order.
|
| 6 |
Click Order to proceed and order the numbers reserved in the cart. The advanced order is successfully submitted. |
| 7 |
Click View Order. This brings you to the PSTN Orders page. |
| 8 |
Click on the PSTN Order to view an order overview and order details. |
| 9 |
Click Phone Numbers on the order overview side panel to see the order details (Quantity and the city). You can open a Cisco support case in case you need more help on the advanced order placed. |
| 10 |
Click Additional Information on the order overview side panel to upload the Address Proof and Business Registration Document. You can upload the address proof and business registration document either from a pending number order or an ESA order. A provisioned number order doesn’t allow you to upload additional documents. |
| 11 |
Click Address Proof and Business Registration Document fields to upload the documents. |
| 12 |
Click Choose a file to upload the documents. Browse the files from your system and click Open to upload documents. |
| 13 |
Click Cancel Order to cancel the order. Canceling the order stops any progress made in ordering all numbers associated with this order and you can only cancel the order in the Calling Partner Help Center.
|
Before you begin
We strongly recommend you to read and familiarize yourself with the Cisco Calling Plan Number Porting Guidelines and Policies before you start porting the numbers.
-
Enable Cisco Calling Plan for your site before you port in phone numbers through Control Hub.
-
A signed Letter of Agency (LOA) is needed, authorizing Cisco to place orders with the current PSTN carrier to move the service to Cisco. The current account owner or authorized signer must sign the LOA. You're prompted to sign the LOA while completing the porting steps.
-
To ensure a successful port, make sure you have the following information ready:
-
List of all phone numbers to port
-
Current PSTN provider account information
-
Customer Service Record (CSR) if available
-
Your account PIN if one exists.
When planning for which numbers to port, we recommend that you consider any number that receives inbound calls. See Cisco Calling Plan Number Policy for more information.
-
-
By default, the Emergency Service Address (ESA) entered for a location during your Cisco Calling Plan setup is applied to all phone numbers for that location.
When you request for porting a number, both Calling and Messaging services related to the number are ported. If you don’t want to port in both these services, then contact PSTN Technical Support. Go to Control Hub and click on PSTN Help link for PSTN technical support.
| 1 |
Add the phone number that you want to keep, and then click Save & continue. Highlighted numbers are considered non-portable. PSTN Technical Support supports further review of these instances. The screenshot shows non-portable numbers highlighted in red in the Numbers page. For AU porting, the result of the portability check takes time. Once the numbers are ported, the user can view the number status in the PSTN overview > Phone numbers page. You receive an email after the porting process completes. 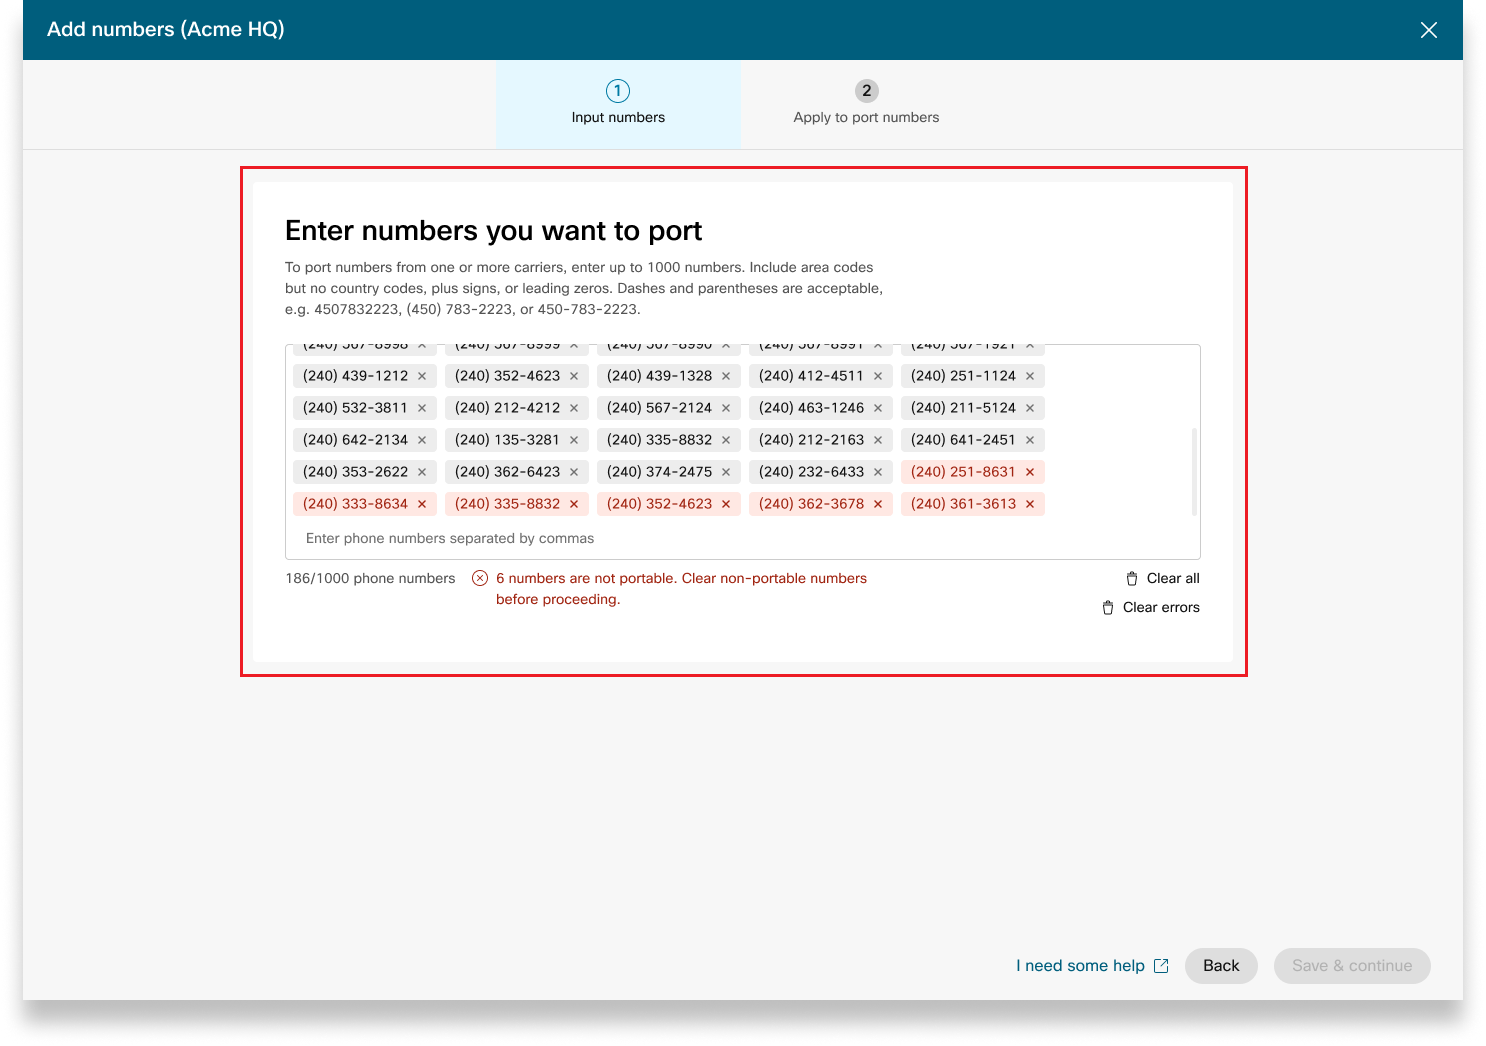
|
| 2 |
Enter the desired port information in the Port order details page. Make sure to enter the email address in the Additional contact field. Click Next. |
| 3 |
Enter your contact information based on your current carrier provider in the Account information page. Enter the ACN/ABN number, which is the Australia Company/Business number. The ACN/ABN field applies based on the carrier provider. |
| 4 |
Review your order and click Next.
|
| 5 |
The order submission screen shows a summary of your port order. Click Done. Control Hub conducts a preliminary error check before you submit a port order. If there are any issues found with a port order, administrators receive an email notification, and an error message appears on the PSTN Orders screen. These statuses apply to Australia port in orders indicating the different stages in the port in order progression:
|
When placing orders for new numbers or porting existing numbers, you can check order status or port rejection notices in Control Hub.
-
Sign in to Control Hub.
-
Select an order to check its status.
ESA order is not provisioned until the additional information is provided.
Status Values for New Number Orders
|
Displayed Status |
Description |
|---|---|
|
Pending |
A New numbers order has been created by the user. |
|
Provisioned |
New numbers have bene provisioned. |
|
Error |
An issue has been detected with the new numbers order. Create a TAC ticket to get help. |
To configure an ESA for an user, ensure the following conditions are met:
- The user has a non-mobile primary phone number assigned.
- The user’s location is within the U.S. or Canada.
These conditions are necessary because the ESA is tied to the user's phone number and location. This setup allows accurate routing of emergency calls and proper callback to the user through the Emergency Callback Number (ECBN) associated with their location or phone number.
| 1 |
Sign in to Control Hub. |
| 2 |
Go to . |
| 3 |
Select the user that you want to modify and click Calling. |
| 4 |
Select the right arrow to expand the primary phone number settings under Numbers. |
| 5 |
Under Emergency Service Address, select Custom Address. Enter the following details. In case of an emergency, the local emergency response crew will use this address to locate the caller.
|
| 6 |
Update the information for the workspace and click Validate. On entering a service address, the system validates the address. If the system cannot find the address, a Suggested Address displays in a side panel. Review the suggested address and click Apply to update the Emergency service address. Click Save , to save the changes. |
A custom emergency address overrides the location's default emergency address for the specific user.
| 1 |
Sign in to Control Hub. |
| 2 |
Go to and select the location you want to update. |
| 3 |
Next to PSTN Connection, click Manage. |
| 4 |
Next to the Emergency Service Address, click Edit. |
| 5 |
Enter the new address and click Save. If ESA (Enterprise Service Address) address validation fails while configuring premise or CCPP connections, administrators can close the ESA screen and continue with the setup. The validation failure will not prevent setting up the connection. If the ESA is not validated, emergency call handling may be delayed, and additional charges may apply if calls are routed to an emergency relay center. |
Webex Calling provides flexible Calling plans and the ability to choose the PSTN solution that fits the requirement. Over time you may have to migrate to a different PSTN solution due to changes in the business environment or other factors.
Use this matrix to know the potential PSTN migration paths for Webex Calling.
Webex Calling supports the following PSTN migration paths:
-
Using Self Service through Control Hub
-
Premises-based PSTN, non-integrated CCPP, and non-integrated IntelePeer to Cisco Calling Plans. See Migrate to Cisco Calling plans.
-
Non-integrated CCP Provider including non-integrated Intelepeer to a Premises-based Solution. See, Configure premises-based PSTN in Control Hub
-
Premises-based solution to non-integrated CCPP. You must update the connection type in Control Hub and select a CCPP partner. This type of migration does not require any further configuration.
-
-
Using Manual Migration
-
Premises-based solution to Integrated CCP Provider
-
Integrated CCP Provider to Non-integrated CCP Provider (Exception: Non-integrated Intelepeer isn’t supported as the target CCP Provider)
-
Integrated CCP Provider to Premises-based Solution
-
To use the manual migration process, you must create a new location, move TNs and users to the new location, and reconfigure site services/service assignments. During migration, you experience service interruption and there’s a risk of data loss.
Here’s a list of unsupported PSTN migration paths:
-
Cisco Calling Plans to integrated Intelepeer
-
Integrated Intelepeer to Cisco Calling Plans
The minimum required order is one Outbound Calling Plan (OCP). Billing includes charges for outbound calling plans, phone numbers, and international Calling usage. Your Cisco monthly billing invoice includes information on call activity, charges, and applicable fees and taxes. There’s no additional charge to port phone numbers.
When your billing begins:
-
Outbound Calling Plans ordered in CCW begin billing on the requested service date (RSD).
-
Outbound Calling Plans provisioned in Control Hub begin billing immediately.
-
Phone numbers provisioned in Control Hub begin billing immediately or, if ported from another provider, billing begins upon port completion.
Outbound calling plan rates:
-
Rates for the Outbound Calling Plans and phone numbers are prorated using the same proration method used to calculate the rates for the Webex Calling licenses.
-
International Calling rates vary by country and are billed the month following usage.
See Cisco Calling Plan bill for the details.
Cisco Calling Plans support is provided by various support divisions, depending on your need.
|
Support Division |
Purpose |
Contact Information |
|---|---|---|
|
Partner Help Desk (PHD) |
Partner how-to and/or documentation inquiries, Pre-quoting Regulatory Tax and other enquiries about the Cisco Calling Plans offering. |
North America: 1-844-613-6108 EMEA: +44 129 366 10 20 APAC: +61 3 7017 7272 Email: webexcalling-phd@cisco.com |
|
PSTN Technical Support (PTS) |
|
Go to Control Hub and click on PSTN Help link for PSTN technical support. |
|
TAC |
Issues with Control Hub functionality Issues with service, such as dropped calls, call quality issues, or service outages |
North America: 1-800-553-2447 EMEA: +32 2 704 5555 APAC: +61 2 8446 7411 Email: tac@cisco.com See also: |
|
Invoice & Collections |
VAT, Payment and other invoicing queries |
Contact the Collector on the Invoice via email or phone |
|
Cisco SaaS Support Team (CES) |
|
Refer Partner Support Playbook and Cisco Calling Plans FAQ Create a case through link below if the required information is not found in the playbook - https://customerservice.cloudapps.cisco.com/ |
You can select varied connections for multi-site applications. For example, you can select Cisco Calling Plans for one location, Cloud-Connected PSTN (CCP) for a second location, and Local Gateway for the third location. When choosing the Cisco Calling Plans, the following applies.
Requirements
-
Partners must be an authorized Webex Calling partner and have accepted the new Webex Calling addendum through enrollment into the Webex Calling PSTN program.
-
A minimum of one committed Outbound Calling Plan license must be purchased to enable access to all services associated with Cisco Calling Plans.
Limitations
-
Cisco Calling Plans are currently available to specified countries.
-
Existing Webex Calling locations or telephone numbers can only transition to Cisco Calling Plans in certain scenarios. For details on supported migration paths, refer Supported paths for PSTN migration section.
-
You can order a maximum of 100 new standard phone numbers at a time. Additional numbers can be placed as a separate order.
-
Toll-free numbers aren’t currently available. You can’t order new toll-free numbers or port existing toll-free numbers to the Cisco Calling Plans.
-
Cisco Calling Plans aren’t supported with Webex Contact Center or authorized for use in which high-concurrent calls or high-volume calls or uncommonly short or long calls are made. For more information about Webex Contact Center, see Get started with Webex Contact Center.
-
Some premium services and international destinations may not be available for operational purposes. If specific destinations which are not generally available are required, customers can open a support case to request availability.
The card view displays the PSTN provider available for the Webex Calling customer before configuring the PSTN location. The PSTN view displays both Providers and Orders.
You can apply the search filter to filter content based on Service Type and Market. Use the toggle option to change the view from Compact to Table. The compact view helps to resize the card to display the provider details without the service information.
The provider screen displays the various provider cards with the list of supported service types. The Providers section is classified into the following:
-
Preferred Calling providers
-
Certified Calling providers
-
Calling providers
Click the Learn More option on the card to view details of the provider. It displays Use the search field to select the PSTN service provider based on Cisco business relationship preference such as certified provider and Calling provider.
The providers include the following:
-
Provider summary
-
List of locations configured with this provider
-
List of markets that the provider is available for the supported services.
If the customer has PSTN locations where Calling services aren’t set up, the Select this provider action bar displays. Use this option to configure the service for the PSTN location.
The preferred view in the Control Hub displays the calling providers that the managing partner prefers to work. However, you can view all available calling providers with Webex Calling. This section provides the following:
-
Select the location from the drop-down menu.
-
Choose the subscription type for the users to use the Cisco Calling plans. Click Next.
-
Complete the fields for Contract Information and Emergency Service Address configuration.
The PSTN service set up is now complete.
Cisco Calling Plans are available for technical evaluation as part of the Webex Calling trial process. While Cisco Calling Plans trials are free to use, there are some neddotable limitations during the trial phase.
As you can convert the trial accounts to paid accounts, the required regulatory documentation, as mentioned in the 'Order New Phone Numbers' section under each country, is also mandatory for trial services. These documents are legally required by country regulators for our Telephone Number (TN) provisioning team to procure the numbers.
-
Each trial account can provision up to 10 standard telephone numbers from Cisco Calling Plans with Webex Calling. It isn’t permitted to provision more than 10 numbers per trial.
-
Only new, standard telephone numbers are supported in trials. Ported numbers, consecutive blocks, and inbound toll-free numbers aren’t supported on trial accounts. You also cannot port numbers out of a trial. You must convert to a paid account if you wish to use these features.
-
International calling, along with Premium Service Call types I & II are blocked from use during the trial period.
-
Business Texting isn’t available on Webex Calling trial accounts.
-
Trial accounts are intended for technical evaluation purposes only, and not for normal commercial operation. As such, emergency services are only meant for technical evaluation; actual emergency calls can’t be guaranteed. Users shouldn’t place actual emergency service calls on a trial account.
When placing an order to convert a Webex Calling trial with Cisco Calling Plans to a paid subscription, you must order at least one Cisco Calling Plan committed license to maintain the telephone numbers and configuration used in the trial.
-
Cisco Calling Plans (Cisco PSTN)
-
Cloud Connected PSTN
-
Premise-based PSTN (Local Gateway must be enabled separately. For more information, see Configure Premises-based PSTN in Control Hub.)
| 1 |
Sign in to Control Hub. |
| 2 |
Go to and select the location you want to update. |
| 3 |
Select the Calling tab and Click Manage next to PTSN Connection. |
| 4 |
Select Cisco Calling Plans and click Next. |
| 5 |
Enter the contact information and click Next. This field is for the contact information of the person who will sign the legal contract with Cisco. |
| 6 |
Enter the Emergency Services Address (ESA), and click Save. By default, the ESA entered here is applied to all phone numbers for this location. You can change the ESA for an individual user if needed. For example, you may need to change the ESA if you have a remote employee who works from home. |
| 7 |
On the summary screen, do one of the following:
|
Before you begin
-
The Cisco Calling Plan must be enabled for your site before you can order new phone numbers through Control Hub.
-
When requesting new numbers, you can enter specific numbers. You can also allow the system to assign numbers from the search inventory based on the country, and city you select.
-
By default, the Emergency Service Address (ESA) entered for a location during your Cisco Calling Plan setup is applied to all phone numbers for that location.
| 1 |
Sign in to Control Hub. |
| 2 |
Specify the Country, State, and the Area Code or City to search by. |
| 3 |
Enter how many numbers you want auto-selected for you and click Search. You are provided a list of available numbers based on your selected criteria. |
| 4 |
Select from the list of available numbers provided, based on your search criteria, and click Order. The selected numbers are displayed as pending to reserve. |
| 5 |
Click Save Cart to reserve the selected numbers. |
| 6 |
(Optional) Click X to remove the numbers from the cart |
| 7 |
(Optional) Click Save Cart to update the reserved numbers. |
| 8 |
Click Order to order the numbers selected. |
| 9 |
Click View Order. On the order submission confirmation page, select the PSTN Orders to check your order status. This brings you to the PSTN Orders page. |
| 10 |
Click on the PSTN Order to view order overview and order details. |
| 11 |
Click Additional Information on the order overview side panel to upload Address Proof and Business Registration Document. The address proof and business registration document can be uploaded either from a pending number order or an ESA order. A provisioned number order does not allow you to upload additional documents. |
| 12 |
Click Address Proof and Business Registration Document fields to upload the documents. |
| 13 |
Click Choose a file to upload the documents. Browse the files from your system and click Open to upload documents. |
| 14 |
Click X to close the side panel once you upload the documents. |
With the Cisco Calling Plan, you can order in advance new phone numbers directly from the Control Hub when there are no numbers available for a specific city or area. Advance ordering is only available for paid organizations.
| 1 |
Select City from the Search by drop-down. |
| 2 |
Select a city from the City drop-down without any numbers assigned. |
| 3 |
Click Search to search for any numbers assigned to the city. |
| 4 |
Click Request, an Advance Order window to order numbers for the selected city displays. |
| 5 |
Enter how many numbers that you want to order and click Add Advance Order to Cart. The cart displays based on your criteria and reserves the order.
|
| 6 |
Click Order to proceed and order the numbers reserved in the cart. The advanced order is successfully submitted. |
| 7 |
Click View Order. This brings you to the PSTN Orders page. |
| 8 |
Click on the PSTN Order to view an order overview and order details. |
| 9 |
Click Phone Numbers on the order overview side panel to see the order details (Quantity and the city). You can open a Cisco support case in case you need more help on the advanced order placed. |
| 10 |
Click Additional Information on the order overview side panel to upload the Address Proof and Business Registration Document. You can upload the address proof and business registration document either from a pending number order or an ESA order. A provisioned number order doesn’t allow you to upload additional documents. |
| 11 |
Click Address Proof and Business Registration Document fields to upload the documents. |
| 12 |
Click Choose a file to upload the documents. Browse the files from your system and click Open to upload documents. |
| 13 |
Click Cancel Order to cancel the order. Canceling the order stops any progress made in ordering all numbers associated with this order and you can only cancel the order in the Calling Partner Help Center.
|
Before you begin
We strongly recommend you to read and familiarize yourself with the Cisco Calling Plan Number Porting Guidelines and Policies before you start porting the numbers.
-
Enable Cisco Calling Plan for your site before you port in phone numbers through Control Hub.
-
A signed Letter of Agency (LOA) is needed, authorizing Cisco to place orders with the current PSTN carrier to move the service to Cisco. The current account owner or authorized signer must sign the LOA. You're prompted to sign the LOA while completing the porting steps.
-
To ensure a successful port, make sure you have the following information ready:
-
List of all phone numbers to port
-
Current PSTN provider account information
-
Customer Service Record (CSR) if available
-
Your account PIN if one exists.
When planning for which numbers to port, we recommend that you consider any number that receives inbound calls. See Cisco Calling Plan Number Policy for more information.
-
-
By default, the Emergency Service Address (ESA) entered for a location during your Cisco Calling Plan setup is applied to all phone numbers for that location.
When you request for porting in a number, both Calling and Messaging services related to the number are ported. If you don’t want to port in both these services, then contact PSTN Technical Support. Go to Control Hub and click on PSTN Help link for PSTN technical support.
| 1 |
Add the phone number that you want to keep, and then click Save & continue. Highlighted numbers are considered non-portable. PSTN Technical Support supports further review of these instances. The screenshot shows non-portable numbers highlighted in red in the Numbers page. For NZ number porting, the result of the portability check takes time. Once the numbers are ported, the user can view the number status in the PSTN overview > Phone numbers page. You receive an email after the porting process completes.
|
| 2 |
Enter the desired port in information in the Port order details page. Make sure to enter the email address in the Additional contact field. Click Next. |
| 3 |
Enter your contact information based on your current carrier provider in the Account information page. Enter the ACN/ABN number, which is the Australia Company/Business number. The ACN/ABN field applies based on the carrier provider. |
| 4 |
Review your order and click Next.
|
| 5 |
The order submission screen shows a summary of your port in order. Click Done. Control Hub conducts a preliminary error check before you submit a port in order. If there are any issues found with a port in order, administrators receive an email notification, and an error message appears on the PSTN Orders screen. These statuses apply to New Zealand port in orders indicating the different stages in the port in order progression:
|
When placing orders for new numbers or porting existing numbers, you can check order status or port rejection notices in Control Hub.
-
Sign in to Control Hub.
-
Select an order to check its status.
ESA order is not provisioned until the additional information is provided.
Status Values for New Number Orders
|
Displayed Status |
Description |
|---|---|
|
Pending |
A New numbers order has been created by the user. |
|
Provisioned |
New numbers have bene provisioned. |
|
Error |
An issue has been detected with the new numbers order. Create a TAC ticket to get help. |
To configure an ESA for an user, ensure the following conditions are met:
- The user has a non-mobile primary phone number assigned.
- The user’s location is within the U.S. or Canada.
These conditions are necessary because the ESA is tied to the user's phone number and location. This setup allows accurate routing of emergency calls and proper callback to the user through the Emergency Callback Number (ECBN) associated with their location or phone number.
| 1 |
Sign in to Control Hub. |
| 2 |
Go to . |
| 3 |
Select the user that you want to modify and click Calling. |
| 4 |
Select the right arrow to expand the primary phone number settings under Numbers. |
| 5 |
Under Emergency Service Address, select Custom Address. Enter the following details. In case of an emergency, the local emergency response crew will use this address to locate the caller.
|
| 6 |
Update the information for the workspace and click Validate. On entering a service address, the system validates the address. If the system cannot find the address, a Suggested Address displays in a side panel. Review the suggested address and click Apply to update the Emergency service address. Click Save , to save the changes. |
A custom emergency address overrides the location's default emergency address for the specific user.
| 1 |
Sign in to Control Hub. |
| 2 |
Go to and select the location you want to update. |
| 3 |
Next to PSTN Connection, click Manage. |
| 4 |
Next to the Emergency Service Address, click Edit. |
| 5 |
Enter the new address and click Save. If ESA (Enterprise Service Address) address validation fails while configuring premise or CCPP connections, administrators can close the ESA screen and continue with the setup. The validation failure will not prevent setting up the connection. If the ESA is not validated, emergency call handling may be delayed, and additional charges may apply if calls are routed to an emergency relay center. |
Webex Calling provides flexible Calling plans and the ability to choose the PSTN solution that fits the requirement. Over time you may have to migrate to a different PSTN solution due to changes in the business environment or other factors.
Use this matrix to know the potential PSTN migration paths for Webex Calling.
Webex Calling supports the following PSTN migration paths:
-
Using Self Service through Control Hub
-
Premises-based PSTN, non-integrated CCPP, and non-integrated IntelePeer to Cisco Calling Plans. See Migrate to Cisco Calling plans.
-
Non-integrated CCP Provider including non-integrated Intelepeer to a Premises-based Solution. See, Configure premises-based PSTN in Control Hub
-
Premises-based solution to non-integrated CCPP. You must update the connection type in Control Hub and select a CCPP partner. This type of migration does not require any further configuration.
-
-
Using Manual Migration
-
Premises-based solution to Integrated CCP Provider
-
Integrated CCP Provider to Non-integrated CCP Provider (Exception: Non-integrated Intelepeer isn’t supported as the target CCP Provider)
-
Integrated CCP Provider to Premises-based Solution
-
To use the manual migration process, you must create a new location, move TNs and users to the new location, and reconfigure site services/service assignments. During migration, you experience service interruption and there’s a risk of data loss.
Here’s a list of unsupported PSTN migration paths:
-
Cisco Calling Plans to integrated Intelepeer
-
Integrated Intelepeer to Cisco Calling Plans
The minimum required order is one Outbound Calling Plan (OCP). Billing includes charges for outbound calling plans, phone numbers, and international Calling usage. Your Cisco monthly billing invoice includes information on call activity, charges, and applicable fees and taxes. There’s no additional charge to port phone numbers.
When your billing begins:
-
Outbound Calling Plans ordered in CCW begin billing on the requested service date (RSD).
-
Outbound Calling Plans provisioned in Control Hub begin billing immediately.
-
Phone numbers provisioned in Control Hub begin billing immediately or, if ported from another provider, billing begins upon port completion.
Outbound calling plan rates:
-
Rates for the Outbound Calling Plans and phone numbers are prorated using the same proration method used to calculate the rates for the Webex Calling licenses.
-
International Calling rates vary by country and are billed the month following usage.
See Cisco Calling Plan bill for the details.
Cisco Calling Plans support is provided by various support divisions, depending on your need.
|
Support Division |
Purpose |
Contact Information |
|---|---|---|
|
Partner Help Desk (PHD) |
Partner how-to and/or documentation inquiries, Pre-quoting Regulatory Tax and other enquiries about the Cisco Calling Plans offering. |
North America: 1-844-613-6108 EMEA: +44 129 366 10 20 APAC: +61 3 7017 7272 Email: webexcalling-phd@cisco.com |
|
PSTN Technical Support (PTS) |
|
Go to Control Hub and click on PSTN Help link for PSTN technical support. |
|
TAC |
Issues with Control Hub functionality Issues with service, such as dropped calls, call quality issues, or service outages |
North America: 1-800-553-2447 EMEA: +32 2 704 5555 APAC: +61 2 8446 7411 Email: tac@cisco.com See also: |
|
Invoice & Collections |
VAT, Payment and other invoicing queries |
Contact the Collector on the Invoice via email or phone |
|
Cisco SaaS Support Team (CES) |
|
Refer Partner Support Playbook and Cisco Calling Plans FAQ Create a case through link below if the required information is not found in the playbook - https://customerservice.cloudapps.cisco.com/ |


