- Home
- /
- Article

Thanks for your feedback.

 In this article
 Feedback?
You can manage your voicemail settings, such as greetings, transcription, storage, and notification from User Hub.
Before you begin
- Your administrator must have enabled the voicemail settings for you to access and configure them. If you don’t find any voicemail settings, check with your administrator.
- Calling option in User Hub
You can configure all the voicemail settings from the User Hub by navigating to .
The Calling option is available only for users with a Webex Calling license. If you don’t see the Calling option, it means you don’t have a Webex Calling license.
If you want to find out which calling service you’re set up with, you can check from the Webex App. For more details, see Find out what calling service you have.
- Voicemail forwarding
When your administrator has enabled this setting, you can forward voice messages to another users’ number or extension. When disabled, you can't forward voice messages, use an external mailbox, or send a copy of the voice message to a specified email address.
- Voicemail deletion
Your administrator can set the voice messages expiration period (1-180 days), and the conditions for expired messages deletion.
When your administrator has configured the settings, the voice messages over 180 days old are archived automatically. If you require access to archived voice messages, contact your administrator.
If the administrator hasn't configured the settings, you need to manually delete the messages.
- Voicemail passcode or PIN
Your administrator can set the minimum number of days (1–7) between the passcode changes, and the passcode expiration period (15–180 days). If the administrator hasn't configured the settings, your passcode never expires.
You can reset your voicemail passcode from the User Hub, see Set or reset your voicemail PIN for more details. To listen to your voice messages from User Hub, see Listen to your voice messages.
If you find any issues in configuring the settings, contact your administrator. Your administrator can also configure all the voicemail settings on your behalf.
Related articles
Enable voicemail
To receive voicemail and fax messages, and configure various voicemail settings such as sending calls to voicemail, enabling notification, and setting message storage, you need to enable the voicemail toggle first.
| 1 |
Sign in to User Hub, then click . |
| 2 |
Go to the Voicemail section and turn on the toggle. 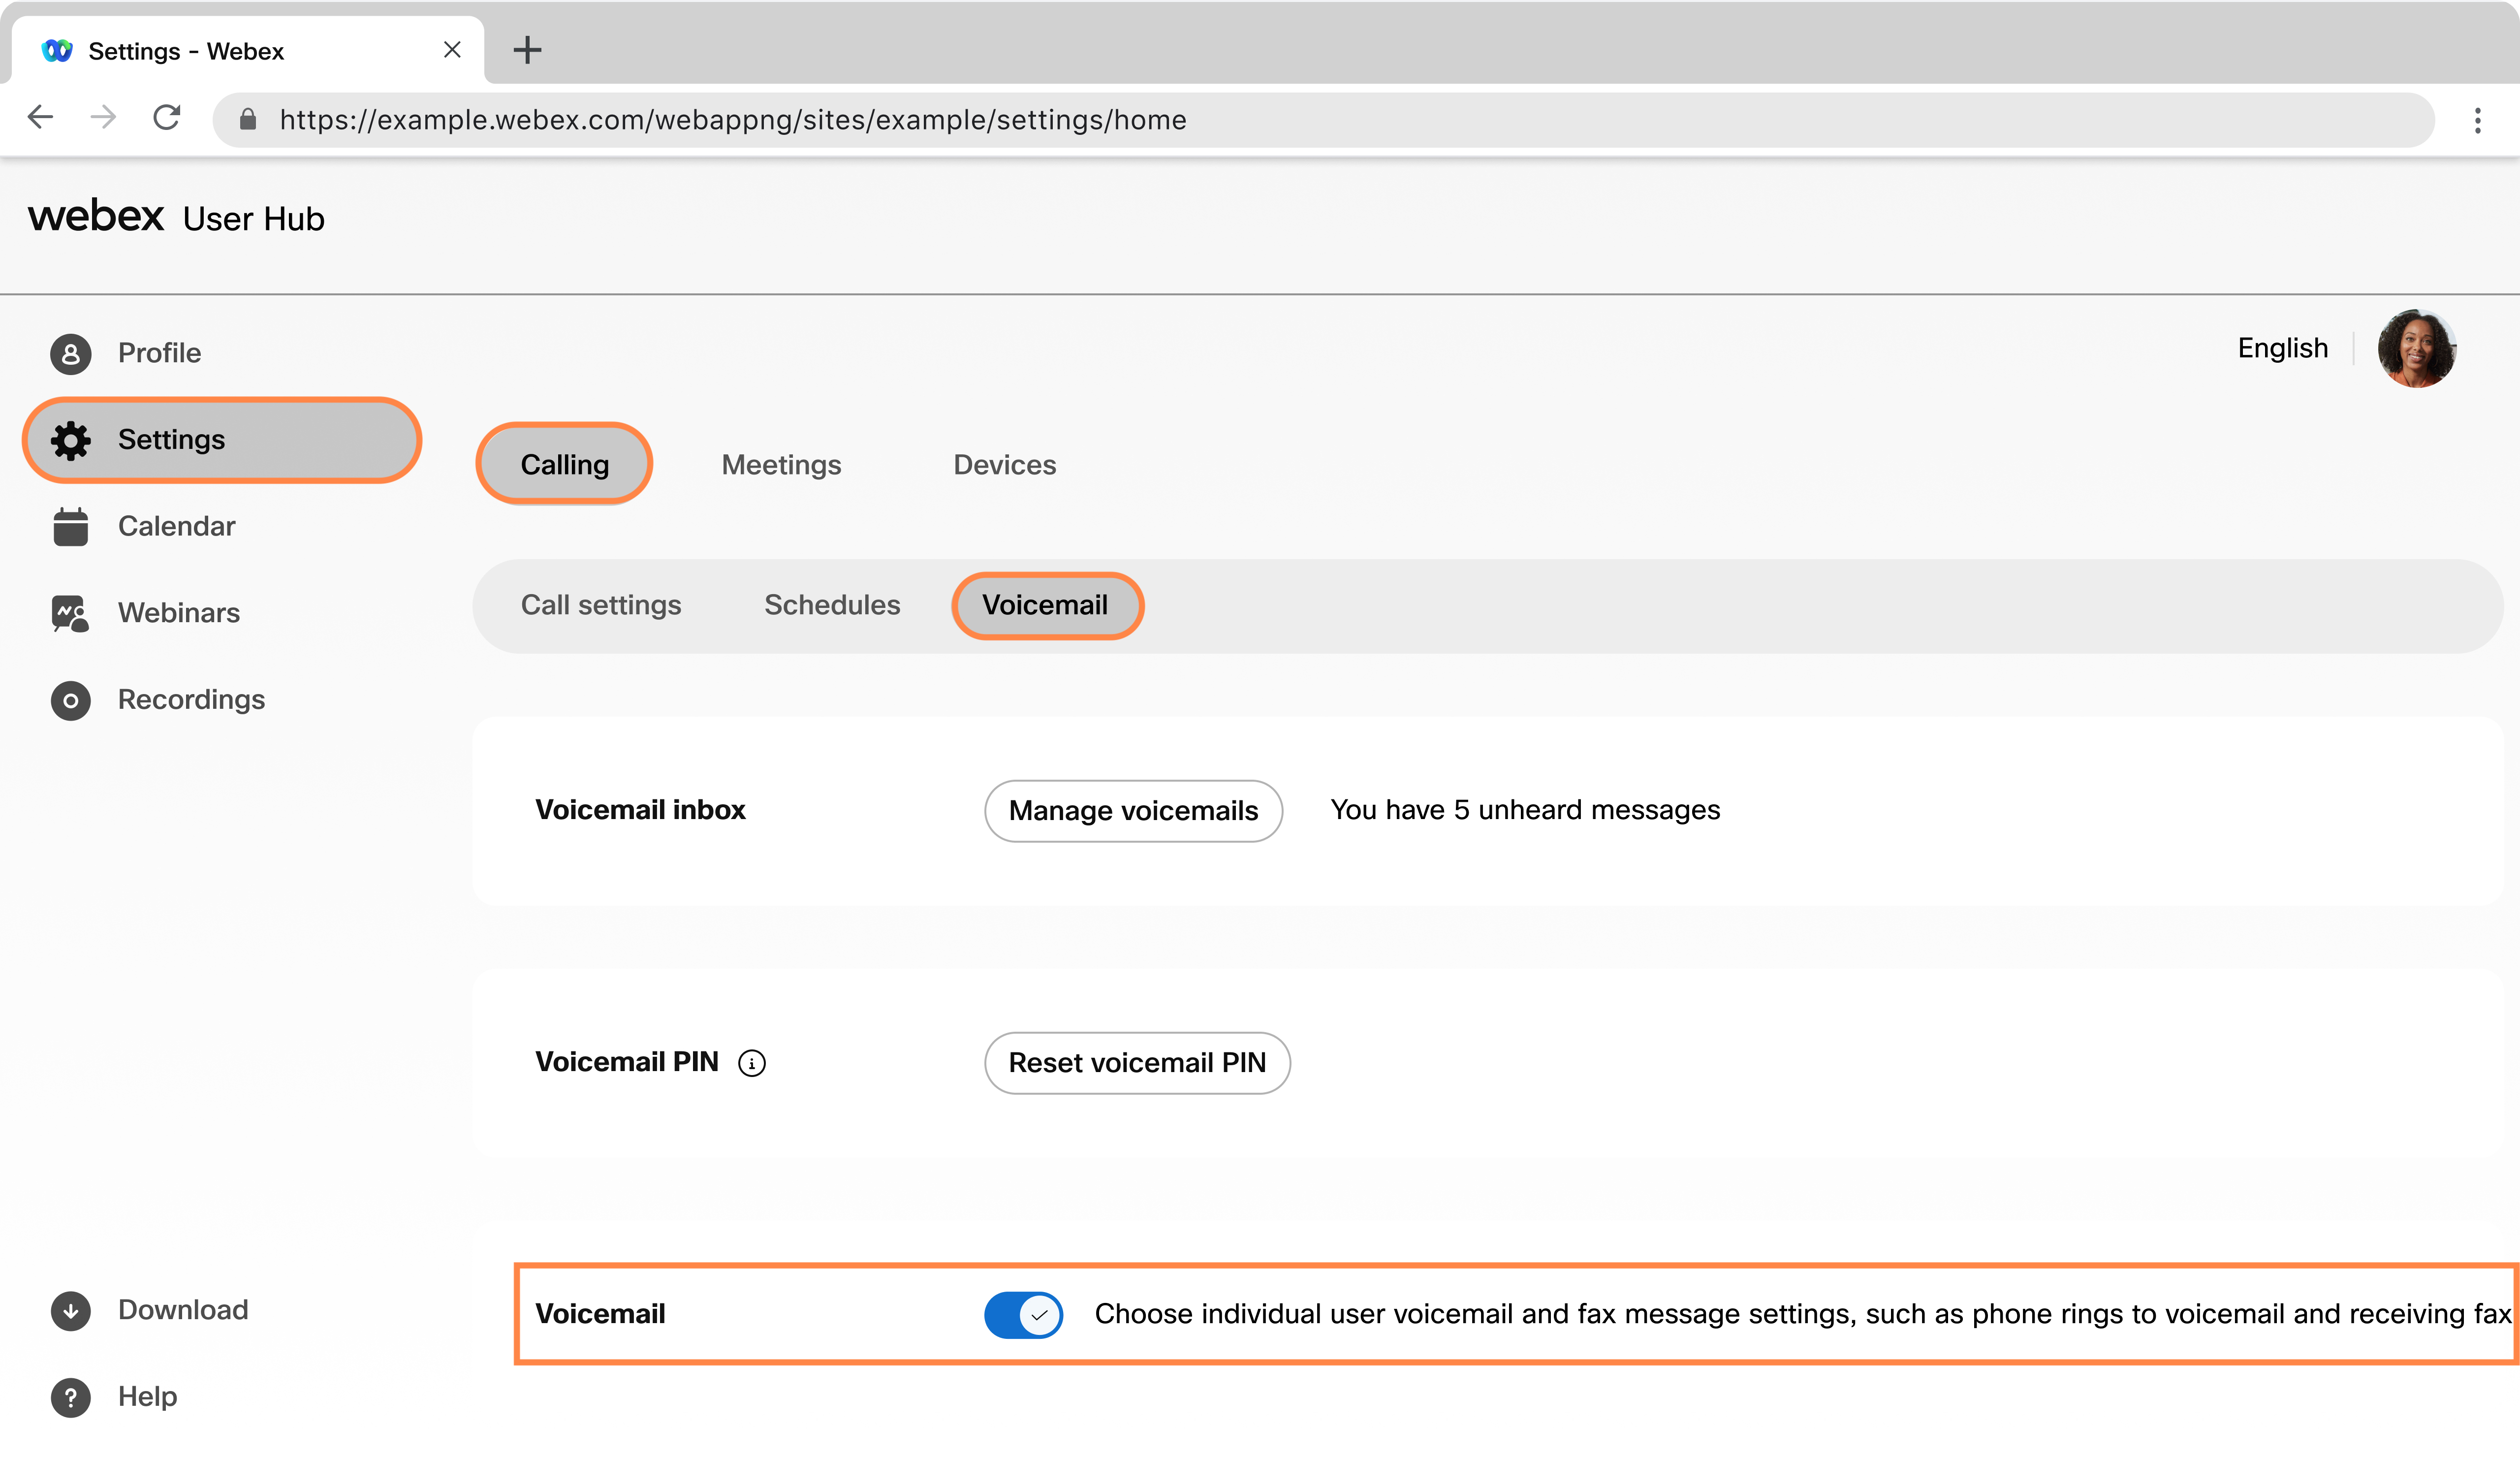
|
What to do next
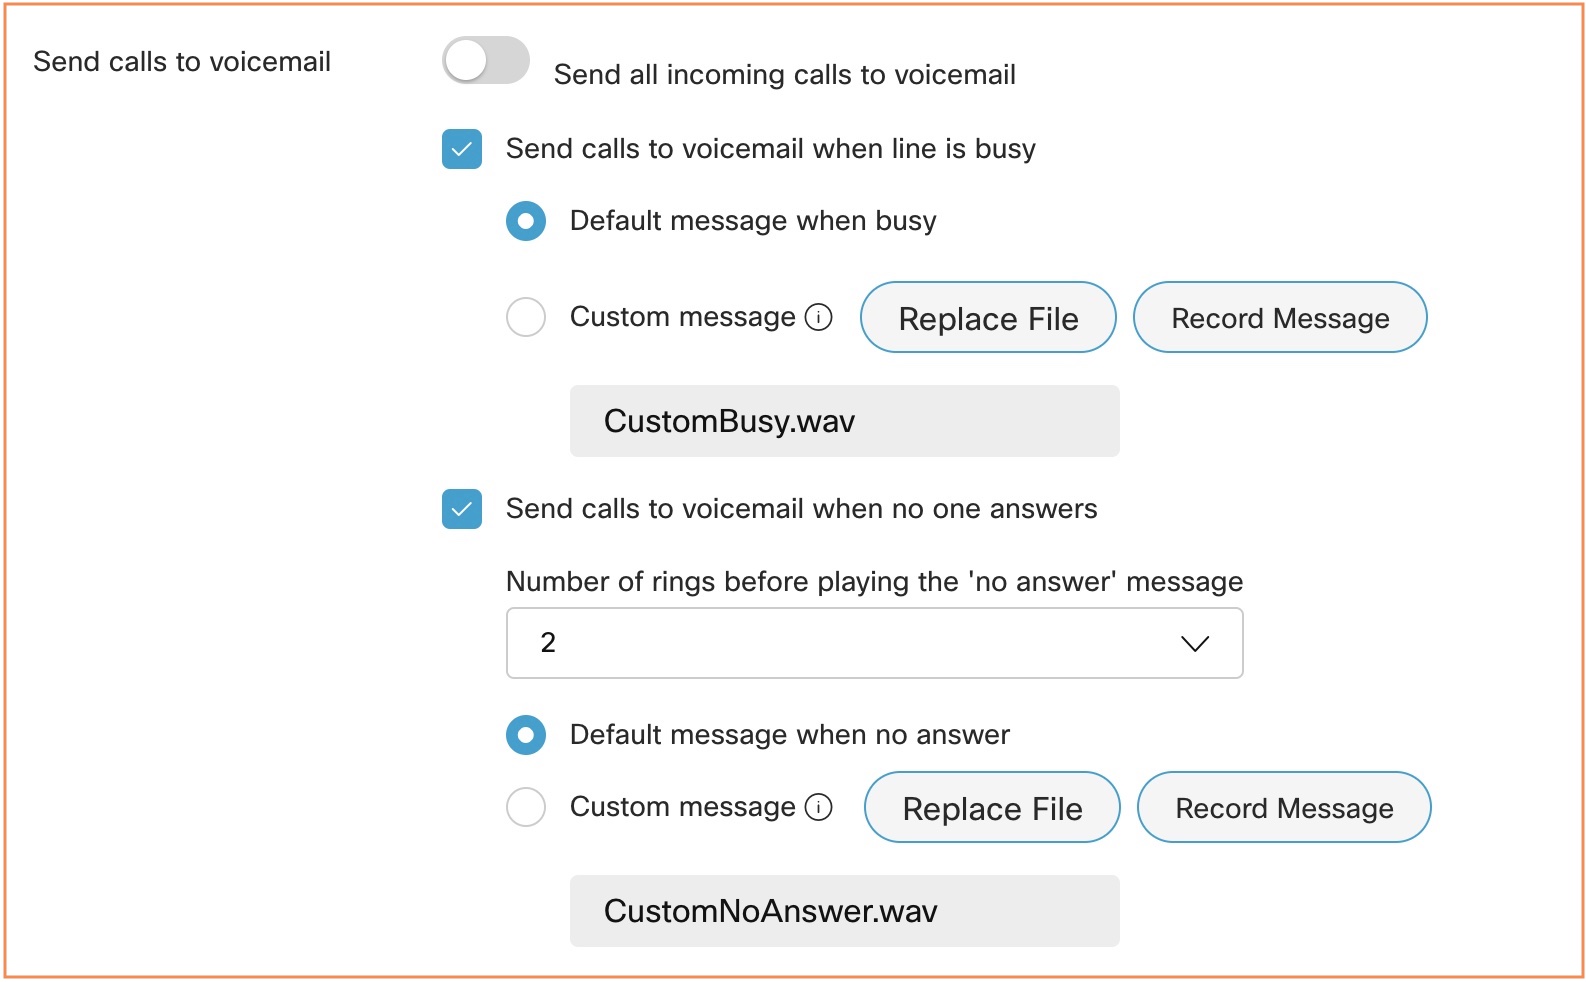
Send calls to voicemail with greetings
You can set when you want to send callers to your voicemail. For example, you may want to send all calls to voicemail when you know you’re going to be out of the office and not taking phone calls.
You can set a voicemail greeting which is the message that your callers hear when they reach your voicemail. There are two types of voicemail greetings - Busy and No Answer. The Busy greeting is played when you’re on another call and don’t have a call waiting, and the No Answer greeting is played when you don’t answer the call.
- The incoming calls aren’t directed to voicemail when you've enabled the call waiting.
- If you have call forwarding enabled, then those call forward settings override the voicemail settings you configured.
| 1 |
Sign in to User Hub, then click . |
| 2 |
Go to Send calls to voicemail and choose from the following options:
Once you've uploaded the file or recorded the greeting, you can change it by selecting Replace File or recording another greeting. Recording a new greeting or uploading a new file overrides the previous greeting. The audio (WAV) file must be 8Khz, 8-bit mono, CCITT µ-law, 2 MB max, .wav file format. The maximum file size is 960 KB for 90 seconds of playback. You can also record the greetings by dialing the Voice Portal *62 from your Cisco IP Phones or Webex App. If you select Send all calls to voicemail, you can’t select the other two options. You can choose to direct to voicemail with both Send calls to voicemail when the line is busy and Send calls to voicemail when no one answers options are selected together. |
| 3 |
Click Save. |
Store your voicemail and fax messages
You can choose where you want to store your voicemail and fax messages—in the User Hub or to a specified email address as a .tiff file.
| 1 |
Sign in to User Hub, then click . |
| 2 |
Go to Message storage and select where you want to store your messages:
|
| 3 |
Click Save. 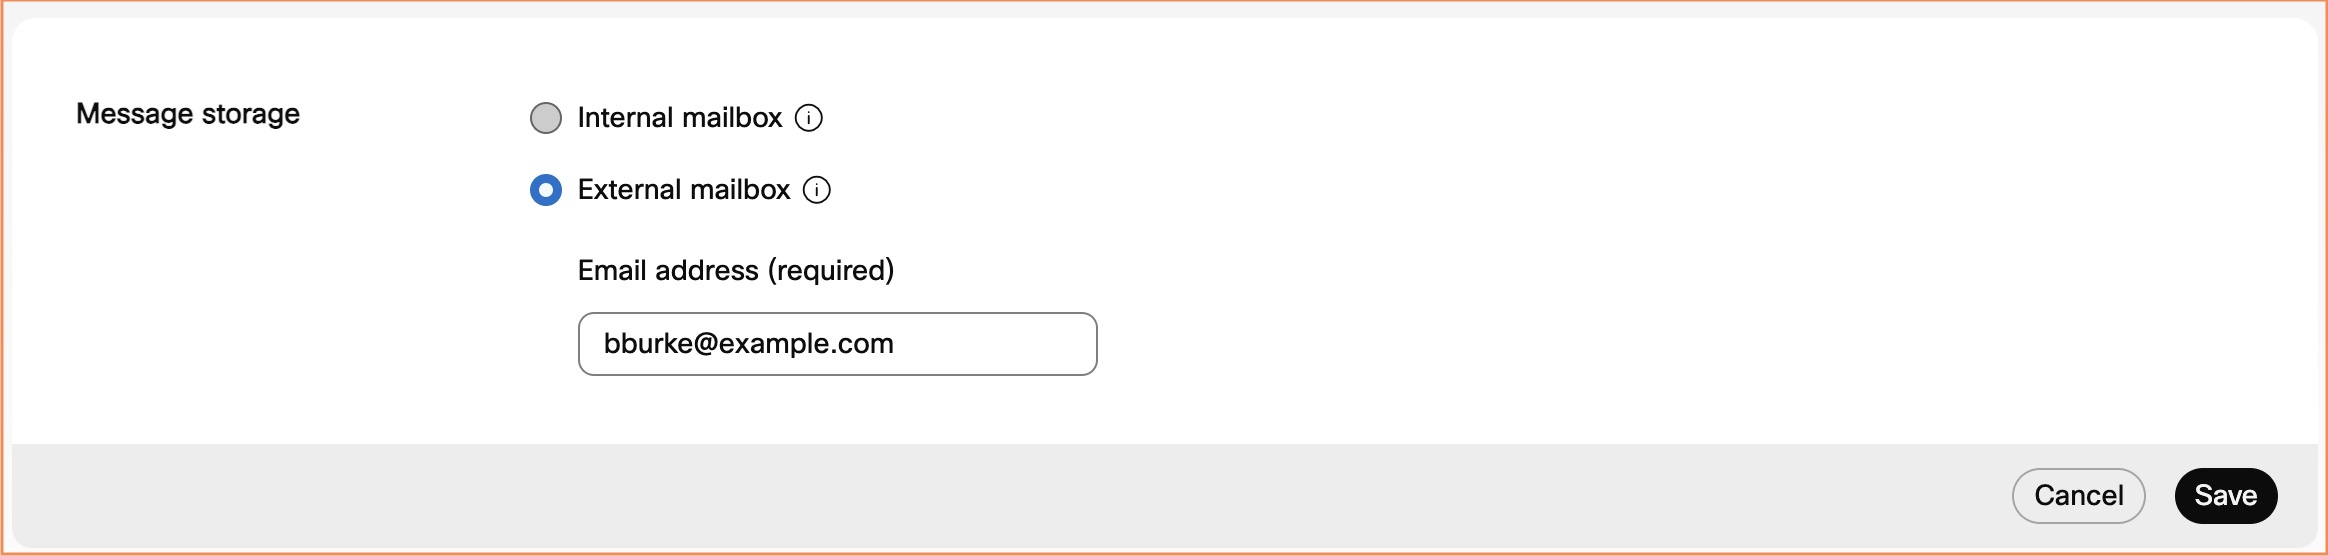
|
What to do next
If your location has voicemail transcription enabled, the option Use internal Mailbox and Email a copy of the voicemail message must be selected for you to receive voicemail transcriptions. For more information, see the Set up voicemail transcription section.
Enable voicemail notifications
| 1 |
Sign in to User Hub, then click . |
| 2 |
Go to Notifications and toggle on Receive voicemail notifications. |
| 3 |
Select one or both of the following options:
Webex Calling supports text message notifications for US and Canada phone numbers only. Webex for Government supports only email notifications. When you select Text message, review the text message terms and privacy information shown in User Hub before saving. 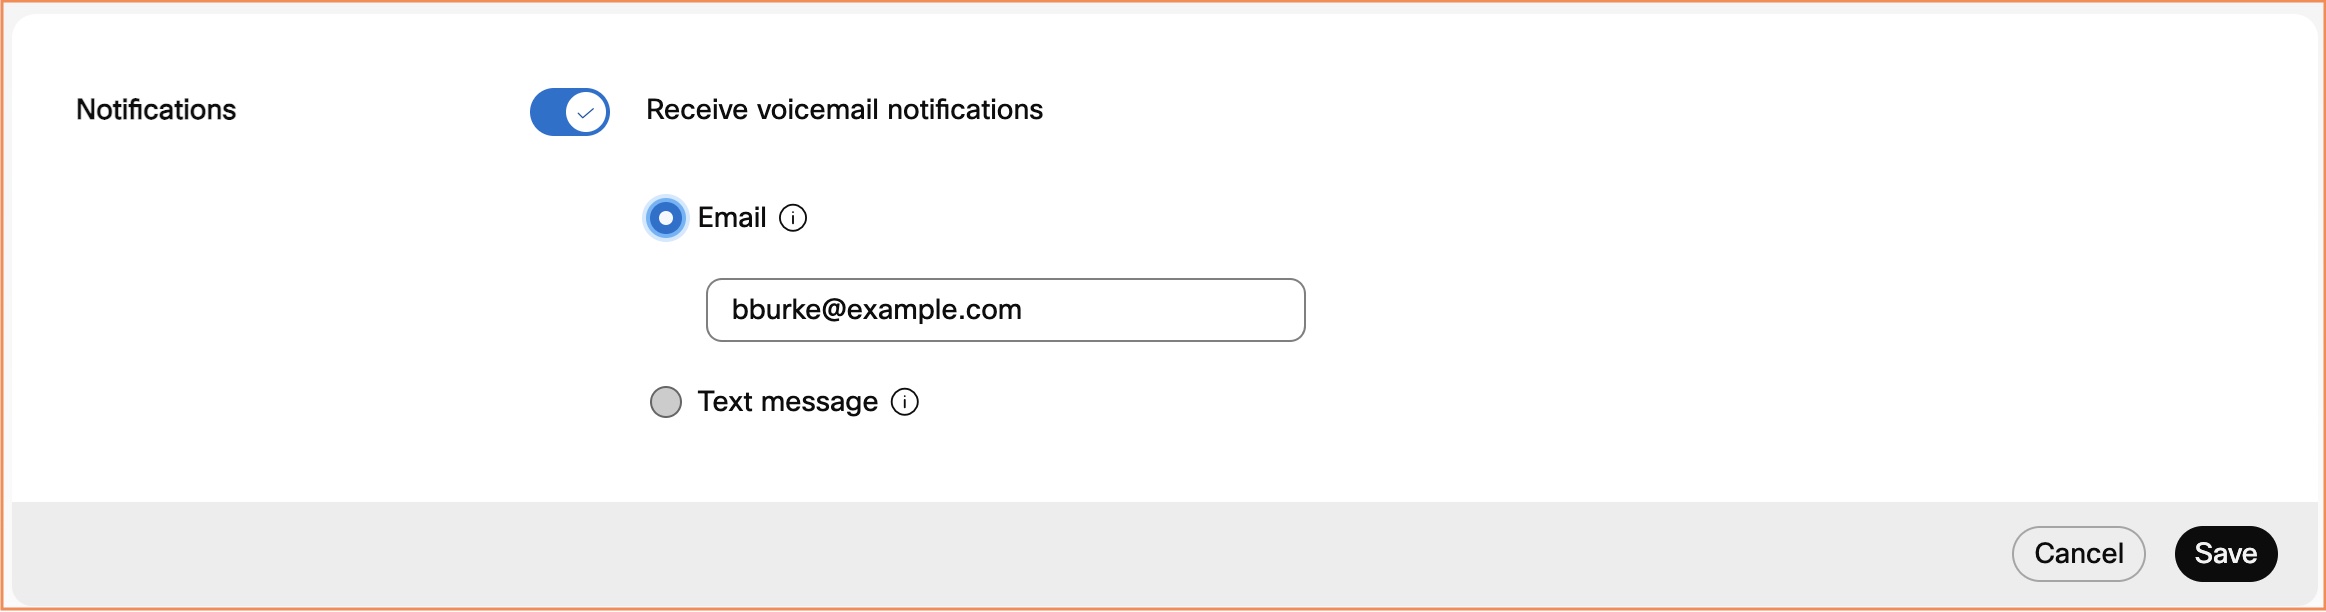
|
| 4 |
To send a voicemail to an email address with the message attached, go to Additional settings, toggle on Email a copy of the voicemail message, and enter the mail address to send the transcriptions to. This option may be unavailable if voicemail forwarding is disabled. 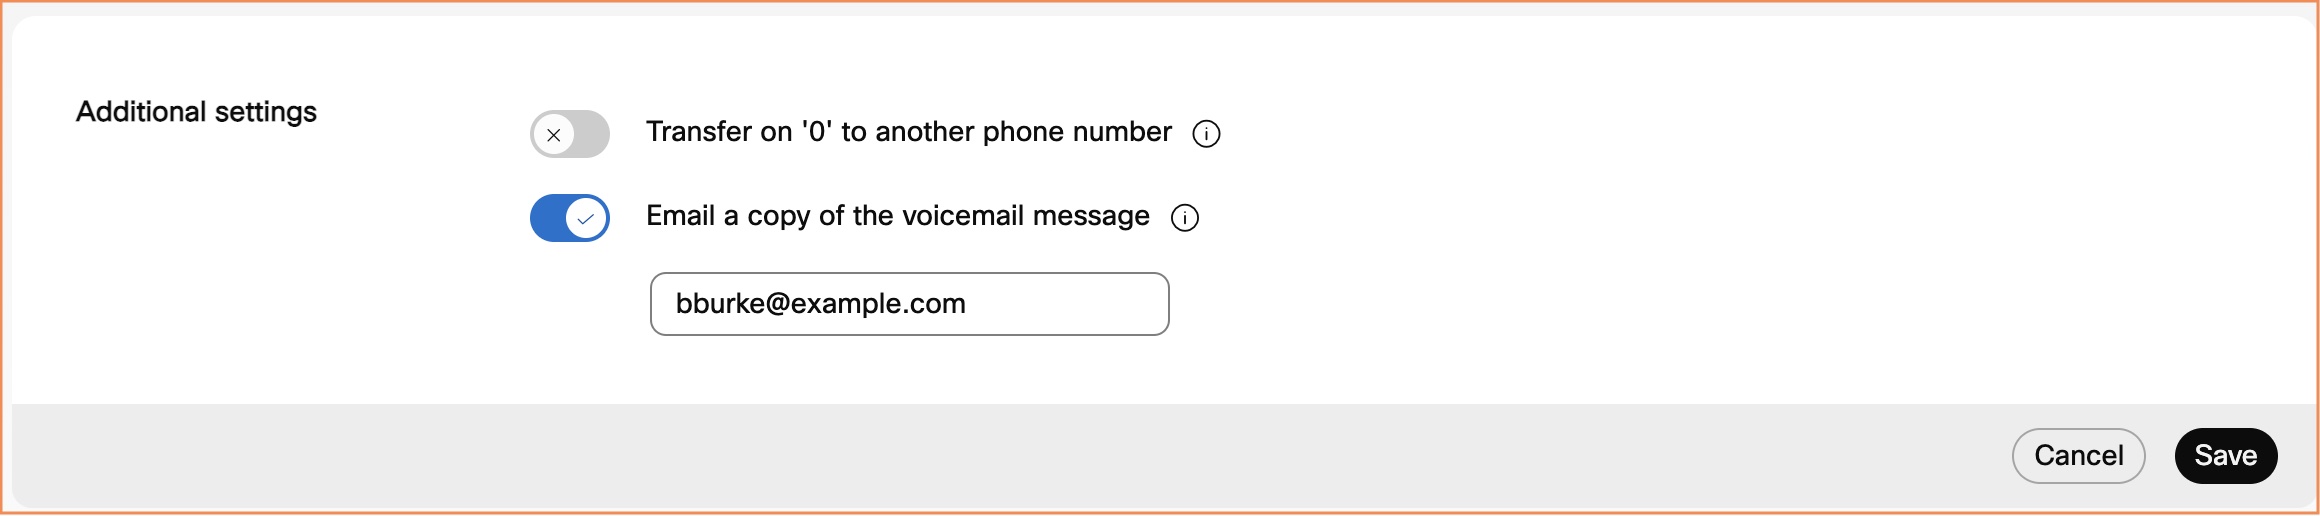
|
| 5 |
Click Save. |
What to do next
If your location has voicemail transcription enabled, the option Use Internal Mailbox and Email a copy of the voicemail message must be selected for you to receive voicemail transcriptions. For help, see Set up voicemail transcription section.
Set up voicemail transcription
Before you begin
-
The supported languages are:
- English
- French
- German
- Italian
- Japanese
- Spanish
-
The administrator must enable voicemail transcription for your location.
| 1 |
Sign in to User Hub, then click . |
| 2 |
Go to Message storage and select Use internal mailbox. 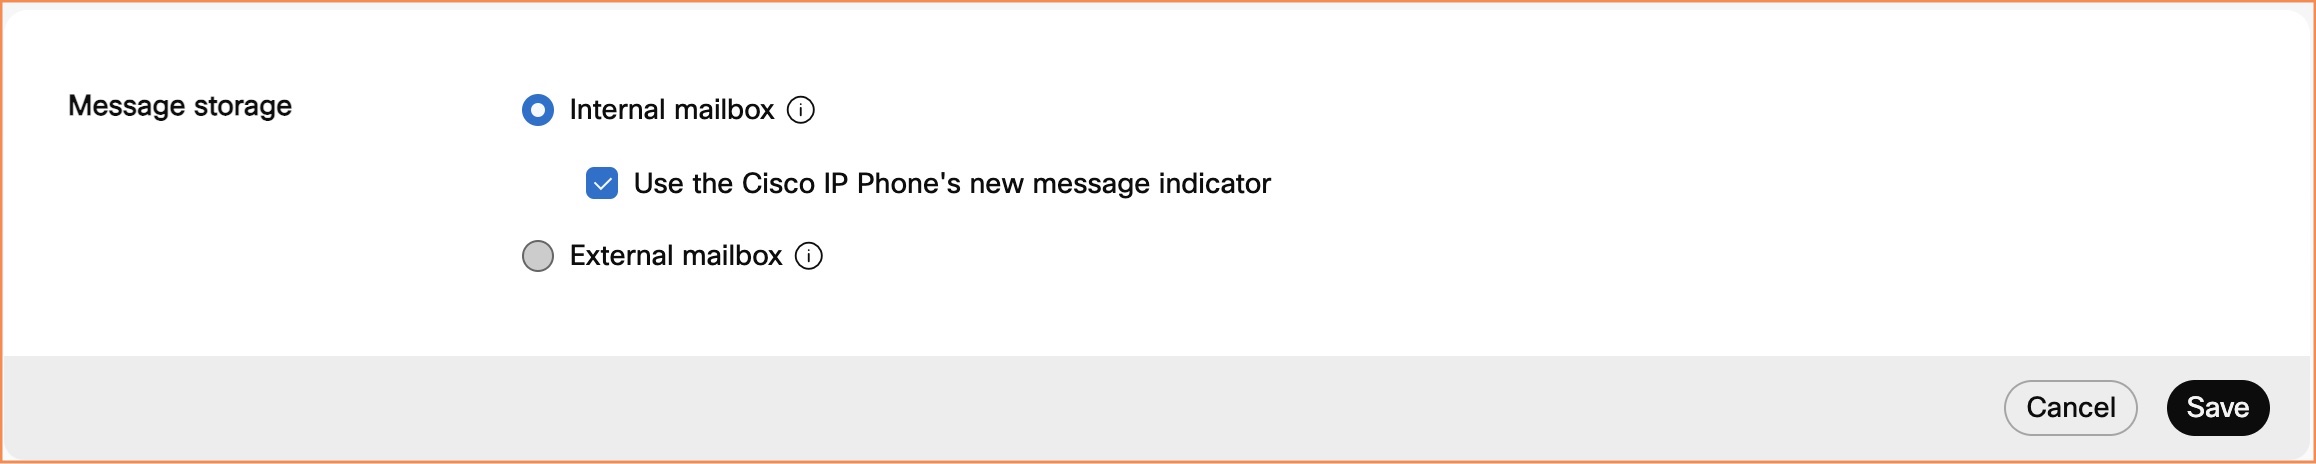
|
| 3 |
Go to Additional settings and toggle on Email a copy of the voicemail message, and enter the mail address to send the transcriptions to. This option may be unavailable if voicemail forwarding is disabled.
|
| 4 |
Click Save. |
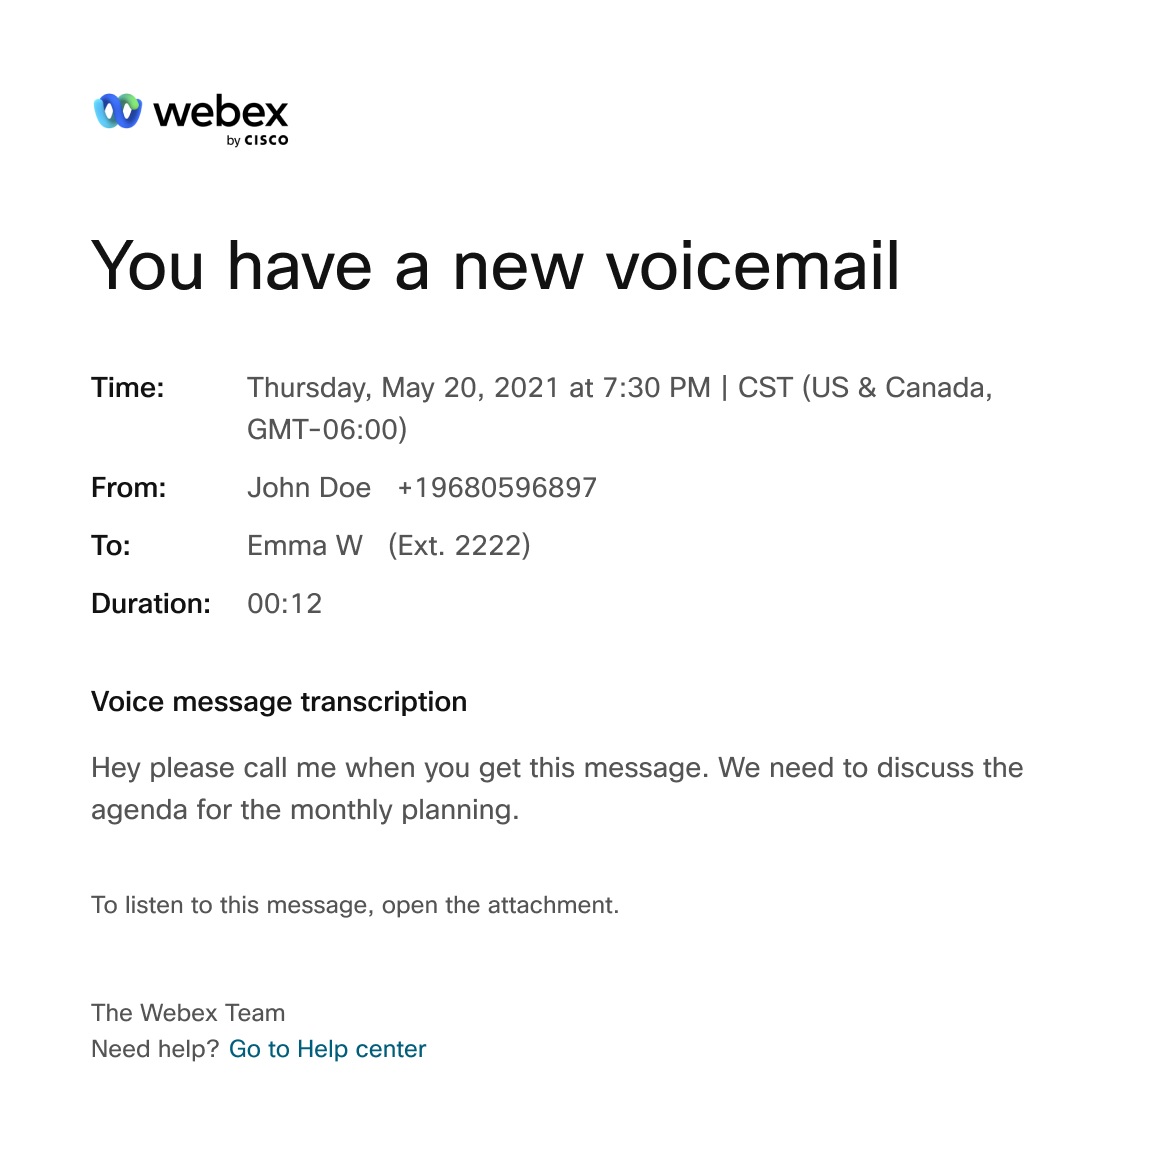
You can use the following image as a helpful visual of an email notification for voicemail transcription.
Reasons why voicemail transcription is not available
The system doesn’t produce a transcript if the overall quality or accuracy of the transcript is poor. It may happen if the audio quality was bad due to the following constraints:
-
Noisy background
-
Poor audibility
-
Unsupported language words present in the audio
Voicemail transcription is available only for voicemails left in the supported languages.
-
Heavy accent
Limitations with voicemail transcription
-
When you forward or reply to a voicemail from the voice portal, the voicemail isn’t transcribed.
-
When you compose a voicemail and send to another user from the voice portal, the voicemail isn’t transcribed.
Allow callers to transfer from your voicemail greeting
You can allow callers to press 0 and be transferred to another phone number, of your choosing, when they reach your voicemail greeting.
If this feature is enabled, be sure to record your voicemail greeting with the appropriate guidance for the caller. For example, “To reach my assistant, press 0.”
| 1 |
Sign in to User Hub, then click . |
| 2 |
Go to Additional settings and toggle on Transfer on '0' to another phone number, and enter the phone number to which callers to be transferred. |
| 3 |
Click Save. 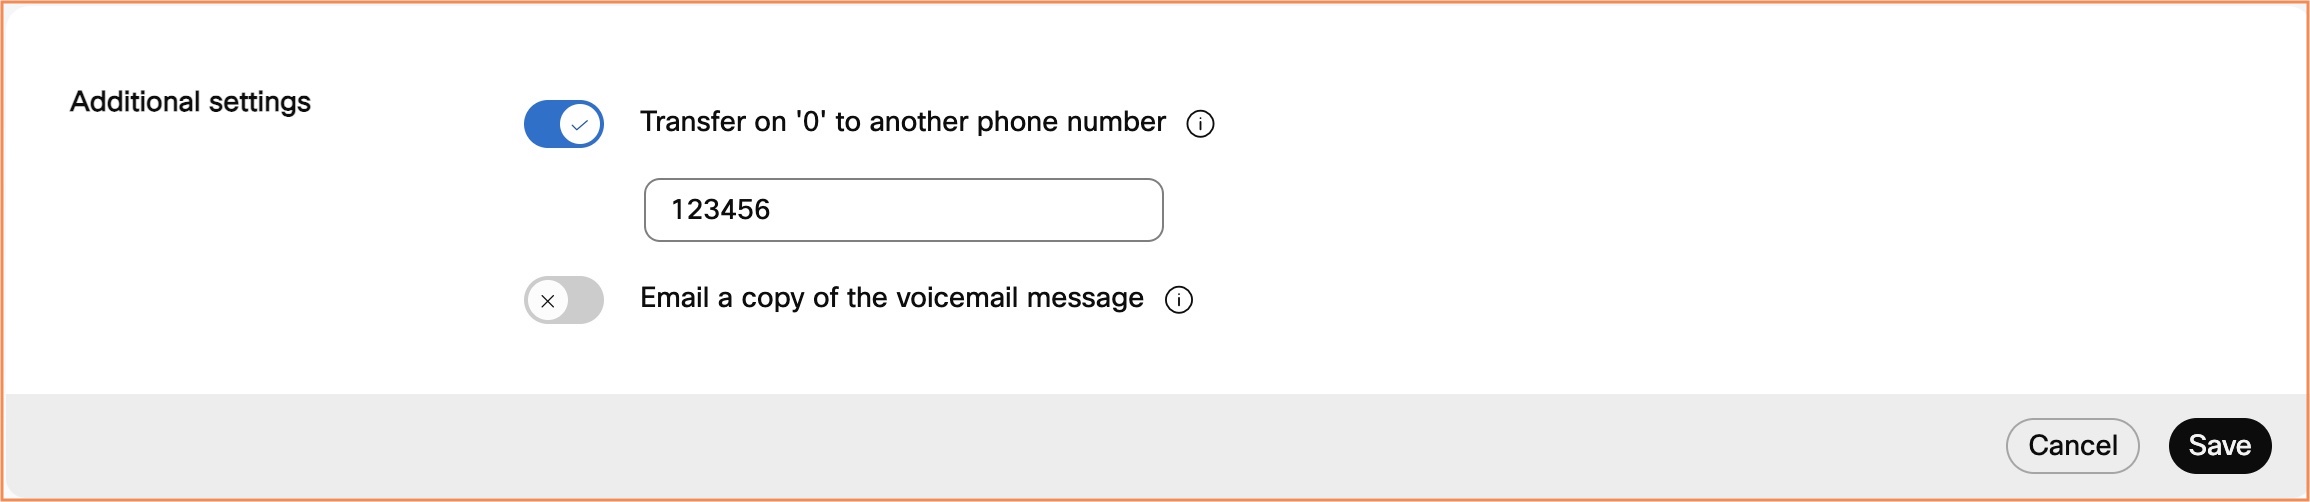
|
Set up to receive fax messages
Fax messaging allows you to receive direct inbound faxes from the voicemail service.
Faxes are stored in a shared storage area along with voice messages. Storage capacity is 100 minutes of voicemail, or 1000 pages of fax messages. Make sure to allocate space for new fax messages and archive wisely.
For more details on fax message feature, see Configure Fax Message Feature for Webex Calling Users.
Before you begin
The Fax messaging option appears only if your administrator has enabled the feature for you.
| 1 |
Sign in to User Hub, then click . |
| 2 |
Go to Fax messaging and turn on the toggle. If the Fax messaging is enabled by the admin, the toggle is on by default. Your fax number and extension appear. |
| 3 |
Click Save. |


