- Domů
- /
- Článek

Děkujeme za vaši zpětnou vazbu.

Konfigurace a správa zařízení Webex Calling
 V tomto článku
 Zpětná vazba?
Zařízení pro uživatele a pracovní prostory můžete přiřazovat a spravovat v Centru řízení. Zvolte, zda chcete přidat podle adresy MAC nebo vygenerováním aktivačního kódu, který chcete zadat na samotném zařízení.
Při přidávání zařízení se zobrazí 16místný aktivační kód. Aktivační kód vyprší po 30 dnech pro telefony MPP a po 7 dnech pro zařízení Room.
Přidání telefonu k uživateli
Pomocí Control Hubu můžete uživateli přiřadit telefon pro osobní použití. Telefony uvedené zde podporují službu Webex Calling. I když všechny tyto telefony lze přidat pomocí MAC adresy, pouze následující podmnožinu lze zaregistrovat pomocí aktivačního kódu:
-
Multiplatformní telefony Cisco IP řady 6800 (Audio telefony – 6821, 6841, 6851, 6861, 6871)
-
Multiplatformní telefony Cisco IP řady 7800 (audio telefony – 7811, 7821, 7841, 7861)
-
Multiplatformní telefony Cisco IP řady 8800 (Audio telefony –8811, 8841, 8851, 8861)
-
Multiplatformní telefony Cisco IP řady 8800 (videotelefony – 8845, 8865)
-
Konferenční telefon Cisco IP 7832 a 8832
-
Cisco Video Phone 8875
-
Stolní telefon Cisco řady 9800
V Control Hub můžete přiřadit pouze základnová zařízení DECT (ne sluchátka DECT). Po přiřazení základní jednotky uživateli ručně spárujte s touto základní jednotkou DECT sluchátko. Další informace naleznete v tématu Připojení sluchátka k základní stanici.
| 1 |
Přihlaste se k Centru řízení. |
| 2 |
Přejít na . Zařízení můžete k uživateli přidat také ze sekce Uživatelé v nabídce > vyberte uživatele > .
|
| 3 |
Vyberte Osobní použití pro přiřazení zařízení uživateli a poté klikněte na Další. |
| 4 |
Zadejte buď uživatelské jméno, nebo skutečné jméno majitele telefonu, vyberte uživatele z výsledků a poté klikněte na Další. |
| 5 |
Vyberte typ zařízení, které chcete pro uživatele nastavit:
|
Přidání telefonu do nového pracovního prostoru
Když jsou lidé v práci, shromažďují se na místech, jako jsou jídelny, vstupní haly a konferenční místnosti. V těchto pracovních prostorech můžete nastavit sdílená zařízení Webex, přidat služby a poté sledovat, jak probíhá spolupráce.
Zařízení pracovního prostoru není přiřazeno konkrétnímu uživateli, ale fyzickému umístění, což umožňuje sdílené používání.
Uvedená zařízení podporují službu Webex Calling. Většinu těchto zařízení můžete zaregistrovat pomocí MAC adresy a pouze následující podmnožinu můžete zaregistrovat pomocí aktivačního kódu:
-
Multiplatformní telefony Cisco IP řady 6800 (audio telefony – 6821, 6841, 6851)
-
Multiplatformní telefony Cisco IP řady 7800 (audio telefony – 7811, 7821, 7841, 7861)
-
Multiplatformní telefony Cisco IP řady 8800 (Audio telefony –8811, 8841, 8851, 8861)
-
Multiplatformní telefony Cisco IP řady 8800 (videotelefony – 8845, 8865)
-
Konferenční telefon Cisco IP 7832 a 8832
-
Stolní telefon Cisco řady 9800
Než začnete
- Do pracovního prostoru s profesionální licencí Workspace můžete přidat až pět stolních telefonů Cisco, telefonů Cisco MPP, bezdrátových zařízení, zařízení ATA, zařízení s operačním systémem telefonu nebo zařízení třetích stran.
- Více zařízení můžete do profesionálního pracovního prostoru přidat pouze ze stránky nového pracovního prostoru. Zapněte Vyzkoušet nové pracovní prostory v pravém horním rohu stránky pracovního prostoru, abyste mohli používat novou stránku pracovního prostoru.
- Do pracovního prostoru s licencí pro pracovní prostor pro společnou oblast můžete přidat pouze jedno zařízení.
| 1 |
Přihlaste se k Centru řízení. |
| 2 |
Přejít na . Zařízení můžete do nového pracovního prostoru přidat také v nabídce .
|
| 3 |
Vyberte Sdílené využitía poté klikněte na Další. |
| 4 |
Vyberte Nový pracovní prostora poté klikněte na Další. |
| 5 |
Zadejte název pracovního prostoru (například název fyzické místnosti), vyberte typ místnosti, přidejte kapacitu místnosti a zvolte umístění pracovního prostoru. Klepněte na tlačítko Další. Název pracovního prostoru nesmí být delší než 128 znaků a nesmí obsahovat %, #, <, >, /, \, a „znaky“. |
| 6 |
Vyberte typ zařízení, které chcete pro pracovní prostor nastavit:
|
| 7 |
Klikněte na službu Volání a vyberte typ předplatného a licence, které chcete přiřadit k pracovnímu prostoru.
Chcete-li se dozvědět více o funkcích dostupných s licencemi, podívejte se na Funkce dostupné podle typu licence pro Webex Calling. |
| 8 |
Přiřaďte umístění a telefonní číslo (určené zvoleným umístěním) a klepněte na tlačítko Uložit. Máte také možnost přiřadit rozšíření. Poloha se aktualizuje během noční synchronizace. Pokud chcete do profesionálního pracovního prostoru přidat další zařízení, můžete to udělat jedním z následujících způsobů:
Chcete-li upravit nebo spravovat zařízení přiřazená k pracovnímu prostoru, přečtěte si část Správa zařízení pro pracovní prostor. |
 ve sloupci
 Znovu přiřazení stávajícího telefonu jinému uživateli nebo zařízení
Chcete-li znovu použít telefon, který je přiřazen k jednomu uživateli volání Webex / pracovnímu prostoru k jinému uživateli nebo pracovnímu prostoru volání Webex, postupujte takto:
| 1 |
Přihlaste se k Centru řízení. |
| 2 |
Jděte na User/Workspace kde je zařízení aktuálně přiřazeno. Přiřazení zařízení můžete změnit v těchto scénářích:
|
| 3 |
V telefonu přejděte do nabídky nastavení a provedením těchto kroků znovu přiřaďte telefon. |
| 4 |
Postupujte podle pokynů v části Přidání a přiřazení telefonu uživateli nebo Přidání telefonu do nového pracovního prostoru a přiřaďte nebo přidejte telefon uživateli nebo pracovnímu prostoru. |
| 5 |
Po přidání zařízení do Control Hubu proveďte v telefonu tyto kroky: |
Přidání nástěnky, stolu nebo zařízení v místnosti k uživateli
Přiřazení zařízení typu nástěnka, stůl nebo místnost jako osobního zařízení někomu umožňuje, aby do svého zařízení přijímal hovory a schůzky přes Webex přímo. Další podrobnosti naleznete v části Přiřazení osobní nástěnky, stolu nebo zařízení v místnosti uživateli.
Přidání tabule, stolu nebo zařízení v místnosti do nového pracovního prostoru
Když jsou lidé v práci, setkávají se v mnoha pracovních prostorech, jako jsou jídelny, haly a konferenční místnosti. V těchto pracovních prostorech můžete nastavit sdílená zařízení Cisco Webex, přidat služby a pak sledovat, jak spolupráce probíhá.
Klíčovým principem zařízení Workspaces je, že není přiřazeno konkrétnímu uživateli, ale fyzickému umístění, což umožňuje sdílené používání.
Zde uvedená zařízení podporují volání Webex.
| 1 |
Přihlaste se k Centru řízení. |
| 2 |
Přejít na . Zařízení můžete do nového pracovního prostoru přidat také ze sekce Pracovní prostory přejděte na .
|
| 3 |
Vyberte Sdílené využití a klikněte na Další. |
| 4 |
Vyberte Nový pracovní prostor a klikněte na Další. |
| 5 |
Zadejte název pracovního prostoru (například název fyzické místnosti), vyberte typ místnosti, přidejte kapacitu místnosti a zvolte umístění pracovního prostoru. Poté klikněte na tlačítko Další. |
| 6 |
Vyberte zařízení Cisco Room and Desk. |
| 7 |
Vyberte jednu z následujících služeb a klikněte na Další.
|
| 8 |
Pokud jste si vybrali službu Cisco Webex Calling, vyberte předplatné a typ licence, které chcete přiřadit k pracovnímu prostoru.
Chcete-li se dozvědět více o funkcích dostupných s licencemi, podívejte se na Funkce dostupné podle typu licence pro Webex Calling. |
| 9 |
Přiřaďte umístění, telefonní číslo (určené zvoleným umístěním), rozšíření a klikněte na tlačítko Uložit. |
| 10 |
Aktivujte zařízení pomocí dodaného kódu. Aktivační kód můžete zkopírovat, odeslat e-mailem nebo vytisknout. |
Hromadné přidávání a přiřazování zařízení
Chcete-li uživatelům a pracovním prostorům přiřadit několik zařízení, můžete do souboru CSV vyplnit požadované informace a tato zařízení aktivovat v několika snadných krocích.
- Do pracovního prostoru s licencí Professional Workspace můžete přidat až 5 stolních telefonů Cisco, telefonů Cisco MPP, zařízení ATA nebo zařízení třetích stran.
- Do pracovního prostoru s licencí pro společný pracovní prostor můžete přidat pouze jedno zařízení.
Zde uvedená zařízení podporují volání Webex. Všechna zařízení můžete zaregistrovat pomocí MAC adresy; následující podmnožinu zařízení však zaregistrujte pomocí aktivačního kódu:
-
Multiplatformní telefony Cisco IP řady 6800 (audio telefony – 6821, 6841, 6851)
-
Multiplatformní telefony Cisco IP řady 7800 (audio telefony – 7811, 7821, 7841, 7861)
-
Multiplatformní telefony Cisco IP řady 8800 (Audio telefony –8811, 8841, 8851, 8861)
-
Multiplatformní telefony Cisco IP řady 8800 (videotelefony – 8845, 8865)
-
Konferenční telefon Cisco IP 7832 a 8832
-
Cisco Video Phone 8875
-
Stolní telefon Cisco řady 9800
| 1 |
Přihlaste se k Centru řízení. | |||||||||||||||||||||||||||||||||||||
| 2 |
Přejít na . | |||||||||||||||||||||||||||||||||||||
| 3 |
Vyberte jednu z následujících možností a klikněte na Stáhnout.
K přípravě souboru CSV můžete použít následující tabulku.
Při přiřazování zařízení uživatelům a pracovním prostorům služby Webex Calling jsou povinná následující pole:
Tato pole Telefonní číslo a Klapka se dříve nazývala Číslo v adresáři a Přímá linka; Tyto názvy sloupců budou i nadále podporovány po krátkou dobu. Doporučujeme omezit počet zařízení na 1000 na soubor CSV. Pokud chcete přidat více než 1000 zařízení, použijte druhý soubor CSV. | |||||||||||||||||||||||||||||||||||||
| 4 |
Vyplňte tabulku. | |||||||||||||||||||||||||||||||||||||
| 5 |
Soubor CSV nahrajte přetažením nebo kliknutím na možnost Vybrat soubor. | |||||||||||||||||||||||||||||||||||||
| 6 |
Pokud je MAC adresa prázdná, zobrazí se vám možnost zvolit, kam bude aktivační kód odeslán.
Pro aktivaci musíte vy nebo uživatel zadat aktivační kód do zařízení. | |||||||||||||||||||||||||||||||||||||
| 7 |
Klikněte na tlačítko Odeslat. Zobrazuje aktualizovaný stav, když se zařízení aktivují.
Aby uživatelé mohli na svém zařízení zadat aktivační kód, musí mít multiplatformní zařízení nainstalovaný firmware verze 11.3.1 SR2 nebo novější. Informace o aktualizaci firmwaru telefonu naleznete v tomto článku. |
Exportovat seznam zařízení
Pokud chcete zobrazit seznam zařízení přiřazených uživatelům a pracovním prostorům, můžete exportovat soubor CSV.
Přihlaste se do Control Hub a přejděte do sekce Zařízení.
Vyberte více zařízení ze seznamu zařízení a vyberte možnost Exportovat. Můžete si vybrat pole, která chcete zahrnout do souboru CSV, a exportovat obsah do místní složky.
Pole zobrazená v souboru CSV závisí na připojení zařízení k platformě. Některá pole proto ve výstupním souboru nejsou k dispozici.
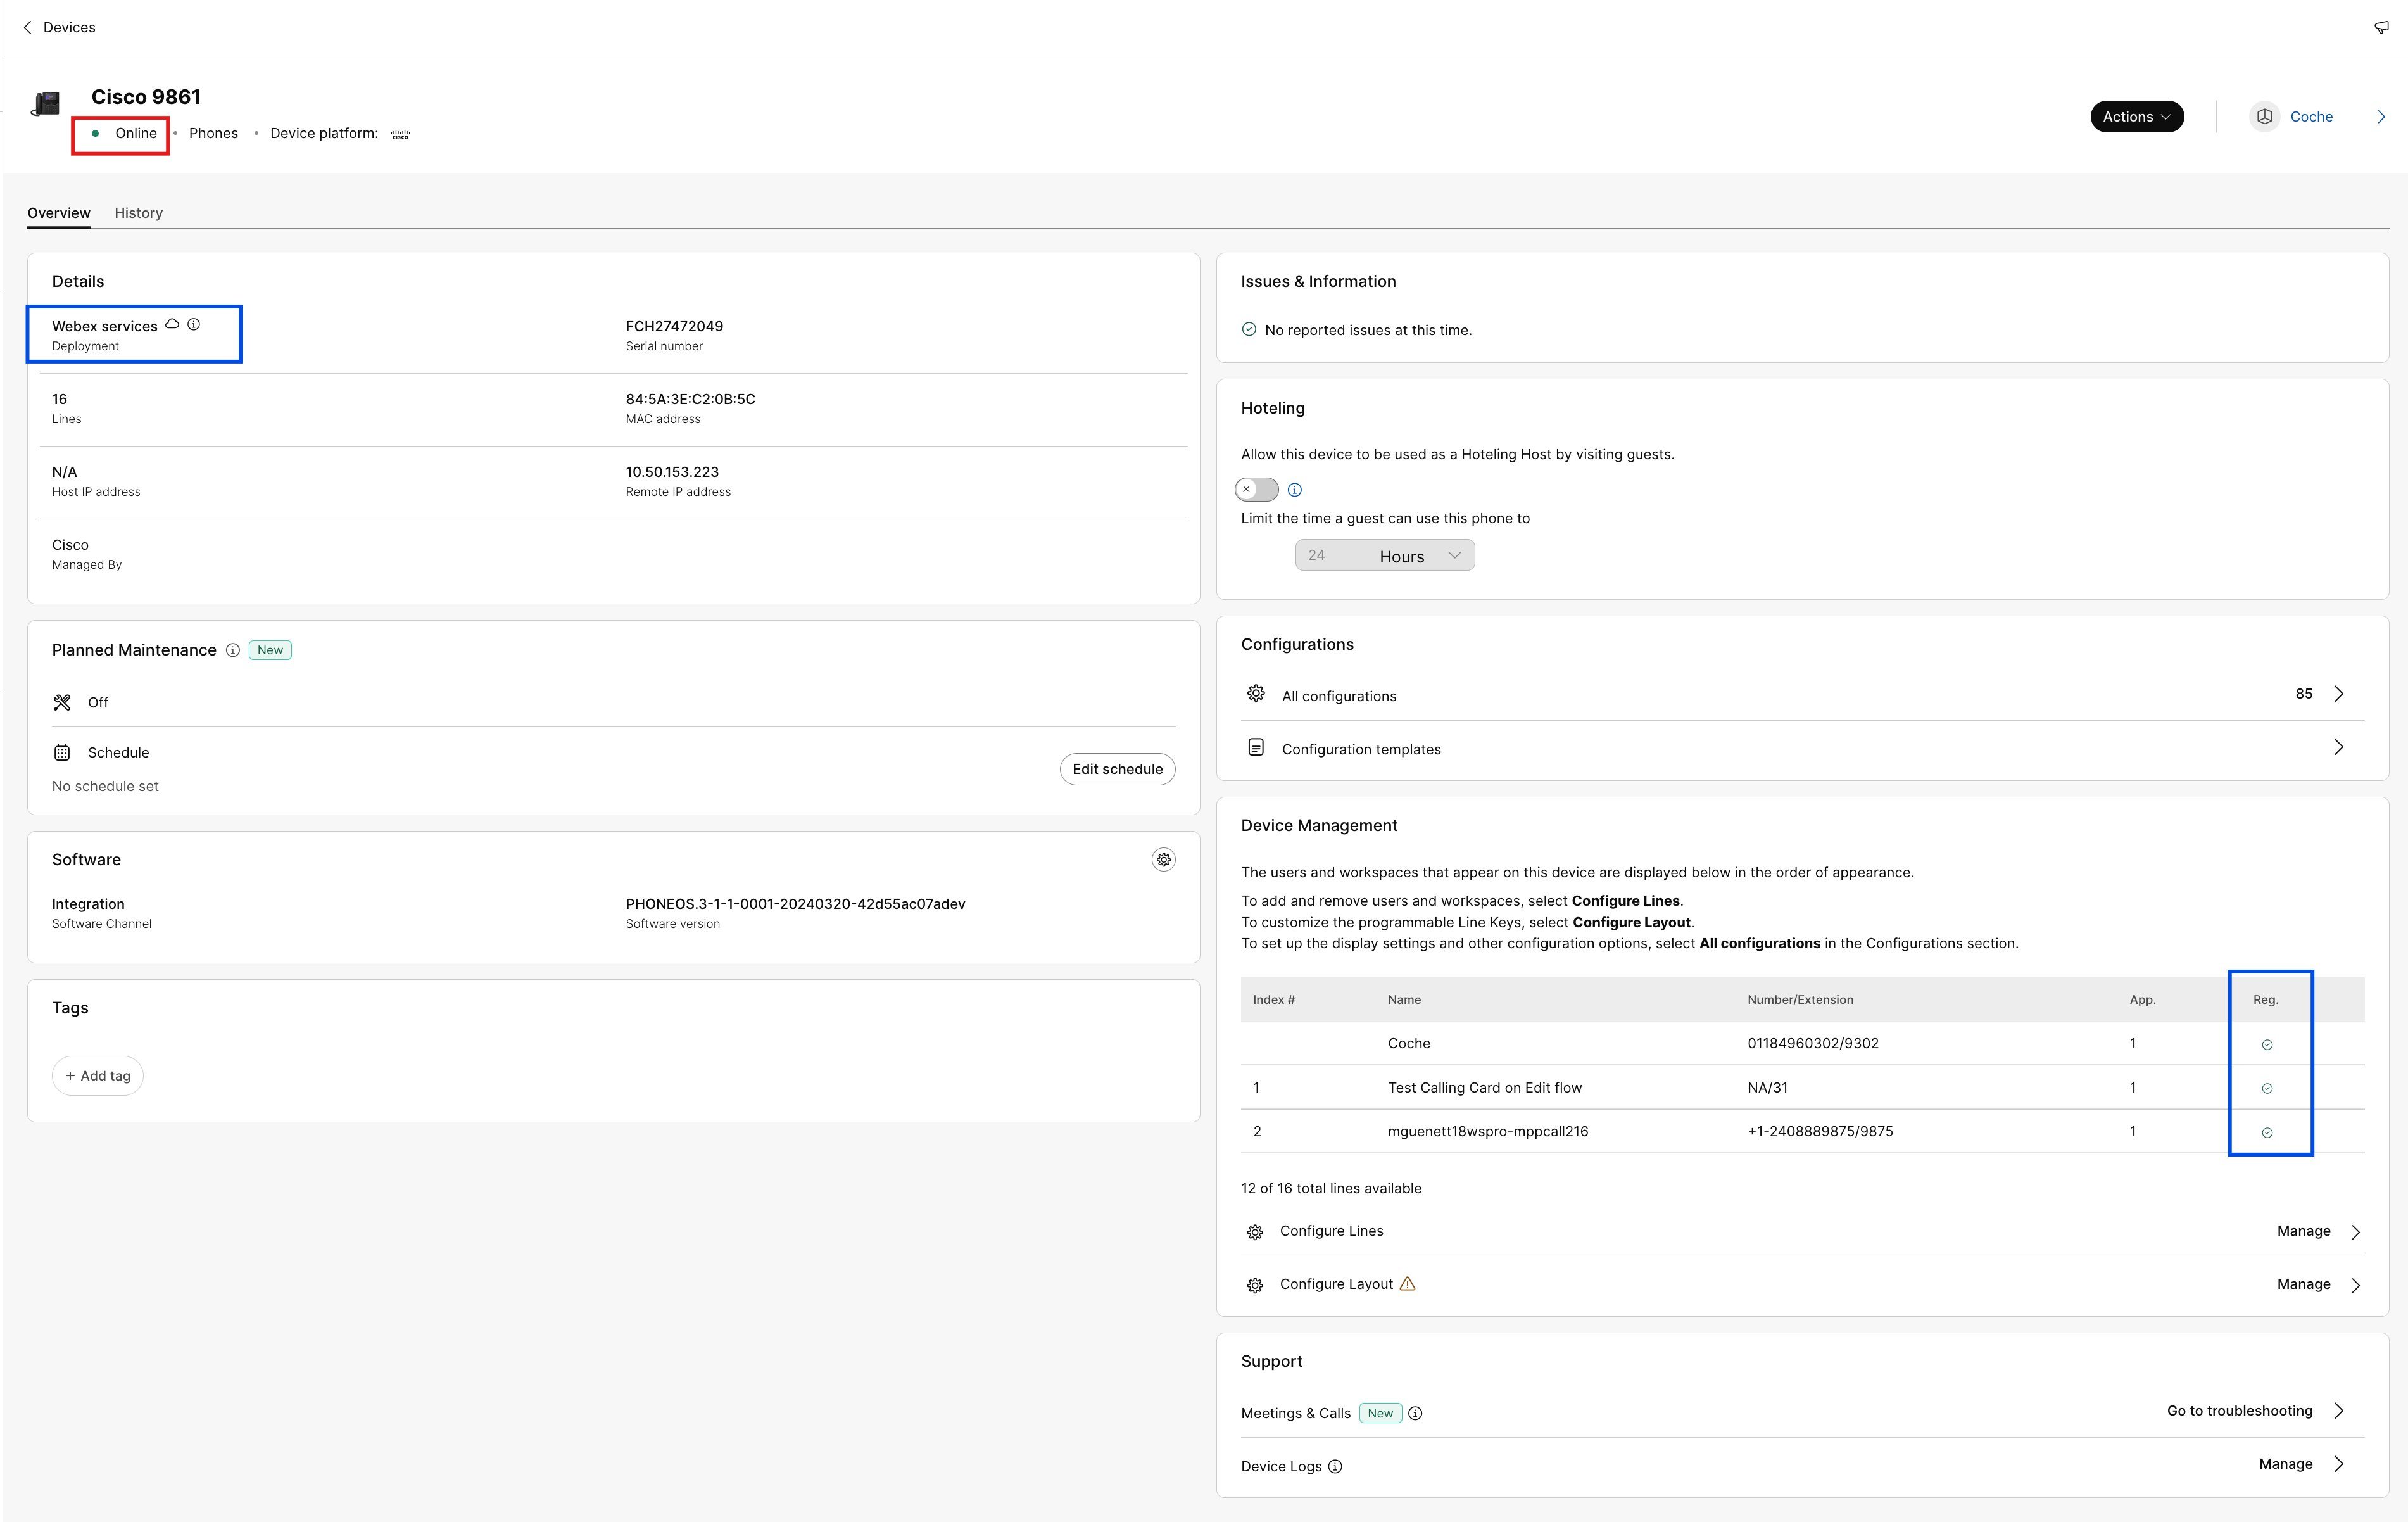
Správa zařízení pro uživatele
Můžete přidat, odebrat, restartovat, zkontrolovat aktivaci nebo vytvořit nový aktivační kód pro zařízení, která jsou přiřazena uživatelům ve vaší organizaci. To může být užitečné pro zobrazení a správu zařízení na obrazovce uživatelů v případě potřeby.
| 1 |
Přihlaste se k Centru řízení. |
| 2 |
Přejít na . |
| 3 |
Vyberte uživatele a klikněte na Zařízení. |
| 4 |
Chcete-li tomuto uživateli přidat zařízení, klikněte na tlačítko Přidat zařízení. Pokud je uživateli již přiřazeno zařízení a chcete přidat další zařízení, klikněte na . Další informace o přidání zařízení k uživateli naleznete v části Přidání telefonů k uživateli. |
| 5 |
Chcete-li upravit existující zařízení, vyberte název zařízení. Tím se dostanete na stránku Zařízení. Zde můžete zobrazit a upravit nastavení zařízení, odstranit zařízení, restartovat zařízení nebo vytvořit nový aktivační kód pro zařízení, pokud je to možné. Další informace o konfiguraci nastavení telefonu naleznete v tématu Konfigurace a aktualizace nastavenítelefonu. |
| 6 |
Pokud je zařízení přidané uživateli Webex Aware, zobrazí se pod zařízeními možnost Webex Aware, jak je znázorněno na obrázku. Webex Aware označuje, že zařízení je připojeno k platformě Webex a má přístup k funkcím Webex podporovaným telefonem.
|
| 7 |
Kliknutím na Akce můžete zařízení spravovat. Akce vám umožňují použít změny konfigurace, restartovat zařízení, nahlásit problém a shromažďovat protokoly zařízení nebo zařízení odstranit. Karta Akce obsahuje tyto možnosti pro zařízení s podporou Webex Aware:
|
Správa zařízení pro pracovní prostor
Zařízení můžete přidávat a spravovat přímo z profilu pracovního prostoru. Zařízení pracovního prostoru mohou zahrnovat zařízení ATA, jako jsou faxy. Zařízení pracovního prostoru můžete také nastavit jako hostitele hotelu. Více informací o hotelování naleznete v části Hotelování v Control Hubu.
| 1 |
Přihlaste se k Centru řízení. |
| 2 |
Přejít na . |
| 3 |
Vyberte pracovní prostor, který chcete upravit. |
| 4 |
Chcete-li přidat zařízení, klikněte na tlačítko Přidat zařízení v dlaždici Zařízení. Další informace o přidávání zařízení do pracovního prostoru naleznete v části Přidání telefonu do nového pracovního prostoru. |
| 5 |
Chcete-li upravit existující zařízení, vyberte název zařízení. Tím se dostanete na stránku Zařízení. Zde můžete zobrazit a upravit nastavení zařízení, odstranit zařízení, restartovat zařízení a povolit použití zařízení jako hostitele hotelu. Další informace o konfiguraci nastavení telefonu naleznete v tématu Konfigurace a aktualizace nastavenítelefonu. |
| 6 |
Pokud je zařízení přidané do pracovního prostoru Webex Aware, zobrazí se pod zařízeními možnost Webex Aware, jak je znázorněno na obrázku. Webex Aware označuje, že zařízení je připojeno k platformě Webex a má přístup k funkcím Webex, které telefon podporuje.
|
| 7 |
Kliknutím na Akce můžete zařízení spravovat. Akce pomáhají použít změny konfigurace nebo aktualizovat firmware pro zařízení MPP. Karta Akce obsahuje tyto možnosti pro zařízení s podporou Webex Aware:
|
Konfigurace řádků - Přidání a změna pořadí řádků
Funkce Konfigurace linek pro přiřazení primárních, sdílených a virtuálních linek k telefonům umožňuje vícenásobné zobrazení sdílené linky na stejném zařízení. Konfigurace portů pro ATA se nezměnila.
Zde jsou aktualizace funkce Konfigurace linek pro zařízení MPP a PhoneOS:
-
Primární linie
-
Přiřaďte vlastníka zařízení a ujistěte se, že zaujímá pozici prvního řádku na zařízení.
-
Zvyšte počet výskytů v daném řádku pro přidání dalších výskytů.
-
-
Sdílené linky / Virtuální linky
-
Přiřaďte sdílené linky od libovolného uživatele nebo pracovního prostoru s povoleným voláním v rámci organizace pomocí dostupných sdílených zobrazení hovorů (SCA).
-
Zvyšte počet zobrazení na sdíleném řádku pro přidání dalších zobrazení.
Limity SCA dostupné pro uživatele nebo pracovní prostor mohou omezit přiřaditelné vzhledy.
-
Přiřaďte každé sdílené lince index linky. Sdílené řádky můžete uspořádat pomocí funkce přetažení.
Jednotlivé výskyty čáry nelze oddělit.
-
Použijte uživatelské pro uspořádání pozice indexů sdílených linek na zařízení.
-
-
Vzhledy
-
Nakonfigurujte více zobrazení stejné primární, sdílené nebo virtuální linky jako jednotlivé sady vážených linií.
-
Vážené linky mají příponu -1, -2 atd. (pouze telefony Cisco).
-
Hovory vyzvání na první dostupné vážené lince.
-
-
Nové souhrnné informace (ve spodní části stránky)
-
Jedinečné registrační linky SIP – Zobrazuje počet jedinečných registračních účtů SIP, které telefon podporuje. Maximální počet podporovaných účtů je aktuálně 16.
-
Celkový počet zobrazení linek – Zobrazuje celkový počet přiřaditelných zobrazení linek podporovaných zařízením. Pokud model telefonu podporuje KEM, maximální počet zobrazení zahrnuje rozšířenou kapacitu.
-
-
Hromadné přiřazení řádků a veřejná API
- Metody Bulk CSV a Public API pro přiřazování řádků zahrnují funkci „Vzhledy“.
Více informací o sdílené lince napříč lokalitami naleznete v části Konfigurace sdílených linek a virtuálních linek napříč lokalitami.
Pokud je k telefonu přidána rychlá volba dlouhým stisknutím požadovaného tlačítka linky, rychlá volba se v Control Hub nezobrazuje. Rychlou volbu lze přepsat konfigurací sdílené linky na daném tlačítku linky.
| 1 |
Přihlaste se k Centru řízení. |
| 2 |
Přejděte na Uživatelé nebo Pracovní prostory (v závislosti na tom, kde je přiřazeno zařízení, které chcete upravit). |
| 3 |
Vyberte uživatele nebo pracovní prostor. |
| 4 |
Přejděte na Zařízení a klikněte na zařízení, pro které chcete přidat nebo upravit sdílené linky. Tím se dostanete na stránku Zařízení. |
| 5 |
V části Správa zařízeníklikněte na Konfigurovat linky. |
| 6 |
Chcete-li přidat sdílenou linku, klikněte na ikonu Stejnou sdílenou nebo virtuální linku můžete přiřadit více jednotlivým tlačítkům linky na telefonu. Ve sloupci Zobrazení příslušného řádku klikněte na ikonu
Řádky můžete přidat v pořadí, v jakém je chcete zobrazit. Chcete-li změnit pořadí vzhledu řádku, odstraňte jej a přidejte do seznamu v pořadí, v jakém se mají zobrazovat. Pokud má uživatel čísla z jiných users/groups nakonfigurováno na jejich zařízeních, můžete pro sdílenou linku přidat popisek linky. Tento popisek čáry pomáhá odlišit jeden sdílený vzhled čáry od druhého. Chcete-li čáru odstranit, klikněte na ikonu |
| 7 |
Klikněte na možnost Uložit. U velkých organizací musí administrátor před konfigurací dalších volacích linek vybrat umístění. Klikněte na ikonu Pro běžnou organizaci není filtr umístění k dispozici a správce může vybrat řádek. |
 , vyhledejte podle jména nebo telefonního čísla a vyberte linku.
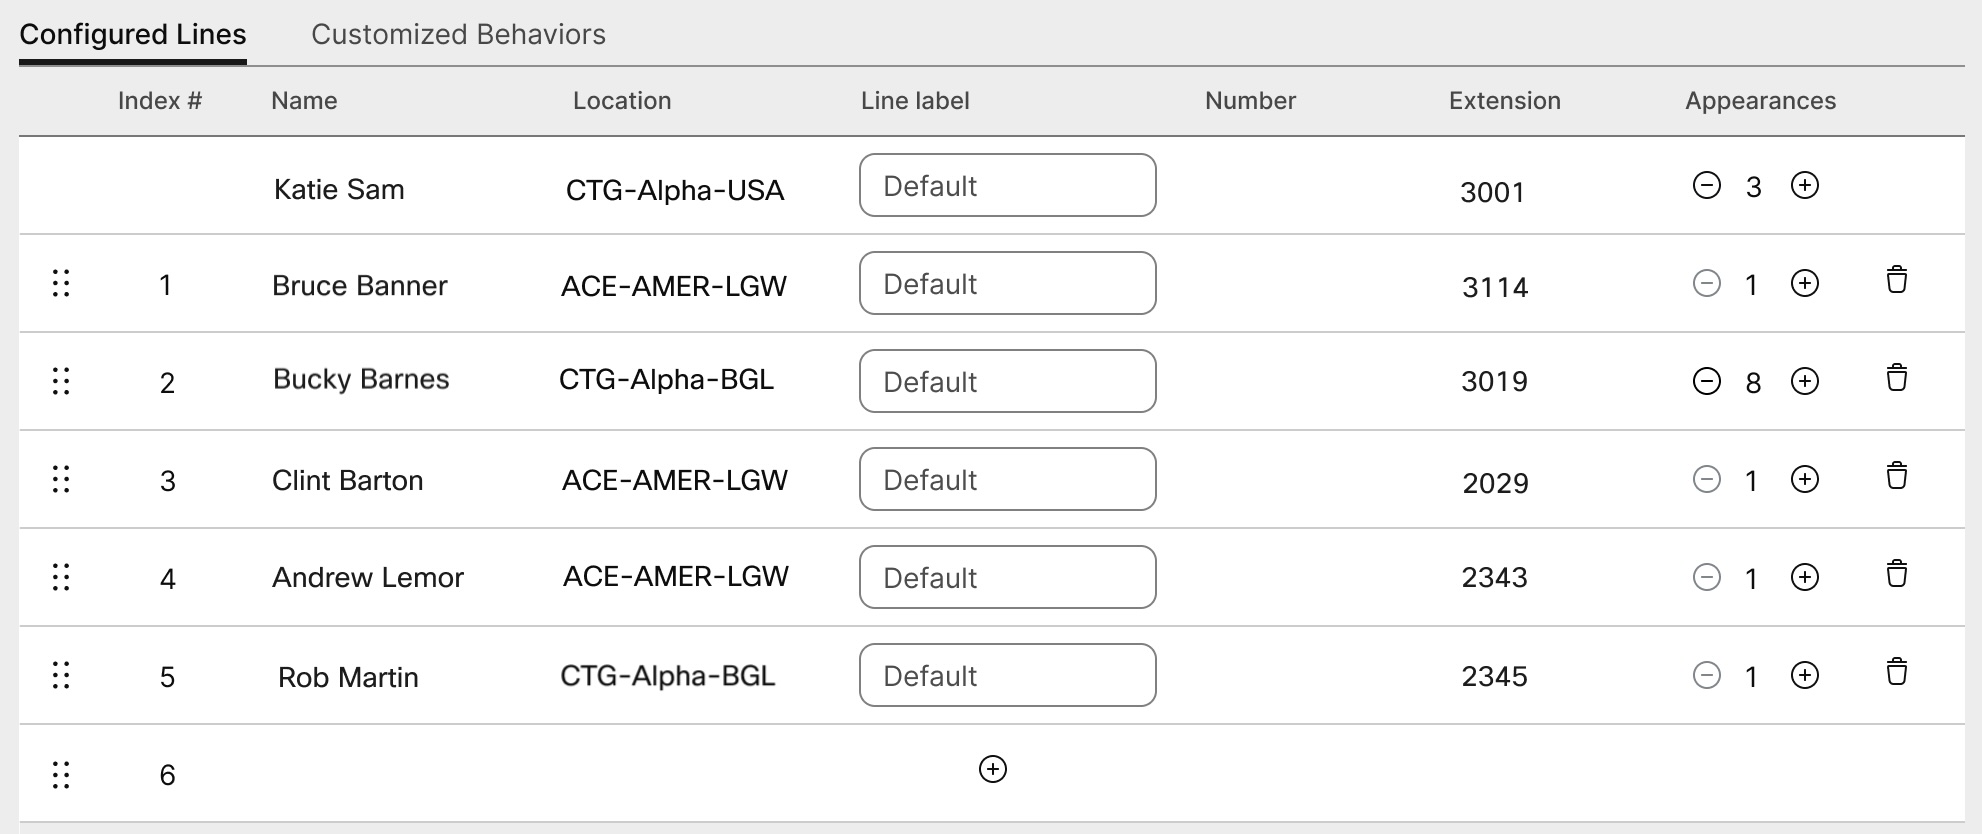
 . Primárního uživatele online nelze odstranit. 1.
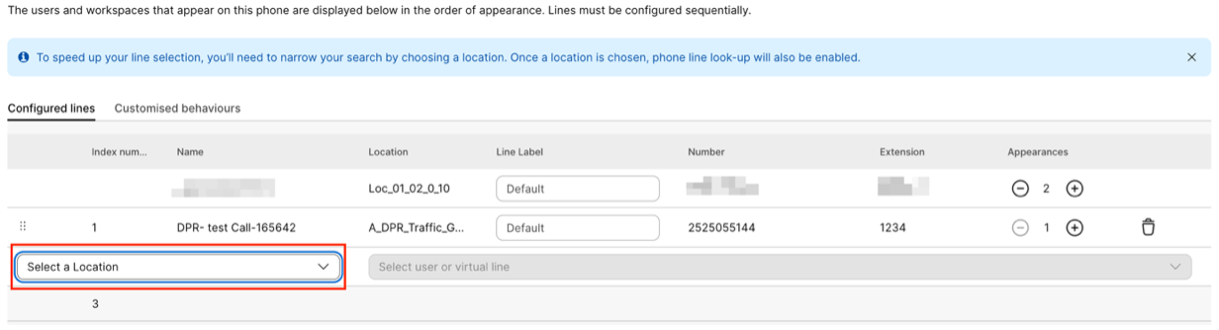
Konfigurace zařízení ATA pro uživatele
Porty na zařízení analogového telefonního adaptéru (ATA) přiřazeném uživateli můžete nakonfigurovat v aplikaci Control Hub. V současné době jsou k dispozici dvě konfigurace zařízení ATA: pro zařízení se dvěma porty a pro zařízení s 24 porty.
| 1 |
Přihlaste se k Centru řízení. |
| 2 |
Přejít na . |
| 3 |
Vyberte uživatele, kterého chcete upravit, a přejděte na Zařízení. |
| 4 |
Vyberte zařízení, které chcete přidat nebo upravit. |
| 5 |
V části Uživatelé na tomto zařízeníklikněte na Konfigurovat porty. |
| 6 |
Chcete-li přidat konfiguraci sdíleného portu, klikněte na ikonu |
| 7 |
Zadejte jméno nebo telefonní číslo, vyberte ze zobrazených možností a klikněte na Uložit . Ve vyhledávání se zobrazí pouze pracovní prostory bez zařízení. |
| 8 |
Pokud zařízení vyžaduje kompresi faxů T.38, zaškrtněte políčko ve sloupci T.38 nebo přepište možnosti komprese na uživatelské úrovni a poté klikněte na Uložit. Pracovní prostor může mít ATA. To je užitečné pro faxy. |
 .
.Přidání čísel k vaší poloze
Telefonní čísla můžete kdykoli přidat do stolních zařízení a místností ve vaší organizaci zákazníků, ať už jste uprostřed zkušební verze nebo jste byli převedeni na placené předplatné.
Zvýšili jsme počet telefonních čísel, která můžete přidat do Control Hubu, z 250 na 1000.
| 1 |
Přihlaste se k Centru řízení. |
| 2 |
Přejít na a poté klikněte na Přidat čísla. |
| 3 |
Zadejte umístění a typ čísla. Pokud přenášíte čísla, zadejte aktuální i nové fakturační číslo. |
| 4 |
Zadejte Místo, Stát, Směrové číslo oblasti, Předponu (volitelné) a poté klikněte na Hledat. Zobrazí se dostupná čísla. |
| 5 |
Vyberte čísla, která chcete k umístění přidat. Vybraná čísla se přesunou do pole Vybraná čísla. |
| 6 |
Klikněte na možnost Uložit. |
Kontrola stavu objednaných čísel PSTN
Zobrazí se seznam čísel veřejné telefonní sítě, které si vaše organizace objednala. S těmito informacemi si můžete prohlédnout nevyužitá čísla, která jsou k dispozici, a objednaná čísla, která budou brzy k dispozici.
| 1 |
Přihlaste se k Centru řízení. |
| 2 |
Přejít na . |
Příslušenství připojené k multiplatformním telefonům (MPP) – náhlavní soupravy a rozšiřující klíčové moduly (KEM)
Při připojení příslušenství (Headsets/KEMs) k zařízení MPP se zobrazují jako položka inventáře na kartě Zařízení v Control Hubu. Z inventáře zařízení Control Hub můžete zjistit model příslušenství, stav a komu příslušenství patří. Když vyberete příslušenství, můžete získat další informace, například sériové číslo příslušenství a aktuální verzi softwaru. Pole stavu příslušenství je hlášeno jako "online", pokud je příslušenství připojeno k MPP. Náhlavní souprava připojená k MPP automaticky upgraduje svůj software na nejnovější verzi dostupnou ve Správě zařízení.
|
Model telefonu |
Náhlavní souprava Cisco řady 520 |
Náhlavní souprava Cisco řady 530 |
Náhlavní souprava Cisco řady 560 |
Náhlavní souprava Cisco řady 730 |
|---|---|---|---|---|
|
Cisco IP telefon 8811/8841/8845 |
— |
— |
RJ9 & RJ11 |
— |
|
Cisco IP telefon 8851/8861/8865 |
USB |
USB |
USB RJ9 & RJ11 |
— |
|
Cisco IP telefon 7811/7821/7841/7861 |
— |
— |
— |
— |
|
Cisco IP telefon 6821/6841/6851/6861 |
— |
— |
— |
— |
|
Cisco IP telefon 6871 |
USB |
USB |
USB |
— |
|
Konferenční telefon Cisco IP 7832/8832 |
— |
— |
— |
— |
|
Model telefonu |
klíčový rozšiřující modul |
|---|---|
|
Cisco IP telefon 8811/8841/8845 |
— |
|
Cisco IP telefon 8851/8861/8865 |
BEKEM CP-8800-A-KEM CP-8800-V-KEM |
|
Cisco IP telefon 7811/7821/7841/7861 |
— |
|
Cisco IP telefon 6821/6841/6861/6871 |
— |
|
Cisco IP telefon 6851 |
CP-68KEM-3PCC |
|
Konferenční telefon Cisco IP 7832/8832 |
— |
Chcete-li vyřešit problémy, kterým čelí modul rozšíření klíče (modul rozšíření klíče) na telefonech registrovaných pro volání Webex, přečtěte si téma Řešení problémů s klíčovými rozšiřujícími moduly v volání Webex, kde najdete podrobnosti.


