- Home
- /
- Article

Thanks for your feedback.


 In this article
 Feedback?
Meet the all-new Cisco Wireless Phone 9821 — the evolution of reliable wireless communications for today’s frontline professionals in retail, manufacturing, healthcare, and hospitality. Read through the following information before using your phone. This Help article includes information about the phone hardware and buttons, steps for phone registration, help documentation, and technical support.
About Cisco Wireless Phone 9821
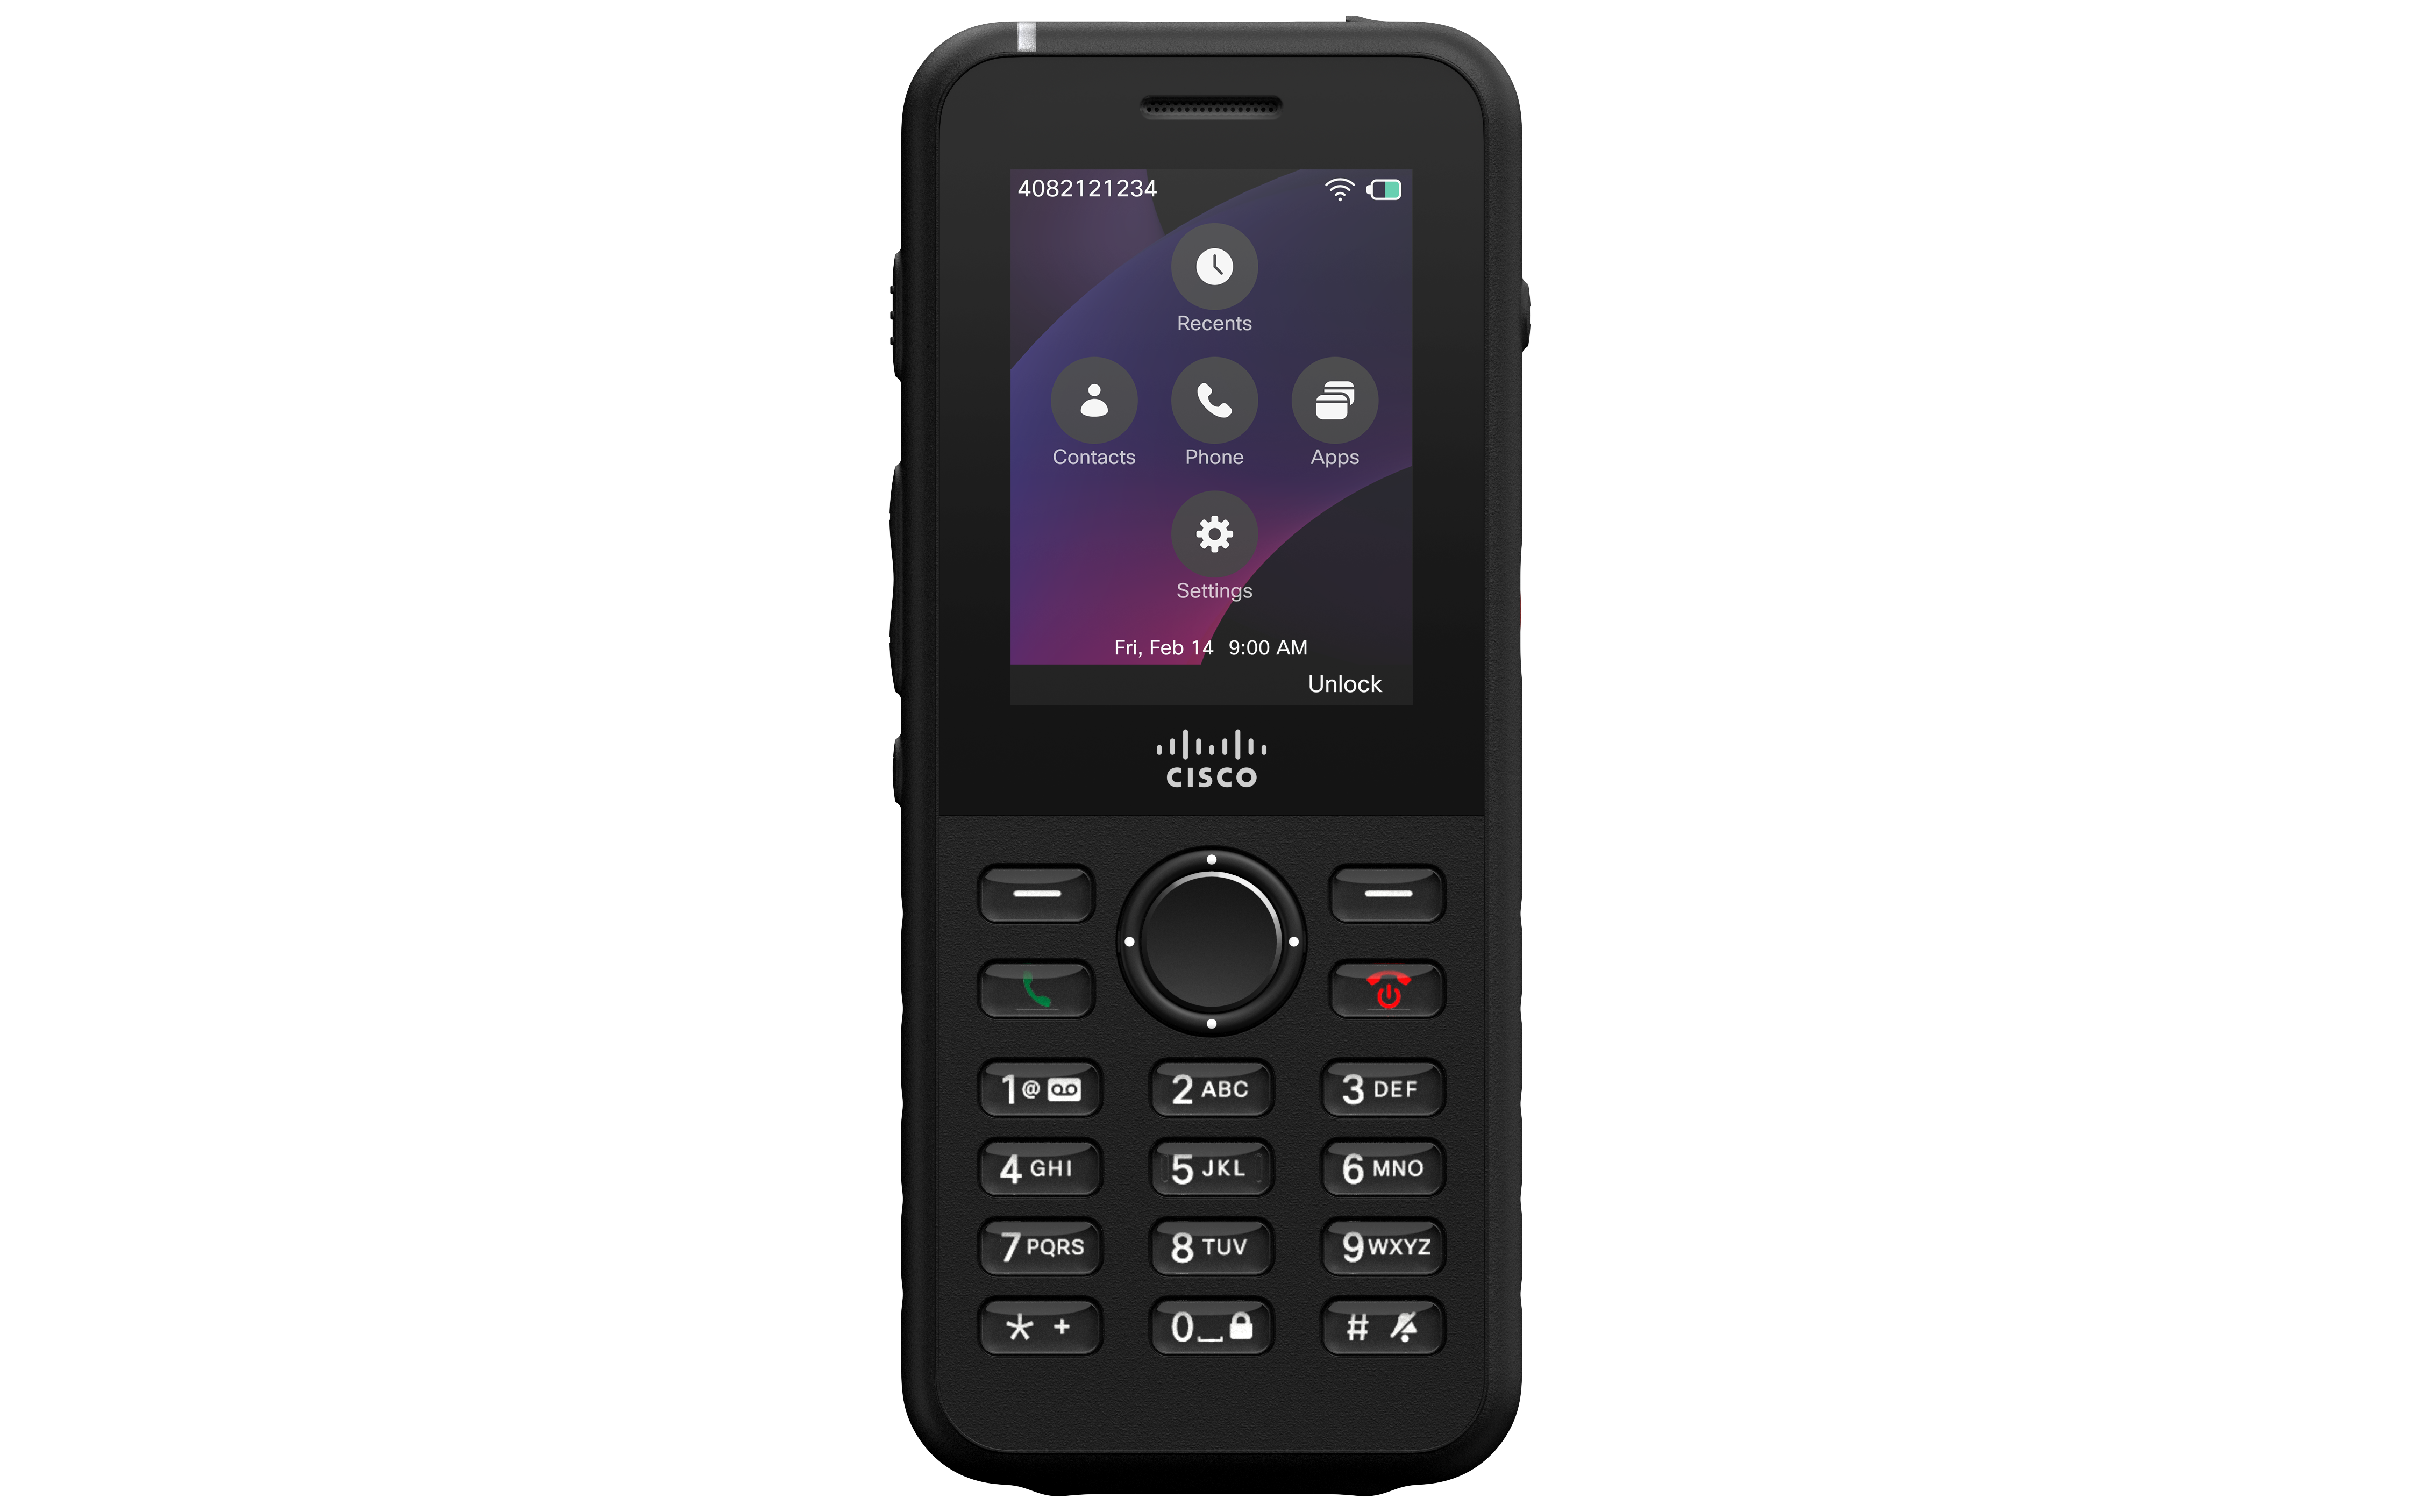
Cisco Wireless Phone 9821 is a 802.11 triple-band wireless device running Cisco Unified PhoneOS. It supports Cisco Unified Communications Manager (Unified CM) and Webex Calling, offering flexibility to meet evolving business needs. This phone enables comprehensive voice communication over the same wireless LAN used by your computer, allowing you to place and receive calls, hold, and transfer calls seamlessly.
Audio and codec support
Cisco Wireless Phone 9821 supports a wide range of codecs, including G.711a, G.711u, G.722, G.722.2, G.729a, G.729ab, iLBC, iSAC, and OPUS. It also supports uncompressed wideband audio (16 bits, 16 kHz) for superior voice quality. Designed for demanding environments, Cisco Wireless Phone 9821 features AI-powered noise removal technology to ensure crystal-clear conversations even in noisy settings.
Accessibility and physical features
- Hearing aid compatible (HAC); however, it does not support TTY features.
- The number 5 key includes tactile ridges for easy identification.
- The physical characteristics include:
- Shockproof and vibration-proof
- IP54-rated for dust and water resistance
- Tolerance of antibacterial wipes
- Latex-free and lead-free
- USB On-the-Go (OTG) 2.0 interface
- A customizable red Action button allows quick access to critical functions.
- Compatibility with existing Cisco Wireless IP Phone 8821 desktop charger and multichargers, maximizing your investment and simplifying upgrades. Charge with a desktop charger for a single phone or a multicharger for up to six phones. For more information, see Accessories.
For details about your phone specifications and features, see the Cisco Wireless Phone 9821 Data Sheet.
Enhanced productivity features
Beyond basic call handling, the phone supports advanced productivity features depending on configuration:
- Bluetooth wireless headset support, including certain hands-free call capabilities.
- Access to your phone number and corporate directory.
- Access to network data, XML applications, and web-based services.
- Online customization of phone features and services via the Cisco Unified Communications Self Care Portal.
- Location reporting upon initial registration, with updates when the phone moves (for example, walking around a building) and periodic reports every 24 hours if stationary.
For more information, see the Cisco Unified CM documentation and the administration articles in the Help Center.
What's in the box
The following items are bundled with your Cisco Wireless Phone 9821 (part number WP-9821-BUN-K9 and WP-9821-BUN-CN-K9). If any items are missing, contact your administrator.
- Battery x 1
- Power adapter x 1
- Power adapter replacement plug x 1
- USB cable x 1
- Pointer card x 1, containing the links to the product help and compliance information
Hardware and buttons
Your wireless phone has many buttons and hardware features that you will use regularly. Use the following figures and tables to identify the important button and hardware features.
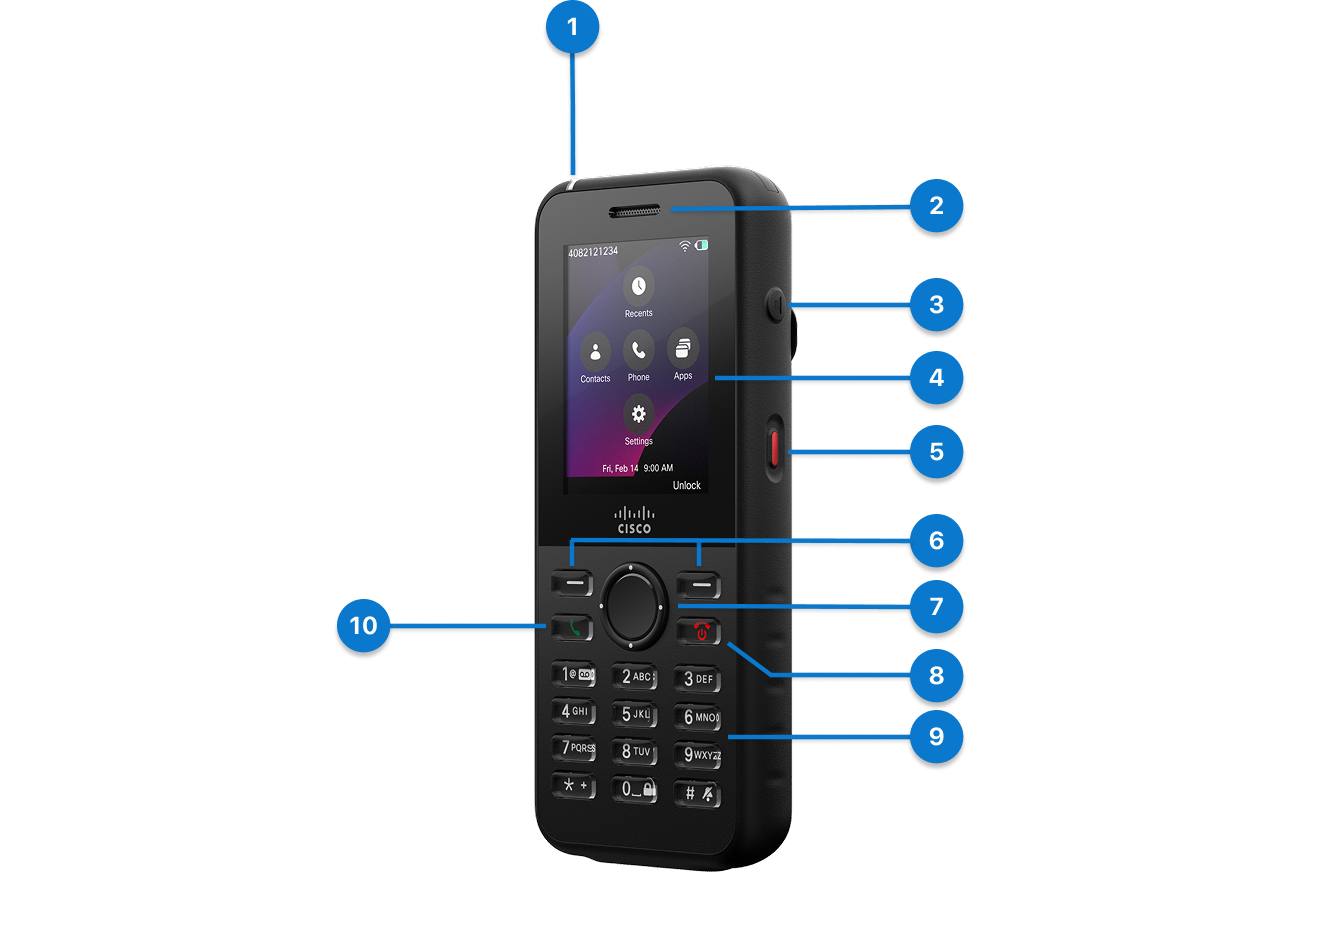
| Number |
Hardware Feature |
Purpose |
|---|---|---|
|
1 |
Indicator light (LED) |
Indicates the states of call, message, and the phone.
|
|
2 |
Receiver |
The phone’s built-in receiver. |
|
3 |
Speaker button |
Toggle the speaker mode on or off for the phone. When there is more than one audio path, press and hold for 3 seconds to change the audio path. |
|
4 |
Phone screen |
2.4" color screen (Resolution 240 x 320) Remove the protective film before using the phone. |
|
5 |
Action button |
Press the button to place a service call, such as an emergency call, or to run a service application, if configured. |
|
6 |
Softkey buttons |
Access to special functions that are displayed on the LCD |
|
7 |
Navigation Cluster |
The Navigation Cluster consists of the Navigation Ring and Select button. Navigation Ring (outer ring):
Select button (center of the Navigation Cluster):
|
|
8 |
Power/End Call button |
|
|
9 |
Alphanumeric keypad |
Use the keypad to dial numbers, enter letters and symbols, and choose menu items by number. One (1)
Asterisk (*)
Zero (0)
Pound (#)
|
|
10 |
Answer/Send button |
|
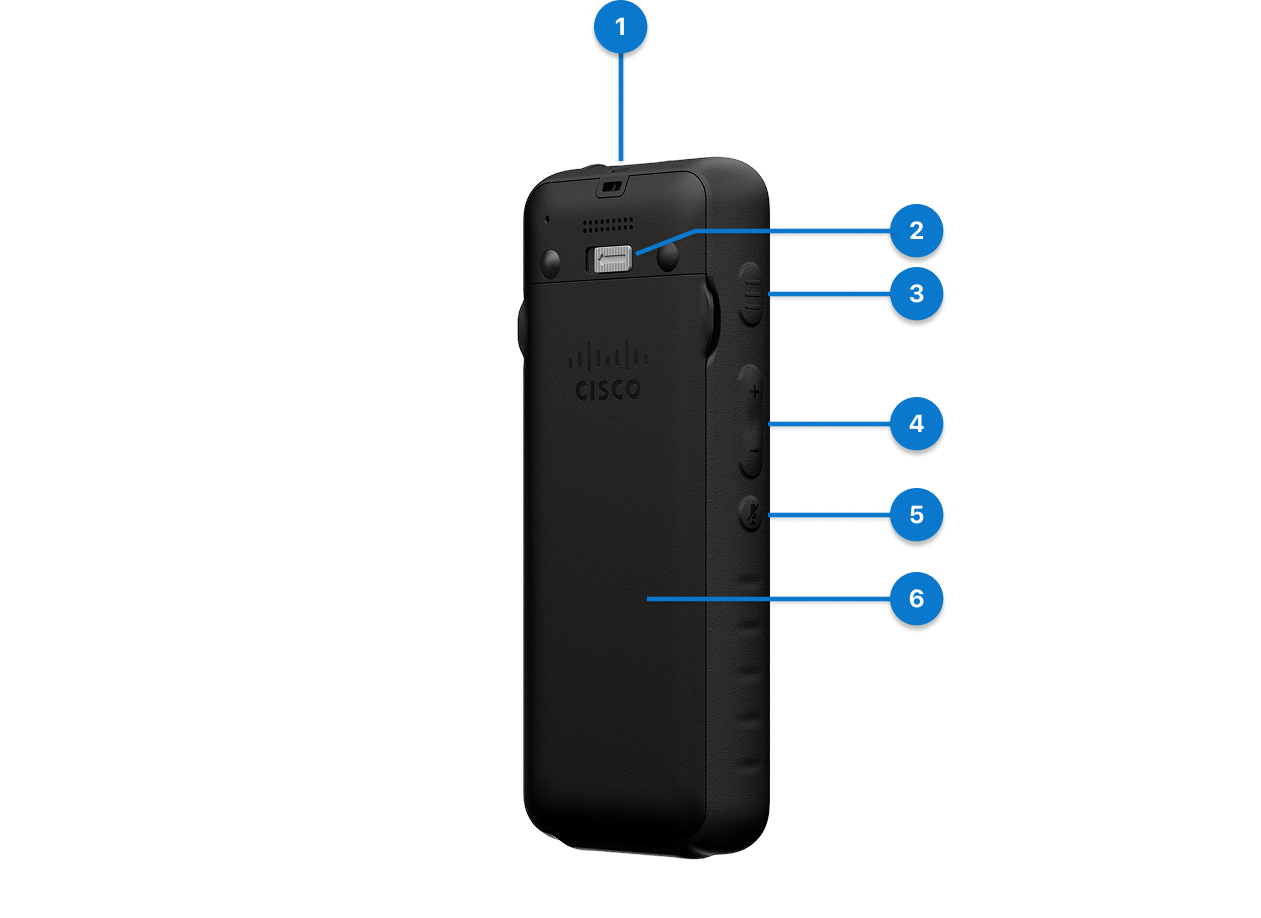
| Number |
Hardware Feature |
Description |
|---|---|---|
|
1 |
Lanyard slot |
Used for tying the lanyard. |
|
2 |
Latch lock |
Push and hold the latch lock to the left to release the battery door. |
|
3 |
Application button |
Use with XML applications, such as Push to Talk. Your administrator configures the button's availability and activation method. Depending on these settings, the button may function from the Applications screen, across all menus and services, or while the phone is locked. The button can be configured to trigger an action either immediately upon pressing or after being held for several seconds. For more information, contact your administrator. |
|
4 |
Volume button |
|
|
5 |
Mute button |
Toggle the mute feature on or off. |
|
6 |
Battery door |
Cover of the battery compartment. |
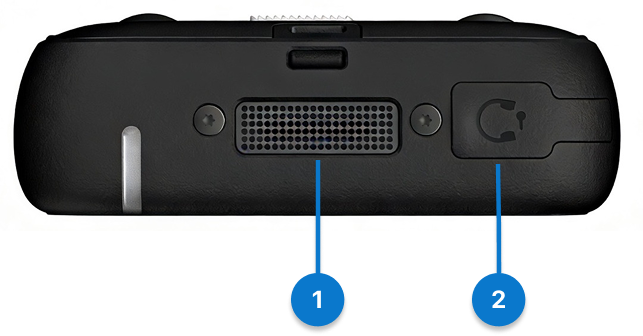
| Number |
Hardware Feature |
Description |
|---|---|---|
|
1 |
Speakerphone |
The phone’s built-in speaker. |
|
2 |
Headset port |
Lift the protective cover and plug in a headset. |
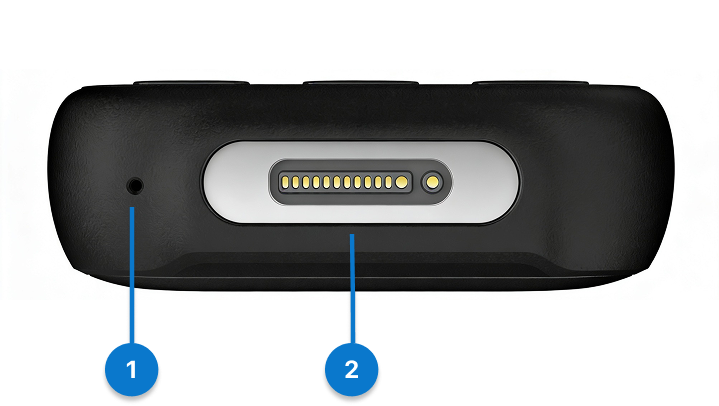
| Number |
Hardware Feature |
Description |
|---|---|---|
|
1 |
Microphone |
The phone’s built-in microphone. Remove the protective film before using the phone. |
|
2 |
Charging port |
Used for charging the phone. |
Register your phone
Depending on how your administrator configures your phone on the call control system, you might use one of the following methods to register your phone:
- Zero-touch: No manual intervention is required during the phone registration. The registration is done automatically.
- Activation code: (Webex Calling registration only) Registration requires a 16-digit activation code. You may obtain this code from your administrator. When prompted during the registration process, enter the code to proceed.
- Opted UCM registration: Select Cisco UCM when you are prompted to choose a call service. The registration is done automatically.
- Alternate TFTP: (Cisco Unified CM registration only) Registration requires an alternate TFTP server address if your phone is missing a TFTP address. Contact your administrator to obtain the necessary server address, and then manually enter this address to complete the registration process.
During registration, the phone checks the DHCP options in the default sequence of 66, 160, 159, 150, 60, 43, and 125 to obtain the URL of the provisioning server. The first valid configuration response the phone receives (which includes a 401 authorization request) will determine its provisioning server. Ensure that your server is properly configured to process phone registrations successfully.
Your phone gets registered automatically when it boots up and connects to the network. In this zero-touch registration scenario, you don't need to enter any input or make any selection as the whole registration proceeds automatically.
Before you begin
-
You have turned on your phone.
-
Your phone connects to a wireless network.
-
Your administrator has configured your phone on the call control system.
| 1 |
Select Start on the Welcome screen. Your phone tries to connect to the network and goes to the next step at timeout. |
| 2 |
The screen displays that your phone successfully connects to Wi-Fi. At timeout, the phone starts checking the configuration and then starts the registration automatically. Typically, the registration takes about 3 minutes depending on the network condition. After the registration succeeds, your primary line name or number displays on the top left of the phone screen. |
| 3 |
When the registration is complete, you will be prompted to enable or disable the noise removal feature. If you don't take any action, the phone enables the feature at timeout. This feature can filter out background noises during a call. If you choose to disable the feature now, you can still enable it later. |
Upon startup, the phone automatically checks its configuration and prompts you for an activation code. Note that activation codes are single-use.
Before you begin
-
You have turned on your phone.
-
Your phone connects to a wireless network.
-
Obtain a 16-digit activation code from your administrator.
| 1 |
Select Start on the Welcome screen. Your phone tries to connect to the network. If you don't take any action, the phone goes to the next step at timeout. |
| 2 |
Select Next on the phone screen showing that your phone successfully connects to the network. If you don't take any action, the phone starts checking the configuration at timeout. |
| 3 |
Depending on your network condition and your administrator's configurations on the call control system, the phone may prompt you to choose a call service. In this case, select . Otherwise, continue with the next step. |
| 4 |
When prompted for an activation code, enter your activation code, and select Activate. Your phone starts the registration immediately. Typically, it takes about 3 minutes depending on the network condition. After the registration succeeds, your primary line name or number displays on the top left of the phone screen. |
| 5 |
When the registration is complete, you will be prompted to enable or disable the noise removal feature. If you don't take any action, the phone enables the feature at timeout. This feature can filter out background noises during a call. If you choose to disable the feature now, you can still enable it later. |
Register your phone to Cisco Unified CM when it boots up and connects to the network. In this opted UCM registration scenario, the only action from you is to select the Cisco UCM service and the rest of the registration proceeds automatically.
Before you begin
-
You have turned on your phone.
-
Your phone connects to a wireless network.
-
Your administrator has configured your phone on Cisco Unified CM.
| 1 |
Select Start on the Welcome screen. Your phone tries to connect to the network. If you don't take any action, the phone goes to the next step at timeout. |
| 2 |
Select Next on the phone screen showing that your phone successfully connects to the network. If you don't take any action, the phone starts checking the configuration at timeout. |
| 3 |
Depending on your network condition and your administrator's configurations on the call control system, the phone prompts you to choose a call service. In this case, select . |
| 4 |
Your phone starts the registration immediately. Typically, it takes about 3 minutes depending on the network condition. After the registration succeeds, your primary line name or number displays on the top left of the phone screen. |
| 5 |
When the registration is complete, you will be prompted to enable or disable the noise removal feature. If you don't take any action, the phone enables the feature at timeout. This feature can filter out background noises during a call. If you choose to disable the feature now, you can still enable it later. |
In some situation, the Cisco DHCP server doesn't contain the network information of the TFTP servers. To accomplish the registration, you need to manually enter an alternate TFTP server address that your administrator provides.
Before you begin
-
You have turned on your phone.
-
Get a TFTP server address from your administrator.
-
Your administrator has enabled autoregistration on Cisco Unified CM
| 1 |
Select Start on the Welcome screen. Your phone tries to connect to the network. If you don't take any action, the phone goes to the next step at timeout. |
| 2 |
Select Next on the phone screen showing that your phone successfully connects to the network. If you don't take any action, the phone goes to the next step at timeout. Then the phone starts checking the configuration, and then prompts you to choose a call service. |
| 3 |
Press Settings. |
| 4 |
Select . |
| 5 |
Toggle on Alternate TFTP. |
| 6 |
Enter an IP address in TFTP Server <n>, where <n> represents the type of the TFTP server.
TFTP Server 1 is the primary server, TFTP Server
2 is the secondary server.
|
| 7 |
Press Save. The registration starts automatically. Typically, the registration takes about 1 minute depending on the network condition. After the registration succeeds, your primary line name or number displays on the top left of the phone screen. |
| 8 |
When the registration is complete, you will be prompted to enable or disable the noise removal feature. If you don't take any action, the phone enables the feature at timeout. This feature can filter out background noises during a call. If you choose to disable the feature now, you can still enable it later. |
Additional help and information
Browse this Help Center to get help content about your Cisco Wireless Phone 9821. If you don't find the topic of your interest there, try to search for it and use the filters on the left to narrow down the results, if necessary.
If you have questions about the functions available on your phone, you should contact your administrator.
See the following sections for more help information:
-
To look for technical support, go to Cisco technical support.
-
To view the hardware warranty terms, go to Cisco one-year limited hardware warranty terms.
Technical support
Cisco provides around-the-clock technical support services, both online and over the phone to all customers, partners, resellers, and distributors who hold valid Cisco service contracts.
You should have your Cisco.com User ID, Contract, and Serial numbers ready when you contact Cisco Support to prevent any delays with your support request.
In addition, support staff need the following information:
-
Serial number—Every device has a serial number on the back.
-
Time and date issue occurred—Support staff use device logs or cloud metrics to troubleshoot issues. It is helpful to have the approximate local time and date.
-
Device Logs—Support staff may require the device logs to identify the root cause of your issue.
-
Brief description—Include any actions prior to the incident.
Support staff can resolve most firmware issues without a Return Material Authorization (RMA). It is best to use the RMA process for hardware issues.
You can find a list of Cisco worldwide support centers at https://www.cisco.com/c/en/us/support/web/tsd-cisco-worldwide-contacts.html.
Cisco one-year limited hardware warranty terms
Special terms apply to your hardware warranty and services that you can use during the warranty period.
Your formal Warranty Statement, including the warranties and license agreements applicable to Cisco software, is available at Product Warranties.
Battery warranty
The Cisco Wireless Phone 9821 battery only has a limited 90-day warranty after being shipped out from Cisco.


