
Thanks for your feedback.
Get started with Agent Desktop
 Feedback?
Welcome to Agent Desktop. When you sign in, the homepage displays custom or persistent widgets based on the layout configuration that is configured by your administrator. To learn more about how to sign in, see Sign in to Agent Desktop.
Agent Desktop automatically adjusts to different screen sizes. However, the display size must be greater than 500 x 500 pixels (width x height). Set your web browser zoom to 100% for the optimum experience. To learn more about supported browser versions, see System requirements for Webex Contact Center.
Familiarize yourself with the Desktop interface and how we talk about it.
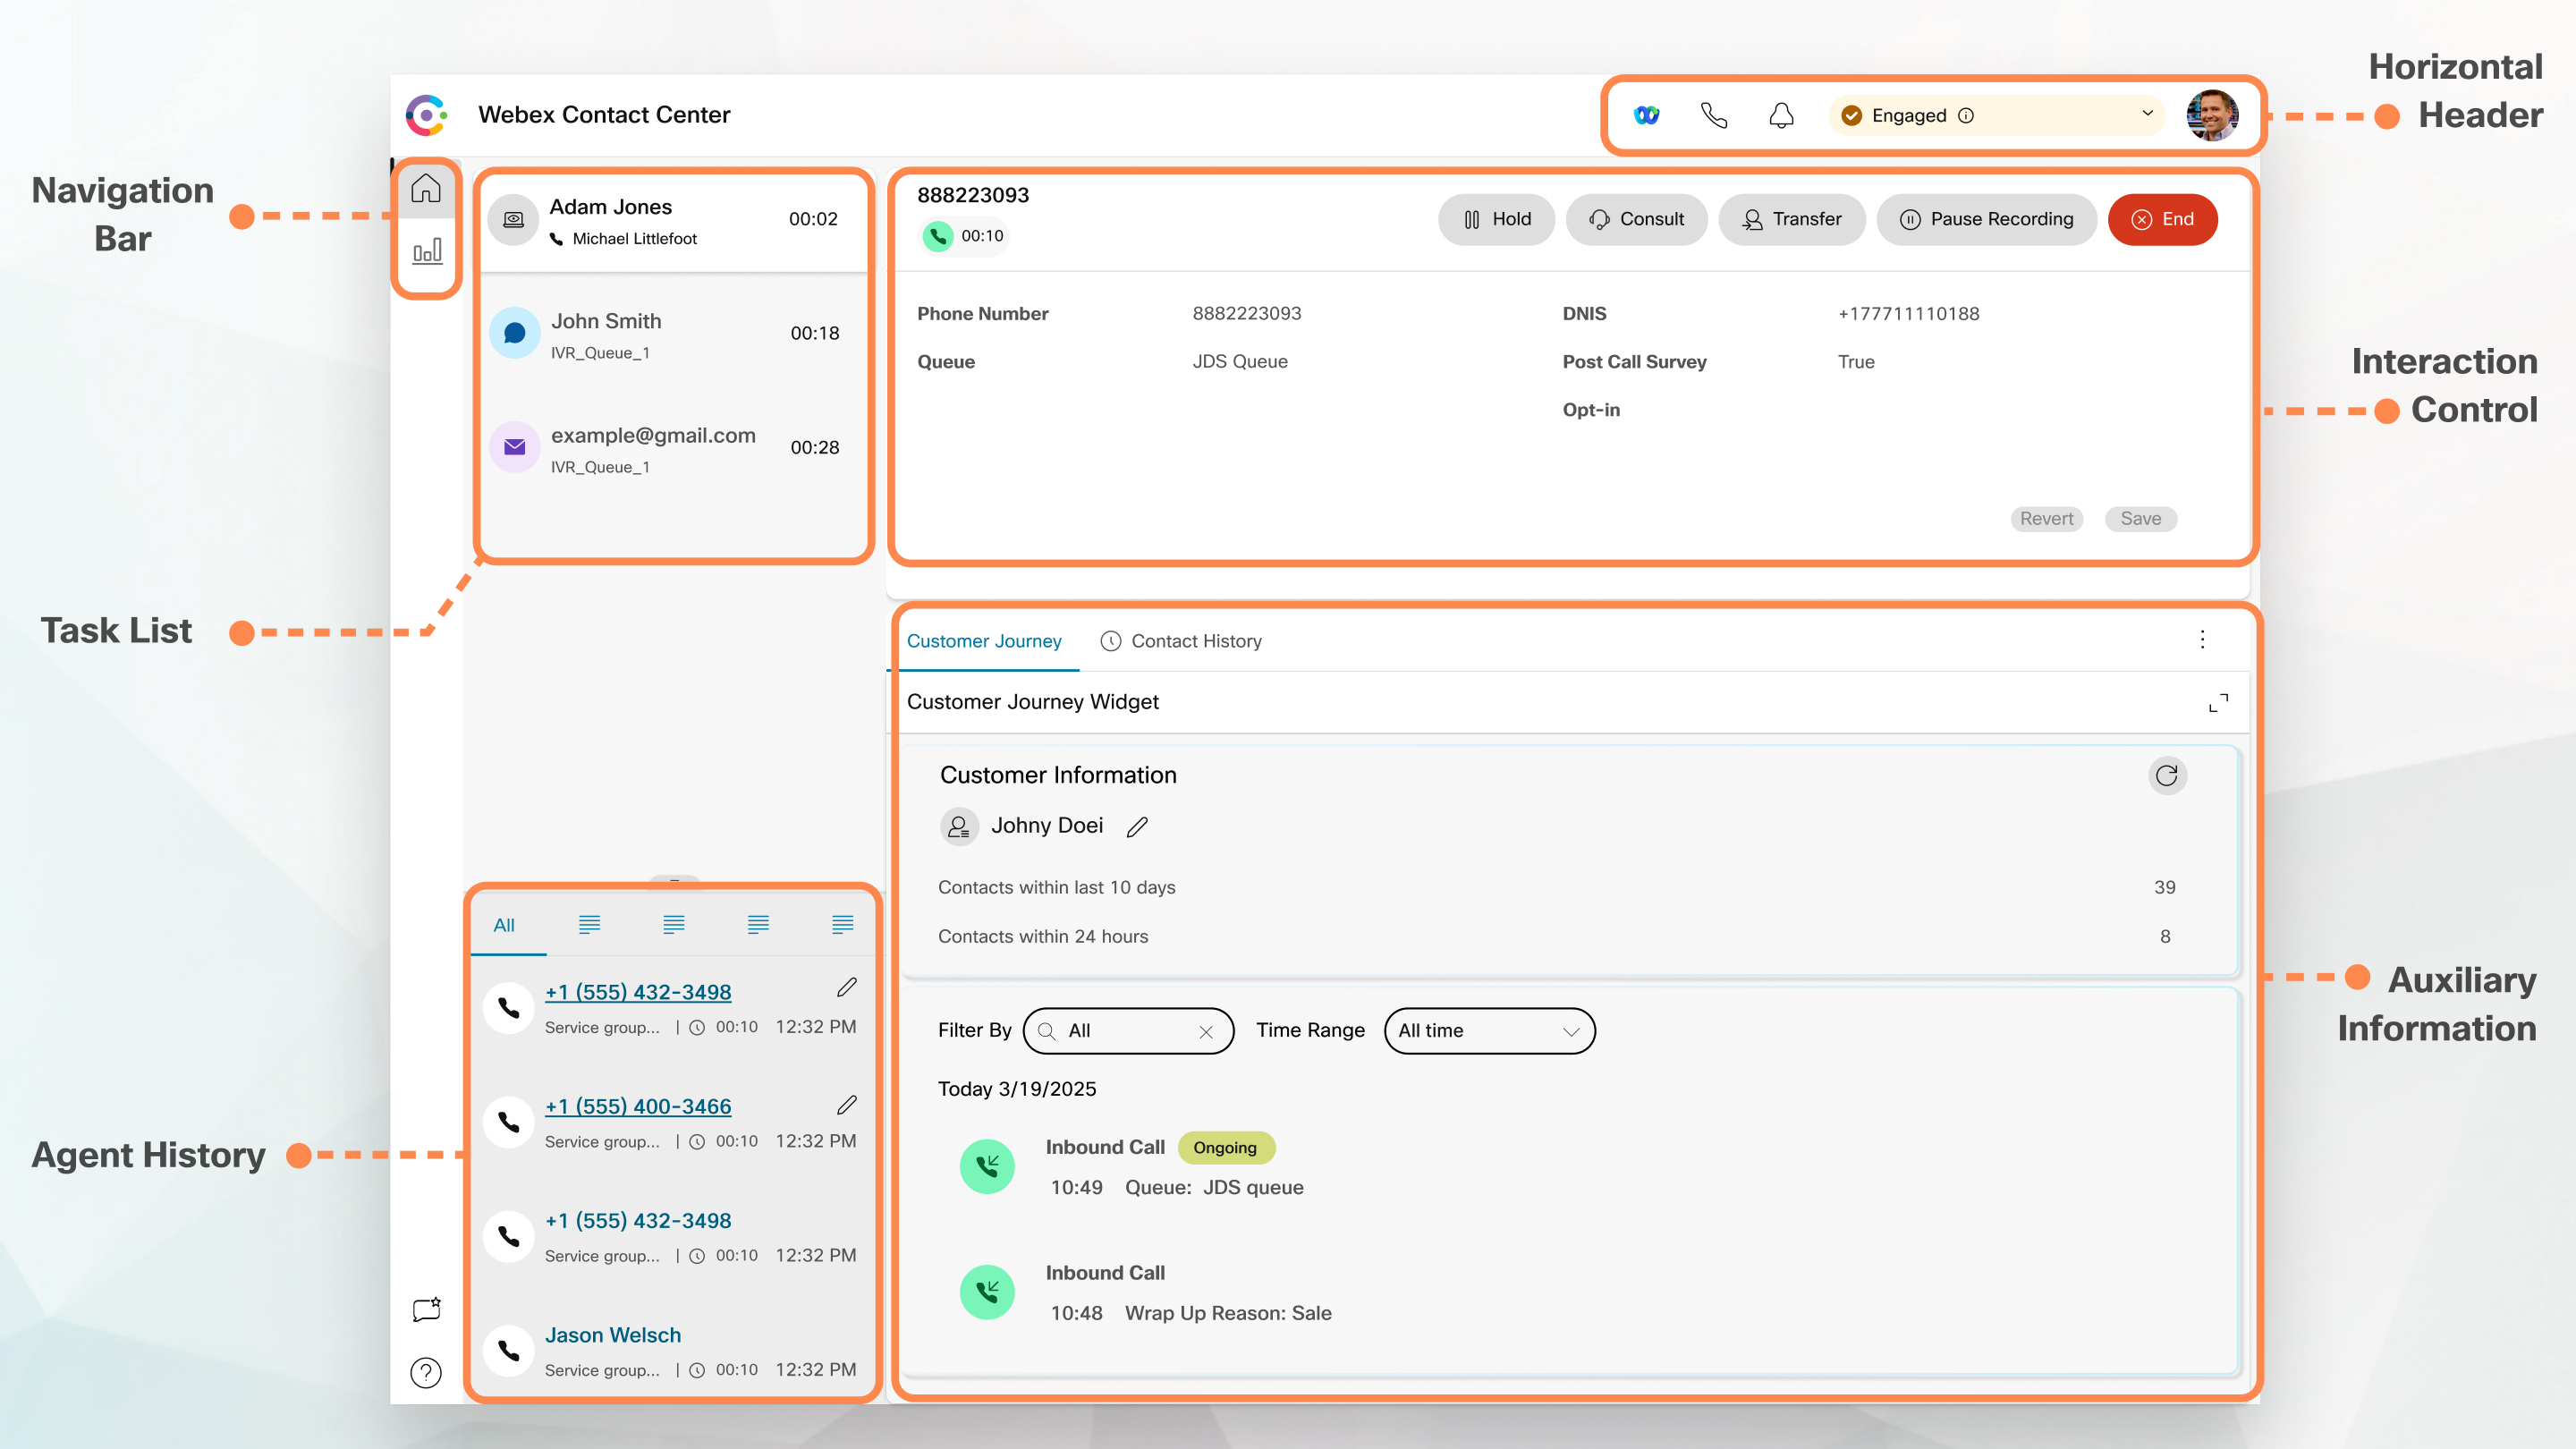
Horizontal header
In the horizontal header, you can do the following:
Navigation bar
The navigation bar is where you can access Home ( ), Feedback (
 ), and Help (
 ). If your profile is configured for statistics reporting, you’ll see the Agent Performance Statistics icon (
 ), where you’ll find the historical and real-time statistics as an agent.
Reload ( ) icon displays only when you access Desktop in an iFrame.
Task list ( )
)
The task list pane is displayed at the top-left corner of the Desktop interface. When a request is routed to your queue and you're available, a new request appears in your task list pane. You must accept the request to start communicating with the customer. By default, the task list pane is expanded. If the task list pane is collapsed, you can see a popover at the bottom-right corner to accept the request. If you have multiple requests, the latest request is displayed at the top of the Task List pane, and the order is calls, chats, social messaging conversations, and emails.
The request displays the following details:
- Calls: Displays a label and icon indicating the call type, phone number of the
customer, DNIS (Dialed Number Identification Service), name of the queue that routed
the call to you, and a timer indicating the time elapsed since you received the
call. The status of the incoming call is displayed as Ringing.
The following table lists the call types, icons, and the corresponding labels:
Call Type Label Icon Incoming Voice Call Incoming Call 
Callback Callback 
Outbound Preview Campaign Call Campaign Call 
Outdial Call Outdial Call 
- Chats: Displays the
 (Chat) icon, the name of the
customer or unique id, the email address, the queue that routed the chat to you, and
a timer indicating how long the chat has been awaiting your acceptance.
(Chat) icon, the name of the
customer or unique id, the email address, the queue that routed the chat to you, and
a timer indicating how long the chat has been awaiting your acceptance. - Social Messaging Conversations: The following details are displayed:
- Facebook Messenger: The request displays the
 (Messenger) icon, the
queue that routed the chat request to you, unique id of the Facebook
business page, and a timer indicating the time that has elapsed since you
received the chat request.
(Messenger) icon, the
queue that routed the chat request to you, unique id of the Facebook
business page, and a timer indicating the time that has elapsed since you
received the chat request.The customer name is displayed in the desktop only if the customer's profile information on Facebook Messenger is set as public.
- SMS: The request displays the
 (SMS) icon, the phone
number of the customer, the queue that routed the SMS chat request to you,
the source number (DN) and a timer indicating the time that has elapsed
since you received the chat request.
(SMS) icon, the phone
number of the customer, the queue that routed the SMS chat request to you,
the source number (DN) and a timer indicating the time that has elapsed
since you received the chat request.
- Facebook Messenger: The request displays the
- Emails: Displays the
 (Email) icon, the name of the
customer, the queue that routed the email to you, the email ID of the customer, and
a timer indicating the time that has elapsed since you received the email
request.
(Email) icon, the name of the
customer, the queue that routed the email to you, the email ID of the customer, and
a timer indicating the time that has elapsed since you received the email
request.
If sensitive data protection is enabled for your desktop, then ANIs, DNIS (for outgoing calls), email addresses will remain masked.
- When you place the pointer on the request in the Task List pane, the
 (expand) icon is displayed.
Click to view the request
details.
(expand) icon is displayed.
Click to view the request
details. - You are alerted with a sound notification when you receive a chat, a social messaging conversation, or an email request.
- A badge in each chat and social messaging conversation task displays the number of unread messages.
The Task List pane displays the following options:
- Accept All Tasks: Click Accept All Tasks to accept all requests (chats, emails, or social messaging conversations) together. The Accept All Tasks button appears when you have more than five new requests.
- New Replies: Click New Replies to scroll to view unread messages (chats or social messaging conversations).
After you have accepted the request, the timer displays the time that has elapsed since you accepted the request. For more information, see the State and Connected Timers section in Understand agent states.
- If you can't accept the request within the specified time displayed in the timer, the action button on the popover flashes for a few seconds and your state changes to RONA (Redirection on No Answer). For more information on RONA, see Understand agent states.
- Consider that you sign out when the Task List pane is collapsed. If you sign in to the Agent Desktop without clearing the cache, the Task List pane retains your earlier selection, which is the collapsed state.
Agent interaction history
The agent interaction history pane is displayed at the bottom-left corner and is where you can view your previous communications with a customer across all channels (voice, email, chat, and social) for the last 24 hours.
If sensitive data protection is enabled for your desktop, then ANIs, DNIS (for outgoing calls), email addresses will remain masked in the interaction history. Also, the click-to-dial feature will not be available from the agent interaction history when sensitive data protection is enabled.
Interaction control pane
The interaction control pane is displayed at the top center. When on an active call, this is where you can see customer information, connected timer, control buttons, and more. However, the personally identifiable information (PII) will remain masked in the interaction control pane, if sensitive data protection is enabled for your desktop.
Workspace
The workspace pane is displayed in the center, only when you accept an email, chat, or social messaging conversation request. Here is where you can see details based on your selection of the contact card in the task list pane. For example, when you select an active email contact, the center pane displays details of the received email. The center pane can also display information based on your selection in the navigation bar.
Auxiliary information pane
The display position of the auxiliary information pane depends on the type of the active request. When you accept an email, chat, or social messaging conversation request, the auxiliary information pane is displayed at the right side of Desktop. When you’re on an active call, the auxiliary information pane is displayed at the center of Desktop.
The details of the tabs in the Auxiliary Information pane are:
-
Contact History:
The Contact History widget displays up to 300 records of a customer’s communication history from the past 60 days. During a voice call, it shows only the history of previous voice interactions — it is not omnichannel and doesn't display digital interactions powered by Webex Connect.
Upon accepting a contact, the Contact History tab presents customer interaction details in chronological order, including the customer's name, wrap-up reason, queue name, connected time, and end time.
The Contact History widget is scheduled for retirement on April 30, 2026.
- The Contact History tab fetches the details of all completed interactions along with the respective wrap up reason. If an interaction is not wrapped up, the wrap up reason appears as N/A. For more information, see Apply a wrap-up reason.
- When a timer is active—such as during post-call wrap-up—navigating to a different URL within the same browser tab prevents the activity from auto-completing. This shows up as exceeding the configured wrap-up time, as the system continues to track time in the background until the activity is manually finalized. To ensure activities complete on time, agents should avoid navigating away in the same tab. Note that using a separate browser tab will not interfere with the timer in either the Desktop or Analyzer environments.
-
Customer Journey Widget:
The Customer Journey Widget equips agents with real-time access to a progressive customer profile and a complete omnichannel interaction history. Powered by the Customer Journey Data Service (CJDS), it provides rich insights — including recent contacts and interaction details — helping agents deliver faster, more personalized service. Customers also have the flexibility to extend the widget by customizing fields and event data, if needed. It is available for all Flex 3 Webex Contact Center customers. The Customer Journey Widget will fully replace the legacy Contact History Widget after April 30, 2026.
Table 1. Comparison of Customer Journey and Contact History widgets Feature Customer Journey Widget Contact History Widget Interaction Channels Omnichannel – voice, digital, and third-party events (if configured) Voice only (no digital interactions shown) Time Range Based on configured data retention settings (up to 3 years is possible) Fixed to the past 60 days Number of Records Depends on configuration and retention policy Maximum of 300 records Customer Profile Shows a progressive customer profile with real-time insights Basic chronological call history (no profile insights) Third-party Event Support Available Not available Alias Management CJDS Merges multiple customer aliases into one unified profile No alias management Retirement Status Active and replacing Contact History Widget Scheduled for retirement on April 30, 2026
- Screen Pop: Displays the screen pop tab based on the default desktop layout settings.
- Custom widgets: Displays custom tabbed widgets based on your default desktop layout or organizational settings.
You can hover the mouse pointer over a tab header to see the complete tab name.
The Auxiliary Information pane retains your tab selection for a specific interaction even when you switch between interactions or custom pages. For example, consider that you are on a voice interaction and have accessed the Screen Pop tab in the Auxiliary Information pane. Later, you switch to a chat interaction and access the Contact History tab. When you return to the voice interaction, the Screen Pop tab selection is still retained. The tab selection is retained when you reload the Agent Desktop. However, when you clear the cache, the tab selection is lost.
You can do the following:
- Click
 to maximize a selected tab in the Auxiliary Information pane.
 - Drag and drop to reorder tabs within the Auxiliary Information pane. This is applicable for:
- Tabs that are displayed in the Auxiliary Information pane.
- Tabs that are grouped under the More Tabs drop-down list in the Auxiliary Information pane. Click the More Tabs drop-down list and then select the required tab.
The order of the tabs is retained even after you navigate away from the Auxiliary Information pane, reload your browser, clear your browser cache, or sign out and sign in again to the Agent Desktop.
To reset the tab order to the default order, click the .
Screen Pop
A screen pop is a window or tab that appears on the Agent Desktop for conversations across all channels (voice, email, chat, and social). Screen pops trigger based on the events that are configured by your administrator.
Screen pop provides more information about the request. For example, your administrator creates a workflow to trigger a screen pop when you accept an incoming call, with display option as a tab in theAuxiliary Information pane. When you accept an incoming call, the screen pop appears under the Screen Pop tab in the Auxiliary Information pane of the Agent Desktop.
When you accept a request, the screen pop notification appears on the Agent Desktop, indicating that the request is associated with a screen pop. Based on the display options, you can view the screen pop on the Agent Desktop.
Your administrator configures the screen pop to be displayed in one of the following ways:
- In the existing browser tab, to replace the previous screen pop.
- As a new browser tab without affecting the existing screen pop.
- As a sub tab within the Screen Pop tab in the Auxiliary Information pane.
- As a screen pop custom page, which can be accessed by clicking the Screen Pop icon on the Navigation bar.
- As one of the widgets on the custom page, which is accessed by clicking the custom icon on the Navigation bar.
If you closed a screen pop accidentally, you can access it again by clicking the screen pop link in the Notification Center. For more information, see Set up and manage your notifications.
Screen pop displays the customer details based on your currently selected interaction. For example,
- When you accept an interaction from the customer Jane Doe, the Screen Pop tab in the Auxiliary Information pane or the custom page displays the screen pop that is associated with Jane Doe.
- When you move from one customer Jane Doe to another customer Will Smith, the Screen Pop tab in the Auxiliary Information pane or the custom page displays the screen pop that is associated with Will Smith.
Your administrator can configure more than one screen pop for a request. The screen pops appear as sub tabs under the tab named Screen Pop. When you submit a wrap-up reason for a request, the associated screen pop in the Auxiliary Information pane or in a custom page is closed.
- If a screen pop is configured in a custom page, the Screen Pop icon appears on the Navigation bar, irrespective of whether you have accepted or ended a request.
- If you configure the screen pop in a custom page in the desktop layout but don't define the workflow in the Flow Designer, the custom page appears blank.
- The screen pop iframe supports camera, microphone, and screen share features. The screen pop iframe prompts you to provide access to your microphone and camera for video calls. Click Allow to use your microphone and camera for video calls.
For information about how to access the screen pop, see the Agent Desktop tab in Set up and manage your notifications.
The Desktop layout management and Widgets features are designed to enhance productivity and user satisfaction by providing a customizable and streamlined interface. The relationship between layout management and widget functionality is crucial for creating a responsive and adaptable user environment.
For example: Imagine an agent who frequently uses the IVR Transcript widget to assist customers. They might:
- Edit the layout to place the IVR Transcript widget in a central location.
- Resize the widget to ensure that all transcript details are visible.
- Reset the layout if they need to revert to a standard setup for a different task.
Desktop layout management
- Edit Desktop Layout: This feature allows users to customize the appearance and organization of their Agent Desktop interface. Users can add, remove, or rearrange widgets and other elements to tailor the interface to their preferences or workflow needs.
- Resize Desktop Layout: This functionality enables users to adjust the size of the desktop layout components, including widgets. It provides flexibility in managing screen space, ensuring that essential information is visible and accessible.
- Reset Entire Desktop Layout: If users want to return to the default desktop layout or undo their changes, they can use this option. It restores the layout to its original state, which can be useful if a customized layout becomes too cluttered or if users need a fresh start.
Edit Desktop layout
You can customize the Desktop layout by editing the default layout that is configured by your administrator. If your administrator has enabled the Drag-and-Drop, and Resize features, the Edit Layout icon ( ) is displayed at the bottom-right of the page or widget.
-
The Drag-and-Drop feature allows you to drag (and drop) the widget to the required position on the Desktop layout.
-
The Resize feature allows you to shrink or expand the widget to a custom size on the Desktop layout.
The following are the restrictions and limitations for Drag and Drop, and the Resize features:
- Rearranging and resizing action that is performed on a widget is specific to the signed-in user, the browser used, and the device used.
- Rearranging and resizing actions aren't applicable for header and default page widgets. For example, Agent Performance Statistics.
- Rearranging and resizing the custom tabbed widgets in the Auxiliary Information pane is applicable only when you have an active task.
| 1 |
Access the custom page widgets by clicking the custom icon on the navigation bar or choose a custom-tabbed widget in the auxiliary information pane. |
| 2 |
Click |
| 3 |
To drag-and-drop a widget, place the pointer on the widget you’d like to move. When the pointer changes to the hand, click and drag to the new position. |
| 4 |
To resize a widget, place the pointer on the widget border until the pointer changes to the sizing handle. Click and drag to resize. |
| 5 |
Click Save Layout. |
Resize Desktop layout
You can reset the Desktop layout to the default view if you used the drag-and-drop or resize feature to edit the layout.
| 1 |
Access the custom page widgets by clicking the custom icon on the navigation bar or choose a custom-tabbed widget in the auxiliary information pane. |
| 2 |
Click . A confirmation message to reset the selected layout is displayed. |
| 3 |
Click OK. |
The default Desktop layout view is restored for the selected page or widget.
Reset entire desktop layout
If you have modified the desktop layout using the Drag-and-Drop or the Resize feature, you can reset the entire desktop layout to the default view.
To reset the entire desktop layout:
| 1 |
Click User Profile at the top-right corner of your desktop. |
| 2 |
In the User Settings section, click Reset Entire Desktop Layout. A confirmation message to reset the entire desktop layout is displayed. |
| 3 |
Click OK. The default desktop layout view is restored across various pages and the custom tabbed widgets. |
Widgets
- IVR Transcript Widget: This widget displays transcripts from Interactive Voice Response (IVR) systems. It allows agents to review customer interactions and queries, providing context and helping them deliver more personalized service.
IVR Transcript widget
IVR Transcript widget displays the transcript of the conversation between the virtual assistant and the customer (caller). The widget is displayed only if your administrator has configured the widget for you. This view-only widget helps to gain context about the customer’s needs and appropriately engages with the customer, increasing customer service efficiency.
Your user profile is where you can view the team you're assigned, channel capacity, keyboard shortcuts, and more. It’s also where you can manage your notifications. Use these articles to get acquainted with everything you can manage in profile settings.
Desktop allows you to manage voice calls and conversations through digital channels like Facebook Messenger, Livechat, email, SMS, and WhatsApp.
Visit these articles to familiarize yourself with the tools offered in Desktop and begin confidently assisting your customers when they reach out through calls and messages.
Handle calls
Handle conversations in digital channels


